# What is VDO.Ninja?

"Vee-Dee-Oh" .. oh, video!

## Remote video for OBS, browsers, and live production

[VDO.Ninja](https://vdo.ninja) is a browser-based live video and audio tool for bringing remote guests, smartphones, webcams, screen shares, and audio feeds directly into OBS Studio or other browser-enabled production software. It is commonly used for remote interviews, podcasts, live streaming, mobile phones as webcams, and peer-to-peer WebRTC video workflows.

VDO.Ninja is offered as a free hosted service, but it is also available as customizable and self-hostable code for teams that want more control over deployment, signaling, and workflow design.

{% embed url="<https://www.youtube.com/watch?index=1&list=PLWodc2tCfAH1l_LDvEyxEqFf42hOBKqQM&v=QaA_6aOP9z8>" %}
Video intro to VDO.Ninja and getting-started playlist
{% endembed %}

For those looking for an AI-generated audio-explanation of what VDO.Ninja is, see:

{% file src="/files/K9sXkWZQ0uuZpkGci9Df" %}
Check out this AI-generated audio generated intro to what VDO.Ninja is
{% endfile %}

## Getting started with VDO.Ninja

There is a playlist of videos above that covers the basics, and there are many community-made guides on YouTube in multiple languages as well.

This documentation covers getting started, room workflows, OBS integration, remote guest setup, advanced URL parameters, troubleshooting, helper apps, and platform-specific notes. The search box is often the fastest way to jump to a specific parameter or workflow.

A written guide to getting started is linked below:

{% content-ref url="/pages/iUjTPajplDXBIhENz7Xi" %}
[Getting started](/getting-started)
{% endcontent-ref %}

## Need help or support?

The preferred support mechanism is via [Reddit](https://www.reddit.com/r/vdoninja) or [Discord](https://discord.gg/feenJm8HTa), which offer community-assisted support. Discord is very active, so check it out. As well, development issues, feature requests, and bugs are tracked on [GitHub](https://github.com/steveseguin/vdo.ninja).

For mission critical support issues, or business-related inquiries, you can contact Steve directly. Please don't make it a habit.

## Bug reports

It is most helpful to report bugs via the official [GitHub](https://github.com/steveseguin/vdo.ninja). While we monitor the [Reddit](https://www.reddit.com/r/vdoninja) and [Discord](https://discord.gg/qWDshMsTar) channels, it is easy to miss issues and details that occur in comments and older threads.


# How does it work

Learn how VDO.Ninja works with WebRTC peer-to-peer streaming, push/view links, low latency, and URL parameter control.

VDO.Ninja harnesses the power of WebRTC, a technology that enables secure, real-time communication directly between web browsers. This peer-to-peer approach means most of the action happens right within your browser, ensuring low latency and high-quality video transmission. While VDO.Ninja does utilize servers for initial setup, the actual video data flows directly between devices, leading to a remarkably smooth experience.

<figure><img src="/files/fRYnzhGpe48p6UyArQRL" alt="Diagram showing a VDO.Ninja push source, setup-only signaling through the VDO.Ninja server, and direct peer-to-peer media to a view or OBS link"><figcaption><p>VDO.Ninja servers help peers find each other, but the live audio and video usually travel directly between browsers.</p></figcaption></figure>

**Benefits of the Peer-to-Peer Approach**

* **Ultra-Low Latency:** Experience minimal delays, making interactions feel natural and conversations flow seamlessly.
* **Exceptional Video Quality:** Enjoy crisp, clear video, even at high resolutions.
* **Bandwidth Efficiency:** When on the same local network, video data stays local, saving you precious bandwidth.
* **OBS Integration:** Stream directly into OBS or other browser-enabled applications without any extra software or accounts.
* **Versatility:** VDO.Ninja works across a wide range of devices and platforms, from your smartphone to a Tesla!

**Simple and Powerful**

VDO.Ninja's core functionality revolves around two types of URLs:

* **PUSH URL:** This is used on the sending device (your smartphone, webcam, etc.) to capture and transmit the video and audio.
* **VIEW URL:** Open this URL on any device, anywhere, to watch the live stream in a clean, full-screen interface.

**Collaboration Made Easy**

Beyond basic streaming, VDO.Ninja offers group chat rooms, giving you more control and flexibility when working with multiple streams simultaneously. You can manage participants, adjust settings, and even create custom layouts, all within your browser.

**URL Parameters: Your Control Center**

VDO.Ninja uses URL parameters to fine-tune your streaming experience. These parameters act like commands, allowing you to adjust video quality, enable features, and much more. Think of them as similar to command-line options you might use with software like FFmpeg.

**Ready to Dive Deeper?**

While VDO.Ninja's default settings are designed to be user-friendly, its extensive feature set offers endless possibilities. Explore our documentation to discover all the advanced options and unleash the full potential of VDO.Ninja for your video production needs.


# Use cases

The use cases of VDO.Ninja are many; they go far beyond the original scope of the project

* To allow your mobile device to be used as a wireless remote camera.
* To pull in other people's video and audio for podcasting/broadcast (guest appearances).
* For sharing high-quality and low-latency audio and video across the Internet and within LANs.
* Bring a friend's remote game stream into your OBS and do side-by-side gaming together.
* For VR chat applications.
* For high-quality audio streaming, including remote DJing.
* Wirelessly stream video from any pro camera using just a $10 Raspberry Pi and HDMI adapter.
* For sending any streaming-data peer-to-peer over the Internet in a few lines of code, including JSON.
* To allow you to publish to YouTube with your smartphone even though you don't yet have enough followers to broadcast to YouTube with the YT mobile yet.
* To watch movies with friends, via screen sharing, privately, and with low-enough latency to talk on the phone together while watching it.
* Use as a remote low-latency teleprompter feed.
* Recording remote or local video at high quality without needing any downloads.
* Remotely streaming MIDI device output, such as MIDI keyboards or production control boards.
* Controlling OBS remotely from any computer on the Internet using [VDO.Ninja](https://vdo.ninja/) as a p2p bridge.
* Recording remote participates during interviews directly to their own computer; perfect recordings.
* Applying green screens, digital face effects, and other advanced video filters to video streams.
* Real-time closed-captions and transcriptions.
* For whatever other reason you might come up with.


# Why use VDO.Ninja over other solutions?

Compare VDO.Ninja to other remote video tools for OBS with a focus on low latency, quality, flexibility, and control.

In some cases, the functionality of [VDO.Ninja](https://vdo.ninja) may overlap with existing solutions. However, in its primary function as an ultra-low latency peer-to-peer video bridge to OBS, it has many benefits and advantages over other methods:

* **100% free.** There's **no downloads** required, **no personal data collected**, and **no sign-in** needed.
* Compatible with most modern browsers and mobile devices.
* **Free support** offered via email, Discord, Reddit and numerous written guides.
* **Video data is peer-to-peer**, so unlike Skype, your video data does not go through the NSA's spying servers.
* **Video can be transferred over a LAN directly**, so if using your phone as a webcam, you can crank the bitrates up to 40-mbps if you want, and your bandwidth won't be affected.
* **Low latency**. I'm talking as low as 30-ms, and normally it never goes higher than 200-ms.
* **Adjustable resolutions and video bitrates** (1920x1080p60 @ 30-mbps -- or even custom resolutions). 4K @ 30fps is possible, but CPU intensive.
* **Control over audio denoise**, **echo-cancellation**, and **auto-gain** is available, along with custom audio bitrates, and **stereo-sound**. It is an exceptional tool for podcasters and live streaming DJs.
* You can **parameterize many aspects of VDO.Ninja** such as total bitrate usage, bitrate per viewer usage, auto-select a device, autostart a session, removing the preview window.
* The interface is **open-source**, so you can white-label, stylize, tweak, and deploy the website code however you want.
* **Reusable invite links**, meaning OBS Browser Sources don't need to be recreated or changed once created and shared.
* Playback of video has been tested on Amazon Fire TV devices using the Silk browser, along with a Tesla Model 3 infotainment display.
* **No plugins needed for OBS** -- just drag the selected link into OBS (v25 or newer on PC\*) and it auto generates the OBS Browser source with the correct resolution. (\*[macOS](/common-errors-and-known-issues/virtual-camera-not-working-on-mac) users should update OBS and review the macOS virtual camera notes.)
* **QR Code support for invite links**, which allows for easy ingestion of mobile devices without needing to use the keyboard.
* **Browser-based control of OBS scenes**.
* **No overlays or windows to crop** -- VDO.Ninja auto-fills the window and if there is a black border, it becomes a transparent layer.
* **Group rooms available** with a Director able to control participants, the options presented to them, and even an autojoin experience.
* **Group chat rooms** have an "auto-mix" mode, making for easy management of dynamic group chat sessions.
* Those in a **group-chat can also be split up into individual streams**, so the Director has control to treat them like different sources in OBS, switching and mixing as they want.
* **Free TURN servers** are hosted for VDO.Ninja users, which normally are quite costly, but are kindly subsidized by community sponsors and by Steve, the developer of the application. [Sponsor](/sponsor)
* **Tally-light** support is offered when VDO.Ninja is used in conjunction with OBS.
* Group rooms and streams can be **password protected** and given extra security.
* The group-room director has a **"push to talk"** capability, along with text-chat being available.
* Support for **ISO feed recording** via the Director's Control Room.
* With little dependence on video servers, at peak usage hours video quality does not suffer.
* VDO.Ninja is a **project of passion**, **built by creators for creators**, and we like to think it shows.


# Getting started

Beginner guide to VDO.Ninja with push and view links, OBS setup, remote guests, rooms, screen sharing, and first-stream best practices.

VDO.Ninja can send live video and audio from a browser, phone, tablet, or computer directly into OBS Studio, a browser source, or another viewer link. This getting-started guide is the best entry point if you want to use VDO.Ninja for remote guests, a phone-as-webcam workflow, screen sharing, or basic live streaming.

## Core concepts

* **WebRTC:** VDO.Ninja uses WebRTC for low-latency browser-based video and audio transport.
* **Peer-to-peer:** Most of the heavy lifting happens in the browser, reducing server dependence for normal guest workflows.
* **Two URL types:**
  * **PUSH URL:** Used on the sending device, such as a smartphone, webcam, or screen-share source.
  * **VIEW URL:** Opened on another device, browser source, or production machine to receive the stream.

## Resources for beginners

* [VDO.Ninja basics](/getting-started/vdo.ninja-basics) (with screenshots)
* [What are stream IDs?](/getting-started/stream-ids)
* [The power of the URL parameter](/getting-started/the-power-of-the-url-parameter)
* [Multi-Person Chat](/getting-started/multi-person-chat)
* [Rooms](/getting-started/rooms)
* [Even higher quality video](/getting-started/high-quality-camera)
* [Mobile phone camera into webcam](/getting-started/mobile-phone-camera-into-webcam)
* [Most common Parameters](/advanced-settings/cheat-sheet-of-basic-parameters)

## Quick start

1. **Open VDO.Ninja:** Visit <https://vdo.ninja/> in Chrome, Edge, Firefox, or Safari.
2. **Choose your source:** Select "Add your Camera to OBS" to use a webcam or phone camera, or "Share your Screen" to stream a desktop or application window.
3. **Grant permissions:** Allow camera and microphone access when prompted.
4. **Start streaming:** Click "Start" and copy the provided VIEW link.
5. **Share or capture:**
   * **Direct sharing:** Send the VIEW link to anyone who should watch the stream.
   * **OBS integration:** Add the VIEW link as a Browser Source in OBS Studio.

## Common use cases

* **Smartphone as webcam:** Turn a phone into a wireless camera for OBS or browser-based meetings.
* **Remote guests:** Bring in interview guests, podcast guests, or co-hosts.
* **Screen sharing:** Share a desktop, game, browser tab, or application window.
* **High-quality audio:** Stream music, podcasts, or voice feeds with low latency.
* **Production capture:** Pull remote video feeds straight into a live production workflow.

## Tips for success

* **Stable internet:** Ethernet is preferred over Wi-Fi when possible.
* **Hardware acceleration:** Enable hardware acceleration in your browser and OBS when supported.
* **Experiment with settings:** Explore the URL parameters to fine-tune video quality, audio settings, permissions, and room behavior.
* **Community support:** Join the VDO.Ninja Discord or Reddit community for help and workflow ideas.

## Native mobile apps

VDO.Ninja also offers native mobile apps for iOS and Android, providing a more focused mobile capture workflow. These apps are especially useful for:

* **Screen sharing on Android**
* **Local recording on mobile**
* **USB audio and external microphone workflows**
* **Quick camera-to-browser publishing**

## Terms of service and privacy policy

Please review the Terms of Service and Privacy Policy: <https://docs.vdo.ninja/help/privacy-and-security-details>. Most of it should come as no surprise, but please note that users using the service must be 16 years of age or older.


# VDO.Ninja basics

VDO.Ninja basics: publish a camera feed with a push link and receive it in OBS or a browser using a view link.

VDO.Ninja needs two things to work:

* Someone pushing a video feed out from their device
* Someone viewing that video feed

1. Visit <https://vdo.ninja/> with your web browser (Chrome, Edge, Safari).

2. Select `Add your camera to OBS`.
3. Select your camera and audio device from the list of devices.![](/files/XM7nyZvZSDlqrQmCvKjU)\
   You will see the video feed of the device on screen.
4. Select `Start` and at the top of the screen a ‘view’ link will appear.
5. Copy this view link and send it to someone you want to have access to this feed, or place it inside an OBS browser source.

<div align="left"><img src="/files/qSvUQFqmbCAS8fi9MahJ" alt=""></div>

![](/files/6nmJKz1jVO2Fv5vgsbGC)

### Powered by WebRTC

[WebRTC](https://webrtc.org/) is the magic behind VDO.Ninja. While the magic sauce is so much more than that, WebRTC powers the engine. This way VDO.Ninja works everywhere there is a modern browser. MS Edge, Google Chrome, Mozilla Firefox, Safari, Opera, Vivaldi, Brave. You name it.

VDO.Ninja is a peer-to-peer system. This means for each new person viewing your feed, a new encode is processed. It also is CPU bound since encoding usually takes place on the CPU. Take care not to overload your system. Keep an eye on your CPU usage.


# What are stream IDs?

Understand VDO.Ninja stream IDs, how push and view links use them, and best practices for secure naming.

Stream IDs are not magical in any way and can be manually or automatically created and reused.

Use [`https://vdo.ninja/?push=STREAMID`](https://vdo.ninja/?\&push=STREAMID) to publish a video and [`https://vdo.ninja/?view=STREAMID`](https://vdo.ninja/?\&view=STREAMID) to remotely view it. If you don't manually specify a stream ID, VDO.Ninja will sometimes generate one for you. You can reuse the generated stream ID if you wish.

Stream IDs only exist when they are actively used; once you stop using a stream ID, it no longer exists until it is used again.

If you want an OBS browser source to keep showing the same guest after refreshes or reconnects, give that guest a stable [`&push`](/advanced-settings/setup-parameters/push) value and use the matching [`&view`](/advanced-settings/mixer-scene-parameters/view) link in OBS. The full walkthrough is here: [Permanent links, reusable invites, and stream IDs](/guides/how-to-get-permanent-links).

### Additional technical details of stream IDs

* When in a group room, a stream ID can only be accessed from within that same room, unless transferred to a new room by the room's director.
* To make up a valid stream ID of your own, keep it at 64-characters or less and ensure it is alphanumeric when possible. Unsupported characters may be sanitized.
* A stream ID must not already be in active use, else you will be provided with an error stating this. This isn't the case when using a password however, as the password AND the stream ID must be the same in this case for the stream ID to be considered *already in use*. So, you technically can reuse the same stream IDs, changing only the password, if security is a concern. Even still, you should try to keep stream ID's confidential and change them when appropriate.
* You can use the [`&label`](/advanced-settings/setup-parameters/label) property to give a name to a stream, rather than using a stream ID to do the same. Using this strategy of using securely-named stream IDs, while using labels to assign a name to a stream, will improve security and unlock new options, like lower-third display name overlays.
* A director does have a stream ID, and they can be manually assigned to a director in the same way they are assigned to any publisher.
* When a guest shares their screen, while also sharing their webcam, the screen share stream will get its own stream ID. Adding [`&ssid`](/advanced-settings/screen-share-parameters/screenshareid) to the guest link can have the stream ID for that screen share be predictable, appending `_ss` as a value. Otherwise, the screen share stream may have a random stream ID.


# The power of the URL parameter

Customize VDO.Ninja links with URL parameters for bitrate, audio, layouts, automation, and advanced streaming workflows.

You can customize the playback of videos by adding query string parameters to the [VDO.Ninja](https://vdo.ninja/) URL links, along with many other aspects. VDO.Ninja is highly flexible in this regard, letting you achieve your desired outcome without needing to code and without additional software.

For example, a simple viewer URL link such as

```
https://vdo.ninja/?view=streamid
```

could be amended to

```
https://vdo.ninja/?view=streamid&videobitrate=500
```

which will cause the viewer to receive the publisher's video stream at a video bitrate of 500-kbps.

{% hint style="info" %}
Multiple parameters can be appended together by using the ampersand (`&`) as a separating character.
{% endhint %}

For example, to view the video stream published at stream ID `streamid` at a video bitrate of 500-kbps and set the [`&proaudio`](/advanced-settings/audio-parameters/and-proaudio) parameter to `1`:

```
http://vdo.ninja/?view=streamid&videobitrate=500&proaudio=1
```

Some parameters, like [`&view`](/advanced-settings/mixer-scene-parameters/view) will accept a comma-separated list of valid values, so you can do some rather powerful combos, such as publishing your own video (using [`&push`](/advanced-settings/setup-parameters/push)) while also viewing multiple others videos. VDO.Ninja will auto-mix the videos together into a single layout for you:

```
http://vdo.ninja/?push=aaa&view=bbb,ccc,ddd
```

{% hint style="info" %}
Parameters provided in the URL fragment (after `#`) are also supported. If the same parameter exists in both query and fragment, the fragment value wins.
{% endhint %}

{% content-ref url="/pages/-MZHYK6HLgmT\_Mcx14Iy" %}
[Advanced Options (URL Parameters)](/advanced-settings)
{% endcontent-ref %}

{% content-ref url="/pages/-Mg1mS2HBs2gJN32lcLC" %}
[Most common Parameters](/advanced-settings/cheat-sheet-of-basic-parameters)
{% endcontent-ref %}


# Multi-Person Chat

Set up multi-person calls in VDO.Ninja with room links or custom push and view URL combinations.

There's different ways to achieve a chat-room like experience with VDO.Ninja, and most users would be best served using a group room for this, however, below we cover a method that does not use[ a group room](https://docs.vdo.ninja/getting-started/rooms).\
\
I like to call this a faux-room setup, and understanding how it works and how to create one will give you better insights into how VDO.Ninja works.

![A manually defined 2-way chat, with OBS Studio as an observer](/files/iYAjSllBag2jvPBm1HId)

## Two-Person Chat

While you can achieve a multi-person chat with a [group room](/getting-started/rooms), you can also do it without it.

For example, `https://vdo.ninja/?view=id2&push=id1`

You’ll notice that here we have the link both a PUSH and VIEW parameter. This allows us to view a remote video and publish our own video to others within a single browser tab. This has the advantage over using two browser tabs as echo-cancellation will work with this approach. It is also compatible with mobile devices where two browser tabs isn’t likely feasible.

The downside of this approach is that you’ll need to create a custom link for every person. In this case,

`https://vdo.ninja/?view=id2&push=id1` and `https://vdo.ninja/?view=id1&push=id2`

If you go with a simple group room instead, you won’t need to personalize links in this way, but rather just have a single link for multiple guests.

For example, `https://vdo.ninja/?room=yourroomname`

or for something even cleaner, `https://vdo.ninja/yourroomname`

## Three-Person Chat

To create a 3-person setup, you can list multiple streams IDs as VIEW values alongside the PUSH value into three different personalized links.

`https://vdo.ninja/?view=id1,id2&push=id3`

`https://vdo.ninja/?view=id1,id3&push=id2`

`https://vdo.ninja/?view=id2,id3&push=id1`


# Rooms

A room allows for group chat and enables a director to control the room and access to each stream

The rooms feature creates a virtual room where multiple devices can connect to share audio and video. It offers echo-cancellation and text-chat support as well. A room's ‘director’ can manage the guests from the control room, easily accessing individual sources for integration into OBS.

♻️ If a room isn't already in use, you can use and reuse it forever.\
🔑 Adding a password will allow you to use your room, even if the same room name is already in use.\
🏷️ You can change the room name anytime; just modify the URL.\
✈️ If the director transfers a user to a new room, that's a temporary transfer; the user will be moved back to the original room if they reconnect/refresh.\
🛂 Add `&requireapproval` to the director URL to require manual approval for each guest join (official `vdo.ninja` service and compatible self-hosted signaling services).\
\\

{% embed url="<https://www.youtube.com/watch?v=Cbm14PSvkIo>" %}
This video explains how to record a podcast using OBS and a VDO.NInja group room
{% endembed %}

## How does it work?

### How many people can a room support? 📈

* There is Chrome-imposed limit of about 128 peers while using video and chat connections.
* You will probably bump into video decoding limits before reaching a 128 peers limit, due to limits on the host's processor power and to a lesser degree their bandwidth.

If you want a room that can handle 30 people, it can be done. However, everyone in the group needs good internet, a fast computer, or the room needs video previews disabled for guests. The [`&broadcast`](/advanced-settings/video-parameters/broadcast) feature can help accomplish this, for example.

For very large groups (i.e. larger than 40), it's generally advised that you use regular server-based chatting service, like Google Meets, and send a VDO.Ninja invite link to each person individually. This way, you can record the individual streams of those in the Google Meet at a high resolution but still have all the guests see and hear each other.

If you use OBS VirtualCam, now included with OBS v26, you can broadcast from OBS directly into the Google Hangouts or other conferencing software. To avoid audio feedback/echo issues, having the guests wear headphones is suggested.

### Privacy 🔒

* Passwords are available to keep rooms secure, but are optional.
* A room name + password combination makes the room unique. IE: a `?room=roomname&password=GeNeRaTedPaSsWoRd` and a `?room=roomname&password=ThisIsAnotherPassword` are different rooms.

### For guests.... 🧍

Guests have their own link to join a room. They will be able to see all of the other guests in the room, including themselves. Settings to restrict what sources each group member can see or hear are also available.

Guest devices present in the Room will see and hear all other present device video/audio streams.

Text-chat is available to those in the room

The video quality of those in a group room will appear low to guests, but this is to ensure more bandwidth and CPU resources are made available for the OBS's access to the stream. This can be changed with parameters such as [`&totalroombitrate`](/advanced-settings/video-bitrate-parameters/and-totalscenebitrate/totalroombitrate) which lets you increase the bitrate of a room.

### For the director... 🎬

The director will be able to view the room, without joining it themselves, and they will have controls provided that will let them modify aspects of how the room shows up in their OBS. For example, they will be able to mute certain people so they can't be heard or seen in OBS.

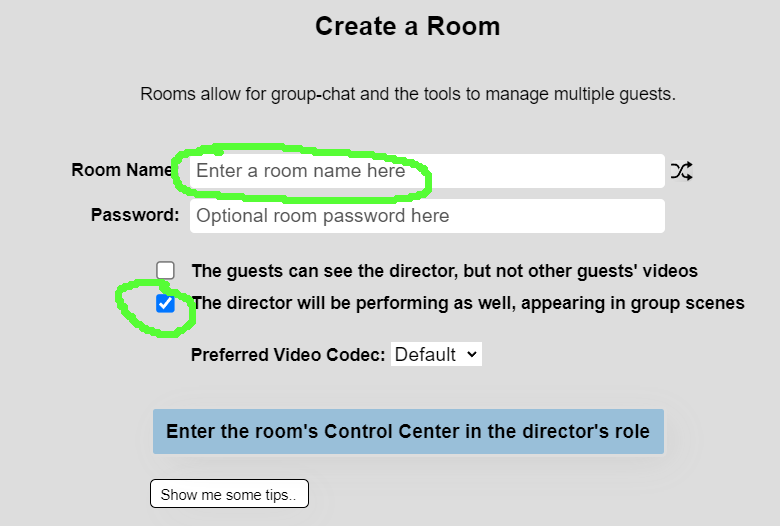
The director can also join the room if needed. Toggle the 'Director will also be a performer' option when creating a room. This can also be done by appending [`&showdirector`](/advanced-settings/director-parameters/and-showdirector) to the director page URL.

The director will be provided isolated direct links to each of those video streams in the group room, allowing for fine-grain mixing control in OBS.

For multiplayer game streams, each player can publish their own gameplay feed with the [Game Capture app](/steves-helper-apps/game-capture) instead of browser screen sharing. The director can then add each player to OBS as an isolated view, solo link, or scene source.

Using OBS VirtualCam (or the Mac equivalent), you can even let your guests view the OBS live stream with sub-100ms of latency. In this case, each guest only needs to view one video stream, the main mixed OBS stream, freeing up group resources to allow for even larger group rooms.

A director can also address a specific guest via full screen text messages, or via dedicated talkback audio.

Text Messages can be broadcast to the room from the director.

## Isolated Solo links for each Room Guest <a href="#h.208l8vmog36i" id="h.208l8vmog36i"></a>

When you create a room, the guest's feeds will show up in the director’s room. While multiple people can join the director’s room, only the first director to join has the ability to issue commands. Any one in the director room can access the isolated solo streams for each guest though.

Appended to the bottom of the video control box for each guest video is a SOLO LINK button and a link. You can copy the link with either the button or the link, or you can just drag the link (on Windows) into OBS. This gives you an independent window of that guest’s stream, at high quality.

The controls in the VDO.Ninja’s director room only will let you adjust the volume (and mute) that solo video. The ‘add to scene’ links do not apply to solo-links.

You can create a solo link by hand by doing <https://vdo.ninja/?room=RID&view=SID&solo>

[`&solo`](/advanced-settings/mixer-scene-parameters/and-solo) is left blank, while the [`&view`](/advanced-settings/mixer-scene-parameters/view) value is specified.

Every time you view a link, in OBS or elsewhere, you increase the load on the remote guests’s computer. Pulling more than one HD feed from a remote guest is not advisable, unless they have a capable computer and good internet connection. As a director, you can disable the preview video in the control box, freeing up a small bit more bandwidth for those connected on very weak connections. (three buttons; video off / video on / binoculars for a HD preview).

<figure><img src="/files/5ytomHgt57Vvlt94vYMh" alt=""><figcaption></figcaption></figure>


# Even higher quality video

Some basic options to achieve higher quality video

You can customize the capture resolution and playback quality of videos by adding parameters to the VDO.Ninja URL.

### Viewer side options

The default video bitrate of most modern browsers is around 2500-kbps, which is okay, but we can achieve higher video quality if we manually set this to something even higher.

[`https://vdo.ninja/?view=streamid&videobitrate=6000`](https://vdo.ninja/?view=streamid\&videobitrate=6000)

You’ll notice that we added [`&videobitrate=6000`](/advanced-settings/video-bitrate-parameters/bitrate) to the viewer’s side and not the publishing side. The viewer gets to control the bitrate; every viewer can set their own custom video bitrate in fact. (For some games, a bitrate of 20000-kbps may be needed, but normally that's overkill though, and can actually increase frame loss if it is higher than your connection can handle.)

You can also play with different video codecs; [`&codec=av1`](/advanced-settings/video-parameters/codec#av1) is a viewer side option and tends to offer better colors and quality than the default vp8 or h264 codecs, but av1 will use a up a lot more CPU.

Another viewer side option is [`&scale=100`](/advanced-settings/video-parameters/scale), which will disable dynamic fit-to-window scaling optimizations. This is especially valuable if wanting to downscale 4K to 1080p video, as otherwise VDO.Ninja would limit the resolution to the size of the OBS Browser source window. It can also help when there is more than one video on screen, but do note that disabling the auto-scale optimizations to achieve better quality will increase the CPU and network load for all parties.

Sometimes adding some sharpness to the video as a digital video effect in OBS can help improve video quality, especially for video containing fine-text, like a screen share or video overlay. By default text might look a bit soft with VDO.Ninja, and sharpening can resolve it.\ <img src="/files/5q6tS6QyiE80AnvkQX8l" alt="" data-size="original">![](/files/JzABdcLiyc464AnCw1Ux)

### Sender side options

On the publishing side, the *default* target resolution is already 1280x720 @ 60-fps, but we can set this higher by adding [`&quality=0`](/advanced-settings/video-parameters/and-quality) to the push link. This will have the publisher’s side try to make available a 1920x1080 video stream, if their camera or video device supports it. If not, it will fall back to 1280x720p. [`https://vdo.ninja/?push=streamid&quality=0`](https://vdo.ninja/?push=streamid\&quality=0)

For 1080p60 gaming, you’ll want to set the video bitrate to 12000-kbps or higher, as lower bitrates might cause the frame rate to be quite low otherwise. Otherwise, for talking head-type videos, the default video bitrate is often going to be adequate.

Higher resolution streams, especially 1080p60, requires a LOT of CPU power. Having 4-CPU cores is generally recommend for 1080p60 video streams, and 6 to 8 cores are recommended if you are intending to game at the same time.

Up to 4K or beyond is possible as well, but you'll need to manually specify the capture resolution with [`&width`](/advanced-settings/video-parameters/and-width) and [`&height`](/advanced-settings/video-parameters/and-height) instead, and it will require significantly more CPU and network bandwidth than even 1080p. You can also gently ask for a specific frame rate with [`&maxframerate=60`](/advanced-settings/video-parameters/and-maxframerate), which is sometimes needed with certain iPhones to force 60-fps at 1080p.

### Connection Quality

As VDO.Ninja dynamically also adjusts video resolution and bitrate to match the available Internet connection bandwidth availability, sometimes 1280x720 video resolutions won’t be maintainable. You can run the <https://vdo.ninja/speedtest> to see if you are able to hit at least 2000-kbps, which is about what is needed for smooth 720p video.

Using Ethernet instead of Wi-Fi will also help to ensure the quality and frame loss at these higher resolutions is obtainable. At higher resolutions, frame rates are more likely to be unstable and the resolution might be throttled to something lower. Packet loss will impact the quality of a video stream quite a bit, and in rare cases, you may need to use [`&relay`](/advanced-settings/turn-and-stun-parameters/and-relay) or [`&meshcast`](/advanced-settings/meshcast-parameters/and-meshcast) mode to assist in overcoming network throttling or routing issues.

### Group Room Settings

When in a group room, specifically as a guest or director sharing video with another guest, the video will be limited to 500-kbps by default.

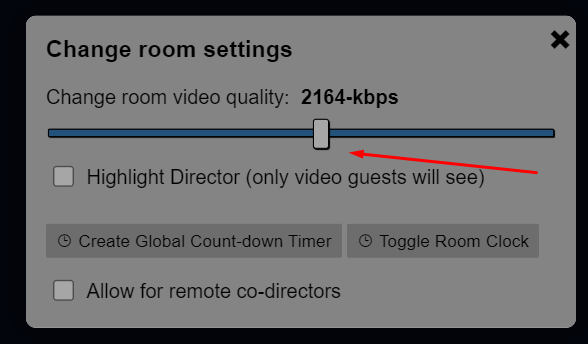
The director can increase the total room bitrate using a slider under the room settings menu; the button for is found in the director's lower menu bar.

You can also use [`&totalroombitrate=4000`](/advanced-settings/video-bitrate-parameters/and-totalscenebitrate/totalroombitrate) to set a higher room bitrate via the URL, as well as experiment with other bitrate options or trying out [`&meshcast`](/advanced-settings/meshcast-parameters/and-meshcast). Setting the room bitrate too high though can cause everyone in the room to have problems, specifically with overloaded CPUs or network bandwidth saturation. 500-kbps is the default for a reason.


# Mobile phone camera into webcam

Use an iPhone or Android phone as a webcam with VDO.Ninja, OBS, and OBS Virtual Camera, including optional audio setup guidance.

VDO.Ninja is one of the easiest ways to turn an iPhone or Android phone into a webcam for OBS, Zoom, Google Meet, Teams, and other apps that can use OBS Virtual Camera or a browser source. This page covers the simplest workflow and points to the full step-by-step guides if you need audio routing or more advanced setup.

{% hint style="info" %}
This set of instructions will work for Windows, macOS, and Linux.
{% endhint %}

## Simple steps

1. Go to <https://vdo.ninja/?push> with your mobile phone and start sharing your camera.
2. Add your VDO.Ninja `view` link as a Browser Source in OBS in a scene.
   1. Select the "Control audio via OBS" option to bring audio in.
   2. Resize the source as you see fit.
3. Configure OBS Virtual Camera to use the scene or source as the output selection.
4. Select "Start Virtual Camera" in OBS.
5. Open your third-party program and choose "OBS Virtual Camera" as the video input.

Detailed steps on how to perform this setup and include audio from the device are explained [here](/guides/use-vdo.ninja-as-a-webcam-for-google-hangouts-zoom-and-more).

## Use cases

OBS Virtual Camera is fully compatible with VDO.Ninja and is useful for connecting multiple different OBS mixers together remotely, turning your smartphone into a webcam, or sharing a live show with a small group of collaborators in near real time.

## Notes

Sometimes you may need to stop and restart OBS Virtual Camera if it starts crashing your computer. If you see nothing but grey, start the virtual camera before using it. If you see only black, it is usually because there is nothing active in OBS yet.

More related guides with more detail:

{% content-ref url="/pages/2lS57K58LtG8FN0jnYrK" %}
[How to use VDO.Ninja as a webcam for Google Hangouts, Zoom, and more](/guides/use-vdo.ninja-as-a-webcam-for-google-hangouts-zoom-and-more)
{% endcontent-ref %}

{% content-ref url="/pages/EYmlKLzn8bqVOJrQENh2" %}
[Syncing USB audio with VDO.Ninja -> OBS Virtual Camera](/guides/syncing-usb-audio-with-vdo.ninja-greater-than-obs-virtual-camera)
{% endcontent-ref %}


# Steve's helper apps & tools

VDO.Ninja helper apps and related tools including Game Capture, Screen Recorder, Meshcast, mobile apps, plugins, and production utilities.

This section covers the VDO.Ninja ecosystem beyond the main web app, including helper apps for screen capture, game capture, OBS publishing, audio workflows, mobile production, tipping, chat overlays, and large-scale distribution.

* [Electron Capture](/steves-helper-apps/electron-capture) (<https://github.com/steveseguin/electroncapture>)
* [Game Capture](/steves-helper-apps/game-capture) (<https://vdo.ninja/gamecapture>)
* [Ninja OBS Plugin](/steves-helper-apps/ninja-obs-plugin) (<https://steveseguin.github.io/ninja-obs-plugin/>)
* [Ninja VST3 Plugin](/steves-helper-apps/ninja-vst3-plugin) (<https://steveseguin.github.io/Ninja-VST3-Plugin/>)
* [Social Stream Ninja](/steves-helper-apps/social-stream-ninja)(<https://socialstream.ninja>)
* [Chat Lite](/steves-helper-apps/chat-lite) (<https://vdo.ninja/chat-lite/>)
* [Meshcast.io](/steves-helper-apps/meshcast.io) (<https://meshcast.io>)
* [Ninja Chatter](/steves-helper-apps/ninja-chatter) (<https://ninjachatter.com>)
* [Ninja Backer](/steves-helper-apps/ninja-backer) (<https://ninjabacker.com>)
* [Caption.Ninja](/steves-helper-apps/caption.ninja) (<https://caption.ninja/>)
* [https://github.com/steveseguin/vdo.ninja/blob/gitbook/steves-helper-apps/raspberry.ninja](https://github.com/steveseguin/vdo.ninja/blob/gitbook/steves-helper-apps/raspberry.ninja "mention") (<https://raspberry.ninja>)
* [Mixer App](/steves-helper-apps/mixer-app) (<https://vdo.ninja/alpha/mixer>)
* [Screen Recorder](/steves-helper-apps/screen-recorder) (<https://vdo.ninja/screenrecorder/>)
* [WHIP and WHEP tooling](/steves-helper-apps/whip-and-whep-tooling) (<https://vdo.ninja/whip>)
* [Icecast and AzuraCast audio publishing](/steves-helper-apps/icecast-and-azuracast) (<https://vdo.ninja/icecast>)
* [Versus.cam](/steves-helper-apps/versus.cam) (<https://versus.cam/>)
* [Speed and Quality Tests](/steves-helper-apps/speed-and-quality-tests) ([https://vdo.ninja/check](https://vdo.ninja/alpha/check))
* [Comms](/steves-helper-apps/comms) (<https://comms.cam/>)
* [VDO.Ninja native mobile app guide](/steves-helper-apps/native-mobile-app) ([Android](https://play.google.com/store/apps/details?id=flutter.vdo.ninja) | [iOS](https://apps.apple.com/us/app/vdo-ninja/id1607609685))
* [Native mobile app versions](/steves-helper-apps/native-mobile-app-versions) ([Android](https://play.google.com/store/apps/details?id=flutter.vdo.ninja) | [iOS](https://apps.apple.com/us/app/vdo-ninja/id1607609685))
* [Teleprompter Tool](/steves-helper-apps/teleprompter-tool) (<https://vdo.ninja/teleprompter>)
* [VDO Applications](/steves-helper-apps/vdo-applications)
* [Tech Demonstrations](/steves-helper-apps/tech-demonstrations)
* [Invite Link Generators](/steves-helper-apps/invite-link-generators)
* [app.invite.cam](/steves-helper-apps/app-invite-cam) (<https://app.invite.cam>)
* [Community contributed tools](/steves-helper-apps/community-contributed-tools)


# Electron Capture

Provides users a clean way of window capturing websites

{% embed url="<https://github.com/steveseguin/electroncapture>" %}
<https://github.com/steveseguin/electroncapture>
{% endembed %}

Created for [VDO.Ninja](https://vdo.ninja) users, it can provide users a clean way of window capturing websites. In the case of [VDO.Ninja](https://vdo.ninja), it may offer a more flexible and reliable method of capturing live video than the browser source plugin built into OBS.

![](/files/-Mg2_N8HJiIKpAx_q-99)

## Why ?

On some systems the OBS Browser Source plugin isn't available or doesn't work all that well, so this tool is a viable alternative. It lets you cleanly screen-grab just a video stream without the need of the Browser Source plugin. It also makes it easy to select the output audio playback device, such as a Virtual Audio device: i.e.) <https://vb-audio.com/Cable/> (Windows & macOS; donationware).

The app can also be set to remain on top of other windows, attempts to hide the mouse cursor when possible, provides accurate window sizes for 1:1 pixel mapping, and supports global system hotkeys (`CTRL+M` on Windows, for example).

Windows users may find it beneficial too, as it offers support for VDO.Ninja's [`&buffer`](https://docs.vdo.ninja/viewers-settings/buffer) audio sync command and it has robust support for video packet loss. In other words, it can playback live video better than OBS can, with fewer video playback errors and with better audio/video sync. If you have a spare monitor, it may at times be worth the hassle to use instead of OBS alone.

The Electron Capture app uses recent versions of Chromium, which is more resistant to desync, video smearing, and other issues that might exist in the native OBS browser source capture method. [More benefits listed here](https://github.com/steveseguin/electroncapture/blob/master/BENEFITS.md)

Lastly, since playback is agnostic, you can window-capture the same video multiple times, using one copy in a mixed-down live stream, while using a window-capture to record a clean full-resolution isolated video stream.

For a multi-guest setup, give every Electron Capture window a unique title and use strict title matching in OBS. See [Stable mobile guest production with OBS and Electron Capture](/guides/stable-mobile-guest-production-with-obs-and-electron-capture) for menu and command-line title instructions, fixed guest mappings, broadcast return options, and troubleshooting.

## ASIO Support (Windows)

The Electron Capture app for Windows now supports ASIO audio device input via VDO.Ninja. ASIO (Audio Stream Input/Output) provides significantly lower audio latency compared to standard Windows audio drivers, making it ideal for:

* Musicians using professional audio interfaces
* IEM (in-ear monitor) applications
* Real-time audio monitoring with minimal delay

When combined with the [`&lowlatency`](/advanced-settings/audio-parameters/and-lowlatency) parameter, ASIO support enables ultra-low latency audio workflows directly through VDO.Ninja.

## Updates

{% content-ref url="/pages/vSP0m7rGTMW7gAI4xAyA" %}
[Updates - Electron Capture App](/updates/updates-electron-capture-app)
{% endcontent-ref %}


# Documentation

This Electron Capture documentation was last updated Aug 16, 2023

**PLEASE NOTE:** This copy of documentation for the Electron Capture app is not kept up to date.

For the most recent version of Electron Capture documentation, please visit: <https://github.com/steveseguin/electroncapture>.

This copy of the documentation is provided here simply as a consolidated resource for our LMM AI support bot to learn from. It will be updated only occasionally, as needed.

Chronologically updates are here:

{% content-ref url="/pages/vSP0m7rGTMW7gAI4xAyA" %}
[Updates - Electron Capture App](/updates/updates-electron-capture-app)
{% endcontent-ref %}

### This is the **Electron Capture app**,

Created originally for [VDO.Ninja](https://vdo.ninja) users, it can provide users a clean way of window capturing websites or as a production-oriented Chrome-alternative with numerous performance tweaks. It can also be used to pin [live chat overlays](https://socialstream.ninja) on screen, screen share without user interaction, increase the resolution of Zoom streams, and much much more.

[**Jump to Downloads Section**](https://github.com/steveseguin/electroncapture#links-to-downloads-below)

<figure><img src="https://user-images.githubusercontent.com/2575698/121296394-94292d00-c8be-11eb-908e-638e5616691a.png" alt=""><figcaption></figcaption></figure>

### Why was this made ?

On some systems the OBS Browser Source plugin isn't available or doesn't work all that well, so this tool was made as a viable agnostic alternative. It was originally built to let you cleanly screen-grab just a video stream without the need of the OBS Browser Source plugin. The app was also made to make selecting the output audio playback device easy, outputting audio to something such as a Virtual Audio device: i.e.) <https://vb-audio.com/Cable/> (Windows & macOS; donationware) or VAC (Windows @ <https://vac.muzychenko.net/>), or Loopback (macOS).

While the OBS Browser source is ever maturing, and issues with video smearing, crashing, and dropped audio are far less common these days, there are still user reports of desync issues and other mishaps with OBS browser sources. As a result, Electron Capture remains the preference for many professional VDO.Ninja users, and over time it has evolved to offer additional solutions for many different use cases in the video production world.

The app can be set to remain on top of other windows, can hide the mouse cursor when possible, provides accurate window sizes options for 1:1 pixel mapping, and supports global system hotkeys (CTRL+M on Windows, for example). It also offers relatively low-CPU usage, command-line launch tools, built-in recording options, and it won't crash if OBS crashes. It may be worth exploring before your next production.

The Electron Capture app uses recent versions of Chromium, and is setup to more resistant to desync, video smearing, and other issues that might exist in the native OBS browser source capture method. If a cutting edge web feature becomes available within browsers, it will also become available to Electron Capture first, making certain experimental features within VDO.Ninja accessible. The app is also optimized to not throttle when the system is stressed, ensuring that production-critical web-oriented code and media does not slow down or stop when its most needed.

For non-VDO.Ninja users, the window-sharing focus of Electron Capture is also useful for Zoom or other users. For example, when screen sharing it into Zoom, the published video will be high-resolution, since Zoom publishes virtual webcam and other camera streams at lower quality compared to screen shares. You can screen share websites without the browser frame, search history, or nav bar from appearing. When doing a Power Point presentation, you can screen share the window via Electron Capture, while also pinning the it in place on top, avoiding having to toggle between multiple windows as you present.

[More benefits listed here](https://github.com/steveseguin/electroncapture/blob/master/BENEFITS.md)

Lastly, since playback is agnostic, you can window-capture the same video multiple times, using one copy in a mixed-down live stream, while using a window-capture to record a clean full-resolution isolated video stream. Both YouTube, Twitch, Facebook, and more are supported in this regard, where a full-window clean output option is available for those sites as well. There's even optimizations for sites like Twitch, letting you easily full-window any video on the page, without overlays or other effects from appearing.

### Video guide on how to use Electron Capture

{% embed url="<https://youtu.be/mZ7X7WvRcRA?si=oNTT0e3POOHAE_kj>" %}

### Settings and Parameters

| Parameter   | Alias  | Description                                                                  | Example values                      | Notes                                                                            |
| ----------- | ------ | ---------------------------------------------------------------------------- | ----------------------------------- | -------------------------------------------------------------------------------- |
| --width     | -w     | Window width                                                                 | 1280                                | Value in px                                                                      |
| --height    | -h     | Window height                                                                | 720                                 | Value in px                                                                      |
| --x         |        | X position on screen                                                         | 1                                   | Left side is 1                                                                   |
| --y         |        | Y position on screen                                                         | 1                                   | Top side is 1                                                                    |
| --pin       | -p     | Pin window on top                                                            | (Takes no values)                   | Display this window always on top.                                               |
| --url       | -u     | Set a custom link on start                                                   | <https://vdo.ninja/?view=aCustomID> | You can push and pull with single links or rooms.                                |
| --title     | -t     | Set a custom window title                                                    | Guest 1                             | Handy for use with OBS window capture                                            |
| --node      | -n     | Use advanced features                                                        | true                                | Enable with `true`. Allows for screen capture, global hotkeys, prompts and more. |
| --hwa       | -a     | Hardware acceleration                                                        | false                               | Disable with `false`                                                             |
| --minimized | -min   | start the app minimized                                                      |                                     |                                                                                  |
| --css       | -css   | Pass a CSS file to insert into newly created windows                         | test.css                            |                                                                                  |
| --chroma    | -color | Pass a 3 or 4 character HEX value to change the background color of websites | 0F0C                                |                                                                                  |

* note: Use the --help command to get the most recent available commands and options. While I try to keep the documenation update to date, I'm not always the best at it.

The default frameless resolution of the capture window is 1280x720. The app automatically accounts for high-DPI displays, so it is always 1:1 pixel-accurate with the specified resolution on even Apple Retina displays.

The optional Command Line arguments can be seen as examples below, along with their default values.

```
elecap.exe --width 1280 --height 720 --url 'https://vdo.ninja/electron' --title 'my Window name' --x 1 --y 1 --node 1
```

or for example

```
./elecap -w 1280 -h 720 -u 'https://vdo.ninja/electron' -t 'my Window name' --x 10 --y 10 -n 1
```

If running from Windows command prompt, any ampersand "&" characters will need to be escaped with a "^" character, as seen below:

```
C:\Users\Steve\Desktop>elecap -t feed2 --url https://vdo.ninja/?view=ePz9hnx^&scene^&codec=h264^&room=SOMETHINGTEST123
```

You can also use it like this, if you are in the same folder as the app itself:

```
elecap.exe --node true --title feed2 --url "https://vdo.ninja/?view=ePz9hnx&scene&codec=h264&room=SOMETHINGTEST123"
```

If running from a Windows batch file with the goal of launching multiple instances at a time, try the following:

```
start elecap.exe -t feed1 -u https://vdo.ninja/?view=2P342n5^&scene^&codec=h264^&room=SOMETHINGTEST123
timeout /T 1
start elecap.exe -t feed2 -u https://vdo.ninja/?view=ePz9hnx^&scene^&codec=h264^&room=SOMETHINGTEST123
timeout /T 1
start elecap.exe -t feed3 -u https://vdo.ninja/?view=12342n5^&scene^&codec=h264^&room=SOMETHINGTEST123
timeout /T 1
start elecap.exe -t feed4 -u https://vdo.ninja/?view=eP543hnx^&scene^&codec=h264^&room=SOMETHINGTEST123
timeout /T 1
start elecap.exe -t feed5 -u https://vdo.ninja/?view=432n5^&scene^&codec=h264^&room=SOMETHINGTEST123
timeout /T 1
start elecap.exe -t feed6 -u https://vdo.ninja/?view=eP654x^&scene^&codec=h264^&room=SOMETHINGTEST123
timeout /T 1
start elecap.exe -t feed7 -u https://vdo.ninja/?view=76542n5^&scene^&codec=h264^&room=SOMETHINGTEST123
timeout /T 1
start elecap.exe -t feed8 -u https://vdo.ninja/?view=gfd9hnx^&scene^&codec=h264^&room=SOMETHINGTEST123
```

* Please note, do not use double-quotes, rather single-quotes, if needing to enclose text via the command line.
* Please also note, the use to timeout /T 1, as adding a delay between loading apps allows them to load correctly
* x and y position is available in v1.5.2 and up; x or y values must be greater than 0.

![](https://user-images.githubusercontent.com/2575698/80891745-290d3000-8c94-11ea-85c4-ae0e7cd1ec19.png)

If you right-click the application, you'll get a context menu with additional options. Changing resolutions dynamically is an option, for example.

#### Screen-share, global hotkeys, and user-prompts

**Screen-sharing**

Starting with version 1.6.0, to enable screen-share support and some other features, the app needs Node Integration enabled; aka, Elevated Privileges. This will allow remote websites to run node-based code, which is a security concern if visiting untrusted websites.

You can enable Elevated Privileges for the app via the command line with `--node 1` or in the app by right-clicking and selecting "Elevate Privileges" from the context-menu. If right-clicking to enable this mode, the app may reload the page afterwards.

A unique feature about the Electron Capture app is that it can auto-select a screen or window when screen-sharing with VDO.Ninja, without user-input. Adding to the VDO.Ninja URL, [`&ss=1`](/advanced-settings/setup-parameters/screenshare) will select display 1, `&ss=2` for the second display, etc. Or specify a window with `&ss=window_name_here`.

To select Screen 1 automatically on load, for example you can do:

`elecap.exe --node 1 --url "https://vdo.ninja/beta/?ss=1&autostart"`

or to select Discord automatically

```
elecap.exe --node 1 --url "https://vdo.ninja/beta/?ss=Discord&autostart"
```

It's also possible to select audio-only when screen sharing via Electron Capture with VDO.Ninja; you do not need to select a video if you wish to share audio-only.

**Global hotkeys**

Global Hotkeys, such as CTRL+M, are supported. CTRL+M will mute the mic, in the most recently opened window. You can assign a custom global hot-key in VDO.Ninja, and it will be respected by Electron Capture. (VDO.Ninja Settings -> User -> Global Hotkey)

YouTube has a built-in automatic ad-skipper added, and for both YouTube, Twitch, and more, when watching a video, you can full-window the video, allowing for clean video capture. This option is available via the context menu of Electron Capture; just right-click somewhere on the page that is empty and select Clean Video Output.

![image](https://user-images.githubusercontent.com/2575698/130308991-4a6e15f2-00e3-453f-a79f-8a874d2a6417.png)

#### Audio Output

A popular way of outputting audio from the Electron Capture app into OBS is done using a virtual audio cable. Some such cables include:

Mac Audio Options: <https://rogueamoeba.com/loopback/> (macOS & non-free, but excellent), and <https://existential.audio/blackhole/> (macOS & free) (and more here <https://github.com/steveseguin/vdoninja/wiki/FAQ#macaudio>)

Windows Audio Option: <https://www.vb-audio.com/Cable/> (donation ware)

If you intend to have more than a 6 virtual audio cables, you can try VAC instead of VB Cables, as VAC seems to support dozens of virtual audio cables, while VB Cable supports just a few: <https://vac.muzychenko.net/>

You can also use some advanced URL parameters to output the audio to specific channels. The following link links the parameters and the outcome, based on device/software used: <https://docs.google.com/spreadsheets/d/1R-y7xZ2BCn-GzTlwqq63H8lorXecO02DU9Hu4twuhuA/edit?usp=sharing>

You can still capture audio via OBS Browser source, appending [`&novideo`](/advanced-settings/video-parameters/and-novideo) to the URL to disable video. Appending [`&noaudio`](/advanced-settings/audio-parameters/noaudio) to the Electron Capture URL would conversely disable audio there, allowing you to capture audio with OBS browser source and video with Electron Capture. The audio/video sync might be slightly off in this setup, but not noticeable in most cases.

More recently, with newer versions of OBS, you can capture an application's audio using OBS natively, but with older versions you can use the following OBS plugin to also do it: <https://github.com/bozbez/win-capture-audio>

<figure><img src="/files/QoUnvGF27i20g3bINQH0" alt=""><figcaption><p>New option in OBS for capture a window's audio</p></figcaption></figure>

\
**Changing the audio output device**

If you right click the app when on a site, you can change the audio output device for that site. This is useful for setting a YouTube or VDO.Ninja video to output to a virtual audio cable or headphones, rather than playout via the default audio device.

On macOS, this is especially helpful since there is a lack of audio routing controls.

Please note: To use this feature, you will need to elevate the app's privileges, which can expose the user to security issues on untrusted websites.

#### Pinning and click-pass thru

You can pin the app on top of other apps via the right-click menu, and when enabled, you can then also enable "click thru" mode also via the context-menu, so no mouse input is captured. The app acts a bit like it is invisible, turning it into a bit of HUD for other applications and games.

If using Social Stream or VDO.ninja, you can append \&transparent to those URLs to make the background transparent. You can also use custom CSS to make web pages shown semi-transparent, so you can still see underneath.

Once "click thru" mode is enabled, you can re-enable click-capture by just selecting the app via the task bar, as bringing the app into focus will disable the click-thru mode.

#### Syphon Output

While there is no native Syphon or NDI output option yet available, one user has mentioned a solution for some users: <http://www.sigmasix.ch/syphoner/>

#### Automation Workflows with VDO.Ninja

You can see a quick start / cheat sheet guide for example uses of the app with VDO.Ninja here: <https://github.com/steveseguin/vdo.ninja/blob/quickstart/automation/cheatsheet_obsn_automation.md>

### Notes on Using and Closing the App

**For Windows users:**

* Right click to bring up the context menu, which allows you to close the app. You can also press ALT-F4 in many cases.
* You can disable hardware-assisted rendering by passing '-a 0' to the command line when lauching; this can help hide the windows mouse cursor with some setups when using BitBlt capture mode.
* You can use the Win+Tab key combo on Windows 10 machines to create a secondary desktop and load the Electron Capture into that. In this way, you can hide your electron capture windows, yet still have them be available to OBS for window-capture. This is a great option for window-capturing without on computers with limited desktop screen space.

**For Mac users:**

* You can hover your mouse cursor over the top-left corner of the app to show the close button.
* Also note, the top portion of the app is draggable, so you can move it around to place it accordingly. It is also resizable.
* Multiple versions of the app can run on macOS; just make a copy of the file with a different name to open up a new window.
* Desktop audio capture with screen share is not supported by Electron (<https://www.electronjs.org/docs/latest/api/desktop-capturer#caveats>)
* You need to enable Screen Capture support in the macOS security preferences for the app to enable desktop capture support on macOS 10.15 Catalina or higher. You also need to enable elevated privileges in the Electron Capture app itself.
* If capturing the window with OBS, you can use either DISPLAY CAPTURE with a WINDOW CROP -or- WINDOW CAPTURE

\--- *WINDOW CAPTURE* will have a video delay of up to \~800ms, but Windows can be stacked without issue

\--- *DISPLAY CAPTURE* will have no delay, but the windows cannot be stacked, which could be a problem if you only have one screen

## Links to downloads below.

You can find the newest release builds of the app here: <https://github.com/steveseguin/electroncapture/releases> or see below.

Please note that the Electron Capture app does not auto-update to newer versions of Chromium. This can become a security issue if it is left to become out of date. It's also recommended to not use the Electron Capture app with websites and remote VDO.Ninja peers that you do not trust.

#### Windows Version

There are two versions for Windows. An installer for x64 systems. There's also a portable version, which is larger in size, but supports x64 and x86 (32-bit) systems. The portable version requires no install and is easier to use from the command-line or from a batch file.

New release here: <https://github.com/steveseguin/electroncapture/releases/>

If you have problems, try a different version or contact me on Discord.

#### Mac Version

* Newest version can be found here: <https://github.com/steveseguin/electroncapture/releases/>
* If having problems, there's an older version here (v1.1.3) <https://github.com/steveseguin/electroncapture/releases/download/1.1.3/obsn-1.1.3.dmg>

If on version of Electron doesn't work for you all that well, try a different version. There may be some issues with rounded edges depending on you macOS version and the Electron version used.

#### Linux Version

There are two pre-build versions of Electron Capture available currently. One built for Pop!\_OS and another for Raspbian. Those builds are here: <https://github.com/steveseguin/electroncapture/releases/tag/2.5.0>

For most Linux users though, we're recommending Linux users build it themselves. Details below

Getting the correct nodejs/npm versions can be hard on linux, but using snap can help there.

```
sudo apt-get update
sudo apt-get install snapd -y
sudo snap install node --classic --channel=16
```

Next, close the shell and open a new one, to ensure the installation is completed.

To get the actual app source code and to build a distributable version, see below

```
git clone https://github.com/steveseguin/electroncapture
cd electroncapture
npm install
npm run build:linux
```

The file you need to run will be in the dist folder.

### Building for the Raspberry Pi

If you want to compile on Raspberry Pi, it's possible, but keep in mind the GPU may not work without also patching Electron.js to support the GPU. Currently you'll need to run it without hardware-acceleration disabled, which is rather disappointing. Contributions that can help fix this are welcomed.

Anyways, this is all much like with the Linux install, but we also need to install `fpm` before trying to build the app.

```
sudo apt-get update
sudo apt-get install snapd -y
sudo apt-get remove nodejs -y
sudo snap install node --classic --channel=14

 ## close the current terminal shell and open a new one here ##

sudo apt install ruby ruby-dev -y
sudo gem install fpm 
```

We also need to build the app using `build:rpi` instead of `build:linux`, as we need to target ARM versus x64.

```
git clone https://github.com/steveseguin/electroncapture
cd electroncapture
npm install
npm run build:rpi
```

You should get a `.deb` file in the dist file with this option. If you install the deb file, it should appear in the Raspbian start menu, under `Other -> ElectronCapture`

This will probably file if you do not disable the GPU / hardware-acceration within the Electron Capture app first, but who knows -- maybe you can get it working?

### Building from source on Windows

You'll also need nodejs and npm installed.

If on Windows, you can find the NPM/Nodejs install files here: <https://nodejs.org/en/download/current/>

and then to get the source code for Electron Capture,

```
git clone https://github.com/steveseguin/electroncapture.git
cd electroncapture
```

To just run the app from source without building, you can:

```
npm install
npm start
```

If you get an error about node versions, you can install the required version with something like this:

```
npm install -g node@14.6.0
npm install
npm run build:win32
```

#### Building the app from source on macOS :

* For Mac, please also see this issue for building: <https://github.com/electron-userland/electron-builder/issues/3828>

The basic idea is is to first install node, npm, and git. Then to clone and build the folder:

```
git clone https://github.com/steveseguin/electroncapture.git
cd electroncapture
npm install -g node@14.6.0
npm install
npm run build:darwin
```

If you need to sign the build, for distribution, you can then try:

```
npm install
export appleId={yourApp@dev.email}
export appleIdPassword={app-specific-password-here}
sudo -E npm run build:darwin
```

#### Trouble-shooting -- if can't hide cursor when window capturing using OBS:

Change the capture method in OBS to "BitBlt"and uncheck the Capture Cursor. Also make sure OBS runs in compatibility mode for win 7, so you don't get a black screen

![image](https://user-images.githubusercontent.com/2575698/126881460-1d8fe840-6ec4-4c35-bde2-fc6db5a9ae30.png)

![image](https://user-images.githubusercontent.com/2575698/126881462-b6916972-aa46-41bd-be01-54e3c2a58906.png)

Adding [`&nocursor`](/advanced-settings/design-parameters/and-nocursor) to VDO.Ninja will hide the cursor in that browser window, but that often isn't enough. If the above fails, make sure you are window capturing with OBS using the same display adapter for both OBS and the Electron window.

Lastly, if that still doesn't help, you can try Windows + Tab (on windows), and host the Electron Capture app on the secondary windows desktop. Windows + Tab back to the main one and select the window then. You may need to toggle between the two desktops after selecting the window to capture, to get it to show in OBS, but it is one way of hiding the mouse.

You can also drag the Electron Capture far off screen, so the cursor can't approach it really.

**Issues with dependencies when compiling**

Sometimes a dependency won't update to the value stated in the package.json.

This option might be able to update the package.json to the newest version of dependencies automatically,

```
npx npm-check-updates -u
npm install
```

Seems to work with newer npm versions

#### Thank you

"Electron capture is one process that unstable atoms can use to become more stable. " - <https://education.jlab.org/glossary/electroncapture.html>


# Game Capture

Windows game, window, and Spout2 capture app for VDO.Ninja with VTuber alpha video, hardware encoding, window audio, and multi-viewer support.

Game Capture is a standalone Windows app for sending a game, app window, esports feed, or local Spout2 source directly into VDO.Ninja without relying on a browser engine in the capture application itself. It is designed for high-performance capture workflows where hardware encoding, window-specific audio, transparent VTuber avatars, and simple guest-side publishing matter.

## Link

* <https://vdo.ninja/gamecapture>
* <https://github.com/steveseguin/game-capture>

## When to use it

Use Game Capture when you want a player or guest to publish gameplay into VDO.Ninja without asking them to run a full OBS setup. This is useful for esports rooms, multiplayer Twitch productions, remote game commentary, and other cases where the host wants each player as a separate OBS source.

The usual workflow is:

1. The host creates the VDO.Ninja room or stream IDs.
2. Each player opens Game Capture on Windows.
3. The player selects their game or app window and starts publishing.
4. The host adds the resulting VDO.Ninja view link, or the room's solo/scene links, to OBS.

For room-based productions, Game Capture can feed the same VDO.Ninja room workflows as browser-based screen sharing. The director or OBS operator can still use isolated links, solo links, and scene links for each player.

## Key features

* game, window, or Spout2 capture direct to VDO.Ninja
* window-specific audio capture without third-party routing tools
* hardware-accelerated video encoding and bitrate presets for gameplay
* stream ID and full VDO.Ninja URL support
* room-compatible publishing for director and OBS workflows
* dual-stream routing for high-quality and lower-quality monitor paths
* multi-viewer support from a single HD encode workflow
* native Windows app with no Electron runtime
* free and open source

## Spout2 and VTuber sources

On Windows, Game Capture can receive Spout2 video from avatar and graphics apps such as VTube Studio, Warudo, VSeeFace, and VNyan. This captures the sender's clean output rather than its control window and keeps transparent pixels available for the alpha or chroma workflow.

1. Enable Spout or Spout2 output in the avatar app and leave it running.
2. In Game Capture, set **Video Source** to **Spout2 (avatar apps)**.
3. Select the named sender, enter the VDO.Ninja stream or room details, and go live.

Spout2 is video-only. Game Capture defaults these sources to **No audio**; select an output mix, microphone, or additional microphone separately if needed.

## Transparent Spout2 video in OBS

For true transparency, choose **VP9 (OBS Alpha Preview, auto fallback)** and enable the alpha workflow. Receive the stream with the [Ninja OBS Plugin](/steves-helper-apps/ninja-obs-plugin), add a **VDO.Ninja Source**, and enable **Use Native Receiver (Experimental)**. OBS Browser Sources and normal browser viewers do not composite the separate alpha track.

VP9 alpha encodes both color and alpha video in software. Start with 1080p30 or 720p60 if 1080p60 drops frames. For a lighter hardware-encoded path, use H.264/NVENC with **Alpha Background → Chroma background**, then apply a chroma-key filter at the receiver.

If a sender is listed but displays black, configure Game Capture and the sender app to use the same GPU in Windows Graphics settings.

The complete setup and troubleshooting flow is in [Using Game Capture and Spout2 with VDO.Ninja](/guides/using-game-capture-with-vdo.ninja).

## Downloads

The latest installer, portable app, and ZIP package are linked from:

* <https://github.com/steveseguin/game-capture/releases/latest>

## Notes

* Windows-only at this time
* for macOS or Linux users already using OBS, the [Ninja OBS Plugin](/steves-helper-apps/ninja-obs-plugin) supports OBS v32 systems
* intended for esports, game capture, and other high-performance capture cases
* capture and encoder settings are locked while streaming, so stop the stream first before changing advanced capture settings
* if you need the broadest compatibility for non-OBS viewers, leave the alpha/transparency workflow disabled


# Ninja OBS Plugin

Publish to or receive from VDO.Ninja in OBS, including transparent Spout2 and VTuber video from Game Capture through the native receiver.

The Ninja OBS Plugin adds native VDO.Ninja publishing and receiving tools to OBS Studio. It is useful when you want a more integrated OBS workflow than opening a separate browser publisher or Browser Source.

## Link

* <https://steveseguin.github.io/ninja-obs-plugin/>

## Key features

* publish live from OBS directly to VDO.Ninja
* receive a VDO.Ninja stream as a **VDO.Ninja Source**
* multi-viewer support
* peer-to-peer publishing model
* open-source plugin
* support for OBS v32 systems, including Windows, macOS, and Linux
* can auto-add room participants into OBS as browser sources
* experimental native VP9/H.264/Opus receiver with dual-track VP9 alpha support
* automatic paced video NACK repair, with optional packet duplication, Audio RED, and REMB adaptation for advanced loss testing

## Packet-loss protection

Leave **Packet Duplication** set to **Off** for the normal starting point. Video NACK retransmission, paced sending, and the plugin's two-second keyframe safety limit still operate while duplication is off.

The optional modes add delayed copies of selected video RTP packets:

* **Low:** keyframe packets, up to 20% best-effort extra video traffic
* **Medium:** keyframes plus one quarter of delta packets, up to 50% extra
* **High:** every packet can receive one copy, up to 100% extra

These modes are packet duplication, not video RED, ULPFEC, FlexFEC, or RTX. **Audio RED** is a separate negotiated option that can carry one previous Opus frame. **Adaptive Bitrate from REMB** tries to avoid congestion by lowering a supported OBS encoder; it does not repair a missing packet.

For the exact NACK cache, timing, bandwidth/fan-out costs, mode-selection guidance, receiver limitations, and the reason H.264 ULPFEC is not offered, see [Advanced packet-loss recovery and resilient media](/steves-helper-apps/ninja-obs-plugin/packet-loss-recovery-and-resilient-media#ninja-obs-plugin).

## Receive transparent Game Capture video

The tested transparent workflow uses a Spout2 avatar or graphics source in [Game Capture](/steves-helper-apps/game-capture), VDO.Ninja for transport, and the plugin's native receiver in OBS:

1. In Game Capture, choose **Spout2 (avatar apps)** and select the sender.
2. Choose **VP9 (OBS Alpha Preview, auto fallback)** and enable the alpha workflow.
3. Publish with a stream ID or room workflow.
4. In OBS, add a **VDO.Ninja Source**, enter the matching stream details, and enable **Use Native Receiver (Experimental)**.

OBS Browser Sources and normal browser viewers receive the standard color track but do not composite the separate alpha track. If software VP9 is too CPU-heavy, use Game Capture's H.264/NVENC **Chroma background** workflow and apply a chroma-key filter in OBS instead.

See [Using Game Capture and Spout2 with VDO.Ninja](/guides/using-game-capture-with-vdo.ninja) for the complete sender setup and troubleshooting flow.

## Notes

* positioned as a simpler publishing workflow than relying on a separate browser publisher
* useful for non-Windows users who want an OBS-native publishing workflow, since the standalone Game Capture app is currently Windows-only
* **Use Native Receiver (Experimental)** is required for the dual-track VP9 alpha workflow
* packet protection is applied per direct viewer, so its upload cost grows with P2P fan-out


# Advanced packet-loss reference

A practical comparison of RTP retransmission, NACK, FEC, RED, keyframes, TURN, SFU distribution, and chunked mode in VDO.Ninja and native OBS tools.

Packet loss can produce several different failures: a brief soft frame, a frozen picture, persistent green or rainbow-coloured corruption, missing audio, or a complete disconnect. No single switch fixes all of them.

The useful question is which layer failed:

* **Capacity:** the encoder is producing more data than the path can carry.
* **Delivery:** individual RTP packets are missing, late, or reordered.
* **Decode state:** a lost reference frame has damaged later predicted frames.
* **Route:** the direct path or NAT traversal is failing.
* **Fan-out:** one publisher is encoding or uploading separately to too many viewers.
* **Application:** the capture, encoder, decoder, audio clock, or CPU is overloaded.

This guide explains the normal VDO.Ninja browser path first, then compares it with OBS Studio's native WHIP output, Game Capture, and the Ninja OBS Plugin.

## Fast recommendations

For fast-moving gameplay where player names must remain readable, start with:

* 1280x720 at 30 fps;
* H.264 for the broadest native-tool compatibility;
* a bitrate that stays below the **sustained** upload rate, not the speed-test peak;
* a one-to-two-second keyframe interval;
* no B-frames;
* NACK and PLI left enabled;
* at least 25-40% uplink headroom for audio, retransmissions, keyframes, and normal rate variation.

For a browser publisher:

```
https://vdo.ninja/?push=STREAMID&quality=1&fps=30&prefervideocodec=h264&outboundvideobitrate=2500&maxvideobitrate=3000
```

For its viewer or OBS Browser Source:

```
https://vdo.ninja/?view=STREAMID&codec=h264&videobitrate=2500&buffer=500&keyframe=1000
```

Treat these as starting values. If the clean path is sharp but the image becomes rainbow-coloured only during loss, the main problem is damaged decoder references. If it is always soft, the problem is more likely bitrate, resolution, capture scaling, or encoder quality.

For text-heavy 1080p gameplay, lower 60 fps to 30 fps before forcing the bitrate too low. A 1080p30 stream can preserve small names better than 720p60 at the same rate, but it still needs a path that can sustain it. No recovery mode can preserve detail that the encoder removed before transmission.

An encoder's **profile** or CPU preset is not packet-loss protection. A slower preset can improve compression when the CPU has headroom. If it causes encoder overload, dropped frames, or an unstable frame cadence, use a faster preset. H.264 High profile can improve compression, but every receiver must support it; it does not repair missing packets.

## What each approach actually does

| Approach                      | Layer                          | Default in normal VDO.Ninja RTP                  | Main benefit                                                                                      | Main cost or limitation                                        |
| ----------------------------- | ------------------------------ | ------------------------------------------------ | ------------------------------------------------------------------------------------------------- | -------------------------------------------------------------- |
| Congestion control            | Capacity                       | Yes, browser controlled                          | Reduces rate before queues collapse                                                               | Quality or frame rate can fall sharply                         |
| Jitter buffer and concealment | Playback                       | Yes, browser controlled                          | Hides small timing variation and isolated audio loss                                              | Adds delay and cannot rebuild arbitrary missing video          |
| NACK                          | Feedback                       | Yes when negotiated                              | Requests specific missing RTP sequence numbers                                                    | Recovery takes at least one feedback round trip                |
| RTX                           | Retransmission                 | Normally negotiated by browsers for video        | Resends only what was requested on a separate RTP repair stream                                   | Uses burst bandwidth and can arrive too late                   |
| PLI and keyframes             | Decoder reset                  | Yes                                              | Clears persistent reference-frame corruption                                                      | Does not restore the missing interval; keyframes are large     |
| Opus in-band FEC              | Audio repair                   | Normally enabled when supported                  | Repairs an earlier audio frame without another network round trip                                 | Adds audio overhead and only covers limited loss patterns      |
| RTP RED                       | Proactive redundancy container | Not forced                                       | Can carry earlier payload data with a current packet                                              | Extra bandwidth; support and actual use are browser controlled |
| Video ULPFEC                  | Proactive parity               | Not forced                                       | Can reconstruct some missing video packets without waiting for a resend                           | Extra bandwidth and limited control from JavaScript            |
| Forced TURN                   | Route                          | No; direct-first automatic escalation is enabled | Replaces a blocked or poor direct route                                                           | Adds a server hop; does not itself repair packets              |
| SFU / Meshcast                | Topology                       | No                                               | Publisher uploads once while the server distributes                                               | Adds a server dependency and another media hop                 |
| Chunked mode                  | Buffered alternate media path  | No                                               | Adds explicit playout buffering, indexed frames, parity, selective resend, pacing, and adaptation | More latency and a narrower compatibility range                |

<figure><img src="/files/qD9makxqdb6kqBX9SZ5U" alt="Three packet timelines comparing reactive NACK and RTX repair, proactive FEC or RED repair, and decoder reset with PLI and a new keyframe"><figcaption><p>Reactive retransmission waits for feedback. Proactive redundancy spends bandwidth before loss. A PLI and keyframe reset the decoder, but do not restore the damaged interval.</p></figcaption></figure>

### RED is not simply "send the whole video twice"

RED is an RTP payload container. It can place a current payload and one or more earlier payloads into a later packet. The sender decides what redundant data to include.

Audio RED commonly carries the previous Opus generation and can approach twice the normal audio bitrate. Video RED is more complicated: browsers may pair the RED container with parity data, may use little redundancy, or may decline to send repair data after it was negotiated. VDO.Ninja's normal video RED flags change negotiation preference; they do not force a duplicate stream or a fixed repair percentage.

The Ninja OBS Plugin's **Packet Duplication** setting is deliberately different. It can send a later copy of the same RTP packet with the same sequence number; `High` can do this for every video packet. It is labeled duplication rather than RED/FEC so the wire behavior is not confused with browser SDP negotiation or parity repair.

By comparison:

* **RTX** sends a missing packet only after a NACK.
* **FEC** sends parity or repair information before the receiver asks.
* **TURN** forwards the same connection through a relay.
* **An SFU** receives one upstream and distributes it to downstream viewers.
* **Chunked parity** adds one XOR parity payload for each configured group of data payloads.

## Normal VDO.Ninja RTP mode

Normal browser-managed RTP is the default. It has the widest browser, room, OBS Browser Source, TURN, and native-peer interoperability.

The normal defaults are:

* browser congestion control and bitrate estimation;
* browser jitter buffering;
* video NACK, RTX, and PLI where both peers negotiate them;
* Opus packet-loss concealment and normally Opus in-band FEC;
* direct ICE first, with bounded automatic TURN escalation after a hard direct-path failure;
* no forced video RED rate;
* no forced TURN;
* no SFU;
* no chunked media path.

The browser owns most of this behavior. VDO.Ninja can preserve, remove, or reorder SDP feedback and payload preferences, but it cannot force every browser to use a particular repair percentage.

### NACK and RTX

A NACK identifies missing RTP sequence numbers. With normal browser peers, video RTX usually carries the requested media again using an associated repair payload type and repair stream. The receiver maps it back to the original packet before decoding.

**Advantages**

* Little steady-state overhead on a clean path.
* Repairs only packets that the receiver noticed were missing.
* Well supported between current browsers.

**Disadvantages**

* A useful resend must return before the playout deadline.
* At high RTT, the resend may arrive after the frame has already been skipped.
* Loss caused by congestion can make the resend burst worsen the same congestion.
* A long outage can exceed the sender's retransmission history.

There is no normal `&rtx=1` switch. Leave NACK enabled and compatible browsers negotiate RTX themselves. `&nonack` and `&nonacks` remove NACK feedback and are primarily diagnostic options:

```
https://vdo.ninja/?view=STREAMID&nonack
```

Do not add them when the goal is better reliability.

A viewer buffer gives late original packets and retransmissions more time:

```
https://vdo.ninja/?view=STREAMID&buffer=1000
```

The tradeoff is about one second of additional playout latency. A buffer does not add bandwidth or guarantee that a retransmission cache is long enough.

### PLI, keyframes, and rainbow corruption

Most video codecs predict later frames from earlier decoded frames. If a lost packet damages an important reference, later packets can arrive perfectly and still decode as green blocks, rainbow smears, duplicated regions, or a frozen image.

A Picture Loss Indication asks the sender for a new keyframe. NACK tries to restore the missing packet; PLI gives up on the damaged prediction chain and starts a clean one.

PLI is normally enabled. `&nopli` disables it for diagnostics and generally makes loss recovery worse.

The viewer can request periodic keyframes:

```
https://vdo.ninja/?view=STREAMID&keyframe=1000
```

`&keyframe`, `&keyframerate`, `&keyframeinterval`, and `&fki` are aliases, in milliseconds.

**Advantages of a shorter interval**

* Bounds how long unrepairable corruption can remain visible.
* Helps late viewers and decoders that missed their initial keyframe.

**Disadvantages**

* Keyframes are much larger than predicted frames.
* A keyframe burst can cause fresh loss on a nearly full uplink.
* More frequent keyframes spend bitrate on repeated full images, leaving less for motion detail.

One second is a useful gameplay and WHIP test. Two seconds is a more conservative general setting. Avoid making every frame a keyframe unless the encoder and network budget were designed for that tradeoff.

### Opus concealment and in-band FEC

Opus can conceal a missing audio packet from nearby decoded audio. With in-band FEC, a later Opus packet can also contain lower-rate information for an earlier frame.

VDO.Ninja normally negotiates Opus in-band FEC where supported. `&nofec` disables that SDP setting:

```
https://vdo.ninja/?view=STREAMID&nofec
```

That is useful for a controlled comparison, not as the normal reliability choice.

In-band FEC works best for isolated loss and suitable packet sizes. It cannot cover a long burst, and the encoder may only produce useful FEC after the receiver reports loss. Packet-loss concealment can hide a short gap but may sound muffled or synthetic.

VDO.Ninja also has experimental audio payload-ordering flags: `&redaudio` and `&fecaudio` on a viewer, with `&predaudio` and `&pfecaudio` as publisher-side companions. They only influence how advertised RED or ULPFEC payloads are ordered beside the selected audio codec. They do not create repair data when the runtime does not support or send it. Explicitly selecting audio RED is easier to verify.

### Audio RED

Audio RED is the most direct VDO.Ninja RED experiment. Use the publisher-side preference and viewer-side selection together:

```
https://vdo.ninja/?push=STREAMID&preferaudiocodec=red
https://vdo.ninja/?view=STREAMID&audiocodec=red
```

Both endpoints must advertise compatible RED and Opus payloads. Confirm the negotiated codec and actual audio bitrate in stats.

**Advantages**

* The redundant earlier audio can be available immediately when the current packet arrives.
* It is less RTT-dependent than NACK.
* Speech can remain intelligible through isolated packet loss.

**Disadvantages**

* Audio bandwidth can approach double.
* Extra traffic can make a saturated uplink worse.
* Browser and embedded-runtime support varies.
* High-bitrate stereo and pro-audio combinations need testing; VDO.Ninja limits some RED combinations to keep them stable.

For an unreliable network, compressed Opus with FEC or RED is usually safer than uncompressed PCM. PCM has no codec concealment and consumes much more bandwidth.

### Video RED and ULPFEC

Use `&vred` on the viewer and `&pvred` as its publisher-side companion:

```
https://vdo.ninja/?push=STREAMID&prefervideocodec=vp8&pvred
https://vdo.ninja/?view=STREAMID&codec=vp8&vred&buffer=500
```

VP8 is the best first comparison for this experiment. The flags prefer video RED in SDP when the runtime advertises it. The browser still decides whether it will send RED or ULPFEC repair traffic and how much.

**Advantages**

* Repair data can arrive without waiting for a NACK round trip.
* Can help short random loss when the uplink has spare capacity.

**Disadvantages**

* The URL flags do not force a protection rate.
* H.264 and some browser combinations may not use the negotiated repair payloads.
* Repair overhead competes with encoded picture quality.
* Native senders and receivers in the comparison later in this guide do not provide equivalent video RED recovery.

Run an A/B test with the same codec, resolution, bitrate, route, RTT, and loss pattern. Negotiating RED is not proof that useful repair packets were sent.

### Codec choice

Changing codec can improve compression efficiency, hardware use, or decoder behavior, but it is not a replacement for loss recovery.

* **H.264** is the safest common choice for OBS WHIP, the Ninja publisher, Game Capture, and browser viewers.
* **VP8** is a useful browser baseline and the first choice for a video RED experiment.
* **VP9 or AV1** may preserve more detail at the same bitrate, but encoder load and native receiver support are narrower.
* A more efficient inter-frame codec can still propagate damage after a lost reference.

If names are unreadable on a clean link, try a more efficient supported codec, reduce frame rate, or raise bitrate within measured headroom. If only damaged frames are unreadable, focus on loss, retransmission, and keyframe recovery.

## TURN: change the route, not the repair method

TURN relays encrypted peer traffic when direct connectivity is blocked or the relay route is better. The endpoints still perform NACK, RTX, PLI, FEC, congestion control, and decoding across that connection.

VDO.Ninja is direct-first by default. `autoRelay` is enabled, so a hard-failed direct connection receives an initial recovery attempt followed by bounded TURN escalation. This is connection recovery, not continuous route optimization for modest packet loss.

Force TURN with:

```
https://vdo.ninja/?push=STREAMID&relay
https://vdo.ninja/?view=STREAMID&relay
```

`&relay`, `&private`, and `&privacy` are aliases. Forced relay mode caps normal video targets at 4000 kbps, or 6000 kbps in speed-test mode.

Force a non-UDP TURN candidate set with:

```
https://vdo.ninja/?push=STREAMID&relay&tcp
https://vdo.ninja/?view=STREAMID&relay&tcp
```

`&tcp` filters the TURN choices but does not itself force TURN. Pair it with `&relay`.

Disable automatic escalation only for a controlled test:

```
&autorelay=0
```

**TURN can help when**

* restrictive NAT or firewall policy blocks a direct connection;
* the direct Internet route has a persistent problem and the relay takes a cleaner route;
* privacy policy requires hiding peer addresses from one another.

**TURN cannot**

* repair local Wi-Fi loss before packets reach the relay;
* create upload capacity;
* combine two Internet connections;
* distribute one upload to many independent peers;
* transcode an over-complex stream.

TURN adds server bandwidth cost and usually adds RTT. TURN/TCP or TURN/TLS can cross restrictive networks, but loss on a reliable byte stream may become head-of-line delay instead of a visibly missing packet.

## SFU and Meshcast: change the topology

An SFU receives one encoded upstream and forwards it to multiple viewers. Unlike a TURN relay, it is aware of RTP streams and normally terminates feedback independently on each leg.

In VDO.Ninja, add `&meshcast` to the publishing guest or director link:

```
https://vdo.ninja/?push=STREAMID&meshcast
```

For a room:

```
https://vdo.ninja/?room=ROOM&push=STREAMID&meshcast
```

The current app also has a `&meshcast2` path. Treat it as a separate implementation to test, not as an error-correction flag.

**Advantages**

* One publisher upload can serve many viewers.
* One publisher encode avoids per-viewer encoder pressure.
* A server can maintain separate loss recovery and pacing toward each viewer.
* A single slow viewer is less likely to pressure every other direct peer.

**Disadvantages**

* The publisher-to-SFU uplink is still a single point of media loss.
* Adds a server hop, operating cost, and dependency.
* Server location affects RTT and loss.
* End-to-end behavior depends on the SFU's packet cache, feedback, and forwarding implementation.
* It does not make an excessive source bitrate sustainable on the publisher's uplink.

Use an SFU when fan-out is the problem. Use TURN when connectivity or routing is the problem. Those can overlap, but they are not interchangeable.

<figure><img src="/files/ILXwIEhBGIfqQlxu3HyR" alt="Side-by-side network diagrams showing a direct peer connection, a one-to-one connection through TURN, and one publisher upload fanning out through an SFU to three viewers"><figcaption><p>Direct media stays between peers. TURN changes the route for the same one-to-one connection. An SFU accepts one publisher upload and distributes it to multiple viewers.</p></figcaption></figure>

### WHIP is session setup, not packet repair

WHIP establishes a send-only media session with an HTTP endpoint. WHEP does the corresponding job for receiving from a server. The media is still RTP, so loss behavior depends on what the publisher, server, and receiver negotiate and implement.

A WHIP endpoint may terminate media in an SFU and provide TURN servers, but WHIP by itself does not promise RTX, RED, FEC, transcoding, a packet-cache duration, or downstream viewer repair. Check the actual server and client implementation.

## Chunked mode: explicit buffering and frame-aware recovery

Chunked mode replaces RTP video publishing with encoded video payloads sent over an ordered, reliable data channel. It is opt-in and keeps the normal RTP default unchanged.

<figure><img src="/files/J5WbAldrig6wHH1qz1Ck" alt="Comparison of normal RTP using a small jitter buffer and NACK retransmission with chunked mode using indexed frame payloads, parity, selective resend, and a larger playout buffer"><figcaption><p>Normal RTP favors lower delay and has less time to repair a packet before playback. Chunked mode deliberately holds more media so parity and selective resend have a larger recovery window.</p></figcaption></figure>

Basic use:

```
https://vdo.ninja/?push=STREAMID&chunked=2500&chunkbitrate=2500
https://vdo.ninja/?view=STREAMID&chunkbuffer=1500
```

`&chunked=2500` is the legacy enable-and-video-bitrate value in kbps. It is **not** a 2500 ms buffer. `&chunkbitrate=2500` is the clearer explicit bitrate setting.

The two main buffers are different:

* `&chunkedbuffer=<ms>` is the publisher's sender backlog and pacing window.
* `&chunkbuffer=<ms>` is the viewer's playout target.

Without a profile or override, the receiver's fallback target is about 3000 ms and the base sender window is about 500 ms. Supplying `&chunkedbuffer` without a number selects a larger fallback of about 5000 ms. Supplying `&chunked` without a number selects about 2500 kbps.

Use `&chunkcodec=h264`, `vp8`, `vp9`, or `av1` to request a chunked video codec. The normal `&codec` flag controls RTP negotiation and does not select this encoder.

Plain chunked mode uses compatibility framing and does not automatically enable parity or selective application-level resend. A robust manual profile is:

```
https://vdo.ninja/?push=STREAMID&quality=1&fps=30&chunked=2500&chunkbitrate=2500&chunkindex=1&chunkfec=4&chunknack=1&chunkedbuffer=1500&chunkadapt=hybrid&chunkadaptfloor=700&chunkadaptceil=2500
```

```
https://vdo.ninja/?view=STREAMID&chunkbuffer=1500&chunkbufferfloor=1000&chunkbufferceil=3000&chunkjitterslack=300
```

The shorter preset form is:

```
&chunked=2500&chunkprofile=balanced
```

The `mobile`, `balanced`, and `desktop` profiles opt into different parity, NACK, buffer, and adaptation defaults. Explicit URL values remain the best choice when a production requires a known latency budget.

| Chunked selection       | Indexed reliability               | Parity       | Selective NACK | Initial playout target | Adaptation                    |
| ----------------------- | --------------------------------- | ------------ | -------------- | ---------------------- | ----------------------------- |
| Plain `&chunked`        | Off unless needed by another flag | Off          | Off            | About 3000 ms          | Adaptive buffer; no rate mode |
| `chunkprofile=mobile`   | On                                | `chunkfec=3` | On             | 900 ms                 | Frame-rate                    |
| `chunkprofile=balanced` | On                                | `chunkfec=4` | On             | 750 ms                 | Hybrid                        |
| `chunkprofile=desktop`  | On                                | `chunkfec=5` | On             | 620 ms                 | Bitrate                       |

Chunked audio can also be used where supported. Add `&nochunkaudio` when video should use chunked mode while audio remains on the normal low-latency path. Keeping conversational audio on normal Opus RTP often avoids making talkback wait for the larger video playout budget.

### Indexed framing, parity, and selective resend

`&chunkindex=1` adds explicit frame and chunk indices. It becomes mandatory automatically when NACK or parity reliability is enabled.

`&chunkfec=4` produces one XOR parity payload per four data payloads. A parity group can repair one missing data payload:

```
&chunkfec=4
```

Approximate parity overhead is `1 / N`, before metadata and transport overhead:

| Setting      | Approximate parity overhead | Single-loss repair scope                     |
| ------------ | --------------------------- | -------------------------------------------- |
| `chunkfec=2` | 50%                         | One missing payload in each two-data group   |
| `chunkfec=3` | 33%                         | One missing payload in each three-data group |
| `chunkfec=4` | 25%                         | One missing payload in each four-data group  |
| `chunkfec=6` | 17%                         | One missing payload in each six-data group   |

Smaller groups repair more loss but consume more bandwidth.

`&chunknack=1` lets a viewer request a missing indexed payload from the publisher's short resend cache:

```
&chunknack=1&chunknackattempts=8&chunknackdelay=250&chunkcache=30000
```

The retry spacing and cache budget are adjusted against buffer and RTT information, with URL controls for advanced testing.

The underlying data channel is already ordered and reliable. On an ordinary direct path, UDP loss therefore often appears as retransmission delay and head-of-line blocking rather than an exposed missing message. Indexed parity and selective resend add frame awareness for incomplete, trimmed, relayed, or otherwise missing application payloads; they do not remove the underlying channel's ordering delay.

### Pacing, trimming, watchdogs, and adaptation

Chunked mode also includes:

* per-viewer backpressure using data-channel buffered amount;
* a sender queue that trims on decodable boundaries instead of keeping arbitrary partial GOP data;
* header and keyframe reset after relief or trimming;
* a stale-frame watchdog so one incomplete frame does not deadlock all later frames;
* bitrate, frame-rate, or hybrid adaptation before the playout buffer empties;
* optional resolution tiers;
* buffer occupancy, NACK, parity-repair, and rebuffer counters.

Useful adaptation examples:

```
&chunkadapt=bitrate&chunkadaptfloor=600&chunkadaptceil=2500
&chunkadapt=framerate&chunkadaptmaxdrop=10
&chunkadapt=hybrid&chunkadaptresolution=1
```

**Advantages**

* Explicit latency budget rather than relying only on an RTP jitter buffer.
* Frame-aware parity and resend controls.
* More time to recover high-RTT loss.
* GOP-aware relief avoids sending an undecodable tail after queue overflow.
* Strong observability through `buffer_level`, `buffer_delta`, `fec_repairs`, and `nacks_sent`.

**Disadvantages**

* More latency.
* Reliable ordered delivery can stall later data behind an earlier loss.
* Parity consumes steady bandwidth; resend consumes burst bandwidth.
* Encoding and decoding support is runtime dependent.
* Current native WHIP, native Game Capture, Ninja native publisher, and Ninja native receiver paths do not implement this media format.
* Current SFU and native WHIP routes do not carry this format as normal RTP video.

Use `&nochunked` on a browser viewer that must stay on the normal RTP path.

## Symptom-based troubleshooting

### Rainbow, green, or smeared video

This is usually a damaged inter-frame prediction chain.

1. Check whether packet loss or PLI rises at the same time.
2. Leave NACK and PLI enabled.
3. Test a one-to-two-second keyframe interval.
4. Lower bitrate enough to leave repair and keyframe headroom.
5. Compare direct and forced TURN routes.
6. If fan-out overloads the source, move distribution to an SFU.
7. If extra delay is acceptable, test chunked buffering and frame-aware repair.
8. If it happens only in one decoder, compare H.264, VP8, or VP9 on that receiver.

Do not first raise the bitrate, add redundancy, and shorten keyframes at the same time. All three can increase traffic and make congestion worse.

### Frozen video while audio continues

Likely causes include:

* the decoder is waiting for a keyframe;
* a video retransmission arrived too late;
* a sender queue is blocked;
* the video encoder or GPU failed while audio remained healthy;
* the viewer requested a codec/profile it cannot decode reliably.

Check the publisher's local preview, encoder-overload counter, outbound FPS, keyframe cadence, viewer decoded FPS, PLI count, and selected candidate path.

### Soft video with no corruption

This is usually rate adaptation or insufficient encoder budget, not packet repair.

* Reduce frame rate before sacrificing the resolution needed for names.
* Use `&degrade=maintain-resolution` for text or UI, accepting lower motion cadence.
* Use `&degrade=maintain-framerate` for motion, accepting reduced resolution.
* Keep the target below sustained capacity.
* Try a more efficient codec only when every endpoint supports it and the encoder can run it without overload.

### Audio pops, gaps, or robotic speech

1. Check audio packet loss, jitter, RTT, and CPU at the same moment.
2. Use Opus rather than PCM on a constrained or lossy network.
3. Leave Opus in-band FEC enabled.
4. Test audio RED if both endpoints support it and bandwidth remains.
5. Add a modest viewer buffer for late packets.
6. Check audio clock/timestamp warnings in native tools.
7. Confirm the capture device is not clipping, resampling badly, or changing format.

Audio RED or FEC cannot fix clipping that already exists in the local recording.

### Both audio and video freeze

This points more strongly to route failure, a large queue, CPU starvation, or application pause. Check ICE state, candidate type, data-channel or RTP queue growth, signaling reconnect logs, system load, and whether the local capture stopped.

### Encoder overload

Network flags cannot repair frames that were never encoded.

* Use a faster CPU preset.
* Reduce FPS or resolution.
* Use hardware encoding when it is stable.
* Avoid an unsupported high H.264 profile.
* Confirm the game's GPU use leaves capacity for capture and encoding.
* For multiple viewers, use one shared encode and an SFU rather than separate encodes.

## Native implementation comparison

These details describe the current source implementations reviewed for this guide. They are narrower than the browser application and can change as the projects evolve.

### Feature overview

| Feature                            | VDO.Ninja browser RTP                                | OBS native WHIP output                                                | Game Capture                                              | Ninja OBS Plugin publisher                                                                      | Ninja native receiver                                  |
| ---------------------------------- | ---------------------------------------------------- | --------------------------------------------------------------------- | --------------------------------------------------------- | ----------------------------------------------------------------------------------------------- | ------------------------------------------------------ |
| Role                               | Publish and receive                                  | WHIP publish only                                                     | VDO publish                                               | VDO publish                                                                                     | VDO receive                                            |
| Default video                      | Browser negotiated                                   | Configured OBS H.264 or AV1; optional HEVC build                      | H.264, 1080p60, 12 Mbps                                   | H.264, 4 Mbps                                                                                   | H.264 or VP9                                           |
| Audio                              | Opus and optional alternatives                       | Opus                                                                  | Opus                                                      | Opus                                                                                            | Opus                                                   |
| Video NACK                         | Yes                                                  | Yes                                                                   | H.264/H.265/AV1 paths                                     | Yes; newer builds pace original-packet repair                                                   | Does not generate NACK                                 |
| Actual RFC RTX stream              | Normally yes                                         | No                                                                    | No                                                        | No                                                                                              | Can normalize offered incoming RTX                     |
| PLI recovery                       | Yes                                                  | Advertised, but no encoder callback in this output                    | Wired for H.264/H.265/AV1                                 | Next scheduled live IDR, normally within two seconds; no on-demand OBS callback                 | Sends PLI on connect and decoder errors                |
| Video RED/FEC recovery             | Browser dependent                                    | No                                                                    | No                                                        | No negotiated video RED/FEC; v1.1.60+ offers opt-in paced packet duplication                    | RED primary extraction only; no redundant-block repair |
| Proactive video packet duplication | Browser controlled, not exposed as this fixed policy | No                                                                    | No                                                        | Default-off Low/Medium/High best-effort copies                                                  | Not applicable                                         |
| Opus FEC                           | Normally browser controlled                          | Negotiated; plugin does not configure the OBS encoder's loss controls | Advertised, but current encoder does not enable it        | Depends on OBS Opus encoder; plugin does not configure it                                       | Decodes Opus; no extra repair layer                    |
| Audio RED                          | Browser dependent                                    | No                                                                    | No                                                        | Opt-in RFC 2198 RED in v1.1.60+, with per-viewer plain-Opus fallback                            | Not implemented in the native receive path             |
| TURN                               | Automatic list and escalation; force by URL          | WHIP endpoint can provide ICE servers                                 | UI modes, fetched VDO TURN list                           | Custom TURN must be supplied                                                                    | Same custom ICE settings                               |
| SFU                                | `&meshcast`                                          | WHIP endpoint may be an SFU                                           | No native SFU mode                                        | No native SFU mode                                                                              | Not applicable                                         |
| Chunked media                      | Opt-in                                               | No                                                                    | No                                                        | No                                                                                              | No                                                     |
| Network rate adaptation            | Browser controlled                                   | Fixed OBS rate; no browser congestion controller                      | Mostly configured rate; app warnings and refresh controls | Fixed by default; newer builds offer opt-in REMB control for dynamic OBS encoders and the pacer | Requests REMB target                                   |

### Retransmission form matters

OBS WHIP and Game Capture use libdatachannel's `RtcpNackResponder`. It caches sent RTP packets and resends the original packet, with its original payload type and sequence number, after a NACK. Newer Ninja OBS Plugin builds use their own bounded original-packet cache so repairs can pass through the same scheduler as live media. None of these native publishers add an associated RTX codec or separate RTX SSRC.

That original-packet retransmission is valid for receivers that accept a late duplicate, but it is not the same negotiated repair stream used by browser-to-browser RTX.

## OBS Studio native WHIP output

OBS Studio's `obs-webrtc` WHIP output sends one OBS program feed to a WHIP endpoint. The endpoint may then expose it to VDO.Ninja viewers or distribute it through an SFU.

### What it implements

* H.264 and AV1 video, with optional HEVC in compatible builds.
* Opus audio.
* Video payload fragmentation around 1200 bytes.
* A 4000-packet video NACK cache, documented in the source as roughly three seconds at 8.5 Mbps.
* Original-RTP retransmission after video NACK.
* An RTP pacing handler configured at roughly ten times the selected OBS bitrate, intended to smooth packet batches rather than enforce the media rate.
* B-frames disabled and repeated headers enabled by the WHIP service.
* STUN/TURN discovery from WHIP endpoint `Link` headers.
* WHIP trickle ICE, including the implementation's negotiated reverse-candidate extension.

### What it does not implement

* A separate RTX payload/SSRC.
* Video RED, ULPFEC, or FlexFEC.
* Chunked mode.
* Browser-style congestion control that dynamically lowers the OBS encoder rate.
* A PLI callback that forces the OBS encoder to emit an immediate keyframe.
* Receive-side playback, jitter buffering, or decode recovery.

The video SDP advertises NACK and PLI feedback, but the current output chain wires a NACK responder and no PLI-to-encoder handler. Unrepairable video therefore waits for OBS's next scheduled keyframe.

The audio chain includes a packet cache, but the Opus SDP does not advertise audio NACK. It normally relies on Opus concealment/FEC behavior instead. The plugin requests the standard Opus FEC format parameter, but it does not configure the OBS Opus encoder's packet-loss controls itself.

### How to use it safely

1. Select **WHIP** in OBS **Settings > Stream**.
2. Enter the VDO.Ninja WHIP endpoint and stream token required by that service.
3. Use H.264 unless the entire server and viewer path was verified with AV1 or HEVC.
4. Set the OBS keyframe interval to one or two seconds.
5. Keep B-frames at zero; the WHIP service also enforces this.
6. Start below the measured sustained upload rate.
7. Enable OBS automatic reconnect so a stopped output can establish a fresh WHIP session.

For complex 1080p gameplay, 4.5-6 Mbps at 30 fps is a reasonable test only when the uplink can continuously sustain substantially more. On a weaker link, test 720p30 around 2.5-4 Mbps. Lowering bitrate is more useful than selecting a slower CPU preset that overloads the machine.

TURN behavior is controlled by the WHIP endpoint's ICE-server response. The OBS UI for this output does not provide the same VDO.Ninja URL-level `&relay` and `&tcp` controls.

### Pros

* Large video resend history compared with the other native publishers here.
* Direct use of the OBS encoder and program output.
* Modern WHIP ICE discovery and trickle behavior.
* No browser capture tab.

### Cons

* Publish-only.
* Fixed encoder rate can keep overdriving a congested path.
* No proactive video repair.
* No immediate encoder keyframe on PLI in the reviewed output.
* Recovery after a hard failure is a new WHIP session, not an in-place media ICE restart.

## Game Capture

Game Capture is a native Windows capture and VDO.Ninja publisher. It uses VDO.Ninja signaling and creates direct libdatachannel peer connections rather than publishing through WHIP.

### Defaults and controls

The current UI defaults to:

* 1920x1080 at 60 fps;
* H.264;
* 12000 kbps;
* Direct STUN;
* ten viewers;
* a 640x360 lower-quality room tier enabled.

The ICE menu offers:

* **Direct STUN (Recommended)**
* **Auto with TURN fallback**
* **Relay Only**
* **Host Only (LAN)**

The bitrate presets are 20000, 12000, 6000, and 3000 kbps, plus custom.

Those defaults target a strong local machine and network. They are aggressive for Wi-Fi, cellular, or an older CPU. For remote Fortnite capture, 720p30 at 3000-6000 kbps is the first native-app A/B test; increase only after the full route stays clean.

### Video recovery

H.264, H.265, and AV1 paths provide:

* a 512-packet original-RTP NACK cache;
* PLI handling that asks the encoder for a keyframe;
* a normal encoder GOP default of 60;
* no B-frames and low-latency encoding;
* a global keyframe request about every 2500 ms;
* warnings after repeated PLI bursts.

At a high bitrate, a 512-packet cache covers a short time interval. It is much smaller than the 4000-packet OBS WHIP cache.

The VP9 path is different:

* custom RTP packetization does not attach the H.264/H.265/AV1 NACK and PLI handler chain;
* the default external VP9 command uses all keyframes;
* all-keyframe VP9 recovers immediately at the next frame but costs much more bitrate and CPU;
* custom `-g 30 -keyint_min 30` reduces that cost but increases recovery time.

### Audio recovery

Game Capture sends 10 ms Opus frames. Short packets reduce the duration of one lost packet, at the cost of more packets and headers.

The SDP advertises Opus in-band FEC, but the current Opus encoder setup configures bitrate and constant rate without enabling the libopus in-band-FEC or expected-loss controls. As a result, the advertised FEC should not be counted as active encoder protection in the current implementation.

There is no audio RED and no normally negotiated audio NACK.

### Connection recovery

* Signaling reconnects indefinitely with delays increasing from one second to a ten-second cap.
* A director refresh or ICE-restart request rebuilds the peer connection with fresh ICE credentials.
* The app keeps a disconnected peer briefly for ICE recovery.
* A hard-failed peer is removed.
* If a default Direct STUN peer fails, the app fetches TURN servers and changes later/rebuilt connections to Auto. It does not guarantee that the already failed peer recovered in place.

### Pros

* Direct window, game, audio, and Spout2 capture.
* Hardware codec choices and a shared encode for multiple peers.
* PLI-to-encoder recovery on the main codec paths.
* Explicit STUN, Auto, Relay, and LAN modes.
* Lower-quality room tier reduces routine monitor traffic.

### Cons

* The 1080p60/12 Mbps default needs a strong path.
* Per-viewer direct upload still grows with viewer count.
* No RTX stream, video RED, or video parity.
* Current Opus FEC advertisement does not match encoder activation.
* VP9's all-keyframe default trades very high repairability for bitrate and CPU.
* Current telemetry does not report real NACK and RTT values as completely as browser stats.

## Ninja OBS Plugin

The Ninja OBS Plugin has two distinct roles:

* a native VDO.Ninja publisher output;
* a VDO.Ninja source whose default receive mode is an internal browser source, with an experimental native receiver option.

Do not treat the browser-backed and native receive paths as the same implementation.

### Native publisher defaults

The current publisher defaults are:

* H.264 video;
* Opus audio;
* 4000 kbps;
* ten viewers;
* data channel enabled;
* automatic signaling reconnect enabled;
* built-in Google and Cloudflare STUN;
* no TURN unless custom ICE settings supply it;
* Force TURN off.

The OBS service disables B-frames, repeats headers, and clamps the keyframe interval to no more than two seconds while preserving a tighter user setting.

### Native publisher recovery

Plugin v1.1.60 and later provide **Packet Duplication (Experimental)**, **Audio RED (Experimental)**, and **Adaptive Bitrate from REMB (Experimental)**. The older 512-packet direct NACK responder and transitional approximately ten-times-rate pacer are not the current implementation.

The three settings are not one combined FEC switch:

| Behavior                                                | Active with protection `Off`? | Purpose                                                                         |
| ------------------------------------------------------- | ----------------------------- | ------------------------------------------------------------------------------- |
| Video NACK and original-packet retransmission           | Yes                           | Reactive repair after a viewer reports a missing RTP sequence number            |
| Frame-aware RTP pacing and whole-frame queue protection | Yes                           | Avoid keyframe bursts, audio starvation, and deliberately partial frames        |
| PLI/FIR handling and two-second keyframe clamp          | Yes                           | Bound decoder recovery when packet repair is not possible                       |
| Packet Duplication                                      | No; default-off               | Proactively send selected video RTP packets a second time                       |
| Audio RED                                               | No; default-off               | Carry one previous Opus frame with the current frame when negotiated            |
| Adaptive Bitrate from REMB                              | No; default-off               | Reduce a supported OBS encoder before persistent congestion collapses the route |

`Off` therefore means **no proactive duplicate video traffic**. It does not disable NACK, pacing, PLI, or the keyframe limit.

The newer publisher uses:

* a video original-RTP cache bounded by 2048 packets, 4 MiB, and two seconds;
* paced NACK repair with a separate repair allowance and a 500 ms deadline;
* a frame-aware token-bucket pacer at approximately twice the encoder rate, with two-millisecond scheduling and a small shared fan-out burst allowance;
* whole-frame admission and queue relief rather than deliberate partial-frame transmission;
* RTP sequence-number reclamation when an assigned but entirely unsent queue tail is discarded;
* a gate that refuses dependent frames after a known local frame loss or incomplete transmission until a complete live keyframe has been sent;
* a cached latest keyframe for a newly connected decoder only;
* RTCP and scheduler telemetry for NACK, cache hits/misses, repair, PLI/FIR, receiver reports, loss, jitter, RTT, REMB, keyframes, queue delay, and drops;
* a rebuilt peer connection for requested ICE restart;
* exponential signaling reconnect from one to 30 seconds.

Dropping a whole frame and gating its dependent frames avoids knowingly feeding an unusable GOP to the decoder. The visible tradeoff after a confirmed local loss is a freeze until the next complete live keyframe. Discarding an unsent tail does not intentionally create an RTP sequence gap for the receiver to NACK.

OBS does not expose a reliable on-demand encoder keyframe API to this output. A PLI from an already synchronized viewer therefore keeps the current live stream flowing while the viewer waits for the next scheduled IDR; it does not replay a stale cached keyframe or intentionally suppress healthy deltas. A confirmed publisher-side frame failure still keeps its safety gate closed. The two-second keyframe clamp bounds the normal wait for the next live IDR.

The publisher does not emit an RTX stream or negotiated video RED, ULPFEC, or FlexFEC. Newer builds instead offer these default-off protection controls:

* **Packet Duplication — Low** duplicates keyframe packets with up to 20% best-effort extra video traffic.
* **Packet Duplication — Medium** duplicates keyframes and one quarter of delta packets with up to 50% best-effort extra traffic.
* **Packet Duplication — High** can duplicate every video packet with up to 100% best-effort extra traffic.
* **Audio RED** negotiates RFC 2198 and carries the current and previous Opus frame when the individual viewer accepts RED; other viewers receive ordinary Opus.

Copies are delayed, paced, lower priority than live media, and allowed to expire instead of extending the live queue. Packet duplication is not RTP RED or parity FEC. Its bandwidth limits are additional to the configured encoded-video target, so include them in the route and fan-out budget. The audio path does not normally negotiate audio NACK, and actual Opus in-band FEC still depends on the OBS encoder.

#### Choosing a Packet Duplication mode

| Mode       | Selected packets                                    | Best-effort extra video traffic | Practical use                                                          |
| ---------- | --------------------------------------------------- | ------------------------------- | ---------------------------------------------------------------------- |
| **Off**    | None; automatic NACK still operates                 | None while the route is clean   | Default and first test                                                 |
| **Low**    | Every keyframe packet                               | Up to 20%                       | Isolated loss damages keyframes, with limited spare upload             |
| **Medium** | Every keyframe packet and every fourth delta packet | Up to 50%                       | Measured random loss remains after bitrate is brought below capacity   |
| **High**   | Every video packet can receive one copy             | Up to 100%                      | Controlled testing with enough capacity to nearly double video traffic |

`High` is the closest mode to “send every packet twice.” It never schedules more than one optional copy of a packet. The scheduler has a small internal High-mode packetization allowance so copies selected near keyframe bursts can still meet their deadline; this is pacing headroom, not a third transmission.

Each copy retains the primary packet's RTP payload, timestamp, SSRC, and sequence number. It becomes eligible 15 ms after the primary was sent and expires after 250 ms. Copies use only idle live-media capacity and remain below NACK repair in scheduler priority. These details make the feature best-effort duplicate delivery, not negotiated RTX, RED, ULPFEC, or FlexFEC.

Direct peer-to-peer fan-out multiplies this cost. A 4 Mbps publisher with three full-quality viewers is already roughly 12 Mbps of video upload before audio, RTP/DTLS overhead, NACK repairs, and protection traffic. High duplication can approach another 12 Mbps. Extra traffic cannot create capacity on a saturated uplink.

#### Audio RED versus Opus FEC

The plugin's **Audio RED** option offers RFC 2198 RED alongside normal Opus. If an individual viewer selects the RED mapping, the current RED RTP payload contains the current Opus generation and, when available, one previous Opus generation. A viewer that declines the mapping receives plain Opus, so fallback is per peer.

This is different from Opus in-band FEC. Opus FEC is generated inside the encoder and encodes information about an earlier frame into a later Opus frame. RFC 2198 RED wraps already encoded payload generations outside the encoder. The plugin does not configure OBS's Opus packet-loss percentage, so do not infer active Opus in-band FEC merely from the plugin's Audio RED setting.

#### Why video RED/ULPFEC is not offered

The plugin and its libdatachannel media-handler path do not contain a video ULPFEC or FlexFEC generator. Advertising `red` and `ulpfec` payload types in SDP would therefore negotiate labels without producing valid parity repair packets.

There is also a specific H.264-with-NACK constraint in the browser stack. Current libwebrtc sender logic disables RED/ULPFEC when NACK is enabled for payloads such as H.264 that lack the picture-ID behavior used to skip unnecessary FEC retransmission. In that combination, FEC packets can themselves need retransmission, reducing the value of the added bandwidth. This is not proof that every browser receiver rejects correctly generated H.264 FEC, but it is why an SDP capability list is not recovery evidence.

A shippable implementation requires a native generator, correct payload/SSRC/sequence and pacing behavior, safe per-viewer fallback, and induced-loss tests proving decoded-frame recovery in supported Chromium, Firefox, and WebKit receivers. FlexFEC is the preferred future H.264 candidate because libwebrtc's H.264-with-NACK ULPFEC restriction does not apply to FlexFEC. Until those tests pass, **Packet Duplication** is the accurate product label.

Browser URL options such as `&vred` and `&pvred` are separate VDO.Ninja browser negotiation preferences. They do not enable the plugin's packet duplication settings and cannot make the native plugin publisher generate ULPFEC.

Adaptive bitrate is also default-off. When enabled with a dynamically adjustable OBS encoder, it uses the lowest fresh REMB estimate across the connected viewers, applies conservative staged changes to both the encoder and pacer, enforces a configured floor, and restores the original bitrate when publishing stops. Unsupported encoders fail closed instead of being repeatedly reconfigured.

### TURN and fan-out

Enter custom STUN/TURN servers in the plugin's advanced ICE field. Enable **Force TURN** only when that list contains a working TURN server. Custom ICE settings replace the built-in STUN defaults.

The publisher creates direct peers. Its output bitrate is therefore approximately multiplied by the number of full-quality viewers. Use an SFU-capable browser or WHIP workflow when direct fan-out is the limiting factor.

### Browser-backed receiver

The normal VDO.Ninja Source mode is the browser-backed receiver. It inherits the browser application's normal codec, jitter-buffer, NACK/RTX, PLI, and chunked receive behavior. This is the compatibility default.

### Experimental native receiver

The native receiver supports:

* H.264 or VP9 video;
* Opus audio;
* optional dual-track VP9 alpha;
* receiver reports and REMB target requests;
* PLI at connection, track replacement, and video decoder failure;
* RTX payload normalization when an associated RTX codec was offered;
* hardware decode with software fallback;
* five-second peer recovery requests;
* 15-second, 45-second, then 180-second view-request backoff;
* one-to-30-second signaling reconnect.

Important limitations in the reviewed native receive path:

* Its `RtcpReceivingSession` records loss for receiver reports but does not generate NACK.
* RTX normalization allows an RTX packet to be decoded if one arrives, but this receiver does not itself request the missing packet by NACK.
* It recognizes video RED packets only to extract the primary payload; it does not use the redundant blocks for repair.
* It has no explicit RTP reorder/jitter buffer in the plugin receive path.
* It assembles and submits received frames, then requests a keyframe when the decoder reports damage.

This means the native receiver's main response to unrepaired video loss is PLI and decoder reset, not packet-level recovery. On a lossy route, the browser-backed source is the stronger default unless native alpha or another native-only feature is required.

### Pros

* Integrated OBS publisher and receiver workflow.
* Frame-aware publisher pacing, paced NACK repair, whole-frame relief, and decoder-safe local-loss gating.
* Detailed per-interval loss, repair, keyframe, audio-continuity, and scheduler telemetry.
* Default-off paced packet duplication, negotiated audio RED, and conservative REMB adaptation in newer builds.
* Automatic signaling reconnect and peer rebuild support.
* Native receiver supports H.264, VP9, Opus, and dual-track alpha.
* Browser-backed receive mode preserves the broad VDO.Ninja feature set.

### Cons

* Direct native publisher fan-out multiplies upload.
* No publisher RTX stream, negotiated video RED, or video parity.
* PLI cannot force the OBS encoder immediately.
* Direct fan-out and opt-in protection traffic still require explicit upload headroom.
* Native receiver does not generate NACK or recover RED redundant blocks.
* Native receiver is experimental and has less jitter/loss handling than the browser path.

## Interoperability recipes

### OBS WHIP to VDO.Ninja

Use:

* H.264;
* one-to-two-second keyframes;
* no B-frames;
* repeated headers;
* a bitrate with substantial route headroom;
* OBS auto reconnect;
* a WHIP endpoint that returns suitable STUN/TURN servers.

Do not expect VDO.Ninja's browser URL flags for video RED, chunked reliability, automatic relay selection, or Meshcast to reconfigure the native OBS publisher. They apply to VDO.Ninja pages, not to OBS's native output.

### Game Capture to browser viewers

Start with:

* H.264;
* 1280x720 at 30 fps on a questionable link;
* 3000 or 6000 kbps rather than 12000;
* Direct STUN for the lowest latency;
* Auto with TURN fallback when restrictive networks cause connection failure;
* the 640x360 room tier for non-program monitoring.

Use the app or director refresh after a failed direct peer has switched later connections to TURN-capable Auto mode.

### Ninja publisher to browser viewers

The 4000 kbps H.264 and two-second keyframe defaults are a reasonable starting point. Add a custom TURN server and **Force TURN** only for an actual routing or NAT problem. Watch newer builds' 30-second `Publish:` summaries for:

* encoded keyframe cadence and size versus the largest paced batch;
* pacer queue size, delay, whole-frame drops, and send errors;
* NACK requests, cache hits/misses, paced repairs, and repair expiry;
* PLI/FIR, receiver-reported loss, jitter, RTT, and REMB;
* packet-duplication and audio-RED activity;
* audio timestamp anomalies.

Pacer or global-media-queue drops identify a publisher-side loss event. NACK/cache-miss/late-repair growth with zero local drops points instead to transport loss or insufficient recovery time. REMB persistently below the configured rate suggests lowering the fixed bitrate, reducing viewer fan-out, or testing the opt-in adaptive mode.

Packet duplication and audio RED can be A/B tested without first proving that congestion is absent. They are still extra traffic: compare the same route and total fan-out with protection off and on, and stop or reduce protection if it raises loss, delay, repair expiry, or pacer pressure.

### Browser publisher to Ninja native receiver

Use H.264 for the safest native path. Keep NACK and PLI enabled on the browser publisher, but remember that the current native receiver sends PLI rather than NACK. A one-to-two-second publisher keyframe cadence limits visible damage.

Do not rely on video RED redundancy or chunked mode with the native receiver. Use the plugin's browser-backed source for those browser features.

## How to test recovery rather than guess

Change one layer at a time:

1. Establish a clean RTP baseline.
2. Add random loss without changing bitrate.
3. Test a lower bitrate.
4. Test a shorter keyframe interval.
5. Test RED/FEC separately.
6. Test forced TURN on the same route.
7. Test SFU fan-out separately from direct peers.
8. Test chunked mode at an explicitly recorded playout delay.

On Linux, a simple reproducible egress test is:

```bash
sudo tc qdisc replace dev IFACE root netem delay 50ms loss random 10%
```

Remove it after the run:

```bash
sudo tc qdisc del dev IFACE root
```

Replace `IFACE` with the exact test interface. This command adds 50 ms on that interface's egress; applying shaping in both directions changes the resulting RTT. Use a disposable test host or namespace and verify the selected interface before applying it.

Run at least:

| Test          | Loss                   | Added delay    | Purpose                                                  |
| ------------- | ---------------------- | -------------- | -------------------------------------------------------- |
| Clean         | 0%                     | 0 ms           | Encoder and baseline quality                             |
| Mild random   | 2%                     | 50 ms          | Normal NACK/RTX behavior                                 |
| Severe random | 10%                    | 50 ms          | Repair overhead and decoder stability                    |
| High RTT      | 10%                    | 300 ms         | Retransmission deadline and buffer behavior              |
| Burst         | 20-30% for 2-5 seconds | 250-400 ms RTT | Queue relief, watchdog, keyframe, and reconnect behavior |

Record:

* exact push and view URLs;
* codec, resolution, FPS, target and actual bitrate;
* packet loss, jitter, RTT, NACK, retransmission, PLI, and keyframe counters;
* selected candidate type and TURN server;
* encoder overload and dropped frames;
* time until a clean decoded frame returns;
* audio gaps, robotic artifacts, and recovery time;
* chunked buffer target/level/delta, parity repairs, NACKs, queue relief, and rebuffer events.

The selected candidate pair is the source of truth for whether the active connection is direct or relayed.

## Reading the result

| Observation                                            | Likely conclusion                                                          |
| ------------------------------------------------------ | -------------------------------------------------------------------------- |
| Lower bitrate fixes both loss and corruption           | The path was congested; extra redundancy would probably have made it worse |
| Forced TURN fixes it                                   | The direct route or NAT path was the problem                               |
| Forced TURN is worse                                   | The relay added RTT, congestion, or a poorer route                         |
| NACK rises but retransmission arrives before decode    | Reactive repair is working                                                 |
| NACK rises and PLI still rises                         | Resends are late, absent, outside cache, or insufficient                   |
| Audio RED helps and total traffic remains stable       | Proactive audio redundancy fits the available headroom                     |
| RED negotiation changes but traffic and outcome do not | The runtime likely did not send useful repair data                         |
| Short keyframes clear corruption but cause new loss    | The link lacks headroom for the keyframe bursts                            |
| SFU fixes multi-viewer instability                     | Publisher fan-out was the bottleneck                                       |
| Chunked mode is smooth only with a larger buffer       | The route needs more recovery time than low-latency RTP allows             |
| Local recording is damaged too                         | Capture or encoder problem, not transport recovery                         |

## Practical decision order

For most productions:

1. Fix encoder overload.
2. Put the media bitrate below sustained capacity.
3. Leave NACK, RTX, PLI, and Opus FEC enabled.
4. Set a sensible keyframe interval.
5. Add modest viewer buffering if latency permits.
6. A/B test a different route with TURN.
7. Use an SFU when publisher fan-out is the constraint.
8. A/B test audio RED, browser video RED, or native packet duplication with an explicit total-traffic budget; this test need not wait for a perfect congestion diagnosis.
9. Use chunked mode when a larger latency budget and narrower compatibility are acceptable.
10. Keep a local recording for outages that no live transport can cross.

## Related guides

* [Video bitrate for push/view links](/guides/video-bitrate-for-push-view-links)
* [Diagnosing problems with the stats panel](/guides/stats-menu/troubleshooting)
* [Stable IRL streaming](/guides/irl-streaming-stability)
* [Recommended OBS WHIP settings](/guides/obs-whip-output-settings)
* [Using the Ninja OBS Plugin with VDO.Ninja](/guides/using-ninja-obs-plugin-with-vdo.ninja)
* [Using Game Capture and Spout2 with VDO.Ninja](/guides/using-game-capture-with-vdo.ninja)
* [Chunked-mode parameter guide](/advanced-settings/settings-parameters/and-chunked)
* [Video RED parameter guide](/advanced-settings/video-parameters/vred)

## Protocol references

* [RFC 4585: RTP feedback, NACK, and PLI](https://www.rfc-editor.org/rfc/rfc4585)
* [RFC 4588: RTP retransmission payload format](https://www.rfc-editor.org/rfc/rfc4588)
* [RFC 2198: RTP redundant payloads](https://www.rfc-editor.org/rfc/rfc2198)
* [RFC 5109: Generic RTP forward error correction](https://www.rfc-editor.org/rfc/rfc5109)
* [RFC 6716: Opus](https://www.rfc-editor.org/rfc/rfc6716)
* [RFC 8656: TURN](https://www.rfc-editor.org/rfc/rfc8656)
* [libwebrtc video sender RED/ULPFEC and FlexFEC selection](https://chromium.googlesource.com/external/webrtc/+/master/call/rtp_video_sender.cc)
* [libwebrtc video receiver RED/ULPFEC path](https://chromium.googlesource.com/external/webrtc/+/master/video/rtp_video_stream_receiver.cc)
* [RFC 9725: WHIP](https://www.rfc-editor.org/rfc/rfc9725)


# Ninja VST3 Plugin

Windows VST3 plugin for VDO.Ninja audio workflows, including audio input and audio output use inside supported DAWs.

The Ninja VST3 Plugin is a Windows audio plugin for using VDO.Ninja inside supported DAWs and audio-routing workflows. It is intended for audio-only use cases, such as sending or receiving VDO.Ninja audio inside Reaper or other VST3-capable tools.

## Link

* <https://steveseguin.github.io/Ninja-VST3-Plugin/>

## Key features

* audio input or audio output support
* intended for DAW and audio-routing workflows
* tested with Reaper

## Notes

* Windows-only for now
* reported to work with Reaper, but not Audacity
* audio-only; not a video plugin


# Social Stream Ninja

Consolidate your live social messaging streams, including YouTube, Twitch, and more, into a single chat stream that can be docked into OBS

{% embed url="<https://socialstream.ninja>" %}
<https://github.com/steveseguin/social_stream#readme>
{% endembed %}

Consolidate your live social messaging streams, including YouTube, Twitch, and more, into a single chat stream that can be docked into OBS and be used to to select featured chat messages as an overlay.

Very much like Chat Overlay Ninja, except is purely for live chat and has a focus on consolidation of chat messages, instead of just featured chat. Has many features and supported sites at this point.

Get support on the Discord if you have any problems: [💬│social-stream-ninja](https://discord.gg/6Wbu848w94)

![](/files/HxI8uyFWp80PtJuJNeyr)

## Standalone App

I'm putting out a "still-in-development preview" version of the **Social Stream Standalone App**

[**https://github.com/steveseguin/social\_stream/releases**](https://github.com/steveseguin/social_stream/releases)\
\
I've been poking at this project for the past year, and due to frequent requests for it I'm making it available as a preview-build.

I'd say 90% of the features available in the extension work in this standalone version, with the interface about 50% done.

Available as an installer for Windows x64 and macOS.

<figure><img src="/files/fBo2cyrd17MaStobAS21" alt=""><figcaption></figcaption></figure>

## Updates

{% content-ref url="/pages/B5C5iz9iTX3CDQvNoxyG" %}
[Updates - Social Stream & Chat Overlay](/updates/updates-social-stream-and-chat-overlay)
{% endcontent-ref %}

{% content-ref url="/pages/3pszCIk1KXkWuwprLwR2" %}
[Updates - Social Stream Standalone App](/updates/updates-social-stream-and-chat-overlay/updates-social-stream-standalone-app)
{% endcontent-ref %}


# Documentation reference

This is a snapshot of the Social Stream documentation, taken Aug. 16, 2023

For the newest and most up-to-date copy of the Social Stream documentation, please visit: <https://github.com/steveseguin/social_stream>. This article won't be kept as up-to-date, but should cover the basics; it is provided here as a consolidated resource for our LMM AI support bot to learn from.

Chronologically Updates are here:

{% content-ref url="/pages/B5C5iz9iTX3CDQvNoxyG" %}
[Updates - Social Stream & Chat Overlay](/updates/updates-social-stream-and-chat-overlay)
{% endcontent-ref %}

## Social Stream

Consolidate your live social messaging streams

[Jump to Download and Install instructions](https://github.com/steveseguin/social_stream/blob/main/README.md#to-install)

* Supports live automated two-way chat messaging with Facebook, YouTube, Twitch, Zoom, and dozens more
* Includes a "featured chat" overlay, with messages selectable via the dockable dashboard; auto or manual selection.
* Supports bot-commands and automated chat responses, with custom logic supported via scriptable plugin file.
* Text-to-speech support, along with many other niche features supported.
* Multi-channel source-icon support, so you can differentiate between different streams and creators
* No user login, API key, or permission needed to capture the chat messages from most sites and services.
* Queuing of messages for later highlighting
* Free community support at <https://discord.socialstream.ninja>

Social Stream makes use of VDO.Ninja's data-transport API to stream data securely between browser windows with extremely low latency and all for free!

![image](https://user-images.githubusercontent.com/2575698/148505639-972eec38-7d8b-4bf3-9f15-2bd02182591e.png) ![image](https://user-images.githubusercontent.com/2575698/148505691-8a08e7b0-29e6-4eb5-9632-9dbcac50c204.png)

#### Supported sites:

* twitch.tv - pop out chat to trigger
* YouTube Live - pop out the chat to trigger (studio or guest view); or add \&socialstream to the YT link
* YouTube Static Comments - click SS in the top right corner of Youtube, then select the message you wish to publish inside the YT comment section via the new buttons there.
* Facebook Live - guest view, publisher view, or the producer's pop-up chat on the web is supported.
* workplace.com - (same setup as Facebook)
* zoom.us (web version)
* Owncast demo page (`watch.owncast.online`, or for a pop-out chat version, open `https://watch.owncast.online/embed/chat/readwrite/` )
* crowdcast.io
* livestream.com
* mixcloud.com (pop out chat)
* Microsoft Teams (experimental support)
* vimeo.com (pop out chat page; <https://vimeo.com/live-chat/xxxxxxxxx/interaction/>)
* Instagram Live (instagram.com/\*/live/), css note: `[data.type = "instagramlive"]`
* Instagram post non-live comments (REQUIRES the TOGGLE in menu to enable it), css note: `[data.type = "instagram"]`
* instafeed.me (no pop out; alternative instagram live support)
* TikTok Live (tiktok.com/\*/live)
* Webex Live Chat (not the pop out)
* LinkedIn Events and Live Comments. (works with linkedin.com/videos/live/\* or linkedin.com/videos/events/\* or linkedin.com/events/\*)
* VDO.ninja (pop-out chat)
* Whatsapp.com (REQUIRES the TOGGLE in menu to enable it; use @ <https://web.whatsapp.com> ; fyi, no avatar support)
* discord.com (web version; requires toggle enabled via the settings as well)
* Telegram (web.telegram.org in stream mode; requires toggle enabled)
* Slack (<https://app.slack.com/> ; required toggle enabled to use)
* Google Meet ; required toggle enabled to use
* ![Requires toggling to enable certain integrations](https://user-images.githubusercontent.com/2575698/178857380-24b3a0fc-bf86-4645-91ec-24893df19279.png) telegram, slack, whatsapp, discord require an extra step to enable. See this video for more help: <https://www.youtube.com/watch?v=L3l0\\_8V1t0Q>
* restream.io chat supported (<https://chat.restream.io/chat>)
* amazon.com/live
* wix.com (<https://manage.wix.com/dashboard/_/live-video/>\_)
* clouthub (no pop out; just the video page)
* rumble.com (pop out chat)
* trovo.live (open the chat pop-up page; ie: <https://trovo.live/chat/CHANNEL\\_NAME\\_HERE>)
* theta.tv (pop-out chat; <https://www.theta.tv/chat/xxxxxxxxxxxxxxx>)
* Dlive.tv (pop-out chat)
* Picarto.tv (pop-out chat; ie: <https://picarto.tv/chatpopout/CHANNELNAMEHERE/public>)
* Mobcrush (this page: <https://studio.mobcrush.com/chatpopup.html>)
* vimm.tv (<https://www.vimm.tv/chat/xxxxxxxxx/>)
* odysee.com (via the pop out chat I think)
* minnit.chat support (<https://minnit.chat/xxxxxxxxxxx?mobile\\&popout>)
* livepush.io (chat overlay link provided; no input field support?)
* piczel.tv (pop out chat @ <https://piczel.tv/chat/xxxxxxxxx>)
* bilibili.tv added (just regular view page /w chat; no pop out)
* Amazon Chime (<https://app.chime.aws/meetings/xxxxxxxxx>)
* Locals.com (no pop out needed)
* Nimo.TV (pop out chat, ie: <https://www.nimo.tv/popout/chat/xxxx>)
* kick.com (pop out chat)
* quickchannel.com (<https://play.quickchannel.com/\\>\*)
* rokfin.com (<https://www.rokfin.com/popout/chat/xxxxxx?stream=yyyyyy>)
* sli.do (<https://app.sli.do/event/XXXXXXXXXXXXXX/live/questions>)
* cbox.ws (no pop out needed)
* castr.io (<https://chat.castr.io/room/XXXXXXXX>)
* tellonym.me
* peertube (triggers on: https\://\*/plugins/livechat/*router/webchat/room/*)
* IRC (via <https://webchat.quakenet.org/>)
* Tradingview\.com (just the normal viewer page; no pop out)
* rooter.gg (no pop out; just pause the video I guess)
* loco.gg (no pop out; just pause the video I guess)
* joystick.tv (+18, pop-out chat, ie: <https://joystick.tv/u/USERNAMEHERE/chat>)
* buzzit.ca (community member submitted integration)
* afreecatv.com (pop out the chat; you can't close the main window it seems tho?)
* nonolive.com (no pop out; partial support added so far only)
* xeenon.xyz
* stageTEN.tv
* vkplay.live (pop out chat)
* arena.tv (no pop out chat support, so just pause the video I guess)
* bandlab.com (no pop out, so just pause the video I guess while chat open)
* threads.net (a little funky star icon, right of the share icon, will select thread to push to dock)
* floatplane.com (pop out chat; gotta keep the main window still open though? annoying..)
* OpenAI chatGPT chat - (via <https://chat.openai.com/chat>). You must opt-in via the toggle for this though
* live.space (Just open the basic watch page, OR, open the pop up chat @ <https://live.space/popout-chat/XXXXXXXXX>)
* vstream.com (pop out chat)
* estrim - live video chat supported
* livestorm.io (open the 'external sidebar', which might be a plugin, and it should capture that)\
  \
  ... and likely many many more. Even more on request

**Chat graveyard 🪦🪦🪦**

Past supported sites that have ceased to exist.

* 🪦 omlet.gg (RIP June 2023)
* 🪦 glimesh (RIP July 2023)

  (it's the effort that counts, guys; may your code live on in our ai llm bots forever)

#### Adding sites yourself

I have a video walk-thru on how I added a simple social site to Social Stream:

{% embed url="<https://youtu.be/5LquQ1xhmms?si=j6-FWJbe_GkvZhQ1>" %}

You can also refer to some of my code commits, where you can see which changes I made to add support for any specific site.

i.e.: `https://github.com/steveseguin/social_stream/commit/942fce2697d5f9d51af6da61fc878824dee514b4`

For a simple site, a developer should need just 30 minutes to an hour to get a site supported. A more complicated and tricky site may take a few hours or longer, depending on the developer's skill.

#### Video walk-thru

An older guide covering the basics of setting up Social Stream:

{% embed url="<https://youtu.be/X_11Np2JHNU?si=DeWtc36ZAvD4PK67>" %}

For a more recent guide focusing on setup for Discord, slack, Whatsapp, and Telegram, see:

{% embed url="<https://www.youtube.com/watch?v=L3l0_8V1t0Q>" %}

#### To install

This extension should work with Chromium-based browser on systems that support WebRTC. This includes Chrome, Edge, and Brave. [Firefox users see here](https://github.com/steveseguin/social_stream#firefox-support).

Currently you must download, extract, and load the browser extension manually. It is not available yet in the browser's web store.

The link to download newest version is here: <https://github.com/steveseguin/social_stream/archive/refs/heads/main.zip>

Once extracted into a folder, you can go here to load it: chrome://extensions/

![image](https://user-images.githubusercontent.com/2575698/142858940-62d88048-5254-4f27-be71-4d99ea5947ab.png)

Ensure you have Developer Mode enabled; then you can just load the extension via the load unpacked button and selecting the folder you extracted the files to.

![image](https://user-images.githubusercontent.com/2575698/142857907-80428c61-c192-4bff-a1dc-b1a674f9cc4a.png)

You're ready to start using it!

Please note also that you will need to manually update the extension to access newer versions; it currently does not auto-update aspects of the extension; just the dock and single overlay page auto-update as they are hosted online.

**Seeing an error message?**

If you see the browser say there is an "Error", specifically a manifest v2 warning or something, you can safely ignore it. It is not actually an error and will not impact the function of the extension.

Something of concern though is Google will be updating Chrome browsers on January 2023 to block many popular Chrome extensions, including many Adblockers and also Social Stream. I'm working to resolve this concern, but Social Stream may end up having diminished functionality if Google has their way. If necessary, Social Stream may evolve into a downloadable app instead to avoid these limitations, but I'm hoping to avoid that if possible.

**Updating**

To update, just download the extension, replace the old files with the new files, and then reload the extension or completely restart the browser. If just reloading the extension, you may then need to also reload any open chat sites that you wish to use Social Stream with.

You can download the newest version here:

{% embed url="<https://github.com/steveseguin/social_stream/archive/refs/heads/main.zip>" %}
Link to the newest version of Social Stream
{% endembed %}

Please note: DO NOT Uninstall the extension if you want to update it. This will delete all your settings. Replace the files, and reload the extension or browser instead. If you MUST uninstall, you can export your settings to disk and reload them after you have reinstalled.

New app integrations do not auto-update; just the overlay and dock page will auto-update. It's suggested you update every now and then manually, or whenever you encounter a bug. I'll try to resolve this issue down the road, perhaps with a standalone desktop app eventually.

**Firefox support**

You have two ways to install the add-on for Firefox.

Please note, neither Firefox option supports two-way message responding, but the dock and featured chat overlay should work. If you want to use the bot commands with auto-responding, please consider using a Chromium-based browser instead.

**First way:**

Download+extract or clone the SocialStream code somewhere.

Go to `about:debugging#/runtime/this-firefox` in Firefox and select Load Temporary Add-on.

Select any file inside the SocialStream folder.

You're done. This is a temporary install and none of the settings made will be persist, including your session ID.

You will still need to manually redo these steps to update when needed, but you can use the newest version of the code.

**Second way:**

(This method hasn't been updated in a while and no longer works probably; you'll need to make your own XPI file to try it)

Go to the release section of this repo and find a release that includes a Firefox XPI file.

<https://github.com/steveseguin/social\\_stream/releases>

Download the XPI file and drag it into an Open Firefox window.

Accept any install pop ups. Storage functions should work with this approach.

You are good to go, but you will need to manually update when needed by recompleting these steps.

Please note: XPI files are currently provided on request or with major updates; XPI file creation hasn't yet been automated. (TODO)

#### To use

Open Twitch or YouTube "Pop out" chat; or just go to your Facebook Live chat while connected to Ethernet or WiFi. You must not minimize or close these windows, but they can be left in the background or moved to the side.

Then, press the Social Stream chrome extension button and ENABLE streaming of chat data. (Red implies disabled. Green is enabled)

![image](https://user-images.githubusercontent.com/2575698/142856707-0a6bc4bd-51b4-4cd0-9fa3-ef5a1adfcbf7.png)

**Please note: If the Extension's icon is RED, then it means it is still off and will not work. You have to click "Enable extension", and the icon must change to the color green.**

Next, using the provided two links, you can manage the social stream of chat messages and view selected chat messages as overlays.

![image](https://user-images.githubusercontent.com/2575698/142935393-4ca90418-a645-45e3-8e37-f4884e16457a.png)

You can hold ALT on the keyboard to resize elements in OBS, allowing you to crop the chat stream if you want to hide aspects like the time or source icon.

Clicking on a message will have it appear in the overlay link. You can press the clear button to hide it or use the `&showtime=20000` URL option added to the overlay page to auto-hide it after 20-seconds (20,000 ms).

![image](https://user-images.githubusercontent.com/2575698/142854951-fe1f34c9-0e24-495f-8bfe-a33ab69fa7cb.png)

There is a `&darkmode` option, but the default is white, for the dock.

![image](https://user-images.githubusercontent.com/2575698/142855585-45c11625-c01c-4cc0-bfe0-cde4aed5fc44.png)

A good resolution for the overlay is either 1280x600 or 1920x600; you can specify this in the OBS browser source. You can edit the style of the overlay using the OBS CSS style input text box. The chat overlay will appear 50-px from the bottom currently, but the height of the chat window can be quite tall; to avoid the name of the overlay being cropped, just make sure you give it enough room.

![image](https://user-images.githubusercontent.com/2575698/142855680-74f6055d-7b79-4e9a-ae7d-909c7f677a24.png)

If using the automated chat response options, like auto-hi, you must ensure the YouTube/Twitch/Facebook chat input options are enabled and that you are able to send a chat message. Manually entering a chat message into the pop-out window or into the Facebook live chat area first can help ensure things are working are intended, else automated message may not be sent.

**Note: If things do not work,**

* Toggle the extension on and off, and reload the pop-out chat window. Ideally the pop-out chat should be visible on screen, as even just a few pixels shown will allow the pop-out chat to work at full-power. Chrome otherwise may throttle performance.
* Open a new dock / overlay link if things still do not work, as the session ID may have changed.
* Ensure that VDO.Ninja works with your browser, as if not, WebRTC may be disabled and so this social stream extension will not work also.
* If using Facebook live chat, please sure you are viewing the page as a "viewer", not as a publisher, and that you are connected to WiFi or Ethernet, and not mobile LTE/4G/5G.
* The auto-responder requires you to be signed in to the social endpoint and that you have access to chat; ensure you accept any disclaimer and try issuing a test message first.
* Try using the extension in Incognito mode or try disabling all other browser extensions, then reloading the browser, and trying again. Many extension types will conflict with SocialStream, causing certain functions to fail.

#### Customize

There are quite a few toggles available to customize functions and styles, but these toggles often just apply URL parameters. You can as a result, just manually apply the parameters yourself, opening up more fine-grain control. A list of some of the options are available below.

To customize the dock, you can use the following options:

* `&lightmode` (Enables the dark-mode for the chat stream)
* `&scale=2` (doubles size/resolution of all elements)
* `&notime` (hides the date in the chat stream)
* `&hidesource` (hides the youtube/twitch/fb icons from the stream)
* `&compact` (Removes the spacing between name and message)
* `&autoshow` (will auto-feature chat messages as they come into the dock at a rate of about 2 per 3 seconds)
* `&attachmentsonly` (will only show image attachments in the dock; the messages will be wiped)

To customize the featured chat overlay, the following URL parameters are available

* `&showtime=20000` (auto-hides selected messages after 20s)
* `&showsource` (shows the YouTube/Twitch/Facebook icons next to the name)
* `&fade` (will have featured messages fade in, rather than pop up)
* `&swipe` (will have featured messages swipe in from the left side)
* `&center` (center featured messages)

To customize the color, font-size and styling, you can edit the CSS, in either the OBS browser source style-sheet section, or by editing the and using the index.html file. See below:

**More advanced styling customizations**

To further customize the appearance of the overlay or dock, you can make CSS style changes via OBS browser source, without any coding.

![image](https://user-images.githubusercontent.com/2575698/153123085-4cf2923e-fce3-40bd-bd66-3ba14a6ab321.png)

```
body { background-color: rgba(0, 0, 0, 0); margin: 0px auto; overflow: hidden; }

:root {
     
     --comment-color: #090;
     --comment-bg-color: #DDD;
     --comment-color: #FF0;
     --comment-border-radius: 10px;
     --comment-font-size: 30px;
     --author-border-radius: 10px;
     --author-bg-color: #FF0000;
     --author-avatar-border-color: #FF0000;
     --author-font-size: 32px;
     --author-color: blue;
      --font-family:  "opendyslexic", opendyslexic, serif;
}

@font-face {
  font-family: 'opendyslexic';
    src: url('https://vdo.ninja/examples/OpenDyslexic-Regular.otf');
    font-style: normal;
    font-weight: normal;
} 

.hl-name{
	padding: 2px 10px
}
```

Sample CSS of which you can use to customize some of the basic styles. There's not much that you can't do via CSS in this way, but you can edit things further at a code-level if needed. Mac/Linux users may face issues with OBS not liking self-hosted versions of the index/dock file, but it's not an issue for the PC version.

**Removing text-outlines**

Try:

```
body {
	text-shadow: 0 0 black;
}
```

#### Changing CSS without OBS

You can also pass custom CSS to the dock and index page via URL parameters using either `&css` or `&b64css`.

`&css=https://youdomain.com/style.css` or `&b64css=YOUR_CSS_CODE_HERE`

You can use this tool to encode the URL you want to link to: <https://www.urlencoder.org/>

For the base64 css option, you can create the base64 encoding using `btoa(encodeURIComponent(csshere))` via the browser's developer console. For example:

`window.btoa(encodeURIComponent("#mainmenu{background-color: pink; ❤" ));`

The above will return the base64 encoded string required. Special non-latin characters are supported with this approach; not just latin characters.

Example of what it might look like: <https://socialstream.ninja/?64css=JTIzbWFpbm1lbnUlN0JiYWNrZ3JvdW5kLWNvbG9yJTNBJTIwcGluayUzQiUyMCVFMiU5RCVBNA>

#### Pre-styled templates / themes

You can try out some stylized chat overlays in the themes folder:

An example of one is available here: <https://socialstream.ninja/themes/pretty.html?session=SESSIONIDHERE>

![image](https://user-images.githubusercontent.com/2575698/193437450-545f7f4c-d5fc-465b-9cfe-d42f82671c51.png)

For anyone who wants to create a custom theme/style/template for their chat stream, you can share them via adding them to this repository as a Pull Request.

**Custom JavaScript**

You can inject a bit of JavaScript into the dock or index pages using `&js={URL ENCODED JAVASCRIPT}`

For example, <https://socialstream.ninja/index.html?session=test123&js=https%3A%2F%2Fvdo.ninja%2Fexamples%2Ftestjs.js>

**Auto responding / custom actions**

You can create your own custom auto-responding triggers or other actions by including a `custom.js` file. You don't need to host the index or dock file for this.

Included in the code is the `custom_sample.js` file, which you can rename to custom.js to get started. Included in it is the `&auto1` trigger, which auto responds "1" to any message that is also "1". You need to add `&auto1` to the dock's URL to activate it.

It's fairly easy to modify the `auto1` trigger to do whatever you want. You can also customize or remove the URL-parameter trigger needed to activate it.

#### Queuing messages

If you hold CTRL (or cmd on Mac), you can select messages in the dock that get added to a queue. A button should appear in the top dock menu bar that will let you cycle through the queue, one at a time. When pressing the Next in Queue button, messages from the queue will appear as featured chat messages in the overlay page.

#### Pinning messages

Like queuing a message, you can also instead hold down the ALT key while clicking a message to pin it; it will stay at the top of the page, until unpinned in the same fashion.

#### Toggleable Menu Commands

These are some generic auto-reply commands that can be toggled on/off via the extension's menu. They do not need a custom.js file to work

* !joke (tells a random geeky dad joke)
* hi (Welcomes anyone who says "hi" into chat)

#### Hotkey (MIDI / Streamlabs) support

There's a toggle to enable MIDI hotkey support. This allows a user to issue commands to the extension when active, such as issue predefined chat messages to all social destinations.

The hotkeys can be issued via MIDI, which can be applied to a Streamdeck also via a virtual MIDI device. The MIDI actions available currently include:

Using Control Change MIDI Commands, on channel 1:

* command 102, with value 1: Say "1" into all chats
* command 102, with value 2: Say "LUL" into all chats
* command 102, with value 3: Tell a random joke into all chats
* command 102, with value 4: Clear all featured chat overlays

![image](https://user-images.githubusercontent.com/2575698/144830051-20b11caa-ba63-4223-80e1-9315c479ebd6.png)

The StreamDeck MIDI plugin can be found in the Streamdeck store pretty easily.

Please note that you will also need a MIDI Loopback device installed if using the StreamDeck MIDI plugin. For Windows, you can find a virtual MIDI loopback device here: <https://www.tobias-erichsen.de/software/loopmidi.html> There are some for macOS as well.

![image](https://user-images.githubusercontent.com/2575698/186810050-c6b026f2-3642-4bed-a3b2-f954b1d5b507.png)

Lastly, please note that you will need to enable the MIDI option in the menu options for it to work, as it is not loaded by default.

![image](https://user-images.githubusercontent.com/2575698/186801053-6319d63e-fe92-42bc-b951-cad4d35753cc.png)

#### Server API support

You can send messages to Social Stream via the hosted server ingest API, and you can also send messages from Social Stream to remote third-parties.

So if you can a donation webhook, you can push those notifications to Social Stream. You can also use a third-party service to overlay messages captured by Social Stream. More below.

**Social Stream's server API (ingest and clear messages via remote request)**

If using the MIDI API isn't something you can use, you can also check out the hosted API service to send messages to SocialStream, which will be redirected to your social live chat sites. This API works with a Stream Deck or custom applications.

This API end point supports WSS, HTTPS GET, and HTTP POST (JSON). Support for this API must be toggled on in the menu settings (or by adding `&server` to the dock.html page).

**A couple common examples**

An overly simple example of how to use the GET API would be: <https://api.vdo.ninja/XXXXXXXXXX/sendChat/null/Hello>, which sends HELLO. Replace XXXXX with your Social Stream session ID. Other options, like `https://api.vdo.ninja/XXXXXXXXXX/clearOverlay` should work, too.

You can use this API to clear the featured-chat, poke the next-in-queue item, and more. It works with WSS or HTTP requests.

**Target specific docks**

You can also target specific docks with your API requests by assigning a target name to each dock.html page using `&label`.

For example, to set a dock with the target name of "NAMEHERE", we'd do: `https://socialstream.ninja/dock.html?session=XXXXXXXXXXXXX&server&sync&label=NAMEHERE`. From there, we can target it with the API format like this: `https://api.vdo.ninja/XXXXXXXXXXXXX/nextInQueue/NAMEHERE/null`. This all may be needed because if you have multiple docks connected to the API interface, you may not want to trigger the same command multiple times in all cases.

**More details**

For details of the commands, see the following link for sample functionality and refer to its source code for examples.

`https://socialstream.ninja/sampleapi.html?session=xxxxxxxxxx` (replacing xxxxxxxx with your Social Stream session ID to have it work)

More functionality can be added on request.

![image](https://user-images.githubusercontent.com/2575698/189367779-67969f47-a305-4347-9a37-053b33479602.png)

**Remote server API support (publish messages to third parties)**

Remote API support is available via dock page, configured by URL parameters. In the future, some support can be added to the extension itself directly, so no dock page needs to be open. You can currently auto-publish messages via the dock with the `&autoshow` parameter, but otherwise messages will be issues to the remote API only when a message is selected manually.

For some images provided in the outgoing data-structure, the assumed host location for certain files/images, if none provided, should be `https://socialstream.ninja/`.

More destinations available on request.

**Singular Live**

`&singular=XXXXXXX` will send selected messages to singular live for featured message overlay. The target address will be: `https://app.singular.live/apiv1/datanodes/XXXXXXX/data`

**H2R**

`&h2r=XXXXXXX` will send selected messages to local H2R server using its POST data structure. The target address will be: `"http://127.0.0.1:4001/data/XXXXXXX`

You can manually set a custom H2R URL though with `&h2rurl` though, which will override the default one.

**Generic POST / PUT**

A generic JSON-POST can be made using `&postserver`, with the address provided `&postserver=https://domain.com/input-source`

A generic JSON-PUT can be made using `&putserver`, with the address provided. There isn't much difference between POST and PUT, but some sites are picky. `&putserver=https://domain.com/input-source`

In these cases, the JSON being delivered is in the Social Stream data-structure.

**Stripe webhook donation support**

If you create a Stripe payment link (eg: <https://donate.stripe.com/YYYYYYYYYYYY>), you can have successful payments show up in Social Stream. This is a great way to collect donations from viewers of your stream without needing to use middleware for payment processing.

To get started, after creating a Stripe payment link, create a Stripe webhook that listens for the event `checkout.session.completed`. Have the webhook point to: `https://api.overlay.ninja/XXXXXX/stripe`, where XXXXXX is your Social Stream session ID. You don't need to worry about the verification signatures or API tokens in Stripe since we won't be verifying the payments. Of course, keep your session ID private as a result, else someone will be able to spoof fake donations to your end point.

If you wish to ask the payer for a name, include a custom field called "Display Name" or "Username" when creating your Stripe payment link. You can also include a field called "Message", which will allow the payer an opportunity to leave a custom message. The donation amount and current type should be dervived from the payment automatically, but some rare exotic currencies may not always show up with the right decimal place -- just keep that in mind.

Lastly, to allow these events to show up in the Social Stream dock, add \&server to the dock URL; this will have the dock start listening for incoming messages from the webhook/api server. You can always test that the workflow is working using Stripe's "Test mode"; just spam 424242.. etc for the credit card number, expiration, cvc, etc, when using the test mode, rather than a valid credit card.

![image](https://github.com/steveseguin/social_stream/assets/2575698/29bab9b6-8fb7-482d-87d1-2b7f2bd74f9f)

![image](https://github.com/steveseguin/social_stream/assets/2575698/3f31974c-6bbb-4ed0-bc7c-4d27f7c3103b)

#### Text to speech

Text messages can be converted to speech, assuming your system supports TTS. On my Windows machine running Chrome/OBS, it works. I have it set to English-US by default, but you can change the language to something else by editing the URL. ()

ie: `index.html?session=XXXXXX&speech=en-US` or `socialstream.ninja/?session=xxx&&speech=en-US`

You can get a list of support languages on your system by running `speechSynthesis.getVoices()` from the Chrome browser console on your system. You can install additional ones fairly easily, if on Windows. See: <https://support.microsoft.com/en-us/windows/download-language-pack-for-speech-24d06ef3-ca09-ddcc-70a0-63606fd16394>

![image](https://user-images.githubusercontent.com/2575698/165753730-374498e7-7885-49ef-83ba-7fe2acde26ee.png)

The audio will play out the default system audio output device. This might be a problem if using OBS for capture, as you'll need to use a virtual audio cable to capture the audio output of the system output and route it back into OBS for capture. Another user mentioned they were able to capture the TTS audio in OBS by selecting `explorer.exe` in the system application recorder. Using the Premium Google-based TTS option (mentioned below) might also be a solution to this issue. See the related issue here: <https://github.com/w3c/mediacapture-output/issues/102>

If loading the app in the Chrome/Edge/Firefox browser, you will need to "click" the web page first before audio will play. This isn't the case with OBS, but most browsers require the user interact with the website on some level before it will play audio. Please keep this in mind when testing things.

There is a toggle in the dock to turn off and on the text-to-speech; turning it off whill automatically stop any audio playout. Still, be careful when using text-to-speech with the dock, as viewers can exploit it to have your system read out unwanted things on air.

**Installing different language-speech packs**

By default, the list of support languages on your computer could be slim. To add more speech options for different languages, you'll need to install them.

see: <https://support.microsoft.com/en-us/windows/download-language-pack-for-speech-24d06ef3-ca09-ddcc-70a0-63606fd16394> for details

There's a simplified test app for text-to-speech here also, that might also help try different languages on the fly: <https://mdn.github.io/dom-examples/web-speech-api/speak-easy-synthesis/>

You can manual set the pitch, volume, rate, and even voice-name with the below URL parameters. The voice just matches on a partial word, so "Siri", "Google", "bob", or whatever is being used will work. This still assumes the language selected also matches. `&speech=en` (first english to match), `&speech=en-US` (default), or `&speech=fr-CA` can specify the language, for example.

```
&pitch=1
&volume=1
&voice=google
&rate=1
```

**Premium TTS voice options**

**GOOGLE CLOUD TTS**

I've added support for Google Cloud Text to Speech API, but you must use your own API key to use this feature, as it is expensive to use.

Go to <https://cloud.google.com/text-to-speech> -> Enable the service, and then get an API key.

![image](https://user-images.githubusercontent.com/2575698/180443408-5cc0f7a9-c015-420d-9541-fd94a520ef25.png)

This premium text-to-speech is supported on the index.html (the featured chat overlay) and dock.html page. If you stop the TTS with the button in the dock's menu, it will stop playback immediately in the dock. It will also delete any queued messages to be spoken.

You need at least \&speech and \&ttskey to enable the premium TTS, but there are customizations:

```
&volume=1
&voice=en-GB-Standard-A
&gender=FEMALE
&speech=en-us
&ttskey=XXXXXXX
```

See the Google Cloud doc for more help

**Eleven Labs TTS**

If you want a different set of voices, or wish to train your own, ElevenLabs.io has a TTS service that you can try. There's a "free" version you can get started testing with, which just needs you to create an account there and get an API key from your profile settings there. You may need to provide attribution as required, for the free tier?

Anyways, documentation on getting start with finding a voice you want to use and testing your API key: API Social Stream is using: <https://api.elevenlabs.io/docs#/text-to-speech/Text\\_to\\_speech\\_v1\\_text\\_to\\_speech\\_\\_voice\\_id\\_\\_stream\\_post> Available voices: <https://api.elevenlabs.io/docs#/voices/Get\\_voices\\_v1\\_voices\\_get>

To use this with Social Stream, you'll need to be using the featured-chat index.html or dock.html page, and you'll need to provide your API key there.

Example URL with options `https://socialstream.ninja/index.html?session=SESSIONIDHERE&tts&elevenlabskey=YOURELEVENLABSAPIKEYHERE&latency=4&voice=VR6AewLTigWG4xSOukaG`

* `&tts` is also required to enable TTS in general
* `&voice={VOICEIDHERE}`, is the voice ID you want to use.
* `&latency={N}`, where N can be 0,1,2,3, or 4. 0 is high latency, but better quality. Default is 4 (fastest)
* `&elevenlabskey={APIKEYHERE}`, don't share this API key, but this is needed to use the service and to specify that you want to use elevenlabs for TTS

If you stop the TTS with the button in the dock's menu, it will stop playback immediately in the dock. It will also delete any queued messages to be spoken.

Please NOTE: Make sure to CLICK on the browser page after it loads, else audio may not work in the browser. Browsers require user-gesture detection before audio can auto-play. OBS Studio's browser source and the Electron Capture app are exceptions to this rule.

#### Branded channel support

There is a toggle that lets you show the source of the chat messages.

* `&branded` will show the channel-icon; YouTube and Twitch channels supported. Use with the dock or index file.
* `&showsource` can be added to the index.file, to show the main site the source is from; ie: YouTube, Facebook.

![image](https://user-images.githubusercontent.com/2575698/166864138-00cd1e1c-2149-473f-be8d-d07a8d400c07.png)

#### Known issues or solutions

* Browsers will sometimes stop browser tabs after an hour of inactivity. Disable this option in your browser under `chrome://settings/performance` or where ever this setting is found.
* Other options that may be active in your browser can be disabled also, to avoid tabs being throttled or paused, such as `chrome://flags/#calculate-native-win-occlusion`
* Another option, if using Windows, is to do Windows + Tab, and have two virtual Desktops on your PC. Put the chat windows into one virtual desktop, and use OBS in the other. Win+Tab can let you switch between windows.

If the auto responder doesn't work -- you see a blue bar, but nothing happens, there's a couple things to do.

* Make sure if using YouTube/Twitch that the pop out window is open
* Go to `chrome://apps` and remove the YouTube(s) apps that might appear. You can remove them all really if none are required.
* Make sure you have permission to post into the chat first -- sometimes you need to be a subscriber for example to send chat messages.

![image](https://user-images.githubusercontent.com/2575698/146602513-e3b7e69c-19fa-4e58-b907-6f08b3f873e0.png)

* If the blue bar warning about Debugging mode is a problem, start Chrome with this command line flag: `--silent-debugger-extension-api`

![image](https://user-images.githubusercontent.com/2575698/196629133-6c06fedb-9f22-40aa-8031-d7f4c681ad95.png)

* If you can't save to disk, like export the settings to disk, ensure your browser allows the `File System Access API`

In Brave, this can be enabled via `brave://flags/#file-system-access-api` ; open that link and enable the setting (then restart)

* If the chat capture stops when you minimize or hide a browser window, disable background throttling within your browser. Instructions as follows:

```
Go to chrome://flags/ (That's a real URL in Chrome, Edge, Brave, and others)

In the search, type "throttle"

You're going to get 3 options, the two labeled "Throttle Javascript timers in background" and "Calculate window occlusion on Windows", probably set as "default" right now, turn them to "disabled"

In the bottom right corner, hit relaunch to relaunch chrome with new settings. Throttling should pause browser tabs or windows when occluded or minimized.
```

* Try refreshing the chat page; sometimes refreshing the page will retrigger the code and bypass any errors. This is particularly try if you install or refresh the extension after the chat page has already been loaded.
* Try to keep the chat window and dock page active and if possible, even partially visible on screen. If the windows are hidden or minimized, they may stop working. This is also true if the scroll bar for the chat window is not at the bottom; sometimes messages won't load unless you are seeing the newest messages.
* If using OBS Studio on macOS or Linux, for some reason this extension will not work if hosted locally on your drive, so custom CSS needs to happen via the browser source style section. It works great on PC locally, and when hosted on SocialStream.ninja, but locally on mac, it does not seem supported. This is an issue you'll need to take up with the OBS developers.
* For discord, slack, and telegram, for security reasons, you need to enable the TOGGLE switch in the settings to enable.
* To set the Session ID to your own value, go to Extensions settings to set it. On Chrome: Settings -> Extensions -> Social Stream Ninja -> Details -> Extension options.

#### Requesting a site

You can make a request here on GitHub as an issue ticket, or join the Discord server at <https://discord.socialstream.ninja> and request there.

Not all requested sites can or will be supported. Steve generally will add support for publicly accessible social chat sites that have a significantly-large community; it's ultimately up to the discretion of Steve though on what he wants to add or has time to add. Code contributions from others that add new site integration or features are normally welcomed, but sites/features that may violate Canadian laws, fail to meet quality standards, or for any other reason, may possibly not be merged or accepted. In these cases you may need to self-host or fork the repo, maintaining your own copy with said changes instead.

There is no guarantee that a site that gets added will continue to be supported over time. Steve also doesn't accept payment for adding an integration or for support.

#### Adding sites yourself

I have a video walk-thru on how I added a simple social site to Social Stream:

{% embed url="<https://youtu.be/5LquQ1xhmms?si=zzMKO2ewoqYOhdCx>" %}

You can also refer to some of my code commits, where you can see which changes I made to add support for any specific site.

i.e.: `https://github.com/steveseguin/social_stream/commit/942fce2697d5f9d51af6da61fc878824dee514b4`

For a simple site, a developer should need just 30 minutes to an hour to get a site supported. A more complicated and tricky site may take a few hours or longer, depending on the developer's skill.

#### Support

You can find me on discord over at <https://discord.socialstream.ninja> or [https://discord.gg/7U4ERn9y](https://discord.gg/vFU8AuwNf3), offering free support in channel #chat.overlay-support

Feedback and feature requests are welcomed. Please also make a GitHub issue if you're not a fan of Discord, but still need to report a bug or feature request.

#### Icons

I do not claim rights of all the icons distributed. While I made some of the icons, trademarks and logos of third party companies/services are the rights of those respective entities. Use them according to the terms that those entities may offer them under.

#### Credit

This project contains inspiration by my other project, chat.overlay.ninja, which was a derivation of another YouTube-specific chat widget, which was inspired by the stylings of other featured-chat code sample, of which that was also inspired by existing chat overlay designs. May the many new innovations of this project inspire the future foundation of other awesome projects as well.

#### Contributors to this project

[![](https://contrib.rocks/image?repo=steveseguin/social_stream)](https://github.com/steveseguin/social_stream/graphs/contributors)


# Chat Lite

Lightweight Social Stream Ninja activity overlay integrated into VDO.Ninja

Social Stream Ninja Lite is a lightweight social activity overlay UI that can run standalone or embedded inside VDO.Ninja.

Current provider cards include YouTube, Twitch, Kick, and Social Stream WebSocket relay mode.

In plain terms: it lets VDO.Ninja show live chat messages from supported services inside the app, so you can keep chat on screen without opening a separate dashboard.

## Sources

Social Stream Ninja Lite can ingest from native provider cards (YouTube/Twitch/Kick) or from the Social Stream WebSocket relay source:

* `wss://io.socialstream.ninja` with a matching session ID

This relay mode can carry additional platform events through the same activity feed workflow.

## Links

* App: <https://vdo.ninja/chat-lite/>
* Activity/embed mode example: <https://vdo.ninja/chat-lite/index.html?view=activity&embed=1&session=demo>

## VDO.Ninja integration

You can enable Social Stream Ninja Lite integration in VDO.Ninja using URL parameters like:

* `&chatlite=1`
* `&chatlitebutton=1`
* `&chatlitesession=YOURSESSION`
* `&chatlitetts=all`
* `&chatlitetts=donations`

See the full parameter reference:

{% content-ref url="/pages/NBB1gJqxfZ1UxkygHLrF" %}
[\&chatlite](/advanced-settings/settings-parameters/and-chatlite)
{% endcontent-ref %}

## What it is good for

* Showing YouTube, Twitch, Kick, or SSN-fed activity directly inside a VDO.Ninja page
* Opening a local pop-out/activity view from the same browser profile
* Keeping chat visible for the director or host without needing the full Social Stream app
* Basic native browser TTS for incoming text messages, or donation/member-style events only

## Current limitations

* The built-in activity overlay is primarily a local browser feature. The copied overlay link is best treated as a same-browser pop-out, not a standalone OBS/browser-source overlay for another machine or browser profile.
* If you need a standalone overlay fed by Social Stream WebSockets, use the Social Stream theme overlays instead.
* Windows opened from the same VDO.Ninja page stay paired together. Standalone Chat Lite pages opened manually still use the default browser-level session behavior.
* This is not a full Social Stream Ninja replacement. Extension-only capture behavior, advanced TTS providers, and full emote-provider support should still use Social Stream Ninja directly.
* Incoming HTML is sanitized before display and before TTS text is built. Executable markup, JavaScript URLs, event handlers, style blocks, and iframe content are removed.

### Control-strip behavior

When enabled inside VDO.Ninja:

* Normal click toggles the Social Stream Ninja Lite activity overlay
* `SHIFT` + click opens Social Stream Ninja Lite setup
* `ALT` / `CTRL` + click toggles native browser TTS

The activity/embed view is intended as display-only output, so overlays do not auto-connect providers in the background.

### TTS notes

Native TTS uses the browser/system `speechSynthesis` voices. This can work on Android, iOS, and desktop browsers, but some browsers require a user gesture before speech can start. OBS Browser Source may not capture native system TTS audio; use the main Social Stream Ninja app if you need a richer OBS-focused TTS pipeline.

## Related

{% content-ref url="/pages/2pGU9TxBaXEy72kvDG33" %}
[Social Stream Ninja](/steves-helper-apps/social-stream-ninja)
{% endcontent-ref %}


# Meshcast.io

A low latency video CDN and app surface for larger-room and one-to-many VDO.Ninja workflows.

{% embed url="<https://meshcast.io>" %}
<https://meshcast.io/>
{% endembed %}

Meshcast is a free-to-use service that works alongside VDO.Ninja. It provides a low-latency CDN-style path for larger rooms and one-to-many distribution workflows without pushing the full load onto the original publisher.

The newer Meshcast app is available at <https://app.meshcast.io>. It is an updated version of the original Meshcast service, is still free to use, and now requires signing in.

The main public entry points are:

* <https://meshcast.io>
* <https://app.meshcast.io>

It is not intended as a mass-broadcast CDN in the traditional sense, but it is designed to handle larger viewing groups more efficiently than pure peer-to-peer fanout alone.

## Production uses

Meshcast can be useful when a normal peer-to-peer VDO.Ninja connection is not the best fit for a guest, venue, or recording workflow.

For example:

* a guest on a difficult connection can publish with RTMP or SRT into Meshcast
* Meshcast can then provide a path back into VDO.Ninja via WebRTC-style playback
* a production can use WHIP, RTMP, SRT, or VDO.Ninja-style workflows depending on what the guest's setup can handle

This makes Meshcast a server-based option for cases where a browser-to-browser connection is too fragile, blocked, or inconsistent. It is a separate service, but it is designed to work well with VDO.Ninja.

## Delayed HLS playback

Meshcast's HLS player can keep an incoming audio/video stream a fixed number of seconds behind live. This is useful for broadcast safety delays and for bringing a delayed feed into OBS.

For example, a two-minute delay uses `delay=120`:

```
https://app.meshcast.io/hls-player/STREAM_ID?delay=120&muted=0&controls=0
```

HLS requires a registered Meshcast account. Start the ingest at least two minutes before opening the player so the complete delay is available.

{% content-ref url="/pages/IfGJAmmDnOW1EFXgyKiW" %}
[Delay an incoming feed](/guides/delay-an-incoming-feed)
{% endcontent-ref %}

{% embed url="<https://www.youtube.com/watch?v=-7QsLChfdsE>" %}
<https://youtu.be/-7QsLChfdsE>
{% endembed %}

{% content-ref url="/pages/ktjnBUJP9QVlUIGZXqRh" %}
[\&meshcast](/advanced-settings/meshcast-parameters/and-meshcast)
{% endcontent-ref %}

{% content-ref url="/pages/xktXZELrZNwkT2rTqYkx" %}
[Meshcast Parameters](/advanced-settings/meshcast-parameters)
{% endcontent-ref %}

## Updates

{% content-ref url="/pages/5SCTfHFt0TpMxrswRR4P" %}
[Updates - Meshcast.io](/updates/updates-meshcast.io)
{% endcontent-ref %}


# Ninja Chatter

Related chat-focused helper site in the VDO.Ninja ecosystem.

Ninja Chatter is a related chat-focused helper site in the VDO.Ninja ecosystem.

## Link

* <https://ninjachatter.com>

## Notes

* document stable user-facing workflows here as they are formalized
* currently listed as part of the broader helper-app ecosystem


# Ninja Backer

Tipping and supporter platform used with VDO.Ninja tip links and creator workflows.

Ninja Backer is the tipping and supporter platform used by VDO.Ninja's `&tip` and `&tips` workflows.

## Link

* <https://ninjabacker.com>

## Notes

* used for direct creator tip pages
* integrates with VDO.Ninja invite and room workflows through the built-in tip options

## Related

{% content-ref url="/pages/0oSM9eXpqpkkAQvWy5hK" %}
[Ninja Backer tipping](/guides/ninjabacker-tipping)
{% endcontent-ref %}


# Caption.Ninja

Lets you use the browser's built in speech-to-text service to provide overlay captions for your live stream

## Caption

{% embed url="<https://caption.ninja/>" %}
<https://caption.ninja/>
{% endembed %}

Although VDO.Ninja supports captions, sometimes you need something simple yet flexible. Caption.Ninja lets you use the browser's built in speech-to-text service to provide overlay captions for your live stream.

Captions are streamed via a web-socket service to your OBS or other studio software, where they can be shown over your video.

Transcriptions can be saved by means of copy and paste when done, multiple languages are supported, and even **manual** user-entered captions support is provided at <https://caption.ninja/manual>

## Translation

<https://caption.ninja/translate>

Added a "translation" component to caption.ninja, so you can convert speakers to a single language for overlay on stream. I tried this before, but only now do I think I have it working okay. There's two ways to use it:

1\. You can go here to explore and tinker.[ https://caption.ninja/translate](https://caption.ninja/translate) which offers a bit of a menu to play with, but is sender's side-based translation (works in a single page, but you can't translate to more than one language)

2\. And then there's the normal way of using caption.ninja, which offers viewer-side translation and scrolling support, so you can use this mode to have different languages as outputs instead of just one (assuming the viewer supports the translation code).

<https://caption.ninja/?room=ufv3QaH&lang=en-US> (to capture as english) and <https://caption.ninja/overlay?room=ufv3QaH&translate=fr> (viewer-side, which converts to french).

I welcome feedback.

## Updates

{% content-ref url="/pages/FCJilbYyyYKLLhKFZ1nG" %}
[Updates - Caption.Ninja](/updates/updates-caption.ninja)
{% endcontent-ref %}


# Raspberry.Ninja

Publish live streaming video to VDO.Ninja at very high resolutions

{% embed url="<https://raspberry.ninja>" %}
<https://raspberry.ninja/>
{% endembed %}

Turn your Raspberry Pi or NVIDIA Jetson into a Ninja-cam with hardware-acceleration enabled! Publish live streaming video to VDO.Ninja on the cheap at very high resolutions! The script for the NVIDIA Jetson ($69 and up) is setup to plug in a $10 1080p30 HDMI to USB adapter and go, while the Raspberry Pi is setup as a quick-deploy image that can work with the official Raspicam.

Get support on the Discord if you have any problems: [🏮│raspberry․ninja](https://discord.gg/BVvGwGaD9F)<br>

![An Nvidia Jetson NX pushing 1080p video to VDO.Ninja, captured with a $10 HDMI to USB adapter](/files/-Mg4BIS2Wz2bI3NrEV1S)

## Raspberry Pi system images (and code)

If you have a Raspberry Pi, NVIDIA Jetson, or a Linux system, you can use those devices to connect UVC-compatible cameras and microphones to VDO.Ninja. It's a great way to make a cheap mobile stream encoder.

This is much cheaper than using a mobile phone and this solution won't overheat when streaming 1080p video after hours. The code is written in Python, so it is accessible for novice developers to use, and it supports hardware-accelerated video encoding.

{% embed url="<https://github.com/steveseguin/raspberry_ninja>" %}
Stream live video from your embedded SBC or Linux system!
{% endembed %}

## Updates

{% content-ref url="/pages/TxGZyFCg6LYOl67gvjOT" %}
[Updates - Raspberry.Ninja](/updates/updates-raspberry.ninja)
{% endcontent-ref %}


# Documentation

This is an archived snapshot of the documentation as of Aug. 16, 2023.

## 👉👉👉Go to [https://raspberry.ninja](https://raspberry.ninja/) 👈👈👈

## Please note that this documentation is not kept up to date.

Please visit [https://raspberry.ninja](https://raspberry.ninja/) for the most up-to-date documentation for Raspberry.Ninja. This documentation is included here as a consolidated resource for our LMM AI support bot to learn from. The resource here will be updated only occasionally, as needed, and many links or references may be out of date.

Chronologically updates are here:

{% content-ref url="/pages/TxGZyFCg6LYOl67gvjOT" %}
[Updates - Raspberry.Ninja](/updates/updates-raspberry.ninja)
{% endcontent-ref %}

## ![](https://user-images.githubusercontent.com/2575698/107161314-f6523f80-6969-11eb-9e9b-9135554b87b5.png) Raspberry Ninja

Turn your Raspberry Pi, NVIDIA Jetson, Orange Pi, or nearly any Python-compatible system into a ninja-cam with hardware-acceleration enabled! This lets you publish live streaming video and audio directly to your web browser or OBS instance using VDO.Ninja. Achieve very low streaming latency over the Internet or a LAN; all for free.

It also has the ability to record remote VDO.Ninja streams to disk, without needing to transcode, and can broadcast a low-latency video stream to multiple viewers at time. More recently, fdsink and OpenCV support have been added, for ingesting remote video streams with sub-300-ms of latency into your computer vision projects.

### Preface

The core concepts and code used in this project can be reused for other projects; most Linux systems, and a large variety of embedded systems; potentially even smartphones. There's a focus of supporting Raspberry Pis and NVIDIA Jetson systems, which includes offering pre-built images and install scripts. Other Linux system users should still be able to use the code, but setup support will be limited.

YouTube video demoing:

{% embed url="<https://youtu.be/J0qqXxHNU_c>" %}

I also have another longer [YouTube video here](https://youtu.be/eqC2SRXoPK4), which focuses on setting up the Raspberry\_ninja for IRL-streaming.\*\*\*\*

[![image](https://user-images.githubusercontent.com/2575698/127951812-b799a6e6-f77e-4749-8ef1-15221b842805.png)](https://youtu.be/J0qqXxHNU_c)

Recent updates to Raspberry Ninja have added improved error correction and video redundancy, along with automated dynamic bitrate controls for congestion management. This has greatly improved stream reliability, reducing frame loss, and limiting buffer sizes. That said, having more than 5-megabites of upload bandwidth and having a solid connection is recommend if intending to use the default settings.

### Install options

See below for different install options

#### Setup for a Raspberry Pi

See the `raspberry_pi` sub-folder for instructions on installing and setting up a Raspberry Pi. [Jump there now](https://github.com/steveseguin/raspberry_ninja/tree/main/raspberry_pi)

A Raspberry Pi works fairly well with a CSI-connected camera, but USB-based cameras currently struggle a bit with older Raspberry Pi models. As a result, consider buying an Nvidia Jetson Nano 2GB instead of a Raspberry Pi if looking to jump into this all. Also, the RPI Zero W 1 and RPi 3 both don't have the greatest WiFi built-in, while the Raspberry Pi Zero 2 seems to work rather well. Without good connectivity, you may find yourself facing frame-drops and stutter. HDMI to CSI adapters do work, but they may be limited to 25-fps and can be finicky still with some camera sources; audio over HDMI is also a bit tricky to setup currently.

![image](https://user-images.githubusercontent.com/2575698/146033910-3c54ba8c-1d3e-4073-bc59-e190decaca63.png)

#### Setup for an NVIDIA Jetson

Please see the `nvidia_jetson` folder for details on installation. [Jump there now](https://github.com/steveseguin/raspberry_ninja/blob/main/nvidia_jetson/README.md)

![image](https://user-images.githubusercontent.com/2575698/127804651-fc8ce68e-3510-4cd0-9d5a-1953c6aac0d8.png)

NVIDIA Jetsons work well with USB-connected cameras and have a selection of compatible CSI-cameras well. You may need to buy WiFi adapter if it is not included.

#### Setup for Linux Desktops

You can deploy Raspberry.Ninja to a desktop pretty quickly in most cases, without compiling anything. I have an installer for recent versions of Ubuntu if interested. [Jump there now](https://github.com/steveseguin/raspberry_ninja/blob/main/ubuntu)

For other distros, see below for requirements

**Requirements for linux systems in general:**

You'll want to install Gstreamer 1.16 or newer; emphasis on the newer. You'll need to ensure `libnice`, `srtp`, `sctp`, and `webrtcbin` are part of that install, along with any media codecs you intend to use.

Python3 is also required, along with `websockets`. If you have PIP installed, `pip3 install websockets` can get you going there.

#### Setup for Windows (WSL)

You can actually run Raspberry Ninja on a Windows PC via the WSL virtual machine interface. It's really quick and simple, except getting camera/hardware support going is tricky.

Still, it might be useful if you want to pull a stream from a remote Raspberry.Ninja system, recording the stream to disk or using it for local machine learning.

See the WSL install script here: [Jump there now](https://github.com/steveseguin/raspberry_ninja/blob/main/wsl)

It is possible to install Gstreamer for Windows natively, but due to the difficulty in that all, I'm not supporting it officially at present. The main challenge is `cairo` fails to compile, so that needs to be fixed first.

### Generic quick-install method

```
sudo apt-get update && sudo apt upgrade -y
sudo apt-get install python3-pip -y

sudo apt-get install -y libgstreamer1.0-dev libgstreamer-plugins-base1.0-dev libgstreamer-plugins-bad1.0-dev gstreamer1.0-plugins-base gstreamer1.0-plugins-good gstreamer1.0-plugins-bad gstreamer1.0-plugins-ugly gstreamer1.0-libav gstreamer1.0-tools gstreamer1.0-x python3-pyqt5 python3-opengl gstreamer1.0-alsa gstreamer1.0-gl gstreamer1.0-qt5 gstreamer1.0-gtk3 gstreamer1.0-pulseaudio gstreamer1.0-nice gstreamer1.0-plugins-base-apps

pip3 install websockets

sudo apt-get install -y libcario-dev ## possibly optional
pip3 install PyGObject ## possibly optional

sudo apt-get install git -y
cd ~ 
git clone https://github.com/steveseguin/raspberry_ninja
cd raspberry_ninja
python3 publish.py --test
```

### Updating

Major updates sometimes will require that the latest Rasbperry Pi or Jetson image be installed on your device, but most updates are minor and only require the `publish.py` file to be updated. If you've just installed the latest device image, you will still want to update before going further, as the image is not updated with every new code release.

You can normally update by logging into your device, either via SSH, or via mouse/keyboard with the terminal app open.

```
cd ~
cd raspberry_ninja
git pull
```

That's it.

If you run into issues due making changes to the code, you can either `git stash` your changes first, or you can just delete the raspberry\_ninja folder and clone it again.

i.e.:

```
cd ~
rm raspberry_ninja -r
git clone https://github.com/steveseguin/raspberry_ninja
cd raspberry_ninja
```

Updates are usually optional, as they typically just focus on added features or improving video quality/stability. I do recommend checking for new updates every now and then.

### Usage

You should be able to run the publishing script simply with `python3 publish.py`, however lots of options are available for customizing as desired.

```
$ python3 publish.py
```

To get the list of supported commands with your version of the code, run `python3 publish.py --help`.

Sample help output: ( what's shown below may not be up-to-date)

```
usage: publish.py [-h] [--streamid STREAMID] [--server SERVER]
                  [--bitrate BITRATE] [--width WIDTH] [--height HEIGHT]
                  [--framerate FRAMERATE] [--test] [--hdmi] [--v4l2 V4L2]
                  [--rpicam] [--nvidiacsi] [--alsa ALSA] [--pulse PULSE]
                  [--raw] [--h264] [--nvidia] [--rpi] [--novideo] [--noaudio]
                  [--pipeline PIPELINE]

optional arguments:
  -h, --help            show this help message and exit
  --streamid STREAMID   Stream ID of the peer to connect to
  --server SERVER       Handshake server to use, eg:
                        "wss://wss.vdo.ninja:443"
  --bitrate BITRATE     Sets the video bitrate. This is not adaptive, so
                        packet loss and insufficient bandwidth will cause
                        frame loss
  --width WIDTH         Sets the video width. Make sure that your input
                        supports it.
  --height HEIGHT       Sets the video height. Make sure that your input
                        supports it.
  --framerate FRAMERATE
                        Sets the video framerate. Make sure that your input
                        supports it.
  --test                Use test sources.
  --rtmp                Use RTMP instead of webRTC; pass "rtmp://xxxx.com/live/xxx-xxxx-xxx"
  --hdmi                Try to setup a HDMI dongle
  --v4l2 V4L2           Sets the V4L2 input device.
  --rpicam              Sets the RaspberryPi input device.
  --nvidiacsi           Sets the input to the nvidia csi port.
  --alsa ALSA           Use alsa audio input.
  --pulse PULSE         Use pulse audio (or pipewire) input.
  --raw                 Opens the V4L2 device with raw capabilities.
  --bt601               Changes the input color profile when in raw mode to BT601
  --h264                For PC, instead of VP8, use x264.
  --vp8                 VP8 encoder instead of h264; likely software-based
  --nvidia              Creates a pipeline optimised for nvidia hardware.
  --rpi                 Creates a pipeline optimised for raspberry pi hadware.
  --novideo             Disables video input.
  --noaudio             Disables audio input.
  --omx                 An alternative hardware encoder for the RPi; glitches, but faster?
  --pipeline PIPELINE   A full custom pipeline
  --record STREAMID     Specify a remote stream ID to record; this will disable publishing mode
  --midi                MIDI transport; can forward/recieve MIDI to remote browser/device
  --save                Will save a local copy of the outbound stream to disk (MKV format)
  --rotate DEGREES      Will rotate the video by 90, 180 , or 270 degrees
  --multiviewer         Allows for multiple viewers at a time; this can increase bandwidth usage of course
  --nored               Disable error correction. If you don't disable it, the bandwidth may be up to 2x higher than the target video bitrate.  I do not recommend removing, unless you're on a pristine connection.
  --noqos               This will disable the qos feature. The QOS feature will lower the bitrate of the video encoder if heavy packet loss is detected. It won't lower it more than 5x (20% of target), but I find this works well to combat times where the network bandwidth is insufficient. 
  --pipein              Lets you pipe data in from a unix pipe, something like: `ffmpeg -i input.mp4 -o - | python3 publish.py --pipein auto`
  --libcamera           Use libcamera as a source; this may be needed if using third party cameras like those from Arducam
  --latency             Set the incoming jitter buffer, in milliseconds. 200-ms is the default.
  --password            Start with VDO.Ninja v24, Raspberry.Ninja is partially compatible with passwords
  --framebuffer         Specify the stream ID that you wish to ingest and output locally as as frame buffer (OpenCV friendly)

```

**Changing video input sources**

Using `gst-device-monitor-1.0` will list available devices and their 'caps', or settings. This can help determine what GStreamer pipeline changes need to be made in the script or getting info about what video format options are available for your device.

To help further debug, `gst-launch-1.0` can be used to test a pipeline out before adding it to the script. For for added reference, here is an example Pipeline for the Rasbperry Pi to enable UVC-based MJPEG video capture support is:

```
gst-launch-1.0 v4l2src device=/dev/video0 io-mode=2 ! image/jpeg,framerate=30/1,width=1920,height=1080 ! jpegparse ! nvjpegdec ! video/x-raw ! nvvidconv ! "video/x-raw(memory:NVMM)" ! omxh264enc ! "video/x-h264, stream-format=(string)byte-stream" ! h264parse ! rtph264pay config-interval=-1 ! application/x-rtp,media=video,encoding-name=H264,payload=96 ! fakesink
```

Notice how we used device = OUR\_AUDIO\_DEVICE\_NAME to specify the audio device we want to use, and we configure the device to read and decode JPEG, as that is what our device in this case supports.

The Raspberry\_Ninja publish.py script automatically tries to create a pipeline for you, based on the command line arguments passed, but you can override that at a code level with your own pipeline if easier as well.

**Adding an audio source**

The script will use the default system ALSA audio output device, although you can override that using the command line arguments or via manually setting a gstreamer pipeline at the code level.

To get details of available audio devices, assuming pulseaudio is installed, running the following from the command line will give us access to audio device IDs

```
pactl list | grep -A2 'Source #' | grep 'Name: ' | cut -d" " -f2
```

resulting in..

```
alsa_input.usb-MACROSILICON_2109-02.analog-stereo
alsa_output.platform-sound.analog-stereo.monitor
alsa_input.platform-sound.analog-stereo
```

In this example, an HDMI audio source is the first in the list, so that is our device name. Your device name will likely vary.

Pulse audio and ALSA audio command-line arguments can be passed to setup audio, without needing to tweak Gstreamer pipelines manually. The defaults I think will use the system ALSA default device.

### How to Run:

Ensure the Pi/Jetson is connected to the Internet, via Ethernet is recommended for best performance. You'll also very likely need to ensure a camera and/or microphone input are connected; this can also be a USB UVC device, supported CSI-based camera, or other selectable media inputs. It technically might be possible to even select a pipe to stream from, although this is a fairly advanced option.

Run using: `python3 publish.py --streamid SomeStreamID --bitrate 2000`

In Chrome, open this link to view: `https://vdo.ninja/?password=false&view=SomeStreamID`

You can have multiple viewers at a time, but you must enable that with a command-line argument.

Also note, if you run with `sudo`, you might get a permissions error when using audio.

#### [Auto-starting the script on boot](https://github.com/steveseguin/raspberry_ninja#auto-starting-the-script-on-boot) <a href="#user-content-auto-starting-the-script-on-boot" id="user-content-auto-starting-the-script-on-boot"></a>

A guide on how to setup a RPi to auto-stream on boot can be found in the Rasbperry Pi folder, along with details on how to configure the WiFi SSID and password without needing to SSH in first.

#### [RTMP output](https://github.com/steveseguin/raspberry_ninja#rtmp-output) <a href="#user-content-rtmp-output" id="user-content-rtmp-output"></a>

RTMP support overrides WebRTC support at the moment, and the features that are support are pretty limited.

`python3 publish.py --rtmp rtmp://a.rtmp.youtube.com/live2/z4a2-q14h-01gp-xhaw-3zvw --bitrate 6000`

Things like bitrate, width, height, raw, framerate are also supported, but not a whole lot else.

RTMP support is currently experimental; example use with a Jetson here: <https://www.youtube.com/watch?v=8JOn2sK4GfQ>

You can't publish to vdo.ninja with RTMP, but rather a service like YouTube.

#### [SRT support](https://github.com/steveseguin/raspberry_ninja#srt-support) <a href="#user-content-srt-support" id="user-content-srt-support"></a>

I have added SRT support to the Raspberry Pi image. You need to use it via FFmpeg or Gstreamer via command line currently, as I haven't added it to the Raspberry Ninja code directly yet. Still, it's easy enough to publish via command line with SRT, and you get the benefits of an up-to-date Raspberry Pi image with drivers and software all pre-installed.

#### [WHIP / Meshcast support](https://github.com/steveseguin/raspberry_ninja#whip--meshcast-support) <a href="#user-content-whip--meshcast-support" id="user-content-whip--meshcast-support"></a>

I added WHIP/WHEP support to the Raspberry Pi x64 pre-built image, although currently its via the rust-based webrtchttp gstreamer plugins and is outside the scope of Raspberry.Ninja itself for now.

[whipsink](https://gstreamer.freedesktop.org/documentation/webrtchttp/whipsink.html?gi-language=python) [whepsrc](https://gstreamer.freedesktop.org/documentation/webrtchttp/whepsrc.html?gi-language=python)

You can technically build these plugins yourself also, using Rust (cargoc) and Gstreamer 1.22 I think, but I intend to offer my own version of WHEP/WHIP support as an integral part of Raspberry.Ninja at some point in the future instead.

#### [NDI support](https://github.com/steveseguin/raspberry_ninja#ndi-support) <a href="#user-content-ndi-support" id="user-content-ndi-support"></a>

I've been experimenting with NDI support, but it's not officially working correct yet.

#### [OpenCV / FFMPEG / FDSink / Framebuffer support](https://github.com/steveseguin/raspberry_ninja#opencv--ffmpeg--fdsink--framebuffer-support) <a href="#user-content-opencv--ffmpeg--fdsink--framebuffer-support" id="user-content-opencv--ffmpeg--fdsink--framebuffer-support"></a>

There's support for OpenCV/Framebuffer (--framebuffer STREAMIDHERE) and FDSink now. There's a Youtube video online demoing how to use Raspberry.Ninja to bring raw BGR video frames into Numpy.

### Hardware options

Of the Raspberry Pi devices, the Raspberry Pi 4 or the Raspberry Pi Zero 2 are so far the best options on this front, depending on your needs. Any of the NVIDIA Jetson devices should work fine, but only the Jetson Nano 2GB, 4GB, and NX have been tested and validated. If you wish to use other Jetson devices, you'll need to setup and install Gstreamer 1.19 yourself on those systems, as no pre-built image will be provided at this time. (Unless someone wishes to donate the hardware that is) Any other Linux system or SBC embedded system is on the user to setup and install at this point, but they should closely follow the same steps that the NVIDIA Jetson uses.

It's rather hard to install everything needed on a Raspberry Pi Zero 2 directly, due to the limited memory, so I do recommend that if installing from scratch that you use a Raspberry Pi 4 with 4GB or greater.

#### Camera options

There's plenty of options for the Rasbperry Pi and NVIDIA Jetson when it comes to cameras and HDMI adapters. The easiest option for a Raspberry Pi is to use one of the official Raspberry Pi camera. These are normally just plug an play on both platforms and well supported.

USB cameras are options, but currently with Raspberry Pi devices these are only supported up to around 720p30. USB 3.0 devices are even less supported, as you need to ensure the Raspberry Pi you are using supports USB 3.0; for example, a Camlink will not work on a Raspberry Pi 3.

If low-light is important to you, the Sony IMX327 and IMX462 series of sensors might appeal to you. They are generally designed for security camera applications, but with the use of an IR Filter, you can make them adequate for use a standard video cameras. These options may require additional gstreamer and driver work to have work however, so they are for more advanced-users at this time.

I have gotten the low-light Arducam IMX462 to work with the newest image for RPi working (the Bullseye image). It might require a small change to the `dtoverlay` line in the `/boot/config.txt` file though to configure your specific camera, but I think I have most working now without any need drivers. (a few exceptions) , oh, and if you are changing `dtoverlay`, you might need to also comment out the camera auto detect link that is also in the config.txt file. (else it might not work)

Links for such low-light cameras:

<https://www.uctronics.com/arducam-for-raspberry-pi-ultra-low-light-camera-1080p-hd-wide-angle-pivariety-camera-module-based-on-1-2-7inch-2mp-starvis-sensor-imx462-compatible-with-raspberry-pi-isp-and-gstreamer-plugin.html> (I own this camera and it works on a Raspberry Pi 4 with my newest created RPi image. It works if you do not use the pivariety daughterboard and just connecting directly; you'll need to change the config.txt file a bit and use --libcamera to use though)

<https://www.amazon.ca/VEYE-MIPI-327E-forRaspberry-Jetson-XavierNX-YT0-95-4I/dp/B08QJ1BBM1>

[https://www.e-consystems.com/usb-cameras/sony-starvis-imx462-ultra-low-light-camera.asp ](https://www.e-consystems.com/usb-cameras/sony-starvis-imx462-ultra-low-light-camera.asp)(USB-based; more compatible with other devices)

You can buy IR Filters, or you can buy lenses that come with IR filters, if needed, for pretty cheap. Many are designed for security applications, so be aware. <https://fulekan.aliexpress.com/store/1862644>

#### 360-degree cameras

Support for the Theta 4k 360 USB camera has been added. Has been tested with the Jetson. It is likely too slow to use with a Raspberry Pi though.

Install script and brief usage example found here: <https://github.com/steveseguin/raspberry_ninja/blob/main/nvidia_jetson/theta_z1_install.sh>\
\
To view equirectangular 360-degree video with VDO.Ninja, you can refer the the <https://vdo.ninja/360> simple 360-degree player offered. Usage is like:\
\
<https://vdo.ninja/360?view=the360StreamIDHere>, with the \&password being an optional parameter. Just change out `the360StreamIDHere` with your own stream ID, and publish a equirectangular video stream at high resolution to it.\
\
Some notes about the 360-player and support:

* The player only supports Chrome/Chromium browsers currently
* It only can one stream at a time; whatever value you specify in the `&view` parameter
* Each viewer of the stream can interact, with each having their control to look around in 360-space.
* As the sender, you can use an OBS Virtual Camera as a source, when sending, or use a camera with a Equirectangular output
  * In terms of supported cameras, I have a Theta V 360 camera for example, which can output via USB to OBS Studio.
    * It requires a plugin to work, but it handles converting to Equirectangular format. From there, you can add the virtual camera output containing the equirectangular output to VDO.Ninja
    * More on the Theta V camera and its use with OBS Studio here; <https://www.youtube.com/watch?v=qUzciWQ5HiM>

#### HDMI Input options

As per HDMI adapters, a 1080p30 USB 2.0 HDMI to MJPEG adapter can usually be had for $10 to $20, although there are many fake offerings out there. I've tested a $12 MACROSILICON HDMI to USB adapter, and it works pretty well with the Jetson (and OK with the RPI), although finding a legitimate one might be tricky. On a Raspberry Pi 4, 1080p30 is posssible with the HDMI to USB adapter, but audio currently then goes out of sync; at 720p though, audio stays in sync with the video more frequently. Audio sync issues might be resolved in the future with more system tuning.

There's another option though, and that is to use an HDMI to CSI adapter for Raspberry Pis, such as the C780A ($29 USD) <https://www.aliexpress.com/item/1005002861310912.html>, although the frame rate of an HDMI to CSI option is limited to 1080p25 (due to 2 CSI lanes only). It's also slightly more expensive than the HDMI to USB alternative. The RPi Compute Module boards seem to have four-lanes of CSI available though, so 30-fps might be achievable there if you buy the compatible board (C780B ?)

Audio is also more challenging when dealing with the HDMI to CSI adapters, as you need to connect audio from the board via I2S to the RPi. This isn't easy to do with some of the HDMI to CSI boards, but there are a couple options where this is a trival step.

Please note before buying that there are different HDMI to CSI2 boards, and they might look similar, but they are definitely not equal.

* X630 boards seem to have a solder-free audio support (via an addon board; X630-A2) and 1080p25 support; there's a nice YouTube guide on setting it up <https://www.youtube.com/watch?v=lJL2Ihs1aYg> and a kit available to make it all a breeze; <https://geekworm.com/products/x630?variant=39772641165400>.
* C779 boards do not support audio (hardware problem), making it quite challenging to use. But it is often the cheapest option. I don't recommend this option.
* C780 boards supposedly has fixed the audio issue of the C779 boards, but they remain untested by me yet. It appears they have good audio support and a 4-lane option (C780B) for the RPi Compute module boards, but most users will probably need the two-lane C780A.
* Boards by Auvidea, like the B100, B101, or B102, have audio support via I2S it seems. These are more expensive options though, and there is mention of RPi Compute Module support with some of these Auvidea boards as well. I haven't tested these boards yet.
* I haven't tested the Geekworm HC100 board yet, but it seems similar to the B100/B101. Might require some light soldering to get audio support? Not sure.

HDMI to CSI boards are not plug-and-play currently, as they do require a couple tweaks to the boot file at the very least, and maybe an update to the EDID file. (script provided for that). Depending on the video input signal, you might need to further tweak settings, such as colorimetery settings. This not really an issue with the HDMI to USB adapters, as they convert to a very standard MJPEG format, making them more plug and play friendly.

Please share with the community what works well for you and what did not.

#### MIDI options

When using the `--midi` parameter, video and audio are disabled. Instead, the script can send and receive MIDI commands over VDO.Ninja. Supports plug-and-play, although you may need to install `python-rtmidi` using pip3 first.

Incoming MIDI messages will be forwarded to the first MIDI device connected to the Pi. Adding `&midiout` to the viewer's view-link will have that remote browser send any MIDI messages (such as from a USB DJ Controller) to the raspberry\_ninja publish.py script, which will then be forwarded to the first local MIDI device

Outgoing MIDI messages will be sent to connected viewers, and if those connected viewers have `&midiin` added to their view-links, those MIDI commands will be forwarded to the connected MIDI devices.

If using a virtual MIDI device on the remote viewer's computer, such as `loopMIDI`, you can target that as both a source and target for MIDI commands. This is especially useful for connecting VDO.Ninja to DJ software applications, like Mixxx or Serato DJ Pro, which supports mapping of MIDI inputs/outputs.

Please note, the raspberry\_ninja publish.py script can both send and receive MIDI commands over a single peer connection, which is a bit different than how video/audio work currently. It's also different than how browser to browser currently is setup, where a sender won't ever request MIDI data, yet the raspberry\_ninja code does allow the sender to both send and receive MIDI data.

Midi demo video:

{% embed url="<https://youtu.be/Gry9UFtOTmQ?si=SpIBdDBPu9J1MN2M>" %}

#### Note:

* Installation from source is pretty slow and problematic on a RPI; using system images makes using this so much easier.
* Please use the provided backup server for development purposes; that wss server is `wss://apibackup.vdo.ninja:443` and for viewing: `https://backup.vdo.ninja`
* Passwords must be DISABLED explicitly as this code does not yet have the required crypto logic added yet. Things will not playback if you leave off `&password=false`
* The current code does not dynamically adjust resolution to combat frame loss; rather it will just drop frames. As a result, having a high quality connection between sender and viewer is required. Consider lowering the bitrate or resolution if problems persist.
* Speedify.com works on Linux and embedded devices, providing network bonding and fail-over connections. The install instructions are pretty easy and can be found here: <https://support.speedify.com/article/562-install-speedify-linux> (not sponsored)
* If you want to do computer-vision / machine-learning with cv2 or tensorflow on the resulting webRTC video stream, I have an open-source project here that you can take snippets from that you can add to raspberry\_ninja to do what you want: [github.com/ooblex](https://github.com/ooblex/ooblex/blob/master/code/decoder.py#L84)
* If you wish to play a video back, using a Raspberry Pi, try this "kiosk" mode image that can be found here: <https://awesomeopensource.com/project/futurice/chilipie-kiosk>. Raspberry Pis seem to handle video playback in Chromium-based browsers OK. I'l try to have browser-free playback at some point in the future.
* If needing to make a backup of your microSD, see: <http://sigkillit.com/2022/10/13/shrink-a-raspberry-pi-or-retropie-img-on-windows-with-pishrink/>

#### TODO:

* Fix VP8/VP9 recordings and add muxing to the H264 recordings (moderate)
* Have an option to "playback" an incoming stream full-screened on a Pi or Jetson, to use as an input to an ATEM mixer.
* Add a jitter buffer to the recording mode (moderate)
* Add support for passwords and group rooms (steve)
* Make easier to use for novice users; perhaps adding a local web-interface or config file accessible via an SD card reader via Windows. These options could then allow for setting of WiFi passwords, device, settings, stream IDs, etc, without needing to SSH in or using nano/vim. (moderate)
* Add a QR-code reader mode to the app, as to setup Stream ID, bitrate, and WiFi passwords using a little website tool. (moderate)
* Have gstreamer/python automatically detect the input devices, settings, system, and configure things automatically. Allowing for burn, plug, and boot, without needing to log in via SSH at all.

#### Discord Support

Support is available on Discord at <https://discord.vdo.ninja> in channel *#raspberry-ninja*


# Mixer App

Customize layouts, positions, and assets in VDO.Ninja, with remote control to change the layouts dynamically. This is very efficient and low on resources compared to other methods.

{% embed url="<https://vdo.ninja/alpha/mixer>" %}
<https://vdo.ninja/alpha/mixer>
{% endembed %}

The Mixer App is an alternative to the director's control center of VDO.Ninja. It gives you the full power to customize scenes, layouts and positions of the video feeds dynamically.

Recent layout versions also support per-slot crop controls (`top/right/bottom/left`) that persist in layout data and render using `clip-path`.

There are currently 3 versions of the Mixer App. The newest version with all the current updates is Alpha.

| Version    | Link                            |
| ---------- | ------------------------------- |
| Alpha      | <https://vdo.ninja/alpha/mixer> |
| Beta       | <https://vdo.ninja/beta/mixer>  |
| Production | <https://vdo.ninja/mixer>       |

<figure><img src="/files/XY6foPkVLDt0nMdEDVBV" alt=""><figcaption><p>Layout of the Video Mixer</p></figcaption></figure>

If you find some bugs, have feature requests, ideas or feedback, please contact us on the [Discord channel](https://discord.gg/qWDshMsTar).

There is a YouTube video from Steve (December 2021) about the Mixer App. It's slightly out of date though.

{% embed url="<https://youtu.be/9xdZq4SCBoA>" %}
<https://youtu.be/9xdZq4SCBoA>
{% endembed %}

## Updates

{% content-ref url="/pages/sHxg53Zsa84Uztp3NkeI" %}
[Updates - Mixer App](/updates/updates-mixer-app)
{% endcontent-ref %}


# Screen Recorder

Standalone screen recorder with local recording and utility tools

The Screen Recorder is a standalone capture tool in the VDO.Ninja project for local-first recording workflows.

## Link

* <https://vdo.ninja/screenrecorder/>

## Key features

* Screen + webcam overlay recording flow
* Countdown and recording transport controls
* Local recording focus with export/download options
* Utility options for transcription and capture workflows

This tool is separate from the main director room UI and is intended as a dedicated recorder surface.


# WHIP and WHEP tooling

WHIP allows you to publish to supported sites, like Twitch, directly from VDO.Ninja

Using the newly added WHIP ingest end point at Twitch, you can now publish directly from VDO.Ninja to Twitch. Low-latency, no downloads needed, and free.

WHIP is a bit like the classic RTMP publishing, but it's far more advanced, includes AV1 video codec support, and can even work within your browser. Best of all, VDO.Ninja supports it. VDO.Ninja can both act as a host for WHIP publishers, such as OBS Studio, or it can publish video via WHIP to WHIP broadcasting hosts, such as Twitch, Janus, Mediamtx, Pion, Cloudflare, and many more.

WHEP, on the other hand, is generally used to playback video using the same technology, rather to publish it. VDO.Ninja also supports WHEP playback and hosting, with advanced statistic panels, recording, and buffering options.

When muting WHEP playback, prefer [`&mutespeaker`](/advanced-settings/audio-parameters/and-mutespeaker) over [`&noaudio`](/advanced-settings/audio-parameters/noaudio). Many SFU servers require the WHEP viewer to accept both audio and video; using `&noaudio` can prevent the session from connecting. `&mutespeaker` allows both tracks to arrive while keeping local speaker output muted.

### Native mobile app WHIP publishing

The VDO.Ninja native Android and iOS apps can also act as WHIP publishing clients. This is useful when you want a phone camera, Android USB camera, Android HDMI capture adapter, mobile screen share, or USB audio source to publish directly to a WHIP service.

The destination does not need to be VDO.Ninja. In **WHIP only** mode, the app can publish to Meshcast, MediaMTX, Cloudflare Stream, a self-hosted WHIP/WHEP service, or another compatible WHIP ingest endpoint. In **Alongside VDO.Ninja** mode, the same source can publish to normal VDO.Ninja signaling and to WHIP at the same time.

{% content-ref url="/pages/hWcjH63YrSr2nIEDKV24" %}
[VDO.Ninja native mobile app guide](/steves-helper-apps/native-mobile-app)
{% endcontent-ref %}

### Our WHIP page for making WHIP / WHEP easy

To make using WHIP and WHEP more accessible, VDO.Ninja has a hosted page with common tools for making use of it, such as publishing a video or screen share to Twitch.

{% embed url="<https://vdo.ninja/whip>" %}
<https://vdo.ninja/whip>
{% endembed %}

This is the future! To try it out, visit <https://vdo.ninja/whip>, enter your Twitch stream token in the correct field, GO, and then select your camera in VDO.Ninja as normal.\
\
![](/files/6gyXDxOQ42VVMsMRCV0z)![](/files/1KAdzcuvjAForctu9yNP)

### Alpha version of WHIP support and features

The alpha version of VDO.Ninja has the cutting edge available to it, often with even more advanced features and fixes that have not yet made it available to the production stable release.

Check out the alpha version here: <https://vdo.ninja/alpha/whip>

### Director-side WHIP and WHEP recovery controls

Mesh Network Debug reports primary WHIP publishing, screen WHIP publishing, and local WHEP playback separately. **Restart Primary WHIP** appears only when the guest reports that its enabled primary WHIP publisher is actually restartable. It sends a command to that guest without requiring a full page reload. **Reconnect Local WHEP** instead rebuilds the current director browser's WHEP player and sends no command to the publisher. The primary action does not restart screen WHIP.

### WHIP ingest from OBS Studio or other

While VDO.Ninja can act as a host for incoming WHIP requests (published to `https://whip.vdo.ninja/YOURTOKENHERE`), many such publishing clients do not support NAT traversal or STUN server support yet.

OBS Studio v30 does not, for example, so it may not work if publishing to someone who is behind a firewall. Still, even in those cases, the WHIP ingest feature will still work when:

* on the same Local Area Network as the publisher,
* if hosting VDO.Ninja on a cloud server with public IP address available,
* if your UDP ports are being forwarded (UDP ports 4096-65535)
* of if your local IP address is set to the DMZ mode target within your router's network settings.\\

While it's possible OBS v31 fixes this issue, I do have a custom version of OBS that also has proper VDO.Ninja WHIP support [available for Win64 here.](https://backup.vdo.ninja/OBS_VDO_Ninja.zip) \[[fork](https://github.com/steveseguin/obs-studio)] This version should let you publish WHIP via VDO.Ninja across the Internet, regardless of Firewall. (This OBS binary was last built November 2024.)\\

For other WHIP publishing clients, such as Gstreamer's whip element, VDO.Ninja will already work with them in most cases, even across firewalls. Not all though.

I welcome support and engagement from other developers to work through these issues, so please reach out if you'd like to speak.

In terms of ideal settings for OBS's WHIP output into VDO.Ninja, below you can find a link to some recommended encoder options, to ensure smoothest playback

{% content-ref url="/pages/VmaXjLjPoqKBQoYbG6fP" %}
[Recommended OBS WHIP settings](/guides/obs-whip-output-settings)
{% endcontent-ref %}

For more help, join the Discord

{% embed url="<https://discord.vdo.ninja>" %}
Contact me on Discord
{% endembed %}

### Using WHIP + WHEP to host your own Meshcast service

For more advanced users, you can use VDO.Ninja's WHIP/WHEP support, with your own WHIP/WHEP compatible broadcasting host, to provide your own Meshcast functionality within VDO.Ninja.

The [Meshcast service](/steves-helper-apps/meshcast.io) long offered by VDO.Ninja works like a WHIP/WHEP host, offloading video distribution via the hosted servers, thus avoiding the need for multiple p2p streams. As a result, it was pretty easy to add support for generic WHIP/WHEP hosting alternatives.

Currently a guide on using Cloudflare as the host is available, located here, <https://vdo.ninja/cloudflare>, with guides for other self-hosted providers becoming available all the time.

For the highly technical and curious, please note that if your WHIP server's response header includes a WHEP URL in it, where the WHIP stream can be viewed from, VDO.Ninja will automatically provide that URL to connected viewers to use as the main video source.

ie: WHEP: [`https://whep.urdomain.com/yourstreamtoken`](https://whep.urdomain.com/yourstreamtoken)

### Demo video, showing us publishing from VDO.Ninja to Twitch

{% embed url="<https://youtu.be/_RHBsAJmfGs?si=653vhKBJesct_cmS>" %}
<https://youtu.be/_RHBsAJmfGs?si=653vhKBJesct_cmS>
{% endembed %}

### The VDO.Ninja Mixer app supports WHIP out also

The VDO.Ninja [Mixer App](/steves-helper-apps/mixer-app) (<https://vdo.ninja/alpha/mixer>) supports WHIP output, with an option to publish directly to Twitch as well. If OBS is too much for you, and you need just a simple studio and mixing controls, this could be a great option for you.

### `&publish` URL option

While still a work in progress, some of the features of the <https://vdo.ninja/whip> page, primarily the WHIP publishing features, are also slowly being added as an integral part of VDO.Ninja itself.

While this may change in the future, adding `&publish` to the URL of a VDO.Ninja (v24) will let you select a screen to capture and publish to a WHIP endpoint. This may also be added as built-in menu option at some point as well, allowing you to select any screen, page, or element to publish via WHIP.

### Raspberry Ninja also now supports WHIP output

[Raspberry.Ninja](/steves-helper-apps/raspberry.ninja) isn't just for Raspberry Pis, but works on a Linux system really, along with Windows WSL.

If you want low-level controls over AV1 codec encoding and other facets of WHIP publishing that can't be obtained via the browser, check it out. It of course also supports VDO.Ninja, has a built-in SFU for VDO.Ninja, and lots more!

{% embed url="<https://raspberry.ninja>" %}

## Related

{% content-ref url="/pages/P6zBFBnG90UiZoDIAEtA" %}
[WHIP Parameters](/advanced-settings/whip-parameters)
{% endcontent-ref %}

{% content-ref url="/pages/VmaXjLjPoqKBQoYbG6fP" %}
[Recommended OBS WHIP settings](/guides/obs-whip-output-settings)
{% endcontent-ref %}

{% content-ref url="/pages/x03Y8uO1LezcvD0LDCwz" %}
[\&whipview](/advanced-settings/whip-parameters/and-whip)
{% endcontent-ref %}

## Updates

{% content-ref url="/pages/IsUsIwQdh7Xs3iy4sHR4" %}
[Updates - WHIP/WHEP](/updates/updates-whip-whep)
{% endcontent-ref %}


# Icecast and AzuraCast audio publishing

Publish VDO.Ninja audio to Icecast or AzuraCast from a browser tab.

VDO.Ninja can act as a browser-based source client for Icecast-compatible radio servers. This is useful when you want a VDO.Ninja audio-only source to publish directly into Icecast, AzuraCast, or another compatible mount.

The setup helper is here:

{% embed url="<https://vdo.ninja/icecast>" %}
<https://vdo.ninja/icecast>
{% endembed %}

The alpha helper is here:

{% embed url="<https://vdo.ninja/alpha/icecast>" %}
<https://vdo.ninja/alpha/icecast>
{% endembed %}

The helper builds a normal VDO.Ninja source URL with `&push` and `&icecastpush` enabled. Keep that source tab open while broadcasting; it captures the local audio and publishes it to the Icecast-compatible source endpoint.

There is also an optional relay mode that builds a `&view` URL with `&icecastview`. Relay mode is for cases where another VDO.Ninja source is already live and you want a second browser tab to listen to that stream and forward it to Icecast/AzuraCast.

## Basic workflow

1. Choose the VDO.Ninja stream ID you want to publish. For example:

   `FUSION_ONLINE`
2. Open the Icecast helper:

   `https://vdo.ninja/icecast`
3. Leave **Publish local audio with \&push** selected and enter the stream ID, such as `FUSION_ONLINE`.
4. Enter your Icecast or AzuraCast source details. Use the source/ingest endpoint, not the public listener URL.
5. Click **Generate**, then **Open**.

The generated source URL will look similar to:

`https://vdo.ninja/?push=FUSION_ONLINE&audioonly&proaudio&icecastpush&icecastauto=1`

If the source settings are saved in the browser, the generated URL can avoid putting the source password in the address bar. If the URL needs to be portable to another machine, enable **Include source credentials in the generated URL**, but treat the resulting link like a password.

## Optional relay workflow

If the audio is already being sent into VDO.Ninja from another browser, use **Relay an existing VDO.Ninja stream with \&view** in the helper. This creates a second browser tab that receives that VDO.Ninja audio and publishes it to Icecast/AzuraCast:

`https://vdo.ninja/?view=FUSION_ONLINE&novideo&proaudio&icecastview&icecastauto=1`

## AzuraCast compatibility

Yes, this should work with AzuraCast when the station exposes an Icecast-compatible source mount. Use the station's source connection details, usually the source username, source password, host/port, and mountpoint.

Do not use the public listener URL, such as an `/listen/` URL. VDO.Ninja needs the source endpoint that accepts a live encoder/source connection.

AzuraCast deployments vary, so the accepted audio format depends on the station and mount configuration. AAC is the default in VDO.Ninja when the browser supports it. Ogg Opus or WebM Opus can also be selected, but the Icecast/AzuraCast mount must accept that format.

## URL parameters

Use an explicit mode flag to enable Icecast/AzuraCast publishing:

* `&icecastpush` publishes the local audio from the same `&push` source tab.
* `&icecastview` publishes received remote audio from a `&view` or scene/room relay tab.

Do not use a generic `&icecast` flag for room workflows. A room can have both local and incoming audio, so the mode must be explicit.

| Parameter              | Aliases                                  | Purpose                                                                                                        |
| ---------------------- | ---------------------------------------- | -------------------------------------------------------------------------------------------------------------- |
| `&icecastpush`         | `&icecastlocal`, `&icecastmic`           | Publishes this tab's local VDO.Ninja source audio. Use with `&push`.                                           |
| `&icecastview`         | `&icecastremote`, `&icecastfromview`     | Publishes received VDO.Ninja audio. Use with `&view`, `&scene`, or a receive-only relay tab.                   |
| `&icecastauto=1`       | `&icecastautostart=1`                    | Starts publishing automatically once audio is available and settings are complete.                             |
| `&icecasttarget=`      | `&icecasturl`, `&icecastsource`          | Full Icecast-compatible source URL, including mountpoint.                                                      |
| `&icecastserver=`      | `&icecasthost`                           | Server URL when you want VDO.Ninja to combine it with `&icecastmount`.                                         |
| `&icecastmount=`       | `&icecastmountpoint`                     | Mountpoint to append to `&icecastserver`.                                                                      |
| `&icecastuser=`        | `&icecastusername`                       | Source username. Defaults to `source`.                                                                         |
| `&icecastpassword=`    | `&icecastpass`, `&icecastsourcepassword` | Source password.                                                                                               |
| `&icecastformat=`      | `&icecastmime`, `&icecasttype`           | Audio format. Common values: `audio/aac`, `audio/ogg;codecs=opus`, `audio/webm;codecs=opus`.                   |
| `&icecastbitrate=`     | `&icecastab`                             | Audio bitrate in bits per second or kbps. For example, `128000` or `128`.                                      |
| `&icecastname=`        |                                          | Stream name metadata.                                                                                          |
| `&icecastgenre=`       |                                          | Genre metadata.                                                                                                |
| `&icecastdescription=` | `&icecastdesc`                           | Description metadata.                                                                                          |
| `&icecastpublic=1`     |                                          | Marks the stream public in Icecast metadata.                                                                   |
| `&icecastrelay=`       | `&icecastrelayurl`                       | Optional relay URL. VDO.Ninja uses its default relay unless this is set to `0`, `false`, `direct`, or `none`.  |
| `&icecastrelaytoken=`  |                                          | Token for private/custom relay deployments.                                                                    |
| `&icecaststream=`      | `&icecastsid`                            | In relay/view mode, selects which received stream should be published if the viewer receives multiple streams. |

## URL examples

Publish local audio to VDO.Ninja and Icecast/AzuraCast from the same source tab:

`https://vdo.ninja/?push=FUSION_ONLINE&audioonly&proaudio&icecastpush&icecastauto=1`

Include source settings directly in the URL:

`https://vdo.ninja/?push=FUSION_ONLINE&audioonly&proaudio&icecastpush&icecasttarget=https%3A%2F%2Fradio.example.com%3A8000%2Fstream&icecastuser=source&icecastpassword=SOURCE_PASSWORD&icecastauto=1`

Build the source endpoint from server plus mount:

`https://vdo.ninja/?push=FUSION_ONLINE&audioonly&proaudio&icecastpush&icecastserver=https%3A%2F%2Fradio.example.com%3A8000%2F&icecastmount=stream&icecastpassword=SOURCE_PASSWORD`

Force direct publishing without the relay:

`https://vdo.ninja/?push=FUSION_ONLINE&audioonly&proaudio&icecastpush&icecastrelay=0&icecasttarget=https%3A%2F%2Fradio.example.com%3A8000%2Fstream&icecastpassword=SOURCE_PASSWORD`

Relay an existing VDO.Ninja source from a second browser tab:

`https://vdo.ninja/?view=FUSION_ONLINE&novideo&proaudio&icecastview&icecastauto=1`

## Browser and relay notes

The publishing happens from the browser tab. Some Icecast servers do not accept browser uploads directly because of CORS, HTTPS, mixed-content, or firewall rules. VDO.Ninja uses an Icecast relay by default to avoid many of those browser limitations.

If your Icecast/AzuraCast source endpoint is available over HTTPS and supports browser CORS uploads, direct publishing may work. If not, leave the relay enabled.

For HTTP-only servers loaded from the HTTPS VDO.Ninja site, the relay is normally required because browsers block mixed-content uploads.

## Troubleshooting

* If the VDO.Ninja page says **Waiting for VDO.Ninja audio**, confirm the microphone/source is active. In relay mode, also confirm the remote sender is live and that the `&view=` stream ID is correct.
* If the Icecast server rejects the stream, confirm the source URL, username, password, mountpoint, and accepted audio format.
* If you are using AzuraCast, copy the source connection details from the station profile instead of the public listening link.
* Keep the generated viewer tab open for the full broadcast. Closing it stops the Icecast/AzuraCast source.


# Versus.cam

Focus on ease of use and high-bitrate / e-sports streams

{% embed url="<https://versus.cam/>" %}

Versus.cam is the upcoming and standalone replacement for the [vdo.ninja/monitor](https://vdo.ninja/monitor) page. Versus.cam has some interesting features that are specific to the upcoming version of VDO.Ninja, so at the moment it only works in conjunction with [vdo.ninja/alpha](https://vdo.ninja/alpha/).

### Details

* It contains a larger and dedicated graph per scene/view link than what the [vdo.ninja/beta/'s ](https://vdo.ninja/beta/)director room has under scene-stats. Both color code to indicate packet loss, where red is bad, and green is good.
* It is setup to use a group room by default, with a very simple interface to login and get started without visiting VDO.ninja itself.
* Despite having a group room by default, it works with standalone push/view links as well, via the "Add a stream manually" button, which lets you include normal view links that exist outside rooms.
* All the scene links and invite links are preconfigured for E-Sports , where video is set to pull around 20-mbps for smooth 1080p60 game play. The idea is, if you choose to use this page for creating links, it's all already setup to be used for ingestion.
* The room is configured so that guests cannot see or talk to each other. All guests can do is text-chat with the versus host.

![](/files/TGdhg133sTY6GxrDK6x3)

* Versus.cam is compatible with a director and the director room, so you can use a director room AND the Versus.cam room at the same time, without conflict.
* A new feature that Versus.cam has, that will also soon be coming to the normal VDO.Ninja directors' room, is the ability to **dynamically change the resolution and bitrate of remote scenes**. This works by means of the [`&remote`](/advanced-settings/settings-parameters/remote) control feature, which is preconfigured in the links already, so no director is needed when using versus. This will then also work with non-room links, so long as [`&remote`](/advanced-settings/settings-parameters/remote) is included in their URL.
* I don't intend to add many advanced features to this site.
* It's designed to be very simple, elegant, and hyper focused on a single use case and user type.
* E-Sports and one-way ingestion of very high quality video. I'll likely be making more scenario-specific interfaces in the future like this, to make VDO.Ninja easier and less cluttered for common use cases.
* Versus.cam is built using the VDO.Ninja IFRAME API, which I hope demonstrates the flexibility of it.
* Versus.cam is only supported by Chrome/Chromium-based browsers; it isn't yet compatible with Firefox/Safari (they lack the features needed for it to operate).

[Please report bugs](https://discord.gg/qWDshMsTar). It's a first release, using the alpha version of VDO.Ninja, so bugs are kind of expected.

{% embed url="<https://youtu.be/I12ASNWHPPI>" %}
<https://youtu.be/I12ASNWHPPI>
{% endembed %}

## Updates

{% content-ref url="/pages/7wxs0RK4Ovi7mRC1e8ZQ" %}
[Updates - Versus.cam](/updates/updates-versus.cam)
{% endcontent-ref %}


# Speed and Quality Tests

Video streaming quality test

{% embed url="<https://vdo.ninja/alpha/check>" %}
<https://vdo.ninja/alpha/check>
{% endembed %}

## VDO.Ninja Speed and Quality Testing Tools

VDO.Ninja offers specialized testing tools to evaluate your connection quality for video streaming, focusing on metrics critical for WebRTC performance that standard speed tests don't measure.

### Speed Test

**URL:** [**https://vdo.ninja/speedtest**](https://vdo.ninja/speedtest)

The Speed Test provides real-time feedback on your WebRTC connection quality:

* Tests your camera or screen-sharing streaming performance
* Visualizes critical metrics with live graphs:
  * Bitrate (kbps)
  * Buffer delay (ms)
  * Packet loss percentage
* Allows testing against different global regions
* Provides detailed logs of connection statistics
* Supports variable bitrate testing (low/high/default)

This tool is ideal for quick diagnostics and troubleshooting your own setup before important streams.

### Automated Check Test for pre-testing guests

**URL:** [**https://vdo.ninja/check**](https://vdo.ninja/check)

The Check Test runs comprehensive automated tests of a user's system and connection:

* Conducts network bandwidth measurements via Cloudflare
* Tests camera and microphone access
* Performs automated testing at increasing bitrates (2500 → 4000 → 6000 kbps)
* Takes approximately 90 seconds to complete
* Automatically stores results on the server for up to 7 days
* Generates shareable results links

Pre-checking guests days before a live stream is crucial for identifying and resolving technical issues in advance, preventing embarrassing on-air failures and giving production teams adequate time to implement solutions without the pressure of an imminent broadcast.

#### Key Features:

* **Shareable Results**: After completion, provides a link to results that can be shared with stream organizers
* **Pre-assigned IDs**: Use `?id=xxx` parameter to pre-assign test IDs (example: `https://vdo.ninja/check?id=exampleGuest123`)
* **Screening Tool**: Ideal as a pre-tech-check for guests before important streams

### Results Viewer

**URL:**[ **https://vdo.ninja/results?id=xxx**](https://vdo.ninja/results?id=xxx)

View comprehensive test results including:

* Average video bitrate
* Buffer delay (video latency)
* Packet loss statistics
* CPU/network limitation indicators
* Browser and device information
* Codec support details

### Why Packet Loss Matters

Packet loss is critical for WebRTC video quality but is not measured by standard speed tests. Even small amounts of packet loss can cause:

* Video freezing
* Audio dropouts
* Quality degradation
* Increased latency

The VDO.Ninja tests specifically measure packet loss percentages, with ideal results being under 0.1% and problematic levels exceeding 1%.

These tools are essential for properly evaluating streaming readiness, especially when screening multiple participants before important broadcasts.

<figure><img src="/files/YwSjgqpameZ8N3ayIumW" alt=""><figcaption></figcaption></figure>

Testing regions for VDO.ninja/check\
[https://vdo.ninja/regions](https://vdo.ninja/alpha/regions)

There is also another Speed Test option here:\
<https://vdo.ninja/speedtest>

## Updates

{% content-ref url="/pages/oduLYsIu6NsbU234sSV0" %}
[Updates - Speed Test](/updates/updates-speed-test)
{% endcontent-ref %}


# Comms

Use Comms for browser-based production intercom, talkback, and multi-group audio chat.

Comms is a browser-based intercom app built on VDO.Ninja. Open <https://comms.cam/> or <https://vdo.ninja/comms.html>, pick a room, allow your microphone, and then choose which group you want to talk with.

The simple version: it is like having several walkie-talkie channels in one web page. A producer, host, camera operator, remote guest, or family member helping with a stream can all be in the same Comms room, but only hear the group they are supposed to hear.

## When to use it

Use Comms when you need private production audio that is separate from the show audio.

Common uses:

* A producer talks to hosts without going live on the stream.
* Camera operators can hear direction from the producer.
* A guest can be placed in a waiting or backstage group before going on air.
* A parent, teacher, coach, or helper can coordinate people from a phone without installing an app.
* A small team can keep a private voice channel open while OBS, Zoom, YouTube, or another production tool handles the public show.

Comms is not meant to replace the normal VDO.Ninja guest room for the final video program. It is for coordination, talkback, and intercom-style audio.

## Quick start

1. Open <https://comms.cam/>.
2. Enter a unique room name.
3. Add a room password if the room should be private.
4. Select **Get started!**.
5. Allow microphone access when the browser asks.
6. Select **START** inside the VDO.Ninja audio panel.
7. Click or tap the group you want to talk with.

<figure><img src="/files/emdI4uuydmZhYGsFM0ww" alt="Comms start screen on a mobile browser"><figcaption><p>Mobile start screen: enter a room name, optionally add a password, then tap Get started.</p></figcaption></figure>

Everyone who needs to talk together should use the same room name and password. For a simple setup, send everyone the same link and tell them which group to click when they join.

## How the groups work

The group buttons are the main point of the app.

| What you do                     | What it means                                                    |
| ------------------------------- | ---------------------------------------------------------------- |
| Click a group button            | You join that group and talk/listen there                        |
| Click more than one group       | You talk and listen in more than one group at the same time      |
| Click the eye button on a group | You listen to that group without putting your microphone into it |
| Click the active group again    | You leave that talk group                                        |
| Use number keys on desktop      | Quickly toggle the first group buttons by keyboard               |

If you are busy and just need the plain-English rule: green group buttons are where your microphone is going. The eye icon is for listening without talking into that group.

<figure><img src="/files/jkNFFMNqtXBShZq7xOb7" alt="Comms desktop room with group buttons, microphone setup, and chat"><figcaption><p>Desktop room view: group buttons are on top, the microphone setup is in the middle, and room chat is on the right.</p></figcaption></figure>

Comms uses VDO.Ninja group routing underneath. In this app, group routing is strict by default, so pick at least one talk group or listen-only group before relying on the room.

## A simple family-style example

Imagine you are running a school concert stream and you have two children performing, one person at the laptop, and one person holding a phone near the stage.

You could create these groups:

* `Producer` for the person running the show.
* `Stage` for the person near the performers.
* `Backstage` for helpers who should not interrupt the stage person.

The laptop user can join `Producer` and click the eye on `Stage`, so they can give instructions while still listening to the stage helper. The stage helper can join only `Stage`, so they hear the producer without hearing every side conversation.

## Mobile web use

Comms is designed to work from a mobile browser. The mobile layout keeps the group buttons at the top, makes them horizontally scrollable, and moves chat behind a small chat button so the microphone page still fits.

<figure><img src="/files/ViT5oDQbei6WDIDlPw2y" alt="Comms mobile room with horizontal group buttons and microphone start button"><figcaption><p>Mobile room view: swipe the group buttons left or right, then tap START to enable the microphone.</p></figcaption></figure>

Mobile tips:

* Use headphones or earbuds to avoid echo.
* Keep the browser tab open while using Comms.
* Do not lock the phone if you need the microphone to stay active.
* On iPhone and iPad, Safari may limit background audio capture if the page is not active.
* On Android, Chrome is usually the safest browser choice.
* If the group buttons feel cramped, rotate the phone sideways or add `&mobile` to force the mobile layout.
* The chat bubble opens room text chat on mobile.

## Text chat

Comms includes a simple text chat for the room. Chat is useful for links, names, reminders, or instructions that people may miss over audio.

Chat is room-wide; it is not limited to the selected audio group.

To hide chat in a prepared link:

```
https://comms.cam/?room=ShowComms&hidechat
```

## Prepared links

You can prepare links so users do not need to type the room name manually.

Basic room:

```
https://comms.cam/?room=ShowComms
```

Room with password:

```
https://comms.cam/?room=ShowComms&password=secret123
```

Room with named groups:

```
https://comms.cam/?room=ShowComms&groups=Hosts,Backstage,Camera,Producer
```

Room with a listen-only group preselected:

```
https://comms.cam/?room=ShowComms&groups=Hosts,Backstage,Camera,Producer&groupview=Producer
```

Same app hosted directly from VDO.Ninja:

```
https://vdo.ninja/comms.html?room=ShowComms&groups=Hosts,Backstage,Camera,Producer
```

## Useful URL options

| Option                           | What it does                                                     |
| -------------------------------- | ---------------------------------------------------------------- |
| `&room=ShowComms`                | Sets the Comms room name                                         |
| `&password=secret123`            | Adds a room password                                             |
| `&groups=Hosts,Backstage,Camera` | Defines the group buttons shown in Comms                         |
| `&groupview=Producer`            | Lets the user listen to a group without talking into it          |
| `&label=Producer`                | Sets the user's display label                                    |
| `&push=producer-comms`           | Sets a stable VDO.Ninja stream ID                                |
| `&hidechat`                      | Hides the Comms chat panel                                       |
| `&mobile`                        | Forces the mobile layout                                         |
| `&video`                         | Enables video mode instead of the default audio-only mode        |
| `&api=ID`                        | Passes an API/OSC identifier into the embedded VDO.Ninja session |

Short aliases also exist for some options, such as `&r` for `&room`, `&pw` for `&password`, `&sid` for `&push`, and `&gv` for `&groupview`.

## Advanced group behavior

Comms uses these VDO.Ninja features behind the scenes:

* [`&group`](/advanced-settings/setup-parameters/and-group) / `&groups` controls which group a user is in.
* [`&groupmode`](/advanced-settings/setup-parameters/and-groupmode) makes group routing strict, so users outside a group do not just hear everyone.
* [`&groupview`](/advanced-settings/setup-parameters/and-groupview) lets someone listen to a group without joining it with their microphone.

This makes Comms useful as an IFB/talkback control surface. One person can listen to several groups, talk into one group, or temporarily be present in multiple groups by selecting more than one button.

## Local room memory

Comms remembers the last room and group setup in the browser's local storage. That is why the page may show **Restore last room** when you come back later.

This memory is local to that browser on that device. It is not a cloud account, and it does not automatically configure other phones or computers.

## Security and privacy notes

Use a unique room name and a password for real productions. Anyone with the room name and password can attempt to join.

Do not publish your Comms link in a public chat unless it is meant to be public. For shows, treat the Comms link like a backstage pass.

## Troubleshooting

If nobody can hear you:

* Make sure you clicked **START** after joining.
* Confirm the browser has microphone permission.
* Select a group button; in Comms, the group is the talk channel.
* Check that your microphone is not muted in the VDO.Ninja controls.

If you hear the wrong people:

* Check which group buttons are green.
* Check whether the eye icon is active on extra groups.
* Ask everyone to use the same room name and password.

If mobile audio stops:

* Keep the Comms tab open and visible.
* Keep the phone awake.
* Try headphones.
* Try Chrome on Android or Safari on iOS.

## Related

{% content-ref url="/pages/-MZX1ErXldKpl6308TzB" %}
[\&room](/advanced-settings/setup-parameters/room)
{% endcontent-ref %}

{% content-ref url="/pages/-MZWzGOLIUtPZii0Lxn1" %}
[\&password](/advanced-settings/setup-parameters/and-password)
{% endcontent-ref %}

{% content-ref url="/pages/hnwXUVoyx9yg44EUT3LO" %}
[\&group](/advanced-settings/setup-parameters/and-group)
{% endcontent-ref %}

{% content-ref url="/pages/CIK9xx91mLs0kfYMcnXI" %}
[\&groupview](/advanced-settings/setup-parameters/and-groupview)
{% endcontent-ref %}

{% content-ref url="/pages/2iac4NY4V7Y8NiGh2Ocn" %}
[\&groupmode](/advanced-settings/setup-parameters/and-groupmode)
{% endcontent-ref %}

{% content-ref url="/pages/-MZXP2U7678vEPo5Yxms" %}
[\&push](/advanced-settings/setup-parameters/push)
{% endcontent-ref %}

{% content-ref url="/pages/-MZNYhxR\_5-Ep\_h\_N74w" %}
[\&label](/advanced-settings/setup-parameters/label)
{% endcontent-ref %}

{% content-ref url="/pages/Oi1lQ2F8L7hGic0omnrO" %}
[Updates - Comms](/updates/updates-comms)
{% endcontent-ref %}


# Teleprompter Tool

Teleprompter tool for flipping, mirroring, and rotating websites or chat overlays for readable on-camera prompts.

{% embed url="<https://vdo.ninja/teleprompter>" %}
<https://vdo.ninja/teleprompter>
{% endembed %}

Created a tool that lets you rotate, flip, and mirror any cors-compatible website. It's designed mainly for teleprompters.

* There are drop downs to switch between source modes, rotation, transformation
* It will store the last used settings automatically, and restore automatically on reload. simple
* Passing discord or chat pop out links will be auto-converted into a cors-friendly embed version of the chat pop out
* (optionally) it can take `&link` with a URL value, or `&twitch` to pass a user name
* Hide menu button; to show the menu again, just reload the page

This works great for reading chat out from a teleprompter or even just for VDO.Ninja feeds. VDO.Ninja works great for sending remote teleprompter feeds to something like a Firestick 4K Max, and this teleprompting website should make it easy to flip/invert/mirror the video as needed.

<figure><img src="/files/ZWC3OXYeVEI4DOBQcZF2" alt=""><figcaption></figcaption></figure>


# LUT maker for color grading

PNG and 3D LUT maker for color calibration

Using accurate color samples obtained from the local paint shop (free) or a color checker card from Datacolor/Aliexpress, you can create online a color filter (LUT) for the purpose of color correcting video recordings, photos, and OBS live streams.\
\
This tool can create custom LUTS (PNG or 3D CUBE) on demand; you just need color references cards to get started. OBS Studio supports PNG-based LUTS, giving everyone the taste of pro-level color grading for free.\
\
It's also open-source and no downloads are needed; you can run the script using Google Colab online. A video guide is available to walk you thru out to customize it, plus the code can be easily adjusted to meet your own needs or preferences.\
\
<https://github.com/steveseguin/color-grading>

{% embed url="<https://www.youtube.com/watch?v=pu9IpbfckDo>" %}

\ <br>


# VDO.Ninja native mobile app guide

Complete guide to the VDO.Ninja native Android and iOS apps, including room and direct publishing, WHIP, USB devices, screen sharing, recording, talkback, Social Stream, and quality tuning.

The VDO.Ninja native mobile apps are focused capture tools for phones and tablets. They are useful when the browser cannot access a feature you need, such as Android USB camera capture, native mobile screen sharing, USB audio, local recording, WHIP publishing, or mobile-specific camera controls.

{% embed url="<https://play.google.com/store/apps/details?id=flutter.vdo.ninja>" %}
Android app
{% endembed %}

{% embed url="<https://apps.apple.com/us/app/vdo-ninja/id1607609685>" %}
iOS app
{% endembed %}

<figure><img src="/files/fiyb2ohK7c1reodRw5th" alt="VDO.Ninja Android native app home screen with screen, camera, microphone, web, and help modes"><figcaption><p>The available capture modes depend on the device, platform, connected cameras, and connected audio devices.</p></figcaption></figure>

<figure><img src="/files/VkqoeMKWKSTBMgAGvgPN" alt="Diagram showing VDO.Ninja native app publishing paths for direct VDO.Ninja, WHIP only, WHIP alongside VDO.Ninja, WHEP viewing, talkback, and Social Stream Ninja"><figcaption><p>The native app can publish directly to VDO.Ninja, into a VDO.Ninja room, to a WHIP service, or to both VDO.Ninja and WHIP at the same time.</p></figcaption></figure>

## When to use the native app

Use the native app when you need one of these mobile-first workflows:

* A phone or tablet as a dedicated VDO.Ninja camera source.
* Android USB/UVC camera or HDMI capture adapter input.
* Android or iOS mobile screen sharing.
* USB, USB-C, or Lightning audio input.
* WHIP publishing to Meshcast, MediaMTX, Cloudflare Stream, Twitch-style WebRTC ingest, or another WHIP-compatible service.
* Local device recording.
* Producer talkback through Remote Audio Stream.
* Social Stream Ninja chat monitoring while filming.
* Professional camera controls such as exposure, focus, white balance, and zoom where the device supports them.

The web version at <https://vdo.ninja> remains the most flexible director, viewer, and control surface. The native app is best used as a reliable mobile capture app.

## Quick start

1. Open the native app and choose a capture mode, such as **BACK CAMERA**, **SCREEN**, **USB CAMERA**, or **MICROPHONE ONLY**.
2. Enter a **Stream ID** if you want a stable VDO.Ninja push/view link. Leave it blank if you want the app to generate one.
3. Enter a **Room name** if you want the app to join a VDO.Ninja room or director session.
4. Enter a **Password** if the room or stream is password protected.
5. Select the microphone. If you plug in USB audio after opening the screen, tap **Refresh Mics**.
6. Tap the connect button and confirm any camera, microphone, screen, USB, or recording permissions requested by Android or iOS.

<figure><img src="/files/jVUbypxXTb4ZlX2pKKIN" alt="VDO.Ninja native app publishing settings with stream ID, room name, password, microphone, and quality controls"><figcaption><p>Publishing Settings is where you choose the VDO.Ninja stream, room, microphone, quality mode, and advanced options.</p></figcaption></figure>

### Stream ID only

Use a **Stream ID** without a room when you want a simple direct push/view workflow.

```
Publisher: native app Stream ID = mycamera
Viewer:    https://vdo.ninja/?view=mycamera
```

This is the simplest way to use a phone as a camera source for OBS, vMix, a browser viewer, or another VDO.Ninja page.

### Room name

Use a **Room name** when you want the native app to join a VDO.Ninja room.

```
Publisher: native app Room name = myroom
Director:  https://vdo.ninja/?director=myroom
```

Rooms are useful when you need a director to manage guests, scene links, layouts, recording, or other room-based workflows.

### Stream ID and room name together

Use both fields when you want the app to join a room while keeping a predictable source ID. This is useful for permanent camera positions, named microphones, and event templates.

```
Publisher: native app Stream ID = widecam, Room name = myroom
Director:  https://vdo.ninja/?director=myroom
```

## Capture modes

### Screen

Use **SCREEN** to share the phone or tablet screen.

* Android can optionally capture system audio on Android 10+.
* Android 14+ may let you choose one app or the entire screen.
* iOS uses ReplayKit for screen sharing.
* For iOS screen share, 720p is usually safer than forcing 1080p for long sessions.
* Protected video apps, DRM content, and some system screens may appear black or may not include audio.

<figure><img src="/files/jGbjJyMLdH57zWub3gNN" alt="Android native app screen sharing settings with Capture System Audio enabled"><figcaption><p>Android screen sharing can capture system audio on supported Android versions when the source app allows it.</p></figcaption></figure>

### Back camera

Use **BACK CAMERA** for the main rear camera. This is the normal mode for using a phone as a mobile camera source.

### Front camera

Use **FRONT CAMERA** for selfie camera capture, talkback, or a presenter-facing view.

### Back ultra-wide and other lenses

Use **BACK ULTRA-WIDE** or other listed rear lenses when the device exposes them. Ultra-wide is useful for room views, event spaces, and wide desk shots.

### USB camera

Use **USB CAMERA** on Android when a UVC USB camera or compatible HDMI capture adapter is connected.

* Android-only in the native app.
* Requires a phone or tablet that supports USB host mode.
* A powered USB-C hub is recommended for webcams and HDMI capture dongles.
* If the USB device also exposes audio, it may appear in the microphone list.
* Grant Android USB permission when prompted.

The iOS native app does not expose USB camera capture. iOS can still use built-in cameras, screen sharing, and external USB/USB-C/Lightning audio devices supported by the OS.

<figure><img src="/files/Lx9QlReVxzY0alIsGn2I" alt="VDO.Ninja native app home screen with USB camera mode"><figcaption><p>USB CAMERA appears on Android when the app detects a compatible external camera.</p></figcaption></figure>

<figure><img src="/files/WYnnuSQIZEyXdNVpbz2H" alt="Android USB permission prompt for an external camera"><figcaption><p>Android asks for permission before the app can use a connected USB camera.</p></figcaption></figure>

### Microphone only

Use **MICROPHONE ONLY** to publish audio without video. This is useful for talkback, commentary, remote audio feeds, and lightweight monitoring.

### Web version

Use **WEB VERSION** when you need the full browser VDO.Ninja feature set from the same device.

### How to use

Use **HOW TO USE** to open the built-in help page from the app.

### iOS front + rear mix

On supported iOS devices, the app may show a **FRONT + REAR MIX** mode. This uses iOS MultiCam support to mix front and rear cameras together. Availability depends on the iPhone or iPad model.

## WHIP publishing

The native app can publish to a WHIP endpoint in addition to, or instead of, normal VDO.Ninja signaling. This means the app can be used as a general-purpose mobile WHIP publisher, even when the destination is not VDO.Ninja.

Common WHIP targets include:

* Meshcast.
* MediaMTX.
* Cloudflare Stream WebRTC ingest.
* A self-hosted WHIP/WHEP service.
* Any compatible WHIP ingest endpoint that accepts the codec and auth method used by the app.

<figure><img src="/files/CQGw6TFm8iQqHcq3XLYL" alt="Native app WHIP publishing settings filled with a Meshcast WHIP URL"><figcaption><p>Enable WHIP output, paste the publish endpoint, and choose whether to publish alongside VDO.Ninja or to WHIP only.</p></figcaption></figure>

### WHIP fields

* **Enable WHIP output**: Turns on WHIP publishing.
* **WHIP URL**: The full HTTPS WHIP publish endpoint.
* **Stream Key**: Optional bearer token. Leave this blank if the publish key is already part of the WHIP URL.
* **Alongside VDO.Ninja**: Publishes to VDO.Ninja and WHIP at the same time.
* **WHIP only**: Skips VDO.Ninja signaling and publishes only to the WHIP endpoint.

Use **WHIP only** when the phone should publish directly to a relay, CDN, SFU, or self-hosted WHIP server. Use **Alongside VDO.Ninja** when you want VDO.Ninja room/director features and a WHIP output at the same time.

### WHIP URL examples

Meshcast anonymous WHIP endpoint:

```
https://app.meshcast.io/api/gateway/whip/YOUR_PUBLISH_KEY
```

MediaMTX-style endpoint:

```
https://media.example.com/mystream/whip
```

VDO.Ninja WHIP ingest endpoint:

```
https://whip.vdo.ninja/YOURTOKENHERE
```

If the provider gives you an authorization token separately from the URL, enter the URL in **WHIP URL** and the token in **Stream Key**. The app sends the stream key as a bearer token.

### WHEP viewer source

The native app can also tell VDO.Ninja viewers to use a WHEP playback source when WHIP/WHEP infrastructure is handling distribution.

<figure><img src="/files/KxBcchNGLtbtkBXk7WTm" alt="Native app WHEP viewer source options including Auto, Meshcast, MediaMTX, Cloudflare Stream, and Manual WHEP URL"><figcaption><p>WHEP viewer source options help VDO.Ninja viewers pull from the WHIP/WHEP host instead of relying only on direct peer-to-peer delivery.</p></figcaption></figure>

Options include **Off**, **Auto**, **Meshcast**, **MediaMTX**, **Cloudflare Stream**, and **Manual WHEP URL**. Use **Auto** when the WHIP response includes a matching WHEP playback URL. Use **Manual WHEP URL** when your provider gives you a separate playback endpoint.

## Meshcast WHIP example

This workflow was tested with:

* Pixel 9a.
* VDO.Ninja Android native app.
* Logitech HD Pro Webcam C920 connected over USB.
* Meshcast anonymous WHIP/WHEP session.

The app exposed the C920 as **USB CAMERA**, requested Android USB permission, published audio and video into Meshcast via WHIP, and Meshcast playback showed the same USB camera feed.

For Meshcast, use the WHIP publish URL as the app's **WHIP URL**:

```
https://app.meshcast.io/api/gateway/whip/YOUR_PUBLISH_KEY
```

If Meshcast gives you a server hint, keep it:

```
https://app.meshcast.io/api/gateway/whip/YOUR_PUBLISH_KEY?server=ovh-use1
```

Leave the app's **Stream Key** field blank when the Meshcast key is already in the URL path.

To view the stream from Meshcast, open the matching watch, embed, or WHEP URL. Anonymous Meshcast sessions use the anonymous key as the view path:

```
https://app.meshcast.io/embed/YOUR_STREAM_KEY?server=ovh-use1
```

<figure><img src="/files/6dgnKy8Au7Apbe5wblJk" alt="Native app live USB camera preview while publishing"><figcaption><p>The live view shows the source preview, connection state, recording state, health overlay, and live controls.</p></figcaption></figure>

<figure><img src="/files/vHglPd5KAzPwgwQGKy2T" alt="Meshcast player showing the USB camera feed published from the native app"><figcaption><p>Meshcast playback receiving the Android USB camera feed via WHIP/WHEP.</p></figcaption></figure>

## USB audio

The native app can use external audio devices when Android or iOS exposes them as input devices.

1. Connect the USB, USB-C, or Lightning audio device before opening Publishing Settings.
2. Open the microphone list.
3. Tap **Refresh Mics** if the device is not listed.
4. Select the external input.
5. Use headphones or echo cancellation if talkback or remote audio is active.

For music, mixers, and professional microphones, test both **Unprocessed Audio** and the **Audio Processing** controls. Unprocessed audio avoids automatic echo cancellation, noise suppression, and gain control, but it also requires cleaner monitoring and echo management.

<figure><img src="/files/0ssahsi3001Irru8zEQ1" alt="Native app settings showing Local Recording, Unprocessed Audio, and Audio Processing controls"><figcaption><p>Recording and audio processing controls are available in Advanced Settings.</p></figcaption></figure>

## Recording

Enable **Local Recording** when you want the native app to save a local copy on the device. The live screen includes a recording indicator, and the overflow menu includes recording controls for recent files.

Use local recording when:

* You need a backup recording on the phone.
* You are using a high-quality mobile camera source.
* The network may be unreliable.
* You want to export or share a local file after the session.

Keep enough storage free, keep the phone powered, and test the full recording length before a paid or live event. Long captures can be limited by storage, thermals, battery saver behavior, and OS background restrictions.

For iOS screen sharing, ReplayKit controls what audio and video samples are made available. Protected apps may block video or audio.

## Talkback and remote audio

**Remote Audio Stream** lets the native app listen to a remote audio stream while publishing. This is useful for producer talkback, IFB-style monitoring, return program audio, or a private cue feed.

<figure><img src="/files/lf3JVZ8kfieHH997N1Nn" alt="Native app settings showing Stream Health Overlay, Professional Camera Controls, and Remote Audio Stream"><figcaption><p>Remote Audio Stream can bring a separate VDO.Ninja audio feed into the native app while the app is publishing.</p></figcaption></figure>

Recommended talkback setup:

1. Create or choose a VDO.Ninja audio-only stream for the producer or director.
2. Enable **Remote Audio Stream** in the native app.
3. Enter the remote stream ID if needed.
4. Use headphones whenever possible.
5. Enable echo cancellation if the phone speaker is being used.

Keep talkback separate from the main program feed unless you intentionally want the talkback audio to be heard by viewers.

## Social Stream Ninja

The native app can connect to Social Stream Ninja so the camera operator can see chat while filming.

<figure><img src="/files/S2WlDbyHv4rx79GuNGgX" alt="Native app Social Stream Ninja integration settings with session ID and connection mode"><figcaption><p>Enter the Social Stream Ninja session ID, then choose Peer-to-Peer or Server mode.</p></figcaption></figure>

Social Stream settings include:

* **Enable Social Stream**: Turns on chat integration.
* **Social Stream Session ID**: The session ID from Social Stream Ninja.
* **Peer-to-Peer**: Lower-latency chat connection.
* **Server**: Easier setup when peer-to-peer is blocked.
* **WebRTC Encryption Password**: Optional encryption password for peer-to-peer mode.

In the live view, the app can show chat controls, a text-to-speech toggle, and connection state so an operator can monitor comments without opening a separate device.

## Live controls

The live screen includes the controls operators usually need during a shoot:

* Mute or unmute microphone.
* Hide or show local video.
* Switch cameras.
* Open more actions such as torch, camera settings, audio settings, recording, and Android picture-in-picture.
* Copy or open a view link.
* Toggle Social Stream chat and text-to-speech when configured.
* Mute or unmute Remote Audio Stream when enabled.
* Watch recording and connection status.

When **Professional Camera Controls** is enabled, supported cameras can show controls for exposure, white balance, focus, and zoom. Built-in cameras also support tap-to-focus where the device exposes it. USB camera control support depends on the camera, Android device, and UVC feature support.

The **Stream Health Overlay** can show useful live stats such as bitrate, FPS, resolution, peer count, and connection state.

## Quality, bitrate, and codec FAQ

### How do I increase bitrate?

For direct VDO.Ninja viewers, bitrate is commonly requested from the viewer side:

```
https://vdo.ninja/?view=mycamera&videobitrate=6000
```

You can also use:

```
&bitrate=6000
```

On Android, the native app also exposes **Custom bitrate** in Advanced Settings. Enable it and enter a value in kbps. The app accepts 100 to 50000 kbps, with common defaults around 6000 kbps for 720p and 10000 kbps for 1080p. iOS currently relies on capture preset and WebRTC negotiation rather than this Android app-side bitrate control.

Higher bitrate is not always better. If the network has packet loss, weak WiFi, cellular jitter, or thermal throttling, a lower bitrate may look more stable.

### How do I change codec?

Codec selection is usually negotiated by the viewer, browser, device hardware, and target service.

Common VDO.Ninja viewer-side examples:

```
&codec=h264
&codec=vp9
&codec=av1
```

H.264 is often the safest mobile choice because phones usually have hardware acceleration. VP9 can look better for some detailed or screen-share content at lower bitrates, but it can cost more CPU. AV1 requires newer device and browser support and may be heavier.

For WHIP publishing, the WHIP service may also restrict codecs, profiles, bitrate, resolution, or frame rate.

### Should I use 1080p?

Use **Prefer 1080p** when you have tested the device, power, thermals, and network. For long mobile sessions, start with 720p at 30 fps and raise quality only after the full setup has proven stable.

For iOS screen sharing, avoid forcing 1080p unless you have tested it. 720p is often more reliable for long ReplayKit sessions.

### Why does quality drop after a few minutes?

Common causes are:

* Phone thermal throttling.
* Battery saver or background restrictions.
* Weak WiFi or packet loss.
* Too much bitrate for the available uplink.
* Too many direct peer-to-peer viewers.
* A codec that is expensive for the device.

Use a cooling fan, remove the phone case, keep the device powered, prefer 5 GHz WiFi or Ethernet, and use WHIP/Meshcast/WHEP fanout when many viewers need the same feed.

## Event checklist

For events such as weddings, ceremonies, panels, lectures, IRL streams, or mobile broadcasts:

1. Test the exact phone, camera, USB adapter, audio device, and network before the event.
2. Keep the phone connected to power.
3. Use a powered hub for USB cameras and HDMI capture adapters.
4. Disable battery saver and avoid thermal throttling.
5. Start at 720p and 30 fps unless the full setup has already proven stable at 1080p.
6. Use **WHIP only** when Meshcast or another WHIP service should handle viewer fanout.
7. Keep a second watch device open so you can verify the remote feed.
8. Run a short local recording test if the recording matters.
9. Verify talkback audio with headphones before going live.

## Troubleshooting

### USB CAMERA does not appear

* Confirm the device is Android. USB camera capture is not available in the iOS native app.
* Reconnect the camera and restart the app.
* Use a powered hub if the camera or capture card needs more power.
* Check that the camera is UVC compatible.
* Grant Android USB permission when prompted.

### USB audio is missing

* Connect the audio device before opening Publishing Settings.
* Tap **Refresh Mics**.
* Try another USB-C adapter or powered hub.
* On iOS, USB/USB-C/Lightning audio support depends on the device, adapter, and iOS audio routing behavior.
* Reopen Publishing Settings after the OS finishes switching audio routes.

### Screen share is black or has no audio

* Protected apps may block capture.
* On Android 14+, try sharing the entire screen instead of a single app.
* On Android, enable **Capture System Audio** only for apps that allow system audio capture.
* On iOS, ReplayKit decides whether screen audio is available.
* Drop to 720p if iOS screen sharing stops after a few seconds.

### WHIP fails to connect

* Confirm the WHIP URL starts with `https://` and points to a WHIP publish endpoint, not a watch or WHEP URL.
* Leave **Stream Key** blank when the key is already in the URL.
* Use a fresh Meshcast anonymous session if the old one expired.
* Make sure only one publisher is using the same key.
* Check whether the WHIP service requires a specific codec, token, or URL format.

### Viewers see nothing

* Open the matching VDO.Ninja view link, room director link, Meshcast watch URL, embed URL, or WHEP URL.
* Do not open the WHIP publish URL as a viewer.
* Wait a few seconds after the phone connects.
* Keep the same server hint on publish and view URLs when a server hint is present.
* If using WHEP viewer source, confirm the WHEP URL is reachable from the viewer's network.

## Related pages

{% content-ref url="/pages/-MiIGNYQQJFIEGOeFOVO" %}
[Native mobile app versions](/steves-helper-apps/native-mobile-app-versions)
{% endcontent-ref %}

{% content-ref url="/pages/yyN0VXelhxCHqoDlzeh4" %}
[How to improve quality of the native app](/guides/improving-quality-of-the-native-app)
{% endcontent-ref %}

{% content-ref url="/pages/-MZfz0Nym0yxXMKxlf2M" %}
[How to control bitrate/quality](/guides/how-do-i-control-bitrate-quality)
{% endcontent-ref %}

{% content-ref url="/pages/-MZdsHq8G6aE\_RlY7fWi" %}
[\&videobitrate](/advanced-settings/video-bitrate-parameters/bitrate)
{% endcontent-ref %}

{% content-ref url="/pages/-MZdudjg0hJYNiC3VGwt" %}
[\&codec](/advanced-settings/video-parameters/codec)
{% endcontent-ref %}

{% content-ref url="/pages/-MZfwIo7kzNiTYxjSnOH" %}
[Packet Loss](/common-errors-and-known-issues/packet-loss)
{% endcontent-ref %}

{% content-ref url="/pages/zDeNQcpkXYzMdqF73cIT" %}
[WHIP and WHEP tooling](/steves-helper-apps/whip-and-whep-tooling)
{% endcontent-ref %}

{% content-ref url="/pages/9kYE934JxRrPbrHCbd5b" %}
[Meshcast.io](/steves-helper-apps/meshcast.io)
{% endcontent-ref %}

{% content-ref url="/pages/Rx73wZVNHnSDztNK81t6" %}
[Options to record streams](/guides/options-to-record-streams)
{% endcontent-ref %}

{% content-ref url="/pages/2pGU9TxBaXEy72kvDG33" %}
[Social Stream Ninja](/steves-helper-apps/social-stream-ninja)
{% endcontent-ref %}


# Native mobile app versions

VDO.Ninja mobile apps for Android and iPhone or iPad, including local recording, screen recording, USB audio, and advanced mobile camera workflows.

VDO.Ninja also offers native Android and iOS apps for mobile capture workflows. These apps are useful if you want phone-to-OBS video, mobile screen recording, local recording, USB microphone support, or mobile-specific camera features such as ultra-wide lenses and dual-camera capture.

These native apps are still more focused than the full browser experience, but they now cover a useful set of mobile production tasks.

{% embed url="<https://play.google.com/store/apps/details?id=flutter.vdo.ninja>" %}
Android
{% endembed %}

{% embed url="<https://apps.apple.com/us/app/vdo-ninja/id1607609685>" %}
iOS
{% endembed %}

## Current feature highlights

Both native apps support:

* local recording
* screen recording
* improved USB audio support, including support that helps with external microphones such as DJI mics
* ultra-wide camera support
* Social Stream Ninja integration for live chat and TTS workflows
* an audio-only talkback channel, so the phone can hear a remote director or OBS output while streaming

Android-specific highlights:

* USB video and UVC capture support
* expanded camera selection options
* a gallery for reviewing and deleting recorded clips

iOS-specific highlights:

* dual-camera mixing mode using front and rear cameras together
* continued USB microphone support improvements

## Current limitations

* The native apps remain focused on capture and publish workflows rather than replacing the full browser-based director and viewer experience.
* Platform restrictions still apply to some mobile screen-sharing behaviors, especially on older iOS versions.

## Android downloads

The Google Play version is the preferred install path:

{% embed url="<https://play.google.com/store/apps/details?id=flutter.vdo.ninja>" %}
Google Play Store
{% endembed %}

For testing newer Android builds before Play Store rollout, a direct APK may also be provided:

{% embed url="<https://drive.google.com/file/d/1cVZPklsdrurpT7GEX2w_igRRGpt0PnAL/view?usp=drive_link>" %}
Current Android test APK noted March 1, 2026
{% endembed %}

Source code:

{% embed url="<https://github.com/steveseguin/vdon_flutter/>" %}
GitHub repository for the native app project
{% endembed %}

## iOS download

{% embed url="<https://apps.apple.com/us/app/vdo-ninja/id1607609685>" %}
Apple App Store
{% endembed %}

The iOS build approved on March 1, 2026 includes ultra-wide camera support in addition to the newer dual-camera and local-recording improvements already noted above.

## Notes

* If a mobile hardware encoder is unstable for screen sharing or playback, testing `&codec=vp8` on the receiving side can still help in some cases.
* Older versions of iOS have more restrictions around screen recording and screen broadcast behavior.
* USB device behavior still depends on the phone, OS version, adapters, and vendor firmware.

## Related

{% content-ref url="/pages/hWcjH63YrSr2nIEDKV24" %}
[VDO.Ninja native mobile app guide](/steves-helper-apps/native-mobile-app)
{% endcontent-ref %}

{% content-ref url="/pages/yyN0VXelhxCHqoDlzeh4" %}
[How to improve quality of the native app](/guides/improving-quality-of-the-native-app)
{% endcontent-ref %}

{% content-ref url="/pages/S9amKQb7V4KTBUEFiksO" %}
[Updates - Native mobile apps](/updates/updates-native-mobile-apps)
{% endcontent-ref %}


# VDO Applications

Useful tools that could help you make your stream better

| Tool                                     | URL                                                |
| ---------------------------------------- | -------------------------------------------------- |
| Device Support                           | <https://vdo.ninja/supports>                       |
| Device IDs                               | <https://vdo.ninja/devices>                        |
| Web-based Media Conversion Tools         | <https://isolated.vdo.ninja/convert>               |
| Electron                                 | <https://vdo.ninja/electron>                       |
| Screen Recorder                          | <https://vdo.ninja/screenrecorder>                 |
| Game Capture                             | <https://vdo.ninja/gamecapture>                    |
| Video streaming quality test             | <https://vdo.ninja/speedtest>                      |
| Remote Monitor                           | <https://vdo.ninja/monitor>                        |
| Companion                                | <https://companion.vdo.ninja/>                     |
| MIDI Controller App                      | <https://vdo.ninja/alpha/remotemidi>               |
| API / IFRAME sandbox page for developers | <https://vdo.ninja/alpha/iframe>                   |
| WHIP publish tool                        | <https://vdo.ninja/whip>                           |
| PTZ control surface                      | <https://vdo.ninja/ptz.html>                       |
| Ninja OBS Plugin                         | <https://steveseguin.github.io/ninja-obs-plugin/>  |
| Ninja VST3 Plugin                        | <https://steveseguin.github.io/Ninja-VST3-Plugin/> |
| Meshcast v2 app                          | <https://app.meshcast.io>                          |
| Ninja Backer                             | <https://ninjabacker.com>                          |
| Ninja Chatter                            | <https://ninjachatter.com>                         |


# Tech Demonstrations

Useful tools that could help you make your stream better

<table><thead><tr><th width="197">Tool</th><th width="549">Description</th></tr></thead><tbody><tr><td><a href="https://vdo.ninja/examples/">Overview</a></td><td>Overview of all the Tech Demonstrations</td></tr><tr><td><a href="https://vdo.ninja/examples/p2p.html">P2P</a></td><td>How to use VDO.Ninja as a data transport tunneling service</td></tr><tr><td><a href="https://vdo.ninja/twitch">Twitch</a></td><td>How to have a Twitch live chat side-by-side with VDO.Ninja on the same screen (viewing Twitch chat while using VDO.Ninja on mobile)</td></tr><tr><td><a href="https://vdo.ninja/examples/youtube.html">YouTube</a></td><td>How to have a YouTube live chat side-by-side with VDO.Ninja on the same screen</td></tr><tr><td><a href="https://vdo.ninja/examples/dual.html">Dual</a></td><td>How to have two VDO.Ninja windows (or any windows really) open on the same page; Picture-in-Picture style</td></tr><tr><td><a href="https://vdo.ninja/examples/multi.html?rooms=room1xx,room2xx,room3xx">Multiple Rooms</a></td><td>How to have multiple director rooms open in a single tab; note the URL's <code>?rooms=xx,yy</code> command</td></tr><tr><td><a href="https://versus.cam/">versus.cam</a></td><td>How to use the IFRAME API to transport audio and video to the parent frame in Chrome</td></tr><tr><td><a href="https://vdo.ninja/examples/addtoscene.html">Add to scene</a></td><td>How to use the IFrame API to add/remove guests to a scene remotely</td></tr><tr><td><a href="https://vdo.ninja/examples/bigmutebutton.html">Big Mute Button</a></td><td>Mobile-friendly big-button for muting yourself easily</td></tr><tr><td><a href="https://vdo.ninja/examples/sensors.html">Sensors</a></td><td>How to transmit sensor and video data from a phone to a computer, drawing it to canvas.</td></tr><tr><td><a href="https://vdo.ninja/examples/sensoroverlay.html">Sensor Overlay</a></td><td>Overlay the incoming speed from remote mobile sensor data onto your video</td></tr><tr><td><a href="https://vdo.ninja/midi">MIDI</a></td><td>Demonstrates the MIDI API for VDO.Ninja</td></tr><tr><td><a href="https://vdo.ninja/examples/draggable.html">Draggable</a></td><td>Demonstrates how to drag multiple windows around, if you wanted to create a custom layout of elements. (experimental)</td></tr><tr><td><a href="https://vdo.ninja/examples/chatoverlay.html">Chat overlay</a></td><td>Example of a chat-only interface for VDO.Ninja; maybe dockable into OBS even.</td></tr><tr><td><a href="https://vdo.ninja/examples/iframe.outbound-stats.html">iFrame outbound stats</a></td><td>iframe.outbound-stats.html demonstrates how to get stats from VDO.Ninja using the IFRAME API</td></tr><tr><td><a href="https://vdo.ninja/examples/changepass.html">Change password</a></td><td>Lets you create passwords and related HASH values for VDO.Ninja rooms</td></tr><tr><td><a href="https://vdo.ninja/webhid">WebHID</a></td><td>WebHID demonstrates how to interface with a USB device, like a Streamdeck (mouse/keyboard not supported)</td></tr><tr><td><a href="https://vdo.ninja/examples/zoom.html">Zoom</a></td><td>A tool for letting you publish into VDO.Ninja, but then full-screen the window once setup, allowing for window-capturing into zoom.</td></tr><tr><td><a href="https://vdo.ninja/examples/obs_remote/index">OBS Remote</a></td><td>Also hosted on GitHub elsewhere, but it's an example of how to remotely control OBS using VDO.Ninja's tunneling abilities</td></tr><tr><td><a href="https://vdo.ninja/alpha/examples/overlay">Overlay</a></td><td>Create a sample of how to apply a custom full-page overlay on top of VDO.Ninja</td></tr><tr><td><a href="https://vdo.ninja/examples/powerpoint">PowerPoint Remote Control</a></td><td>Remote PowerPoint Web control via VDO.Ninja (IFrame API)</td></tr><tr><td><a href="https://vdo.ninja/examples/rotated.html">Rotate website</a></td><td>Lets you rotate a specific website 90, 270, or 180 degrees</td></tr><tr><td><a href="https://vdo.ninja/examples/waitingroom?room=TESTROOM123">Waiting room</a></td><td>Prompts a guest who is joining a room with a message if the director is not there yet</td></tr><tr><td><a href="https://vdo.ninja/alpha/examples/obsremote">OBS Remote Control</a></td><td>A code example of how to use the IFRAME API of VDO.Ninja to remotely control OBS</td></tr><tr><td><a href="https://vdo.ninja/alpha/examples/ptz">PTZ Remote Controller</a></td><td>Remotely control the pan tilt of a camera</td></tr></tbody></table>


# Invite Link Generators

Link generators to create invite links for VDO.Ninja

| Tool                         | URL                                                                                                                   |
| ---------------------------- | --------------------------------------------------------------------------------------------------------------------- |
| Wizard-style                 | <https://linkgen.vdo.ninja/>                                                                                          |
| Toggle-style                 | <https://invite.vdo.ninja/>                                                                                           |
| Excel-based                  | [https://drive.google.com/file/d/1A7qiFAC](https://drive.google.com/file/d/1A7qiFACoCxk9J-uTv9yyZa5yQWzFol8l/view)... |
| Trampoline                   | <https://rse.github.io/vdo-ninja-trampoline/>                                                                         |
| URL Obfuscator for VDO.Ninja | <https://invite.cam/>                                                                                                 |
| Managed short links          | <https://invite.cam/dashboard>                                                                                        |
| Large lobby and access flow  | <https://app.invite.cam/>                                                                                             |
| Dock for OBS                 | <https://vdo.ninja/dock>                                                                                              |

Use [invite.cam](https://invite.cam/) when you mainly need to hide, encode, or shorten a VDO.Ninja URL. Use the signed-in dashboard when you need reusable short links that can be managed later.

For larger lobby, waiting-list, helper, and room-owner workflows, see [app.invite.cam](/steves-helper-apps/app-invite-cam).

For OBS/browser-source persistence, see [Permanent links, reusable invites, and stream IDs](/guides/how-to-get-permanent-links). A short link can make an invite easier to share, but the underlying guest/source still needs a stable stream ID, `&permaid`, scene, or slot strategy.


# app.invite.cam

A larger lobby and invite workflow for controlling access before users join VDO.Ninja.

<https://app.invite.cam> is a lobby and invite workflow that can sit in front of VDO.Ninja.

Use it when you expect many people to request access, or when you want authenticated room ownership, waiting lists, and owner-controlled grant/revoke decisions before sending people into the actual VDO.Ninja room.

## What it is for

`app.invite.cam` is useful for:

* larger public lobbies
* events where many people may request access
* owner-managed waiting lists
* signed-in or authenticated access workflows
* reusable host room links tied to a signed-in owner
* separating the public invite/lobby from the final VDO.Ninja room link

## Permanent room idea

The simple version: the host signs in, gets a room under their name, and shares that app.invite.cam room link. Guests can wait in the lobby, raise their hand, chat, or be moved into the live VDO.Ninja room when the host is ready.

This is different from a raw VDO.Ninja `&push` stream ID. `app.invite.cam` manages the lobby, identity, helpers, and invite rules before someone reaches the final VDO.Ninja room flow. If your only problem is "my OBS browser source changes when a guest refreshes," start with [Permanent links, reusable invites, and stream IDs](/guides/how-to-get-permanent-links).

## How it differs from VDO.Ninja URL parameters

`app.invite.cam` is not the same layer as VDO.Ninja room/source parameters.

* [`&requireapproval`](/advanced-settings/director-parameters/and-requireapproval) approves guests at the VDO.Ninja handshake-server room-admission layer.
* [`&roomcap`](/advanced-settings/director-parameters/and-roomcap) caps admission to a claimed VDO.Ninja room.
* [`&queue`](/advanced-settings/guest-queuing-parameters/queue) controls the guest activation workflow inside VDO.Ninja.
* [`&prompt`](/advanced-settings/settings-parameters/and-prompt) asks a source publisher before sending media to a viewer.
* `app.invite.cam` handles the larger invite/lobby and owner grant/revoke workflow before the final VDO.Ninja room flow.

## Typical flow

1. A user opens the `app.invite.cam` lobby link.
2. The user signs in or joins the lobby flow.
3. The room owner sees the waiting user.
4. The owner grants or revokes access.
5. Approved users are sent to the intended VDO.Ninja link or room flow.

## Related

{% content-ref url="/pages/ZfR6xaezGnQ9TFCbRDxz" %}
[How to selectively allow access](/guides/how-to-selectively-allow-access)
{% endcontent-ref %}

{% content-ref url="/pages/aEx3Uvd4SpfdwqNAArMl" %}
[SSO and signed-in access](/guides/sso-and-signed-in-access)
{% endcontent-ref %}

{% content-ref url="/pages/-MZfzezMF7\_FyjAq8Dze" %}
[How to get permanent links](/guides/how-to-get-permanent-links)
{% endcontent-ref %}

{% content-ref url="/pages/1DJIsyeNiIGWSxKCv86l" %}
[Invite Link Generators](/steves-helper-apps/invite-link-generators)
{% endcontent-ref %}


# Community contributed tools

Awesome tools made by the community that help with common VDO.Ninja-related tasks

There's some tools out there made by the greater community that can help with common [VDO.Ninja](https://vdo.ninja/) related-tasks. If you want your project listed here, please get in contact with us at the discord ([discord.vdo.ninja](https://discord.vdo.ninja)).

| Tool                                                                                                                              | Description                                                                                                                                               | Author                                                                                       |
| --------------------------------------------------------------------------------------------------------------------------------- | --------------------------------------------------------------------------------------------------------------------------------------------------------- | -------------------------------------------------------------------------------------------- |
| [Linkgen](https://linkgen.vdo.ninja/)                                                                                             | Wizard style links generator                                                                                                                              | [@jcalado](https://github.com/jcalado/)                                                      |
| [Invite Generator](https://invite.vdo.ninja/)                                                                                     | Toggle style links generator                                                                                                                              | [@jcalado](https://github.com/jcalado/)                                                      |
| [Trampoline](https://rse.github.io/vdo-ninja-trampoline/)                                                                         | Another awesome link generator for VDO.Ninja                                                                                                              | [Dr. Ralf S. Engelschall](https://github.com/rse)                                            |
| [Vingester](https://github.com/steveseguin/vingester)                                                                             | Ingest web pages as NDI-multicasted streams                                                                                                               | [Dr. Ralf S. Engelschall](https://github.com/rse)                                            |
| [Cheat Sheets](https://docs.vdo.ninja/guides/cheat-sheets)                                                                        | Quick start guides and cheat sheets                                                                                                                       | [Chris Marquardt](https://chrismarquardt.com/)                                               |
| [Show Manager](https://github.com/knmurphy/show-manager-obsn)                                                                     | Excel based link configuration tool                                                                                                                       | [@knmurphy](https://github.com/knmurphy)                                                     |
| [Pro Audio Matrix](https://docs.google.com/spreadsheets/d/1onfIh1hNR1Gh_mthkhmezzWNUMYKMGKPrwx7T428_hc/edit#gid=0)                | Detailled sheet of how to use [`&proaudio`](/advanced-settings/audio-parameters/and-proaudio) and [`&stereo`](/advanced-settings/audio-parameters/stereo) | ?                                                                                            |
| [Cheat Sheet 2](https://docs.google.com/spreadsheets/d/15xPoTeLnOufB2VCRm-Aj-uP9KCMWMiLTxxypcwEyVsc/edit?usp=sharing)             | A simple Google Sheets list of most common parameters                                                                                                     | qdaps on Discord                                                                             |
| [Cheat Sheet 3](https://docs.google.com/spreadsheets/d/1rNPus_c6fLwNIKOr1WCZZVMRWtlNJttUNtvvelInuRU)                              | A Google Sheets list of all available parameters                                                                                                          | JK14 on Discord                                                                              |
| [URL Configurator](https://drive.google.com/file/d/1A7qiFACoCxk9J-uTv9yyZa5yQWzFol8l/view?usp=sharing)                            | Excel based URL Link Configurator                                                                                                                         | JK14 on Discord                                                                              |
| [Layout String Generator](https://docs.google.com/spreadsheets/d/1cHBTfni-Os3SAITsXrrNJ3qVCMVjunuW3xugvw1dykw/edit#gid=151839312) | For [`&layouts`](/advanced-settings/director-parameters/and-layouts) parameter                                                                            | JK14 on Discord                                                                              |
| [API / IFRAME sandbox page](https://vdo.ninja/alpha/iframe)                                                                       | API / IFRAME Sandbox page for developer using VDO.Ninja                                                                                                   | Sam MacKinnon on Discord                                                                     |
| [Companion Module](https://github.com/bitfocus/companion-module-vdo-ninja)                                                        | Remote control VDON via this plugin for Companion                                                                                                         | [Bryce](https://github.com/bitfocus/companion-module-vdo-ninja/commits?author=bryce-seifert) |
| [VirtualCam Filter](https://github.com/exeldro/obs-virtual-cam-filter)                                                            | Select any source in OBS to be the virtual cam output                                                                                                     | [Exeldro](https://obsproject.com/forum/members/exeldro.128836/)                              |
| [Source Record](https://obsproject.com/forum/resources/source-record.1285/)                                                       | Record a source in OBS that is different than the output                                                                                                  | [Exeldro](https://obsproject.com/forum/members/exeldro.128836/)                              |
| [OBS Audio Monitor](https://obsproject.com/forum/resources/audio-monitor.1186/)                                                   | Plugin for OBS; adds Audio Monitor dock and filter                                                                                                        | [Exeldro](https://obsproject.com/forum/members/exeldro.128836/)                              |
| [Win Cap Audio](https://obsproject.com/forum/resources/win-capture-audio.1338/)                                                   | Capture audio from specific window in OBS                                                                                                                 | [bozbez](https://obsproject.com/forum/members/bozbez.344203/)                                |
| [Browser to RTMP](https://github.com/steveseguin/browser-to-rtmp-docker)                                                          | A docker container that lets you output a VDO.Ninja to RTMP                                                                                               | [aws-samples](https://github.com/aws-samples/amazon-chime-meeting-broadcast-demo)            |
| [Atrium Vertical](https://obsproject.com/forum/resources/aitum-vertical.1715/)                                                    | Allow OBS to publish both Portrait (vertical) and Landscape (16:9) video at the same time.                                                                | [Aitum](https://obsproject.com/forum/members/aitum.441032/)                                  |

The video engineering and live streaming community is pretty amazing, so thank you all for being so awesome. ♥


# Whiteboard

Browser-based VDO.Ninja whiteboard for live collaborative drawing with real-time streaming via P2P or WHIP.

## VDO.Ninja Whiteboard: Live Streaming Collaboration Tool

### Overview

VDO.Ninja Whiteboard is a powerful, browser-based drawing tool that integrates with VDO.Ninja's peer-to-peer streaming technology. It allows you to create and share live drawings, diagrams, or annotations with viewers in real-time without requiring any downloads, installations, or accounts.

### **You can access it here:**[ **https://vdo.ninja/whiteboard**](https://vdo.ninja/whiteboard)

<figure><img src="/files/vo5x3bgR9ia0z9soifsa" alt=""><figcaption><p>Example Masterpiece</p></figcaption></figure>

### Key Features

* **Live Whiteboard Streaming**: Share your drawings in real-time with anyone through a simple view link
* **Multiple Publishing Options**: Stream via VDO.Ninja P2P, WHIP, or directly to Twitch
* **End-to-End Encryption**: When using the VDO.Ninja mode, all streams are encrypted peer-to-peer
* **Drawing Tools**: Includes brush, text tool, eraser, fill tool, and color picker
* **No-Install Browser Based**: Works entirely in your browser with no plugins required
* **Free and Open Source**: Use it without cost or limitations\\

  <figure><img src="/files/M2VfBY0WCR4u94vlXIz6" alt=""><figcaption><p>Menu setup</p></figcaption></figure>

### How It Works with VDO.Ninja

The whiteboard leverages VDO.Ninja's P2P data channels and media streaming capabilities to broadcast your canvas to viewers securely and efficiently.

#### Technical Integration

1. **Embedding VDO.Ninja**: The whiteboard creates a hidden iframe that loads VDO.Ninja with specific parameters:

```javascript
function createAndAppendIframe(config) {
    let url = new URL("./index.html", window.location.href);
    
    if (config.mode === 'vdo') {
        if (config.room) url.searchParams.set("room", config.room);
        if (config.push) url.searchParams.set("push", config.push);
        if (config.password) url.searchParams.set("password", config.password);
    }
    
    url.searchParams.set("framegrab", "");
    url.searchParams.set("view", "");

    const iframe = document.createElement("iframe");
    iframe.style.width = "0";
    iframe.style.height = "0";
    iframe.src = url.toString();
    
    document.body.appendChild(iframe);
    return iframe;
}
```

2. **Canvas Streaming**: The whiteboard captures the canvas content and sends it to the VDO.Ninja iframe:

```javascript
async function startStreaming() {
    const iframe = document.querySelector('iframe');
    if (!iframe) return;

    // Using modern MediaStreamTrackProcessor API when available
    if (typeof MediaStreamTrackProcessor === 'function') {
        const { tracks } = await createCanvasStream();
        
        // Send frames to the VDO.Ninja iframe
        const processor = new MediaStreamTrackProcessor(track);
        const reader = processor.readable.getReader();
        
        // Read and send each frame
        // ...
    } else {
        // Fallback to sending canvas as data URL
        frameGenerator = setInterval(() => {
            const imageData = canvas.toDataURL('image/webp');
            iframe.contentWindow.postMessage({
                type: 'canvas-frame',
                frame: imageData
            }, '*');
        }, 1000/10); // 10 fps
    }
}
```

3. **View Link Generation**: When using VDO.Ninja mode, it generates a view link that can be shared with viewers:

```javascript
const viewUrl = new URL("./", window.location.href);
if (push) viewUrl.searchParams.set("view", push);
if (room) viewUrl.searchParams.set("room", room);
if (password) viewUrl.searchParams.set("password", password);
document.getElementById('viewLink').value = viewUrl.toString();
```

### How to Use the Whiteboard

1. **Access the Tool**: Open the whiteboard in any modern browser
2. **Choose Publishing Mode**:
   * VDO.Ninja (P2P): For secure, peer-to-peer streaming
   * WHIP: For streaming to any WHIP-compatible service
   * Twitch: For direct streaming to Twitch
   * Playground: For local drawing with no streaming
3. **Configure Your Stream**:
   * For VDO.Ninja mode, enter an optional Stream ID and/or Room Name
   * Set a password if desired for privacy
4. **Start Drawing**: Use the brush, text, eraser, and fill tools to create your content
5. **Share the View Link**: Copy and share the generated view link with anyone you want to see your whiteboard

### Benefits of Using VDO.Ninja Integration

* **Low Latency**: Direct peer-to-peer connections provide near real-time sharing
* **Privacy**: End-to-end encryption ensures your whiteboard sessions remain private
* **Firewall Friendly**: Works through NATs and firewalls without port forwarding
* **Scalability**: Multiple viewers can connect simultaneously
* **Cost Effective**: No server costs as data transfers directly between peers
* **Cross-Platform**: Works on any device with a modern browser

### Use Cases

* Remote teaching and tutoring
* Live diagramming during video conferences
* Virtual brainstorming sessions
* Real-time collaboration on design concepts
* Creating explanatory drawings for live streams
* Adding visual annotations to presentations

The VDO.Ninja Whiteboard combines the power of HTML5 Canvas with VDO.Ninja's peer-to-peer streaming technology to provide a versatile, secure, and accessible tool for real-time visual communication.

## Annotating a caller's live video

The Whiteboard publishes its own canvas as a video source. To draw or ping directly over a caller's camera or screen share, use VDO.Ninja's separate built-in annotation tool. It can send the caller and annotations together to OBS or provide the drawings as a transparent OBS overlay.

{% content-ref url="/pages/fSikEM7kfO9rqX2eXKc0" %}
[Telestrate a caller's video](/guides/telestrate-a-callers-video)
{% endcontent-ref %}


# Guides

VDO.Ninja how-to guides for OBS Studio, remote guests, screen sharing, mobile apps, bitrate and quality tuning, WHIP, Meshcast, and API workflows.

This section collects practical VDO.Ninja guides for OBS Studio, remote guest workflows, screen sharing, mobile phones, audio routing, bitrate tuning, recording, WHIP, Meshcast, and browser-source production setups.

* [Cheat Sheets](/guides/cheat-sheets)
* [Common questions re: Rooms](/guides/how-does-group-chat-work)
* [Video bitrate for push/view links](/guides/video-bitrate-for-push-view-links)
* [Video bitrate in rooms](/guides/video-bitrate-in-rooms)
* [Room-only mobile bitrate tiers](/guides/room-only-mobile-bitrate-tiers)
* [Basic hotkeys](/guides/hotkey-support)
* [MIDI, API and WebHID support](/guides/midi-api-and-webhid-support)
* [PTZ remote control](/guides/ptz-remote-control)
* [Handling Guest Disconnects and Connection Recovery](/guides/handling-guest-disconnects-and-connection-recovery)
* [Primary and Backup Guests with \&scene and \&slots=1](/guides/primary-and-backup-guests-with-scene-and-slots)
* [Delay an incoming feed](/guides/delay-an-incoming-feed)
* [Stable mobile guest production with OBS and Electron Capture](/guides/stable-mobile-guest-production-with-obs-and-electron-capture)
* [Ninja Backer tipping](/guides/ninjabacker-tipping)
* [Hardware-accelerated video encoding](/guides/hardware-accelerated-video-encoding)
* [Audio Filters & Bitrate](/guides/audio-filters)
* [Audio-Reactive Avatars](/guides/audio-reactive-avatars)
* [Options to record streams](/guides/options-to-record-streams)
* [Cloud Sync (Google Drive + Dropbox)](/guides/cloud-sync-google-drive-and-dropbox)
* [External guides and how-tos](/guides/guides-and-how-tos)

## How-to's

* [How to lock the resolution](/guides/how-do-i-lock-the-resolution)
* [How to use VDO.Ninja as a webcam for Google Hangouts, Zoom, and more](/guides/use-vdo.ninja-as-a-webcam-for-google-hangouts-zoom-and-more)
* [How to capture without browser sources](/guides/capturing-without-browser-sources)
* [How to control bitrate/quality](/guides/how-do-i-control-bitrate-quality)
* [Green rooms and guest waiting options](/guides/green-room-and-guest-approval-options)
* [How to selectively allow access](/guides/how-to-selectively-allow-access)
* [SSO and signed-in access](/guides/sso-and-signed-in-access)
* [How to send the audio/video output of one OBS to another OBS using VDO.Ninja](/guides/how-to-send-the-audio-video-output-of-one-obs-to-another-obs-using-vdo.ninja)
* [Multi-operator Twitch production with VDO.Ninja and OBS](/guides/multi-operator-twitch-production)
* [Low-latency game streaming for esports commentary](/guides/low-latency-game-streaming-for-esports-commentary)
* [Stream Apple Vision Pro POV and an iPhone camera to TikTok with OBS](/guides/stream-apple-vision-pro-and-iphone-to-tiktok-with-obs)
* [Active speaker layouts in OBS](/guides/active-speaker-layouts-in-obs)
* [Active speaker, Highlight, and talking indicators](/guides/active-speaker-highlight-and-talking-indicators)
* [How to mirror a video while Full-Screen - For iPads and Teleprompters](/guides/how-to-mirror-a-video-while-full-screen-for-ipads-and-teleprompters)
* [How to get permanent links](/guides/how-to-get-permanent-links)
* [How to capture an application's audio](/guides/audio)
* [Phone call-ins with VDO.Ninja and virtual audio cables](/guides/phone-call-ins-with-vdo-ninja-and-virtual-audio-cables)
* [Phone call-in provider options](/guides/phone-call-in-provider-options)
* [SignalWire SIP call-in setup](/guides/signalwire-sip-call-in-setup)
* [Twilio phone call-in setup](/guides/twilio-phone-call-in-setup)
* [How to control VDO.Ninja with Touch Portal](/guides/how-to-control-vdo.ninja-with-touch-portal)
* [How to publish from OBS into VDO.Ninja](/guides/publish-from-obs-into-vdo.ninja)
* [How to screen share your iPhone/iPad](/guides/screen-share-your-iphone-ipad)
* [How to get iPhones to output 1080p Videos](/guides/how-to-get-iphones-to-output-1080p-videos)
* [How to stream into Zoom without OBS](/guides/how-to-stream-into-zoom-without-obs)
* [How to connect a smartphone to computer via USB](/guides/connecting-smartphone-to-computer-via-usb)
* [How to edit an invite after sending it](/guides/edit-an-invite-after-sending-it)
* [How to get highest video quality (for an interview)](/guides/highest-quality-video-for-an-interview)
* [How to stream 4K video using VDO.Ninja](/guides/how-to-stream-4k-video-using-vdo.ninja)
* [How to get lowest audio latency possible](/guides/lowest-audio-latency-possible)
* [How to share webcam from inside OBS](/guides/share-webcam-from-inside-obs)
* [How to publish to Facebook Live](/guides/publish-to-facebook-live)
* [How to embed VDO.Ninja into a site with iFrames](/guides/iframe-api-documentation)
* [How to use the green screen just locally](/guides/use-the-green-screen-just-locally)
* [How to connect a GoPro to VDO.Ninja](/guides/connect-a-gopro-to-vdo.ninja)
* [How to install RaspNinja on Jetson](/guides/installing-raspninja-on-jetson)
* [How to transfer guests to other rooms](/guides/transfer-rooms)
* [How to set up a simple chat room](/guides/how-to-set-up-a-simple-chat-room)
* [How to screen share in 1080p](/guides/how-to-screen-share-in-1080p)
* [How to control PowerPoint remotely with VDO.Ninja](/guides/how-to-control-powerpoint-remotely-with-vdo.ninja)
* [How to improve quality of the native app](/guides/improving-quality-of-the-native-app)
* [How to stream transparent video](/guides/how-to-stream-transparent-video)
* [Recommended OBS WHIP settings](/guides/obs-whip-output-settings)


# Cheat Sheets

Some cheatsheets to help you get started

#### [VDO.Ninja Basic Concepts Cheatsheet](https://github.com/steveseguin/vdo.ninja/blob/quickstart/basicconcepts/cheatsheet_obsn_basic_concepts.md)

Learn the basic concepts of VDO.Ninja: Rooms, Control Center and Scenes

![](/files/WOSKE8YQpSMW6w8pFTy4)

#### [VDO.Ninja Parameters Cheatsheet](https://github.com/steveseguin/vdo.ninja/blob/quickstart/cheatsheet/cheatsheet_obsn_parameters.md)

Learn how to use parameters to customize VDO.Ninja's behavior<br>

![](/files/3smFrAudjIswUOJlZS29)

#### [VDO.Ninja Automation Cheatsheet](https://github.com/steveseguin/vdo.ninja/blob/quickstart/automation/cheatsheet_obsn_automation.md)

Learn how to automate starting up VDO.Ninja, automatically join rooms and scenes with camera and audio devices already selected<br>

![](/files/45cJPQ6mh4rnPLMmFxxo)

#### [VDO.Ninja Mac Audio Routing w Loopback Cheatsheet (example 1)](https://github.com/steveseguin/vdo.ninja/blob/quickstart/loopbackrouting1/cheatsheet_obsn_loopback_routing1.md)

Learn how to route guest and application audio on the Mac using Loopback\ <br>

![](/files/CjdOlQVbnYG75UYrJeVe)

Author:\
[Chris Marquardt](https://chrismarquardt.com/)


# Common questions re: Rooms

General information about group rooms and how they work.

For a more in-depth guide on how to setup a group chat room, [please see this getting started guide.](https://docs.vdo.ninja/getting-started/rooms)\
\
The group chat feature in VDO.Ninja creates a virtual room where multiple devices can connect to share audio and video. It offers echo-cancellation and text-chat support as well, along with an easy to use screen share function.

Each room has a main director, whom can manage the guests from the control room, easily accessing individual sources for integration into OBS. Only one main director can exist in a room at a time, however that main director can invite co-directors.

* Guests have their own link to join the chat room. They will be able to see all of those in the chatroom, including themselves. Settings to restrict what sources each group member can see or hear are also available.
* Guests by default will be assigned a random stream ID each time they re-join a room with the invite link provided to them. This stream ID can be made permanent though if the invite link given to the guest specifies the stream ID in the URL using the `&push` parameter. For more information on this, see <https://docs.vdo.ninja/guides/how-to-get-permanent-links>.<br>
* The 'director' will be able to view the chat room, without joining it themselves, and they will have controls provided that will let them modify aspects of how the room shows up in their OBS.
  * For example, directors will be able to mute certain people so they can't be heard or seen in OBS.
* The director will be provided isolated direct links to each of those video streams in the group room, allowing for fine-grain mixing control in OBS. These are called "solo links" in the director's room.<br>
* Text-chat is available to those in the group chat. You can upload files to other guests in the room, pop out the chat, and see certain events listed in the chat feed. The chat is peer to peer based, so it does not go through a server and is end-to-end encrypted by default.<br>
* Passwords are available to keep rooms secure, but are optional. Passwords are not stored on any server; they are used for client-side end-to-end encryption. Setting a password is strongly advised, as it both encrypts the peer to peer initial connection handshake, but it also scrambles the room name and stream IDs.
* Stream IDs are not unique to a room, but are global. Using a password however "salts" the stream ID, and also the room name, so if you are intending to use a basic stream ID, such as "guest\_1", then adding a password to your room would make it highly unlikely that you'd ever have a collision with someone else using the same stream ID value.<br>
* Guests present in the Group Chat room will see and hear all other present guests video/audio streams; by default anyways. There are ways to change this, both via invite-link options, but also via having a guest be assigned to a group; an option the director has.<br>
* The video quality of those in a group room will appear low to guests, but this is to ensure more bandwidth and CPU resources are made available for the OBS's access to the stream. You can increase the quality, but with potentially detrimental results.
* Group rooms are not restricted in size, although more than 10 guests can start to be challenging.
  * For larger rooms, using `&broadcast` mode or `&meshcast` may be needed to avoid overloading the CPU or network of you and/or your guests
* Group rooms cease to exist when everyone leaves a room. Settings for a room are stored client-side, in your URL parameters or browser cache/storage, so when everyone closes their browser or leaves the room, the room ceases to exist.

Using OBS VirtualCam (or the Mac equivalent), you can let your guests view the OBS live stream itself with sub-100ms of latency. In this case, each guest only needs to view one video stream, the main mixed OBS stream, freeing up group resources to allow for even larger group rooms. This is usually called [`&broadcast`](/advanced-settings/video-parameters/broadcast) mode.

{% embed url="<https://www.youtube.com/watch?v=m1cIT1kdlEo>" %}


# Video bitrate for push/view links

How to control video bitrates for basic push/view links

## The default settings

The default video bitrate for simple push/view links is 2500-kbps.

<https://vdo.ninja/?push=streamid>\
<https://vdo.ninja/?view=streamid>\
\
By default, both outgoing and incoming video bitrates are set at 2500-kbps. This default setting and parameters are different if using [Rooms ](/getting-started/rooms)and explained in detail [here](/guides/video-bitrate-in-rooms).

There are five parameters we will take a look at:

1. [\&outboundvideobitrate (\&ovb)](/advanced-settings/video-bitrate-parameters/and-outboundvideobitrate) -> push side
2. [\&maxvideobitrate (\&mvb)](/advanced-settings/video-bitrate-parameters/and-maxvideobitrate) -> push side
3. [\&limittotalbitrate (\&ltb)](/advanced-settings/video-bitrate-parameters/limittotalbitrate) -> push side
4. [\&videobitrate (\&vb)](/advanced-settings/video-bitrate-parameters/bitrate) -> view side
5. [\&totalscenebitrate (\&tsb)](/advanced-settings/video-bitrate-parameters/and-totalscenebitrate) -> view side

<figure><img src="/files/s4zS9W2gI1MekFxySr3H" alt="Diagram showing that the push source link can set outgoing defaults and caps while the view or OBS link requests incoming bitrate"><figcaption><p>The source can set defaults and caps, but the view or OBS link usually requests the incoming bitrate.</p></figcaption></figure>

## On the source side ([\&push](/advanced-settings/setup-parameters/push))

### The push link sets the default outgoing video bitrate target

[`&outboundvideobitrate (&ovb)`](/advanced-settings/video-bitrate-parameters/and-outboundvideobitrate)\
Sets the sender-side default target bitrate for outgoing streams.

<https://vdo.ninja/?push=streamid&ovb=4000>\
<https://vdo.ninja/?view=streamid>\
\
The push link sets the outgoing default target to 4000-kbps. The view link doesn't need an additional parameter unless you want to override the default.

<https://vdo.ninja/?push=streamid&ovb=4000>\
<https://vdo.ninja/?view=streamid&vb=2000>\
\
In this case the viewer requests 2000-kbps, which overrides the push-side default target (unless capped by a max).

Depending on browser/negotiation, `&ovb` can be enforced via SDP munging and may also cap the maximum bitrate.

### The push link sets a software max bitrate per stream out

[`&maxvideobitrate (&mvb)`](/advanced-settings/video-bitrate-parameters/and-maxvideobitrate)\
`&mvb` sets a software-enforced cap per stream out. Viewer requests (`&vb`) and sender defaults (`&ovb`) cannot exceed it.

<https://vdo.ninja/?push=streamid&mvb=1000>\
<https://vdo.ninja/?view=streamid>\
\
Every view link will be capped to 1000-kbps, even if it requests a higher bitrate.

### The push link limits the video bitrate to a maximum defined value

[`&limittotalbitrate (&ltb)`](/advanced-settings/video-bitrate-parameters/limittotalbitrate)\
Limits the total outbound video bitrate to a defined value.

<https://vdo.ninja/?push=streamid&ltb=5000>\
<https://vdo.ninja/?view=streamid>\
\
The incoming video bitrate will still default to around 2500-kbps but permits the viewer to increase it on their end with `&ltb` telling the push link to not get higher than 5000-kbps total outgoing bitrate.

## On the viewer side ([\&view](/advanced-settings/mixer-scene-parameters/view))

### The view link sets the video bitrate per stream in

[`&videobitrate (&vb)`](/advanced-settings/video-bitrate-parameters/bitrate)\
The view link is setting the target video bitrate per incoming stream.

<https://vdo.ninja/?push=streamid>\
<https://vdo.ninja/?view=streamid&vb=2000>\
\
The view link is setting the bitrate per incoming stream (in this case 2000-kbps). So if you have a view link with three incoming video feeds: `&view=stream1,stream2,stream3` - every source is pushing 2000-kbps as `&vb=2000` and the view link has a combined bitrate of 6000-kbps.

Depending on browser/negotiation, `&vb` can be enforced via SDP munging and may also cap the maximum bitrate.

### The view link sets the total video bitrate for all incoming streams combined

[`&totalscenebitrate (&tsb)`](/advanced-settings/video-bitrate-parameters/and-totalscenebitrate)\
This is similar to [`&vb`](#the-view-link-sets-the-video-bitrate-per-stream-in) but it sets the target and maximum bitrate for all incoming streams combined.

<https://vdo.ninja/?push=streamid>\
<https://vdo.ninja/?view=streamid&tsb=3000>\
\
So if you have a view link with three incoming video feeds: `&view=stream1,stream2,stream3` - every source is pushing 1000-kbps as `&tsb=3000`.

## Mixing the parameters

As doing some testing there were these results:

All three push parameters cap the maximum. If you set one of these values, the outgoing video bitrate will never be higher than that limit.

`&tsb` always limits the bitrate on the viewer side (total across streams). `&vb` sets the viewer target per stream, but it can be capped by sender-side limits or SDP munging.

* `&vb` overrides the default target from `&ovb`
* `&mvb` is a software max cap, regardless of `&vb` or `&ovb`
* `&tsb` caps the total incoming bitrate across all streams

## Related

{% content-ref url="/pages/V1Pj8EBxP8crFyFveJho" %}
[Video Bitrate Parameters](/advanced-settings/video-bitrate-parameters)
{% endcontent-ref %}

{% content-ref url="/pages/cmIArVZ1ZIIeKoPAl7As" %}
[Video bitrate in rooms](/guides/video-bitrate-in-rooms)
{% endcontent-ref %}


# Video bitrate in rooms

How to control the video bitrate inside of a room

This guide will show you how to control and set up the bitrate in rooms as a director and as a guest.

## Default settings

In production-style rooms, every guest views the other room videos with a combined room bitrate of 500-kbps by default. This is a total budget, not a per-video value. If there is only one video stream, the guest will view that stream at about 500-kbps. With two visible video streams, each stream will be requested at about 250-kbps.

The room name itself does not permanently save this bitrate. To make a room start at a higher value each time, add a room bitrate parameter to the URL used to join the room.

For guest-only room calls, VDO.Ninja may use higher automatic room-only bitrate tiers. These tiers are designed for conferencing-style rooms where there is no director or scene viewer connected to the guest. The normal room-only tier is 2000-kbps and the lower mobile/protected tier is 1500-kbps. These automatic tiers do not apply when an explicit room bitrate is set or when a director or scene viewer is connected. See [Room-only mobile bitrate tiers](/guides/room-only-mobile-bitrate-tiers) for details.

<figure><img src="/files/XNP5XPzXKMv0DxDGgoEF" alt="Diagram showing total room bitrate as a shared budget split across one visible room feed or three visible room feeds"><figcaption><p>A total room bitrate is a shared room-viewing budget. More visible feeds means each feed gets a smaller share unless the total budget is raised.</p></figcaption></figure>

## Which room bitrate option should I use?

| Goal                                                                                     | Parameter                                                                                                                                                           | Where to add it                                                        |
| ---------------------------------------------------------------------------------------- | ------------------------------------------------------------------------------------------------------------------------------------------------------------------- | ---------------------------------------------------------------------- |
| Raise the room's guest-to-guest viewing budget when a director is present                | [`&totalroombitrate=4000`](/advanced-settings/video-bitrate-parameters/and-totalscenebitrate/totalroombitrate) or `&trb=4000`                                       | The main director/host link                                            |
| Raise guest-to-guest viewing when no director is present                                 | [`&totalroombitrate=4000`](/advanced-settings/video-bitrate-parameters/and-totalscenebitrate/totalroombitrate) or `&trb=4000`                                       | The guest room invite link; it affects that guest's own receive budget |
| Raise screen-share quality in a room                                                     | [`&screensharebitrate=4000`](/advanced-settings/screen-share-parameters/and-screensharebitrate) or `&ssbitrate=4000`                                                | Viewer, scene, director, or room links that receive the screen share   |
| Cap how much other guests can pull from one guest                                        | [`&roombitrate=1000`](/advanced-settings/video-bitrate-parameters/roombitrate) or `&rbr=1000`                                                                       | That guest's link                                                      |
| Disable a guest's video to other guests, while keeping director or scene video available | `&roombitrate=0`                                                                                                                                                    | That guest's link                                                      |
| Let each guest adjust their own room receive budget                                      | [`&controlroombitrate`](/advanced-settings/video-bitrate-parameters/and-controlroombitrate) or `&crb`                                                               | That guest's link                                                      |
| Force a minimum per visible room feed after the room total is split                      | `&minroombitrate=500` or `&mrb=500`                                                                                                                                 | Room/director/guest link, used carefully                               |
| Tune guest-only automatic room tiers                                                     | `&roomtier2bitrate=2500` / `&roomtier1bitrate=1500`                                                                                                                 | Guest-only room links                                                  |
| Control OBS scene quality                                                                | [`&videobitrate`](/advanced-settings/video-bitrate-parameters/bitrate) or [`&totalscenebitrate`](/advanced-settings/video-bitrate-parameters/and-totalscenebitrate) | Scene, solo, or view link                                              |

For most rooms where guests keep raising the room quality slider and a director/host is normally present, put `&trb=4000` on the director/host link.

## Priority order

1. If the main director is connected, the main director's current room bitrate is sent to guests and becomes their room bitrate.
2. If no main director is controlling the room bitrate, each guest uses their own URL setting, such as `&trb=4000`.
3. If a guest has no `&trb` / `&totalroombitrate`, `&videobitrate` can be used as that guest's total room bitrate target.
4. If no explicit room bitrate is set, VDO.Ninja uses the default room behavior. In guest-only rooms, automatic room-only tiers may raise the effective room budget.

This means a director link with `&trb=4000` is enough while the director is in the room. A guest link needs `&trb=4000` only if guests should have that higher room-viewing budget before a director joins, after the director leaves, or in rooms used without a director.

## Director

As a director of a room you can control the total room bitrate dynamically.

<div align="left"><figure><img src="/files/443PCSGQX1mlf2H6WKp5" alt=""><figcaption><p>Open the room settings via this button as a director</p></figcaption></figure></div>

<div align="left"><figure><img src="/files/L8S3NsAg7YhJeoisxbIa" alt=""><figcaption><p>The default is (as explained before) 500-kbps. You can increase it up to 4000-kbps by default (the slider max increases if a higher <code>&#x26;totalroombitrate</code> is set).</p></figcaption></figure></div>

You can control the total room bitrate also with a URL parameter: [`&totalroombitrate=6000`](/advanced-settings/video-bitrate-parameters/and-totalscenebitrate/totalroombitrate). The short alias is `&trb=6000`.

<div align="left"><figure><img src="/files/MKsDgafzT7cCc9KN8YDl" alt=""><figcaption><p>Default is 6000-kbps now with <code>&#x26;totalroombitrate=6000</code></p></figcaption></figure></div>

When the director joins with `&totalroombitrate=6000` or `&trb=6000`, that value becomes the room bitrate for guests by proxy. You can decrease it dynamically if guests have problems.

The director's room settings slider changes the value live for the active room and late joiners should receive the current director value while that director remains connected. It is not a permanent saved setting on the room name. If several people might be the main director/host, each of their director links should include the desired value, such as `&trb=4000`.

## Guest

If you add [`&roombitrate=2000`](/advanced-settings/video-bitrate-parameters/roombitrate) to the guest's link all the other guests can view the video of the guest with a bitrate of 2000-kbps. So three other guests watching the video stream of the guest -> 6000-kbps outgoing bitrate. [`&roombitrate`](/advanced-settings/video-bitrate-parameters/roombitrate) limits any guest viewer in the group chat room from pulling the video stream at more than the specified bitrate value.

You can also use [`&totalroombitrate`](/advanced-settings/video-bitrate-parameters/and-totalscenebitrate/totalroombitrate) on the guest's URL if you want to have different settings for each guest. So adding `&totalroombitrate=4000` to a guest's URL, the guest can view all video streams in the room with a combined bitrate of 4000-kbps.

If a main director is connected, the director's room bitrate setting can replace the guest's local `&totalroombitrate` value. If no director is connected, the guest's own URL controls that guest's room receive budget.

If `&totalroombitrate` is not set on a room link, `&videobitrate` will be used as the total room bitrate target for that guest.

If you use [`&controlroombitrate`](/advanced-settings/video-bitrate-parameters/and-controlroombitrate) on the guest's URL, the guest can change the total room bitrate dynamically via a slider. If you add `&controlroombitrate&totalroombitrate=4000` to the guest's URL the guest can change the bitrate between 0 and 4000-kbps (it cannot exceed the `&totalroombitrate` cap). It doesn't affect what other guests are viewing.

If a guest is screen sharing detailed content, [`&screensharebitrate`](/advanced-settings/screen-share-parameters/and-screensharebitrate) can be useful in addition to `&totalroombitrate`, since screen-share bitrate has its own override.

![](/files/RuNvQbiHSfaAodNTWPAv) ![](/files/cMeren4U5rKpUb4iHEll)

## Examples

<https://vdo.ninja/?director=TestRoomName&push=directorStreamID&broadcast&totalroombitrate=5000>\
When adding `&broadcast&totalroombitrate=5000` to the director's URL the guests can only see the video of the director with a bitrate of 5000-kbps. So they get pretty good video quality. If you have three guests in the room the outgoing bitrate for the director is 15000-kbps, so it's pretty high.

If you want a guest to appear in scenes (for example in OBS) but you don't want other guests to see their video stream you can add `&roombitrate=0` to the guest's URL. [`&roombitrate`](/advanced-settings/video-bitrate-parameters/roombitrate) only affects the bitrate in the room, not in scenes.

Adding [`&maxbandwidth=80`](/advanced-settings/video-bitrate-parameters/and-maxbandwidth) to the guest's URL will allow to them to put 80 % of their available bandwidth into the video stream. This is useful for high quality gaming streams for example.

## Scenes

For scenes in OBS or other software ([`&scene`](/advanced-settings/mixer-scene-parameters/scene) or [`&solo`](/advanced-settings/mixer-scene-parameters/and-solo)) use [`&videobitrate`](/advanced-settings/video-bitrate-parameters/bitrate) to specify the bitrate per video stream or [`&totalscenebitrate`](/advanced-settings/video-bitrate-parameters/and-totalscenebitrate) to get a combined bitrate for all videos in the scene.

3 guests in a scene -> `&videobitrate=3000`\
The bitrate of each guest will be 3000-kbps.

3 guests in a scene -> `&totalscenebitrate=3000`\
The bitrate of each guest will be 1000-kbps.

## Notes and caveats

* Screen shares are weighted differently in the room mixer; they can take a larger share of the total budget versus camera feeds.
* `&screensharebitrate` is a separate screen-share override and does not count against the total room bitrate budget.
* Hidden, muted, or disabled videos are not counted when the room bitrate is split across streams.
* `&minroombitrate` can enforce a per-stream floor when splitting a total room bitrate.
* Automatic room-only mobile tiers do not apply when a guest is connected to a director or scene viewer. In those production-style rooms, set `&totalroombitrate`, `&roombitrate`, `&videobitrate`, or `&totalscenebitrate` explicitly depending on whether you are tuning guest-to-guest room quality or scene quality.

## Meshcast

If you are using [`&meshcast`](/advanced-settings/meshcast-parameters/and-meshcast) on the director's or guest's URL remember that you control the bitrate via [`&meshcastbitrate`](/advanced-settings/meshcast-parameters/and-meshcastbitrate) on the sender's side.

## More Parameters

There are more parameters to control the bitrate. You can find them here:

{% content-ref url="/pages/wJQGxl0KrTeLughBKsSK" %}
[Video bitrate for push/view links](/guides/video-bitrate-for-push-view-links)
{% endcontent-ref %}

{% content-ref url="/pages/V1Pj8EBxP8crFyFveJho" %}
[Video Bitrate Parameters](/advanced-settings/video-bitrate-parameters)
{% endcontent-ref %}

{% content-ref url="/pages/2sMgzgRpMONN0QYeQ2X9" %}
[Room-only mobile bitrate tiers](/guides/room-only-mobile-bitrate-tiers)
{% endcontent-ref %}


# Room-only mobile bitrate tiers

How VDO.Ninja balances higher guest room quality with mobile device safety

VDO.Ninja group rooms use peer-to-peer mesh networking by default. This means each guest may need to send a separate video stream to every other guest. A three-person call is usually easy. A five-person call can already mean four outbound video encodes per guest, plus scene or director connections if you are producing a show.

The default room behaviour has historically been conservative because VDO.Ninja is often used for production. In that workflow, the director or scene link is usually the priority, and guest-to-guest video is more of a confidence monitor. Keeping room preview bitrates low helps avoid overheating phones, saturating upload links, or causing audio dropouts.

For room-only calls, such as family calls or conferencing, VDO.Ninja can allow a higher room bitrate automatically when the call is only guests talking to other guests.

## When automatic room-only tiering applies

Automatic room-only tiering is intended for normal guests in a group room.

It applies when:

* the user is in a room as a guest
* the visible videos are other guests
* there is no director or scene viewer connected to that guest
* no explicit room bitrate has been set
* the room is not being redistributed through a production-oriented mode such as Meshcast or WHIP

It does not apply when the guest is connected to a director or scene viewer. In those cases, VDO.Ninja returns to production-safe behaviour unless you explicitly set bitrate parameters.

## Default tier values

The default automatic room-only budgets are:

| Tier   | Intended device type              | Default total room budget |
| ------ | --------------------------------- | ------------------------- |
| Tier 1 | weaker or stressed mobile devices | 1500-kbps                 |
| Tier 2 | normal or stronger devices        | 2000-kbps                 |

The value is a total room budget, not a per-person bitrate. If a guest is watching three other guests, a 2000-kbps total budget is split across those visible videos, so each feed is requested at about 666-kbps.

Low-tier mobile senders are treated more carefully. If a weak mobile guest is in the same room, other guests will request less from that specific sender, while still allowing stronger senders to use the higher room-only budget.

## How device strength is estimated

Browser device detection is limited, so VDO.Ninja uses broad hints rather than exact phone model lists.

The main signals considered are:

* mobile versus desktop browser mode
* browser-visible CPU thread count
* browser-visible device memory, when available
* older iOS Safari/WebKit handling
* live WebRTC CPU pressure when available

Typical classification:

| Device signal                                                                    | Likely tier                |
| -------------------------------------------------------------------------------- | -------------------------- |
| mobile device with fewer than 4 reported CPU threads                             | weak                       |
| mobile device with 2 GB or less reported memory                                  | weak                       |
| mobile device with 8 or more reported CPU threads and at least about 6 GB memory | strong                     |
| mobile device with 4 or more CPU threads but not clearly high end                | normal                     |
| modern iOS/iPadOS WebKit devices                                                 | generally normal or strong |
| unknown specs                                                                    | normal fallback            |

These are only hints. Browsers may hide or round system information for privacy. Chrome, Brave, Edge, Firefox, and Safari can expose different information. On iOS and iPadOS, Chrome, Firefox, Brave, and Safari are all WebKit-based for practical WebRTC behaviour, even if their browser names differ.

Runtime behaviour still matters. If a device starts showing CPU pressure while encoding, it can be treated more carefully even if its initial specs looked strong.

## Parameters to use

For normal room-only calls, you often do not need to add anything. VDO.Ninja will use the automatic tier values.

To tune the automatic room-only tiers:

* [`&roomtier2bitrate`](/advanced-settings/video-bitrate-parameters/and-totalscenebitrate/roomtier2bitrate) changes the normal or strong room-only budget. Default: `2000`.
* [`&roomtier1bitrate`](/advanced-settings/video-bitrate-parameters/and-totalscenebitrate/roomtier1bitrate) changes the weak mobile room-only budget. Default: `1500`.

Example:

`https://vdo.ninja/?room=FamilyCall&roomtier2bitrate=2500&roomtier1bitrate=1500`

Use higher values only when you trust the devices, network, and thermals. A higher room budget increases both inbound viewing quality and outbound load on the senders.

## If a director or scene is connected

When a guest is connected to a director or scene viewer, VDO.Ninja assumes a production workflow. In that mode, protecting the guest's audio/video stability and the production feed takes priority over guest-to-guest room quality.

To improve room quality in a director or scene controlled room, use explicit parameters:

* Add [`&totalroombitrate`](/advanced-settings/video-bitrate-parameters/and-totalscenebitrate/totalroombitrate) to the room or guest links to raise the guest-to-guest room budget.
* Add [`&controlroombitrate`](/advanced-settings/video-bitrate-parameters/and-controlroombitrate) if you want guests to adjust their own room receive budget from the interface.
* Use [`&roombitrate`](/advanced-settings/video-bitrate-parameters/roombitrate) on weaker guests to cap how much other room guests can pull from them.
* Use [`&maxmobilebitrate`](/advanced-settings/video-bitrate-parameters/and-totalscenebitrate/and-maxmobilebitrate) or [`&flagship`](/advanced-settings/mobile-parameters/and-flagship) on a known-capable mobile publisher if you intentionally want to lift mobile sender limits in production-style rooms.
* Use [`&nomobilebitratecap`](/advanced-settings/video-bitrate-parameters/and-totalscenebitrate/and-nomobilebitratecap) only when you want a mobile publisher to accept higher viewer or director bitrate requests while keeping the mobile interface.
* Use [`&videobitrate`](/advanced-settings/video-bitrate-parameters/bitrate) or [`&totalscenebitrate`](/advanced-settings/video-bitrate-parameters/and-totalscenebitrate) for scene quality. Scene bitrate and guest room bitrate are separate concerns.
* For larger rooms or one-to-many production, consider [`&meshcast`](/advanced-settings/meshcast-parameters/and-meshcast) or [`&broadcast`](/advanced-settings/video-parameters/broadcast) so guests do not need to upload many peer-to-peer video streams.

## Suggested starting points

| Use case                                           | Suggested parameters                                               |
| -------------------------------------------------- | ------------------------------------------------------------------ |
| simple family call with modern phones              | no extra bitrate parameters                                        |
| high-quality room-only call on strong devices      | `&roomtier2bitrate=2500&roomtier1bitrate=1500`                     |
| mixed room with low-end phones                     | `&roomtier2bitrate=2000&roomtier1bitrate=1200`                     |
| director room where guest-to-guest quality matters | `&totalroombitrate=2000` or higher, tested carefully               |
| production scene quality                           | use `&videobitrate` or `&totalscenebitrate` on the scene/view link |

## Related

{% content-ref url="/pages/cmIArVZ1ZIIeKoPAl7As" %}
[Video bitrate in rooms](/guides/video-bitrate-in-rooms)
{% endcontent-ref %}

{% content-ref url="/pages/V1Pj8EBxP8crFyFveJho" %}
[Video Bitrate Parameters](/advanced-settings/video-bitrate-parameters)
{% endcontent-ref %}


# Stable IRL streaming

A practical field guide for stable VDO.Ninja IRL streams from phones and mobile encoders over cellular, Starlink, bonded networks, TURN relay, and chunked mode.

Start with 720p30 at about 2 Mbps. A 6000-kbps viewing target does not reserve 6000 kbps or make a cellular path more reliable. It asks for larger frames and can make packet loss, recovery bursts, phone heat, and encoder instability worse.

## 1. Start with this profile

Replace `STREAMID` with a unique stream ID.

Publisher/push link:

```
https://vdo.ninja/?push=STREAMID&quality=1&fps=30&codec=h264&outboundvideobitrate=2000&maxvideobitrate=2500&autorecover=1
```

OBS/view link:

```
https://vdo.ninja/?view=STREAMID&videobitrate=2000&buffer=1000&retry=10&autorecover=1&degrade=maintain-framerate
```

This profile uses:

* 720p at 30 fps instead of 1080p or 60 fps;
* hardware-friendly H.264 when available;
* a 2000-kbps target with a 2500-kbps sender cap;
* a 1-second viewer buffer for jitter;
* periodic stream discovery plus VDO.Ninja's staged connection recovery.

If it still freezes while moving, use the weak-signal profile before trying a higher bitrate.

Publisher/push link:

```
https://vdo.ninja/?push=STREAMID&quality=2&fps=30&codec=h264&outboundvideobitrate=900&maxvideobitrate=1200&autorecover=1
```

OBS/view link:

```
https://vdo.ninja/?view=STREAMID&videobitrate=900&buffer=1500&retry=10&autorecover=1&degrade=maintain-framerate
```

The weak-signal profile targets 360p30. It is less sharp, but its smaller frames need less upload capacity and recover faster after loss.

## 2. Prepare the mobile encoder

1. Update the device OS, browser, and VDO.Ninja app before the event.
2. Record locally when the device supports it. A local copy protects the program when no live transport can cross a real coverage hole.
3. Keep browser-based capture foregrounded, the device awake, and interruptions disabled during the stream.
4. Keep the encoder shaded and ventilated. Avoid 1080p60, direct sun, and an insulating case; charging plus encoding can create significant heat.
5. Test with the same device, mount, power source, carriers, route, and time of day that will be used live.

The [native VDO.Ninja mobile apps](/steves-helper-apps/native-mobile-app-versions) add mobile-specific camera features, local recording, improved external audio support, and background-operation options. Test both the native app and browser on the actual device; neither path can compensate for a complete network outage.

### iPhone and iPad notes

Do not assume switching from Safari to Chrome or Firefox changes the media engine on iPhone; common iOS builds still use WebKit. Keep browser capture foregrounded and the screen awake. If Safari is unstable, test the native VDO.Ninja app rather than assuming iOS Chrome will behave like desktop Chrome.

### Android notes

Test current Chrome and the native VDO.Ninja app. Disable aggressive battery optimization for the chosen app, prevent the screen from sleeping during browser capture, and confirm the OS does not revoke camera, microphone, or background-network access during a long field test.

## 3. Identify what is failing

| Symptom                                                 | Likely layer                                      | First test                                                                             |
| ------------------------------------------------------- | ------------------------------------------------- | -------------------------------------------------------------------------------------- |
| Bitrate falls and the image becomes soft                | Congestion control                                | Lower bitrate or resolution; relay usually does not create more radio capacity.        |
| Audio and video freeze together during movement         | Cellular loss or network handoff                  | Test a bonded path and keep `autorecover=1`.                                           |
| Audio continues but remote video turns black or freezes | Video encoder, track, or decoder recovery         | Add `&keyframe=2000` to the view link as a test and compare the local phone preview.   |
| The local preview also freezes or turns black           | Device capture, thermal, or app lifecycle         | Cool the device, keep browser capture foregrounded, and test 360p30 in the native app. |
| The app or page closes or reloads                       | Mobile OS memory, thermal, or application failure | Lower capture load, close unused apps/tabs, and preserve a local recording.            |

`&keyframe=2000` is a diagnostic for video that remains damaged after loss. It requests a new keyframe every two seconds. Remove it if it causes larger bitrate bursts or more loss; it is not a general cellular fix.

## 4. Choose the network path

| Path               | Best use                                                   | Main tradeoff                                                             |
| ------------------ | ---------------------------------------------------------- | ------------------------------------------------------------------------- |
| Direct WebRTC      | Normal low-latency IRL with a usable cellular path         | Fastest, but short outages are visible.                                   |
| Automatic recovery | Roaming or intermittent peer-path failures                 | Recovery takes time; `autorecover=1` enables the broader recovery bundle. |
| Forced TURN relay  | Carrier NAT or a poor direct route                         | Adds a server hop and latency; it does not repair weak RF coverage.       |
| Bonded connection  | Carrier handoffs, moving coverage, or critical streams     | Uses more data, battery, equipment, and sometimes VPN latency.            |
| Chunked/WebCodecs  | Supported devices where 1-4 seconds of delay is acceptable | Browser-dependent and cannot bridge a complete outage by itself.          |

### Test forced relay instead of assuming it helps

Current VDO.Ninja recovery starts direct and can automatically escalate a failed path to TURN. `&relay` forces TURN from the beginning, so use it as an A/B test rather than a default cure.

1. Run the stable profile for at least 10 minutes on the real route.
2. Add `&relay` to both the publisher and view links, then repeat the same route.
3. Keep relay only if it produces fewer failures at an acceptable delay.

TURN can help when a carrier's NAT or direct route is the problem. It cannot combine connections, restore missing cellular coverage, or provide bandwidth that the uplink does not have. Sustained high-bitrate relay use should use an appropriately provisioned TURN service.

### Bond separate internet paths

A bond is the most relevant upgrade when the stream fails during cellular handoffs or brief coverage holes. Use genuinely independent paths when possible, such as different carriers.

On a phone or laptop, a practical software setup is cellular plus Wi-Fi from a second carrier hotspot, vehicle router, or Starlink. Most dual-SIM phones expose only one active cellular data path at a time, so two SIMs in one phone are not the same as two bonded modems.

For Speedify:

1. Confirm both Wi-Fi and cellular show as connected inside Speedify.
2. Start with Speed mode plus Enhance Streaming.
3. Try Redundant mode for a critical stream with packet loss; it duplicates traffic and uses more data and battery.
4. Leave transport on Auto first, then A/B test UDP for latency-sensitive live streaming.
5. Select a nearby server and repeat the actual moving route.

For a Peplink/SpeedFusion-style router, prioritize Smoothing and Hot Failover for real-time WebRTC. Plain bandwidth bonding is aimed more at aggregate throughput; it is not automatically the best mode for low-latency media. Use separate carrier modems and a nearby SpeedFusion endpoint.

### Treat chunked mode as a device-specific experiment

Chunked mode adds VDO.Ninja-controlled buffering, indexed chunks, NACK retransmission, parity repair, and adaptation. It can absorb more loss than an extremely low-latency path, but it is not network bonding.

Recent Chromium-based runtimes are the primary target. Current VDO.Ninja code disables chunked publishing on Firefox. Safari/WebKit publishing is capability-gated: it is enabled only when the complete WebCodecs audio/video stack and required worker track-processing APIs are present. Test the exact device, OS, browser/app runtime, and OBS receiver before relying on it.

Experimental publisher/push link:

```
https://vdo.ninja/?push=STREAMID&quality=1&fps=30&chunked=1400&chunkbitrate=1400&chunkprofile=mobile&chunkedbuffer=2000&autorecover=1
```

Experimental OBS/view link:

```
https://vdo.ninja/?view=STREAMID&chunkbuffer=1500&chunkbufferfloor=1000&chunkbufferceil=3500&chunkjitterslack=500&retry=10&autorecover=1
```

Expect extra delay. If VDO.Ninja reports that chunked mode is unsupported, or if the publisher heats or crashes, return to the standard 720p30 profile.

## 5. Run a field test before going live

1. Record 10 minutes while parked and 10 minutes while moving with the stable profile.
2. Repeat with the weak-signal profile; test forced relay separately.
3. At the receiver, record bitrate, packet loss, RTT, jitter, decoded FPS, candidate type, and recovery time; do not rely only on a speed-test result.
4. Repeat under the real heat, movement, and charging conditions so thermal behavior matches the event.
5. Choose the lowest profile that completes the route without a black screen or manual reconnect.

For critical work, run two outputs: the live VDO.Ninja feed and a local recording on the publisher device. No WebRTC flag can recover media that was never transmitted during a complete coverage outage.

## Related guides and references

{% content-ref url="/pages/mHncqF2muM4PNL9puffp" %}
[Mobile uplinks with Starlink, cellular, and bonded networks](/guides/mobile-uplink-starlink-cellular-bonding)
{% endcontent-ref %}

{% content-ref url="/pages/wJQGxl0KrTeLughBKsSK" %}
[Video bitrate for push/view links](/guides/video-bitrate-for-push-view-links)
{% endcontent-ref %}

{% content-ref url="/pages/-MZX-rFCzgmIUyBitkaa" %}
[\&relay](/advanced-settings/turn-and-stun-parameters/and-relay)
{% endcontent-ref %}

{% content-ref url="/pages/RuI5uNIo2aV3KSIBc2p1" %}
[\&chunked](/advanced-settings/settings-parameters/and-chunked)
{% endcontent-ref %}

* [Speedify supported connection types](https://support.speedify.com/article/56-what-internet-connections-can-i-use-with-speedify)
* [Speedify bonding modes](https://support.speedify.com/article/870-bonding-mode)
* [Speedify transport modes](https://support.speedify.com/article/882-transport-mode)
* [Peplink SpeedFusion bonding, smoothing, and hot failover](https://www.peplink.com/technology/speedfusion-bonding-technology/)
* [WebKit features in Safari 26](https://webkit.org/blog/17333/webkit-features-in-safari-26-0/)


# Mobile uplinks with Starlink, cellular, and bonded networks

How to choose VDO.Ninja, chunked, SRT, RTMP, and bonded-network options for moving mobile uplinks.

This guide is for remote mobile video feeds, such as a phone camera on a moving Starlink Roam plus 5G uplink, received in OBS with a VDO.Ninja browser source.

The short version:

> For mobile Starlink, the problem is often packet timing, packet loss, and short outages before it is raw upload bandwidth.

VDO.Ninja's normal media path is WebRTC. WebRTC is built for low latency, so it reacts quickly when packets arrive late or disappear. That is good for conversation, but it can make video quality collapse on a moving uplink with tree cover, Starlink jitter, or cellular handoffs.

Use the [Mobile Uplink Packet Flow Lab](https://vdo.ninja/misc/mobile-uplink-packet-flow.html) to visualize the tradeoffs between plain WebRTC, buffered WebRTC, chunked/WebCodecs, SRT, RTMP, and different bonded-network paths.

Use the [Unstable Connection Builder](https://vdo.ninja/misc/unstable-connection-builder.html) to generate matching push/view URLs for normal WebRTC, chunked/WebCodecs, audio recovery, Meshcast, relay tests, and local iframe simulation.

![Packet-flow lab showing chunked mode over a bonded Starlink and 5G service](/files/7jZTNJPuey1mGH461Qfi)

## Why a high bitrate can still look bad

`&outboundvideobitrate=7000` sets a sender-side target/default bitrate. It does not force the browser to keep sending 7000-kbps through loss, jitter, or congestion.

If the browser sees network trouble, WebRTC congestion control can reduce bitrate sharply. In bad cases, the viewer may see a low-bitrate image even though a speed test shows enough average upload.

`&q=0` or `&quality=0` targets 1080p/high quality. That creates larger compressed video frames. Larger H.264 frames need more packets, so one burst of packet loss can damage more of the picture and take longer to recover.

Lower bitrate and smaller frames can survive lossy links better because:

* each frame contains less data;
* missing packets can be retried faster;
* recovery keyframes are smaller;
* the congestion controller has more headroom before it hits the real link limit.

This is why a 720p30 feed at 2500 to 4000-kbps can sometimes look better than a 1080p feed targeting 7000-kbps over a moving Starlink path.

## Why H.264 damage can linger

H.264 video depends on keyframes and predicted frames. If a predicted frame is damaged, later frames can also look wrong until the decoder receives a clean reference again.

WebRTC already requests a fresh keyframe automatically whenever it detects loss or corruption, so it recovers on its own much of the time. That recovery is time-limited, though: if a packet arrives too late for low-latency playback, the frame may still be dropped or shown damaged.

If damage lingers for several seconds after a dropout instead of clearing quickly, you can force a periodic keyframe. `&keyframe` is a **viewer-side** option: you put it on the OBS/view link, and it asks the remote phone to send keyframes at that interval.

```
&keyframe=2000
```

Do not treat this as a default quality setting. A keyframe is the largest frame type, so forcing them often spends bandwidth and sends big bursts that are themselves vulnerable to loss. On a weak uplink, too-frequent keyframes can make congestion and loss worse, not better.

Use it only as a targeted fix for lingering damage, and start at `&keyframe=2000`. Drop to `&keyframe=1000` only if 2000 still does not clear damage fast enough and you have confirmed the bond has bandwidth headroom to spare. Values under about 1000 ms cause a steep quality drop and may not work at all.

## Bonding is not one single thing

Do not treat every "bonded" connection as equivalent.

There is a major difference between:

* **load balancing:** each connection/session is assigned to one path;
* **failover:** one path is active and another takes over after failure;
* **throughput bonding:** packets are split across multiple links and reassembled by a tunnel/server;
* **redundant bonding:** packets are duplicated over multiple links and the first good copy is used;
* **real-time smoothing/FEC:** extra bandwidth is spent to reduce loss, jitter, or short gaps.

RTMP, SRT, and WebRTC do not all benefit from those modes in the same way.

### RTMP/TCP-style traffic

RTMP commonly runs over a reliable ordered transport such as TCP. When data is lost, delivery blocks until the missing data is recovered. That often protects the encoded video from corruption, but it can create stalls and latency.

For RTMP, raw throughput bonding and TCP-friendly recovery can work well if the bonded tunnel is stable. A few seconds of delay is often acceptable for program contribution.

### WebRTC/real-time UDP traffic

WebRTC is timing-sensitive. A packet that arrives late can be nearly as useless as a packet that never arrives.

For WebRTC, the bonding layer must preserve real-time behavior. It needs to manage packet timing, reordering, duplication, loss, and jitter without adding too much queueing delay.

This matters because Starlink and cellular often have different latency and jitter. Sending different packets over Starlink and 5G without a service that reorders, buffers, and de-duplicates them can make timing worse.

For WebRTC, a "good" bonded setup is not just the one with the highest speed-test number. It is the one with the lowest useful packet loss, stable jitter, and a tunnel endpoint close enough to avoid adding avoidable round-trip time.

## Peplink, Speedify, and other bonding options

### Peplink / SpeedFusion-style hardware

Peplink SpeedFusion has separate features for bandwidth bonding, smoothing, and hot failover. Peplink describes bandwidth bonding as packet-level aggregation, smoothing as using redundant packets to reduce packet loss and jitter, and hot failover as maintaining sessions when a link drops.

For live WebRTC-style traffic, the relevant features are usually the real-time ones: smoothing, loss handling, failover behavior, traffic rules, and where the SpeedFusion endpoint is located.

For RTMP/SRT contribution, aggregate throughput and stable failover can also matter, since those workflows can usually tolerate more buffering.

Peplink-style hardware can be a strong option when you need router-level control, external antennas, multiple WANs, traffic steering, and the ability to use your own SpeedFusion endpoint or a provider endpoint. The configuration matters. A generic failover setup is not the same as a real-time bonded tunnel.

### Speedify-style software bonding

Speedify is software-based bonding. Its modes are not interchangeable:

* Speed Mode focuses on aggregate throughput.
* Redundant Mode sends packets over multiple connections and uses the first copy that arrives, trading data use and battery for reliability.
* Streaming/Enhanced Streaming mode prioritizes real-time streams and can switch behavior based on network conditions.
* Transport mode also matters; UDP transport is generally the better fit for latency-sensitive use than forcing everything through TCP.

Speedify can be useful on a phone or laptop because it is easy to deploy, but the selected mode, server location, per-link priority, and per-link quality still matter. If the selected Speedify server is far away, or if Starlink and 5G have very different latency, the tunnel can add delay or reassembly overhead.

### Server and endpoint location

Bonding normally requires a reassembly point. With Speedify, that is a Speedify server. With Peplink, it might be SpeedFusion Connect, SpeedFusion Cloud, or your own FusionHub/SpeedFusion endpoint. With a managed broadcast system, it may be the provider's cloud receiver.

That endpoint location matters.

For WebRTC, the media path is timing-sensitive. If the bonded tunnel exits far from the receiver, TURN server, relay, office, or media ingest point, the added path can increase round-trip time and make keyframe requests, retransmits, and congestion control slower.

For RTMP and SRT, a few extra milliseconds are often less important than clean recovery, but the endpoint still affects latency, throughput, and how quickly retransmits complete.

When comparing bonding providers or modes, compare the whole path:

* phone to each uplink;
* each uplink to the bonding endpoint;
* bonding endpoint to the office, relay, Meshcast/SRT/RTMP ingest, or OBS receiver;
* packet loss, jitter, and latency during movement.

### Broadcast bonding systems

Dedicated broadcast systems, such as hardware or cloud workflows built around bonded contribution, are often designed around a known latency budget and a managed receiving endpoint. These can be better suited to remote production than a generic VPN-style bond, especially when the goal is a clean program feed rather than direct two-way interaction.

The tradeoff is cost, complexity, and usually more latency.

## Options to test in VDO.Ninja

Use unique stream IDs and room names in the examples below.

### Option 1: Stable low-latency WebRTC

Use this when interaction matters and the uplink is imperfect.

Phone/push link:

```
https://vdo.ninja/?push=STREAMID&q=1&fps=30&codec=h264&outboundvideobitrate=2500
```

OBS/view link:

```
https://vdo.ninja/?view=STREAMID&bitrate=2500&buffer=500
```

This gives up some sharpness so the stream has more room to survive loss and jitter. If you find that damage lingers for seconds after a dropout, add `&keyframe=2000` to this view link (see [Why H.264 damage can linger](#why-h-264-damage-can-linger)).

### Option 2: Higher-quality WebRTC when the bond is clean

Use this only when packet loss is low and the bonded service is stable.

Phone/push link:

```
https://vdo.ninja/?push=STREAMID&q=0&fps=30&codec=h264&outboundvideobitrate=4000
```

OBS/view link:

```
https://vdo.ninja/?view=STREAMID&bitrate=4000&buffer=1000
```

If this is stable, you can test higher bitrates. If the stream starts smearing, freezing, or dropping to very low bitrate, reduce the target before raising it again. As above, only add `&keyframe=2000` to the view link if post-dropout damage is slow to clear.

### Option 3: More receive-side buffer for OBS

Use this when a little extra delay is acceptable.

```
&buffer=1000
```

or:

```
&buffer=3000
```

This is added to the OBS/view link. It can give WebRTC more time to smooth jitter and receive a recovery keyframe. It is still browser-managed WebRTC buffering, so it is not the same as a dedicated contribution buffer. Very large WebRTC buffers are not a good fit for most browser-source workflows.

### Option 4: Advanced normal-WebRTC reliability knobs

Use this when you need to stay on the normal low-latency WebRTC media path, but the link has short random packet loss or jitter. These settings do not turn WebRTC into SRT, and they cannot hide multi-second outages, but they can make a marginal mobile uplink more stable.

Phone/push link:

```
https://vdo.ninja/?push=STREAMID&q=1&fps=24&width=1280&height=720&outboundvideobitrate=2500&maxvideobitrate=2500&maxbandwidth=70&contenthint=motion
```

OBS/view link:

```
https://vdo.ninja/?view=STREAMID&codec=vp8&vred&videobitrate=2500&buffer=500&audiobuffer=120&degrade=maintain-framerate&keyframe=3000
```

What to test:

* `&buffer=500` or `&buffer=1000` is usually the first WebRTC knob for jitter. It gives late packets and keyframe recovery a little more time before playback needs the frame.
* `&codec=vp8&vred` asks WebRTC negotiation to prefer VP8 with RED support. RED is useful to test for short random loss, but the browser still decides whether to send redundancy or FEC packets. It is not a fixed FEC percentage that VDO.Ninja can force from JavaScript.
* Test VP8 first when experimenting with RED/FEC. Chromium's WebRTC stack has code paths that disable RED+ULPFEC combinations in some cases, including payloads such as H.264 when NACK is enabled. H.264 may still be the better practical choice on phones when hardware encoding, battery, heat, or compatibility matter more than experimenting with RED.
* Keep NACK, PLI, and congestion control enabled. Do not add `&nonack`, `&nopli`, or `&noremb` when the goal is reliability.
* `&maxbandwidth=70` leaves about 30% headroom against the estimated available sender bandwidth. On unstable mobile links, leaving headroom can look better than chasing the highest possible bitrate.
* `&degrade=maintain-framerate` asks the sender to preserve frame rate and reduce resolution first when constrained. This is often better for motion. For screen sharing or text, `&degrade=maintain-resolution` may be better, but it can make motion less smooth.
* `&keyframe=3000` is still only a recovery aid for lingering damage. If keyframes make the link bursty, remove it or raise the interval.

Browser support and limits:

* WebRTC capabilities are browser-specific. The WebRTC specification includes RTX, RED, and FEC entries in RTP codec capabilities when a browser supports them, but pages need to work from the browser's advertised capabilities rather than assume every engine exposes the same set.
* Modern browsers support codec preference APIs, but older OBS Browser Source / CEF builds, old mobile browsers, and some embedded browsers can lag behind current Chrome or Firefox.
* `jitterBufferTarget`, the newer receiver-side buffer API, is marked by MDN as limited availability and is capped at 4000 ms. VDO.Ninja only applies it when the browser exposes it; otherwise it falls back to older browser delay hints where available.
* If you need several seconds of repair time, use chunked/WebCodecs, SRT, RTMP, or a proper bonded/smoothing path instead of trying to make normal WebRTC buffer indefinitely.

Best fit:

* short random packet loss: try VP8 + RED, keep NACK/PLI on, and leave bitrate headroom;
* high jitter or packet reordering: increase `&buffer` first;
* burst loss or handoffs: use a bonded path with smoothing/redundancy, or move to chunked/SRT/RTMP with more latency;
* phone heat or hardware encoder stability: H.264 at a lower bitrate may beat VP8 even if VP8 is better for RED testing.

{% content-ref url="/pages/y3TIjGr6X9edZjK2NOU9" %}
[\&vred](/advanced-settings/video-parameters/vred)
{% endcontent-ref %}

### Option 5: Chunked/WebCodecs mode

Use this when OBS can tolerate more delay and you want a more buffered, recovery-oriented VDO.Ninja path.

Phone/push link:

```
https://vdo.ninja/?push=STREAMID&chunked=2500&chunkprofile=balanced&chunkedbuffer=6000
```

OBS/view link:

```
https://vdo.ninja/?view=STREAMID&chunkbuffer=1500&chunkbufferfloor=1000&chunkbufferceil=4000&chunkjitterslack=500&chunkadapt=hybrid
```

Chunked mode is JavaScript-powered and uses encoded chunks over data channels. It is cruder than dedicated SRT/RTMP contribution systems, but it gives VDO.Ninja control over buffering and recovery behavior that normal WebRTC media tracks do not expose.

Use Chromium-based browsers for this path.

### Option 6: SRT or RTMP through a relay

Use this when the cleanest program feed matters more than sub-second latency.

SRT is built for unreliable networks with configurable latency and packet recovery. It uses a recovery window, so more latency can mean more time to repair missing packets.

RTMP is widely supported and commonly uses reliable ordered delivery. It usually avoids partially corrupted video frames by waiting for missing data, but that can create blocking and delay.

For VDO.Ninja-adjacent workflows, [Meshcast](https://app.meshcast.io) can be tested as a relay/contribution path when SRT or RTMP is a better fit than browser-to-browser WebRTC.

## Phone and encoder notes

On a Samsung S25 Ultra or similar phone, watch for heat, battery, and background app behavior. A high bitrate target does not help if the phone thermal-throttles or the encoder becomes unstable.

`&h264profile` can change H.264 encoder/profile behavior, but it is not a bonding or packet-loss fix by itself. Test it separately from network changes so you know whether it helped compatibility or made the phone work harder.

`&nomobilebitratecap` can remove VDO.Ninja's mobile sender bitrate safety cap. Only use it when you have already proven the phone, encoder, and uplink are stable enough for the higher target.

## Field test checklist

Test each path while moving, not just while parked.

For each test, write down:

* Starlink-only result;
* cellular-only result;
* bonded result;
* bonding mode;
* bonding server or endpoint region;
* VDO.Ninja push URL parameters;
* VDO.Ninja OBS/view URL parameters;
* OBS browser-source latency;
* visible artifacts: bitrate collapse, smearing, freezes, audio drops, or long delay.

Do not judge by speed test alone. Watch packet loss, jitter, recovery time, and the actual OBS recording.

## Related VDO.Ninja settings

{% content-ref url="/pages/wJQGxl0KrTeLughBKsSK" %}
[Video bitrate for push/view links](/guides/video-bitrate-for-push-view-links)
{% endcontent-ref %}

{% content-ref url="/pages/-MZfz0Nym0yxXMKxlf2M" %}
[How to control bitrate/quality](/guides/how-do-i-control-bitrate-quality)
{% endcontent-ref %}

{% content-ref url="/pages/-MZXYKYAzmk-2IPAChP1" %}
[\&outboundvideobitrate](/advanced-settings/video-bitrate-parameters/and-outboundvideobitrate)
{% endcontent-ref %}

{% content-ref url="/pages/-MZXed7af4kF83c7mG52" %}
[\&maxvideobitrate](/advanced-settings/video-bitrate-parameters/and-maxvideobitrate)
{% endcontent-ref %}

{% content-ref url="/pages/tkxDQxgcyIBofqVrjZsU" %}
[\&maxbandwidth](/advanced-settings/video-bitrate-parameters/and-maxbandwidth)
{% endcontent-ref %}

{% content-ref url="/pages/-MZdudjg0hJYNiC3VGwt" %}
[\&codec](/advanced-settings/video-parameters/codec)
{% endcontent-ref %}

{% content-ref url="/pages/-MZdtO5YNVAt2R8vG5Us" %}
[\&buffer](/advanced-settings/video-parameters/buffer)
{% endcontent-ref %}

{% content-ref url="/pages/-MZdutI2JiIeMJrZLwhm" %}
[\&keyframerate](/advanced-settings/settings-parameters/keyframerate)
{% endcontent-ref %}

{% content-ref url="/pages/RuI5uNIo2aV3KSIBc2p1" %}
[\&chunked](/advanced-settings/settings-parameters/and-chunked)
{% endcontent-ref %}

{% content-ref url="<https://github.com/steveseguin/vdo.ninja/blob/gitbook/advanced-settings/newly-added-parameters/and-chunkedbuffer.md>" %}
<https://github.com/steveseguin/vdo.ninja/blob/gitbook/advanced-settings/newly-added-parameters/and-chunkedbuffer.md>
{% endcontent-ref %}

{% content-ref url="/pages/-MZfwIo7kzNiTYxjSnOH" %}
[Packet Loss](/common-errors-and-known-issues/packet-loss)
{% endcontent-ref %}

{% content-ref url="/pages/ydII9ENScx0tPeqQkILx" %}
[Handling Guest Disconnects and Connection Recovery](/guides/handling-guest-disconnects-and-connection-recovery)
{% endcontent-ref %}

## External references

* [Speedify Bonding Mode Overview](https://support.speedify.com/article/870-bonding-mode)
* [Speedify Transport Mode Overview](https://support.speedify.com/article/882-transport-mode)
* [Speedify Streaming Prioritization Overview](https://support.speedify.com/article/1010-speedify-streaming-prioritization-overview)
* [Peplink SpeedFusion Bonding & Failover Technology](https://www.peplink.com/technology/speedfusion-bonding-technology/)
* [Haivision SRT introduction](https://doc.haivision.com/SRT/1.5.3/Haivision/introduction-to-srt)
* [Adobe RTMP Chunk Stream specification](https://ossrs.net/lts/en-us/assets/files/rtmp_specification_1.0-25a467618b92a3115bc97d4b0038b0ff.pdf)
* [W3C WebRTC RTP parameters and capabilities](https://www.w3.org/TR/webrtc/#rtcrtpparameters)
* [MDN RTCRtpTransceiver.setCodecPreferences](https://developer.mozilla.org/en-US/docs/Web/API/RTCRtpTransceiver/setCodecPreferences)
* [MDN RTCRtpReceiver.jitterBufferTarget](https://developer.mozilla.org/en-US/docs/Web/API/RTCRtpReceiver/jitterBufferTarget)
* [WebRTC RFC 8854: Forward Error Correction Requirements](https://www.rfc-editor.org/info/rfc8854/)
* [Chromium WebRTC RED/ULPFEC sender logic](https://chromium.googlesource.com/external/webrtc/+/master/call/rtp_video_sender.cc)


# Delay an incoming feed

Add a fixed delay of several seconds or minutes to an incoming VDO.Ninja feed using Meshcast HLS, OBS, or experimental chunked video.

A two-minute delay is much longer than a normal WebRTC jitter buffer. The best method depends on whether you need to delay one incoming feed, the complete OBS program output, or video without audio.

## Quick recommendation

| Goal                                                     | Recommended method                             |
| -------------------------------------------------------- | ---------------------------------------------- |
| Delay one incoming audio/video feed by two minutes       | Meshcast HLS player                            |
| Delay the complete outgoing OBS broadcast by two minutes | OBS Stream Delay                               |
| Bring a delayed program back into another production     | First OBS or media server feeding a second OBS |
| Delay only VDO.Ninja video                               | Experimental chunked mode                      |
| Keep the workflow private and self-hosted                | MediaMTX with an HLS DVR window                |

Do not use a normal VDO.Ninja viewer link with `&buffer=120000`. With normal WebRTC, the browser-managed buffer is limited to roughly 3–5 seconds of useful delay, even when a much larger value is requested.

## Option 1: Meshcast HLS player

[Meshcast](https://app.meshcast.io) is the simplest current option for delaying audio and video together. Its current HLS configuration keeps approximately five minutes of seekable history, and its HLS player accepts a delay in seconds.

HLS playback requires a registered Meshcast account. A free registered account includes HLS on shared servers.

### Set it up

1. Sign in to [app.meshcast.io](https://app.meshcast.io) and create or select a stream.
2. Publish to that stream using Meshcast Web Studio, RTMP, SRT, WHIP, or the VDO.Ninja Meshcast 2.0 integration.
3. Let the stream run for at least two minutes before opening the delayed player. A player cannot go two minutes behind live until two minutes of media exist.
4. Copy the **HLS Player URL** from the Meshcast dashboard or studio.
5. Add `delay=120`, enable audio, and optionally hide the controls.

If the copied URL has no query string:

```
https://app.meshcast.io/hls-player/STREAM_ID?delay=120&muted=0&controls=0
```

If the copied URL already contains a server value:

```
https://app.meshcast.io/hls-player/STREAM_ID?server=SERVER_ID&delay=120&muted=0&controls=0
```

`delay` is in seconds. The Meshcast player currently accepts up to 240 seconds. It is muted by default, so include `muted=0` when audio is required.

### Use it in OBS

Add the HLS Player URL as an OBS **Browser Source**. Use the same width and height as the expected feed, and test that audio is reaching the desired OBS track.

For an exact two-minute offset at program start, begin the Meshcast ingest first, wait two minutes, and then load or refresh the Browser Source. If the player is opened too early, it can only seek to the oldest media currently available.

### Publishing from VDO.Ninja

Meshcast 2.0 can accept a stream key or token from a VDO.Ninja publishing URL:

```
https://vdo.ninja/?push=STREAMID&meshcast2=live_...
```

Use the VDO.Ninja publishing URL and HLS Player URL supplied for the same Meshcast stream. Copying them from the Meshcast dashboard avoids mixing up the private publishing key and public viewing identifier.

See [Meshcast.io](/steves-helper-apps/meshcast.io) and [`&meshcast`](/advanced-settings/meshcast-parameters/and-meshcast) for the available publishing paths.

## Option 2: OBS Stream Delay

If the complete outgoing OBS production should be delayed, use OBS's built-in **Stream Delay**:

1. Open **Settings**.
2. Select **Advanced**.
3. Enable **Stream Delay**.
4. Set the duration to `120` seconds.
5. Test starting, reconnecting, and stopping the stream before using it live.

This delays the encoded outgoing program. It does not create a delayed source inside the same OBS scene, and the local preview remains live.

Use this method when the destination is YouTube, Twitch, an RTMP server, or another streaming endpoint and every part of the program should share the same delay.

## Option 3: Feed a second OBS

If the delayed result must return as a source for switching, graphics, recording, or monitoring, separate the ingest and production roles:

```
VDO.Ninja feed → first OBS or media server → delayed encoded stream → second OBS
```

The first OBS receives the VDO.Ninja feed and sends an encoded program through a delayed RTMP, SRT, or HLS path. The second OBS receives that delayed result as a Media Source or Browser Source.

This uses more CPU and can add another encode generation, but it is easier to reason about than trying to hold two minutes of uncompressed frames in an OBS source filter. A local [MediaMTX](/guides/deploy-your-own-meshcast-like-service) server can keep the delayed leg on the production network.

## Option 4: Experimental VDO.Ninja chunked video

VDO.Ninja's [`&chunked`](/advanced-settings/settings-parameters/and-chunked) mode uses WebCodecs and a custom receiver queue. Unlike the normal WebRTC buffer, it can hold encoded video for minutes when the browser has enough memory.

Example publisher:

```
https://vdo.ninja/?push=STREAMID&chunked=2500
```

Experimental two-minute video-only viewer:

```
https://vdo.ninja/?view=STREAMID&noaudio&nochunkaudio&chunkbuffer=120000&chunkbufferadaptive=0&chunkbufferceil=180000
```

Important limitations:

* Current shared chunked audio/video buffering is limited to about 30 seconds, so this is not the recommended method for a two-minute feed with synchronized audio.
* Chunked publishing requires a compatible WebCodecs browser and is more experimental than normal VDO.Ninja video.
* The receiving page owns the buffer. Refreshing or closing it loses the queued media.
* Memory use grows with bitrate and delay. At 2500 kbps, two minutes of encoded video is roughly 38 MB before browser and queue overhead.
* Test the exact sending browser, receiving browser or OBS version, codec, and network before production use.

Use Meshcast HLS or an encoded OBS/server path when synchronized two-minute audio and video are required.

## Option 5: Self-hosted HLS with MediaMTX

For a private or on-premises workflow, MediaMTX can create an HLS DVR window. The server must retain more media than the requested delay.

For example, two-second segments and 150 retained segments provide approximately five minutes of seekable history:

```yaml
hls: yes
hlsVariant: fmp4
hlsSegmentDuration: 2s
hlsSegmentCount: 150
hlsDirectory: /var/lib/mediamtx/hls
```

The segment count creates the seekable history; it does not automatically force viewers to remain two minutes behind live. Use an HLS player configured to start and remain at the live edge minus 120 seconds.

H.264 video and AAC audio offer the broadest conventional HLS compatibility. A WHIP source using Opus audio may require an AAC transcode for some HLS players.

See [Deploy your own Meshcast-like service](/guides/deploy-your-own-meshcast-like-service) for a broader MediaMTX setup.

## Methods that are not suitable

### Normal `&buffer`

The normal [`&buffer`](/advanced-settings/video-parameters/buffer) parameter controls the browser's WebRTC playout target. Modern browsers usually limit its useful result to roughly 3–5 seconds. It is not a two-minute DVR.

### OBS Render Delay filters

OBS Render Delay is intended for short synchronization corrections. Holding minutes of uncompressed video consumes excessive GPU memory. Do not stack hundreds of short filters to create a broadcast delay.

### Audio sync offsets alone

An audio offset does not create matching delayed video and is not a substitute for an audio/video buffer. Use a method that stores both tracks together.

## Production checklist

Before relying on a long delay:

* run the ingest early enough to fill the complete delay;
* confirm the measured live offset with a visible clock and audible clap;
* verify that audio is enabled and remains synchronized;
* test a sender reconnect and a viewer reload;
* confirm what viewers see when the input ends;
* monitor free disk, memory, and network capacity;
* keep a low-latency confidence feed separate from the delayed program when operators need immediate monitoring.


# How to get permanent links

Make VDO.Ninja guest invites, OBS browser sources, stream IDs, scenes, slots, SSO links, and invite links reusable so they keep working after refreshes or reconnects.

If your OBS browser source stops showing the right guest after they refresh, you usually need a **stable stream ID**.

Think of it like a phone number for a camera feed:

* the guest link says, "publish as this ID" with [`&push=ALICE`](/advanced-settings/setup-parameters/push)
* the OBS/browser-source link says, "watch that ID" with [`&view=ALICE`](/advanced-settings/mixer-scene-parameters/view)
* if the same guest comes back with the same ID, your OBS link keeps working

## Quick answer for OBS

Give each regular guest their own `&push` value:

```
https://vdo.ninja/?room=MyShow&push=AliceCamera&label=Alice
```

Then use the matching `&view` link in OBS:

```
https://vdo.ninja/?view=AliceCamera&solo&room=MyShow
```

Use a different `&push` value for every guest or camera. Two people cannot publish with the same stream ID at the same time.

{% hint style="info" %}
Use a friendly label for the person, but a hard-to-guess stream ID for the URL. For example, `&push=A7kP9vAliceCam` and `&label=Alice`.
{% endhint %}

## Pick the right method

| Goal                                                                        | Use this                                                                                                                                                                                                          |
| --------------------------------------------------------------------------- | ----------------------------------------------------------------------------------------------------------------------------------------------------------------------------------------------------------------- |
| One regular guest should always feed the same OBS source                    | Set [`&push=STREAMID`](/advanced-settings/setup-parameters/push) on their guest link and use `&view=STREAMID` in OBS                                                                                              |
| You want VDO.Ninja to remember a generated ID for that browser              | Use [`&permaid`](/advanced-settings/setup-parameters/and-permaid) on the guest link                                                                                                                               |
| You want one OBS source per position, not per person                        | Use [`&slotmode`](/advanced-settings/director-parameters/and-slotmode), [`&slot=N`](/advanced-settings/settings-parameters/and-slot), and [`&viewslot=N`](/advanced-settings/mixer-scene-parameters/and-viewslot) |
| You manually add guests to scenes and want that to recover after reconnects | Add [`&scenerestore`](/advanced-settings/mixer-scene-parameters/and-scenerestore) to the director link                                                                                                            |
| You sent an invite already and want to change where it points               | Use a managed short link, such as [invite.cam](/steves-helper-apps/invite-link-generators) or another URL shortener                                                                                               |
| You want a lobby, sign-in, waiting list, and reusable host room             | Use [app.invite.cam](/steves-helper-apps/app-invite-cam)                                                                                                                                                          |
| You need sign-in before a VDO.Ninja room is used                            | Use [SSO and signed-in access](/guides/sso-and-signed-in-access), such as `&auth` or `&requireauth`                                                                                                               |

## How stream IDs work

Every published camera, microphone, screen share, or media source needs a stream ID. When you use:

```
https://vdo.ninja/?push=AliceCamera
```

the guest is publishing as `AliceCamera`. A viewer or OBS source can watch it with:

```
https://vdo.ninja/?view=AliceCamera
```

Stream IDs are not permanent accounts. They exist while someone is actively using them. What makes a link "permanent" is reusing the same ID later.

Rules to remember:

* stream IDs are case sensitive
* keep them under 64 characters
* unsupported characters may be changed to `_`
* a stream ID cannot be used by two active publishers at once
* use [`&label`](/advanced-settings/setup-parameters/label) for the human name shown in the interface

## Refreshing vs rejoining

If a guest joins a room without a `&push` value, VDO.Ninja normally generates one once they start publishing. Their address bar may update with that new `&push` value.

That means:

* refreshing the same tab often keeps the same stream ID
* reopening the original invite link may create a new stream ID
* copying a guest's address bar after they joined can accidentally share their private stream ID with someone else

For planned shows, give each regular guest a prepared invite link with a unique `&push` value.

## Use `&permaid` when you do not want to pre-name everyone

[`&permaid`](/advanced-settings/setup-parameters/and-permaid) saves a stream ID in that browser's local storage.

Example:

```
https://vdo.ninja/?room=MyShow&permaid&label=Guest
```

The first time the guest opens it, VDO.Ninja creates a stream ID and saves it in that browser. The next time the same person opens a link with `&permaid`, that saved ID is reused.

This is useful when you want a reusable guest link, but you do not want to make up a `&push` ID in advance.

Important limits:

* it depends on the same browser and browser profile
* it can break if the guest clears site data, changes devices, or uses private/incognito mode
* it is not a cloud account or a reserved name

You can also set the first ID yourself:

```
https://vdo.ninja/?room=MyShow&permaid=AliceCamera
```

After that, `&permaid` without a value can reuse the saved value in that browser.

## Use scenes when OBS should not care who the guest is

Sometimes you do not want an OBS source for "Alice"; you want an OBS source for "the person currently in Scene 1".

Use a scene link in OBS:

```
https://vdo.ninja/?scene=1&room=MyShow
```

Then the director manually adds the current guest to Scene 1. The OBS source stays the same even when the person changes.

## Use slots when OBS should follow positions

Slots are good when your show has fixed positions, such as Host, Guest 1, Guest 2, or Piano.

Director link:

```
https://vdo.ninja/?director=MyShow&slotmode
```

Guest link for a preferred slot:

```
https://vdo.ninja/?room=MyShow&push=AliceCamera&slot=1
```

OBS source for that slot:

```
https://vdo.ninja/?scene&room=MyShow&viewslot=1
```

The OBS source follows whatever the director has assigned to slot 1. If the guest changes, the OBS link does not need to change.

## Use `&scenerestore` for reconnects

[`&scenerestore`](/advanced-settings/mixer-scene-parameters/and-scenerestore) is a director option:

```
https://vdo.ninja/?director=MyShow&scenerestore
```

It helps when you manually add a guest to a scene and that guest disconnects briefly. If the guest reconnects soon enough with the matching restore identity, the director can restore their previous scene selection.

This is not a permanent cloud scene store. It uses a temporary local restore lease, currently around 15 minutes after the last relevant scene action. It also does not bypass room security, queue, approval, or SSO.

{% hint style="info" %}
If you are searching for `scenestore`, `scene store`, or "store scene", the current VDO.Ninja option is named `&scenerestore`.
{% endhint %}

## Managed invite links and short links

VDO.Ninja links can get long. They also sometimes need to change after you already sent them.

Options:

* [invite.cam](https://invite.cam/) can encode or shorten VDO.Ninja invite links. Where enabled, its signed-in dashboard can manage reusable short links.
* [app.invite.cam](/steves-helper-apps/app-invite-cam) gives hosts a reusable signed-in room, lobby, helper controls, and owner-managed invite links.
* Third-party URL managers, such as Short.io, can point a friendly URL at a VDO.Ninja invite and let you update the target later.

Use a short-link manager when you want to change an invite after sending it. Use `&push` or `&permaid` when you want the same guest to keep the same stream ID.

## Signed-in rooms, SSO, and browser-source links

The newer signed-in access flow uses [`&auth`](/guides/sso-and-signed-in-access) and [`&requireauth`](/guides/sso-and-signed-in-access).

In plain language:

* `&auth` turns on the signed-in VDO.Ninja access layer
* `&requireauth` makes sign-in required
* the authenticated director can generate scene, view, and solo links with a `&universaltoken` so OBS/browser sources can view without a person signing in inside OBS
* `&authtoken` is used during sign-in redirects and is normally saved then removed from the visible URL

SSO is about identity and access. It does not replace `&push`, `&permaid`, scenes, or slots when your goal is a stable OBS source.

## Which link should I give guests?

For a simple recurring guest:

```
https://vdo.ninja/?room=MyShow&push=AliceCamera&label=Alice
```

For a guest whose browser should remember its own generated ID:

```
https://vdo.ninja/?room=MyShow&permaid&label=Guest
```

For a signed-in room where the access layer is enabled:

```
https://vdo.ninja/?room=MyShow&auth
```

For a room where sign-in is required:

```
https://vdo.ninja/?room=MyShow&requireauth
```

For a larger lobby or event workflow:

```
https://app.invite.cam/
```

## Common mistakes

* Do not give two people the same `&push` value.
* Do not paste a guest's already-joined address-bar URL into a public chat.
* Do not expect `&permaid` to follow a person across devices.
* Do not use a person's real name as the only stream ID if the link is public.
* Do not confuse `&view=STREAMID` with a slot number. To view a slot, use [`&viewslot`](/advanced-settings/mixer-scene-parameters/and-viewslot).
* Do not rely on `&scenerestore` as a permanent database. It is a reconnect helper.

## Related pages

{% content-ref url="/pages/-MZHig23phhx8694TlBu" %}
[What are stream IDs?](/getting-started/stream-ids)
{% endcontent-ref %}

{% content-ref url="/pages/-MZXP2U7678vEPo5Yxms" %}
[\&push](/advanced-settings/setup-parameters/push)
{% endcontent-ref %}

{% content-ref url="/pages/nflQf8jCCEjl8n8TWEcm" %}
[\&permaid](/advanced-settings/setup-parameters/and-permaid)
{% endcontent-ref %}

{% content-ref url="/pages/8iGa3swf4rC1o6lOIngY" %}
[\&scenerestore](/advanced-settings/mixer-scene-parameters/and-scenerestore)
{% endcontent-ref %}

{% content-ref url="/pages/mzMLC7jVXSenuzms4vPA" %}
[\&viewslot](/advanced-settings/mixer-scene-parameters/and-viewslot)
{% endcontent-ref %}

{% content-ref url="/pages/pPNWQyU9PybI3WEBdwyr" %}
[app.invite.cam](/steves-helper-apps/app-invite-cam)
{% endcontent-ref %}

{% content-ref url="/pages/aEx3Uvd4SpfdwqNAArMl" %}
[SSO and signed-in access](/guides/sso-and-signed-in-access)
{% endcontent-ref %}

## Search words

People may search for this as: permanent link, persistent link, persistant link, reusable link, re-usable link, reusable guest invite, persistent browser source, OBS source refresh, same browser source, same stream ID, streamid, stream id, permaid, perma id, permanent ID, permaID, scene store, scenestore, scene restore, scenerestore, short link, shortener, URL shortner, URL shortener, invite manager, link management, app invite cam, invite.cam, SSO invite, signed-in room, authenticated invite.


# Large production rooms with isolated guest feeds

Configure larger VDO.Ninja productions so each remote guest sends an isolated feed to vMix, OBS, or another production system without receiving every other participant's video.

When remote participants are primarily **contributors to a production**, do not make every guest behave like a full video-conference participant. Give each guest a unique Push ID and add a bare [`&view`](/advanced-settings/mixer-scene-parameters/view) parameter to the invite.

```
https://vdo.ninja/?room=EVENT_ROOM&push=GUEST_01&label=Guest%2001&view
```

The guest still publishes camera and microphone media, but does not request remote room streams. The production system requests that guest with the matching View ID:

```
https://vdo.ninja/?view=GUEST_01&solo&room=EVENT_ROOM
```

This is the recommended starting point when each participant needs to arrive as a separate browser or web input in vMix, OBS, or similar software.

{% hint style="info" %}
The `&view` at the end of the guest invite intentionally has **no value**. `&view=GUEST_01` would request a stream instead of enabling publish-only behavior.
{% endhint %}

## Why a normal room becomes demanding

A normal VDO.Ninja room is peer to peer. If all participants can see and hear one another, their browsers establish guest-to-guest media paths in addition to the connections requested by the director and production inputs.

With 16 guests, each guest can have up to 15 other room peers. VDO.Ninja limits the combined room-viewing video bitrate in production-style rooms by default, but a larger mesh still creates more connections, audio routes, video decoders, rendering work, and outbound publisher fan-out. A weak device or saturated connection may respond with dropped frames, latency, packet loss, or reduced production-feed quality.

The local self-preview is different: it displays the guest's own camera locally and does not download another network stream. Hiding it with [`&nopreview`](/advanced-settings/video-parameters/and-nopreview) may save a little display work, but it is not a meaningful bandwidth optimization.

<figure><img src="/files/854bkNFfQ3SxyVerCD7q" alt="Comparison of an all-to-all VDO.Ninja room mesh with a publish-only production topology"><figcaption><p>Contribution mode removes unnecessary guest-to-guest playback while keeping independently addressable production feeds.</p></figcaption></figure>

## Build stable guest and production links

### 1. Choose a room and unique stream IDs

Create one Push ID per expected position or participant. Use IDs that are difficult to guess when links may be exposed publicly.

```
CamA7Q
CamB4N
CamC9K
```

Stream IDs are case sensitive. Do not open the same Push ID on two publishing devices at once. Use [`&label`](/advanced-settings/setup-parameters/label) for the friendly name shown in the interface rather than relying on the ID as a display name.

### 2. Give each guest a publish-only invite

```
https://vdo.ninja/?room=EVENT_ROOM&push=CamA7Q&label=Guest%2001&view
https://vdo.ninja/?room=EVENT_ROOM&push=CamB4N&label=Guest%2002&view
https://vdo.ninja/?room=EVENT_ROOM&push=CamC9K&label=Guest%2003&view
```

Keep any shared room access parameters consistent across the guest, director, and production links. See [How to selectively allow access](/guides/how-to-selectively-allow-access) before distributing links publicly.

### 3. Add matching inputs to the production system

Create one browser or web input per guest:

```
https://vdo.ninja/?view=CamA7Q&solo&room=EVENT_ROOM
https://vdo.ninja/?view=CamB4N&solo&room=EVENT_ROOM
https://vdo.ninja/?view=CamC9K&solo&room=EVENT_ROOM
```

The important mapping is `push=CamA7Q` to `view=CamA7Q`. Reusing the same pair lets the production input recover the same guest after a refresh or reconnect without being reassigned manually.

<figure><img src="/files/5J6Ml0hxiVdmTDxND7yP" alt="Stable guest Push IDs mapped to matching production View inputs"><figcaption><p>Each unique Push ID has one matching production View link.</p></figcaption></figure>

For more permanent-link, scene, and slot options, see [Permanent links, reusable invites, and stream IDs](/guides/how-to-get-permanent-links).

## Choose what guests should receive

Publish-only is the lightest option, but some productions need talkback or a confidence return. Choose the smallest return path that meets the event's needs.

<figure><img src="/files/gmDuXFxiyWUUUUjKCUyJ" alt="Decision diagram comparing view, directoronly, and broadcast guest modes"><figcaption><p>The guest invite determines whether the participant receives nothing, the directors, or director video plus room audio.</p></figcaption></figure>

| Guest requirement                                            | Add to each guest invite                                                | Result                                                                |
| ------------------------------------------------------------ | ----------------------------------------------------------------------- | --------------------------------------------------------------------- |
| Send an isolated feed and receive nothing remote             | [`&view`](/advanced-settings/mixer-scene-parameters/view) with no value | The guest publishes only; lowest guest-side load                      |
| See and hear the production director, but not other guests   | [`&directoronly`](/advanced-settings/video-parameters/and-directoronly) | Directors provide private talkback or confidence media                |
| See director video while continuing group conversation audio | [`&broadcast`](/advanced-settings/video-parameters/broadcast)           | Other guest video is blocked, but guest-to-guest audio remains active |

`&broadcast` reduces guest video load, but it is not publish-only mode. Guest-to-guest audio connections remain, and a direct director return still fans out separately to each guest.

## Recommended configurations

### Isolated contribution only

Use this when guests only need to feed the production system:

```
https://vdo.ninja/?room=EVENT_ROOM&push=GUEST_ID&view
```

This provides the cleanest topology for a large number of independent vMix or OBS inputs.

### Contribution with private production talkback

Use this when the director must speak to guests or send a confidence video:

```
https://vdo.ninja/?room=EVENT_ROOM&push=GUEST_ID&directoronly
```

Guests connect to directors and co-directors, but not to one another. The director's outbound media load still grows with the number of guests receiving it. See [Send an OBS return feed to guests](/guides/send-an-obs-return-feed-to-guests) if the return comes from the production mix.

### Panel audio with reduced video load

Use this when guests must hear the panel conversation but should not decode every panelist's video:

```
https://vdo.ninja/?room=EVENT_ROOM&push=GUEST_ID&broadcast
```

Guests receive director video, while room audio between guests remains available. Use headphones and test echo cancellation or mix-minus routing before the event.

## What not to use as the primary fix

[`&roombitrate=0`](/advanced-settings/video-bitrate-parameters/roombitrate) prevents other room guests from pulling that publisher's video while leaving director and scene video available. It can help individual weak contributors, but it does not stop that guest from requesting other room feeds and does not remove guest-to-guest audio paths. Applying bare `&view` to every contribution invite is cleaner when nobody needs the room conversation.

Raising [`&totalroombitrate`](/advanced-settings/video-bitrate-parameters/and-totalscenebitrate/totalroombitrate) makes the room previews look better, but increases network and decoding demand. It does not solve an unnecessary all-to-all topology. See [Video bitrate in rooms](/guides/video-bitrate-in-rooms) when the room genuinely needs conferencing-style video.

## Pre-event checklist

1. Confirm every guest has a different `&push` value.
2. Confirm publish-only guest links end in bare `&view`, not `&view=SOMETHING`.
3. Open each matching production View link and label the corresponding input.
4. Test reconnecting one guest and verify that the same input recovers automatically.
5. Confirm guests receive only the return path intended for their mode.
6. Test the expected number of simultaneous guests while watching guest upload, production download, and CPU/GPU load.
7. Leave network headroom; do not plan around the maximum result from a single speed test.

## Troubleshooting

### A guest sees or hears other guests

Check the invite actually contains bare `&view`. If it uses `&broadcast`, other guest video is blocked but their audio remains. Use `&directoronly` for director-only talkback or bare `&view` for no remote media.

### The production input does not find the guest

Compare the exact Push and View IDs, including capitalization. Confirm the guest completed device selection and started publishing. Do not use the same Push ID on another active device.

### Production quality falls as more inputs open

The guest mesh may be gone, but the production machine still receives and decodes every requested ISO feed. Check its inbound bandwidth, browser-input limits, hardware decoding, and CPU/GPU load. Reduce unused inputs, lower requested production bitrate, or split ingest across production machines when necessary.

### Guests need to see the final program

Use `&directoronly` or `&broadcast` with a deliberate return feed. A direct return creates one outbound path per guest; larger productions may need a relay. See [Send an OBS return feed to guests](/guides/send-an-obs-return-feed-to-guests).

## Related guides

* [Permanent links, reusable invites, and stream IDs](/guides/how-to-get-permanent-links)
* [Video bitrate in rooms](/guides/video-bitrate-in-rooms)
* [Send an OBS return feed to guests](/guides/send-an-obs-return-feed-to-guests)
* [`&view`](/advanced-settings/mixer-scene-parameters/view)
* [`&directoronly`](/advanced-settings/video-parameters/and-directoronly)
* [`&broadcast`](/advanced-settings/video-parameters/broadcast)

## Search words

Large room, many guests, isolated guest feeds, contribution mode, publish only, publish-only guest, vMix guest inputs, OBS guest inputs, one input per guest, bandwidth, guest mesh, guests see each other, disable guest video, remote production, permanent guest links, unique Push ID.


# Stable mobile guest production with OBS and Electron Capture

Build a stable multi-guest production with phones, OBS, Electron Capture, broadcast mode, a program return, and optional Meshcast distribution.

This guide is for a production that has several remote phone guests, one isolated source for each guest in OBS, and an OBS Program video sent back to the guests.

The recommended starting design is:

1. Each guest publishes one camera and microphone with a unique Push ID.
2. Each guest uses [`&broadcast`](/advanced-settings/video-parameters/broadcast), so the phone receives only the director's video instead of every guest's video.
3. The director publishes an OBS Virtual Camera return.
4. OBS or Electron Capture opens one fixed View link for each guest.
5. Every Electron Capture window has a unique title.
6. Conversation audio uses one deliberate path. Every speaker wears headphones.

This design reduces phone heat and makes the OBS sources predictable. If the director computer or its upload connection becomes overloaded, add [`&meshcast`](/advanced-settings/meshcast-parameters/and-meshcast) to the director's link.

<figure><img src="/files/oq8n359B3vgJPS1OmBRx" alt="Comparison of a direct broadcast return and a broadcast return distributed through Meshcast"><figcaption><p>Broadcast mode reduces the video received by each phone. Meshcast can also reduce the number of return copies sent by the director.</p></figcaption></figure>

## Terms used in this guide

| Term                 | Meaning                                                           |
| -------------------- | ----------------------------------------------------------------- |
| Guest link           | The link opened on a remote phone or tablet                       |
| Director link        | The VDO.Ninja control room opened by the producer                 |
| View link            | A link that receives one guest using that guest's Stream ID       |
| Program return       | The OBS video sent back to guests so they can follow the show     |
| Isolated feed or ISO | One guest's camera and microphone, separate from the other guests |
| Fan-out              | One sender creating media paths for several viewers               |

## Recommended setup

The examples below use `ROOM_NAME`, `CAM_01`, and `PROGRAM_RETURN`. Replace them with your own values. Stream IDs are case-sensitive. Keep the room password and other access options identical on every room link.

### 1. Give each guest a unique link

Example for the first guest:

```
https://vdo.ninja/?room=ROOM_NAME&push=CAM_01&label=Guest%2001&broadcast&quality=1&maxframerate=30
```

Example for the second guest:

```
https://vdo.ninja/?room=ROOM_NAME&push=CAM_02&label=Guest%2002&broadcast&quality=1&maxframerate=30
```

These options have separate jobs:

* `&push=CAM_01` gives the camera a permanent Stream ID.
* `&broadcast` allows only the director's video to play on the guest device. Other guests' audio remains available.
* `&quality=1` targets approximately 1280 x 720 capture.
* `&maxframerate=30` limits the requested frame rate but allows a lower fallback if the camera needs it.

Start without additional quality options if the phones are already stable. Add the 720p and 30-fps limits when a device becomes hot or cannot sustain its current settings. An emergency low-load test can use `&quality=2`, which targets approximately 640 x 360.

Do not give two active guests the same `&push` value. Do not copy a guest's address-bar URL after the guest has joined and give that modified URL to another guest.

{% hint style="warning" %}
Do not add [`&nopreview`](/advanced-settings/video-parameters/and-nopreview) to an iPhone or iPad publishing link. A local camera preview is required for reliable iOS publishing.
{% endhint %}

### 2. Publish the OBS return from the director

Open a director link with a stable return ID:

```
https://vdo.ninja/?director=ROOM_NAME&push=PROGRAM_RETURN
```

In OBS:

1. Create a dedicated scene for the guest return, or use Program output.
2. Open the OBS Virtual Camera settings.
3. Select Program, Preview, a specific scene, or a specific source.
4. Start the OBS Virtual Camera.
5. In the director's VDO.Ninja device settings, select **OBS Virtual Camera** as the camera.

<figure><img src="/files/x0NXnk7I5dEvYEiIcuY9" alt="OBS Virtual Camera output selection"><figcaption><p>A dedicated return scene can stay independent from changes to the public Program output.</p></figcaption></figure>

Keep the director or `PROGRAM_RETURN` source out of the OBS scene that feeds the Virtual Camera. If the return captures itself, it creates a repeating picture.

The room-creation page can add broadcast mode to the generated guest invitations:

<figure><img src="/files/BqHsyvc2CVOzHG1bW6KD" alt="VDO.Ninja Create a Room option that lets guests see the director but not other guests&#x27; videos"><figcaption><p>This room option adds broadcast behavior to the guest links.</p></figcaption></figure>

### 3. Open one isolated View link for each guest

The matching View links are:

```
https://vdo.ninja/?view=CAM_01&solo&room=ROOM_NAME&forceviewerlandscape
https://vdo.ninja/?view=CAM_02&solo&room=ROOM_NAME&forceviewerlandscape
```

The important mapping is:

| Phone publisher | Production viewer | Electron Capture title | OBS source name       |
| --------------- | ----------------- | ---------------------- | --------------------- |
| `push=CAM_01`   | `view=CAM_01`     | `VDO Guest 01`         | `Guest 01 - Electron` |
| `push=CAM_02`   | `view=CAM_02`     | `VDO Guest 02`         | `Guest 02 - Electron` |
| `push=CAM_03`   | `view=CAM_03`     | `VDO Guest 03`         | `Guest 03 - Electron` |
| `push=CAM_04`   | `view=CAM_04`     | `VDO Guest 04`         | `Guest 04 - Electron` |

Use the same mapping for every rehearsal and production. A guest can reconnect with the same Push ID and return to the same production input.

## Choose what each guest receives

Do not make every phone display a full room unless the guests need that view. Choose the smallest return path that supports the production.

<figure><img src="/files/gmDuXFxiyWUUUUjKCUyJ" alt="Choice between publish-only, director-only, and broadcast guest modes"><figcaption><p>The guest invite controls the return path.</p></figcaption></figure>

| Mode                      | Guest link option           | Video received             | Audio received             | Main trade-off                                          |
| ------------------------- | --------------------------- | -------------------------- | -------------------------- | ------------------------------------------------------- |
| Normal room               | No special receive option   | Other guests and directors | Other guests and directors | Familiar gallery, but highest phone load                |
| Broadcast                 | `&broadcast`                | Main director only         | Director and other guests  | Recommended for a panel with one Program return         |
| Selected broadcast source | `&broadcast=PROGRAM_RETURN` | One named return source    | Director and other guests  | Keeps the return separate from the director             |
| Directors only            | `&directoronly`             | Directors and co-directors | Directors and co-directors | Private producer return; guests cannot hear one another |
| Publish only              | Bare `&view` with no value  | Nothing remote             | Nothing remote             | Lowest phone load; no conversation or confidence return |

### Option A: Normal full room

```
https://vdo.ninja/?room=ROOM_NAME&push=CAM_01
```

Use this only when every guest must see every other guest. Each additional video creates more decoding, rendering, network traffic, and publisher fan-out. Older phones may heat quickly.

### Option B: Broadcast mode

```
https://vdo.ninja/?room=ROOM_NAME&push=CAM_01&broadcast
```

This is the recommended starting point for a panel that uses an OBS Program return. The phone receives one director video. Guests can still hear one another through the room.

Add `&broadcast` to guest links. Do not add it to the director or OBS View links.

### Option C: Director-only mode

```
https://vdo.ninja/?room=ROOM_NAME&push=CAM_01&directoronly
```

Use this when the guest should receive only the production team. It removes guest-to-guest video and audio. It is useful for private talkback, auditions, or contribution-only events where guests must not communicate directly.

### Option D: Publish-only mode

```
https://vdo.ninja/?room=ROOM_NAME&push=CAM_01&view
```

The final `&view` has no value. The guest publishes but receives no remote media. This is the lowest-load browser setup. It is appropriate when a separate phone call, intercom, or other system provides communication.

### Option E: Use a separate Program return publisher

Use this when the director needs a normal camera that is separate from the OBS return.

```
Return publisher: https://vdo.ninja/?room=ROOM_NAME&push=PROGRAM_RETURN&novideo&noaudio
Guest:            https://vdo.ninja/?room=ROOM_NAME&push=CAM_01&broadcast=PROGRAM_RETURN
```

Open the return-publisher link on the production computer. Select OBS Virtual Camera. The `&novideo&noaudio` options stop that publisher page from receiving the room; they do not disable its outgoing camera and microphone.

## Add Meshcast when direct distribution is too demanding

Broadcast mode moves the return-video burden to the director. Without a server, the director normally sends a separate return path to each guest.

Add `&meshcast` to the director link when the director's CPU or upload connection cannot sustain those copies:

```
https://vdo.ninja/?director=ROOM_NAME&push=PROGRAM_RETURN&meshcast
```

The guest links still use `&broadcast`:

```
https://vdo.ninja/?room=ROOM_NAME&push=CAM_01&broadcast
```

Meshcast receives the director's outbound media and distributes it to the guests. It normally reduces return-feed encoding and upload fan-out on the production computer.

If each phone camera is being requested by several production pages, the guest links can also use `&meshcast`:

```
https://vdo.ninja/?room=ROOM_NAME&push=CAM_01&broadcast&meshcast
```

Use [`&nomeshcast`](/advanced-settings/meshcast-parameters/and-nomeshcast) on a specific production View link when that viewer must request a direct peer-to-peer path from a Meshcast-enabled publisher.

Meshcast has trade-offs:

* It normally adds some latency.
* Media passes through a server instead of remaining entirely peer to peer.
* Quality and availability depend on the selected server and its current load.
* It reduces sender fan-out. It does not reduce the number of guest videos that OBS or the production computer must decode.

Add Meshcast only after the direct broadcast setup is working. Rehearse the exact server-assisted configuration before an event.

## Native mobile app option

The [VDO.Ninja native mobile app](/steves-helper-apps/native-mobile-app) is another option when Safari cannot provide stable capture or when the production needs native features such as local recording, USB audio, background operation, or additional camera controls.

<figure><img src="/files/jVUbypxXTb4ZlX2pKKIN" alt="VDO.Ninja native mobile app publishing settings with Stream ID and Room name fields"><figcaption><p>Use the same stable Stream ID and Room name planned for the browser guest link.</p></figcaption></figure>

For an isolated camera source:

1. Enter a unique **Stream ID**, such as `CAM_01`.
2. Enter the production **Room name** if the director must manage the source as a room participant.
3. Open the matching `&view=CAM_01` link in Electron Capture, OBS, or the Ninja OBS Plugin.
4. Use the app's Remote Audio Stream or another talkback method if the camera operator needs producer audio.

The native app is focused on capture and publishing. It is not an exact replacement for the full browser room, and it may not show every guest or the complete Program return in the same way as a browser guest using `&broadcast`.

The simpler interface and reduced playback can lower device load, but the app does not guarantee a cooler phone. High resolution, high frame rate, local recording, screen sharing, or dual-camera capture can still create substantial heat. Test the exact app mode and phone before production.

## iPhone and iPad heat, rotation, and disconnection

Video capture, video encoding, several incoming video decoders, a bright screen, Wi-Fi or cellular transmission, and battery charging all create heat. An older iPhone or iPad may lower its performance when it becomes hot. The visible result can include low frame rate, audio interruption, frozen video, or a disconnected media path.

Older iOS devices and older iOS releases have also shown sporadic orientation errors. Heat or resource pressure may make an orientation problem appear at the same time as stuttering, but a rotated picture does not prove that heat caused the failure. VDO.Ninja's orientation controls do not intentionally disconnect a guest.

### Reduce heat first

1. Use `&broadcast`, `&directoronly`, or publish-only mode instead of a full-room video gallery.
2. Start around 720p30 with `&quality=1&maxframerate=30`.
3. Use 360p as a diagnostic fallback with `&quality=2`.
4. Use a current iOS or iPadOS release and a current Safari version when possible.
5. Close unused VDO.Ninja tabs and other camera applications.
6. Remove a thick insulating case when safe.
7. Lower screen brightness and keep the device out of direct sunlight.
8. Start with a charged battery. Charging an already hot phone creates more heat.
9. Use a stable Wi-Fi or cellular signal. A weak radio connection can increase power use and packet loss.
10. Do not request the same phone camera from unnecessary director tabs, OBS sources, Electron Capture windows, Scene links, or test devices.

If a phone still becomes hot, optionally cap each outbound video path:

```
&maxvideobitrate=1500
```

A lower limit can reduce quality. Very low limits such as 600 kbps can also trigger resolution scaling. Test the result on the actual phone.

### Keep an incoming video in landscape

Add [`&forceviewerlandscape`](/advanced-settings/mixer-scene-parameters/and-forceviewerlandscape) to the link that **receives** the phone video. For example, add it to the Electron Capture or OBS View link:

```
https://vdo.ninja/?view=CAM_01&solo&room=ROOM_NAME&forceviewerlandscape
```

The default rotation is 270 degrees. If that is the wrong direction, test:

```
&forceviewerlandscape=90
```

This option rotates an incoming video when its reported aspect ratio becomes portrait. It does not cool the phone, repair a network connection, or prevent a publishing disconnect.

The related sender-side option is [`&forcelandscape`](/advanced-settings/mobile-parameters/and-forcelandscape):

```
https://vdo.ninja/?room=ROOM_NAME&push=CAM_01&broadcast&forcelandscape
```

`&forcelandscape` asks the phone's outgoing video to remain 16:9. `&forceviewerlandscape` is a receiver-side workaround. Test one change at a time so it is clear which option helped.

## Configure Electron Capture so OBS does not switch guests

Every Electron Capture window must have a different title. If several windows have the same title, OBS may match a Window Capture source to the wrong window after a reconnect, reload, application restart, or scene change.

<figure><img src="/files/9Vwo4SSJbHRzOL3pz6bt" alt="Stable mapping from a VDO.Ninja Stream ID to an Electron Capture window title and an OBS source"><figcaption><p>Keep the Stream ID, Electron Capture title, and OBS source name unique and consistent.</p></figcaption></figure>

### Set the title from the Electron Capture menu

1. Open the required guest View link in Electron Capture.
2. Right-click inside the Electron Capture window.
3. Select **Edit Window Title**.
4. Enter a unique title such as `VDO Guest 01`.
5. Repeat with a different number for every guest.
6. In OBS, select the matching window for that guest's Window Capture source.

The menu changes the current window. A command-line or batch-file launch is easier to reproduce after a restart.

### Set the title from the command line

The portable Windows build is named `elecap.exe`. On Windows, use an equals sign and quotation marks around the URL and title:

```
elecap.exe --width=1280 --height=720 --url="https://vdo.ninja/?view=CAM_01&solo&room=ROOM_NAME&forceviewerlandscape" --title="VDO Guest 01"
```

The shorter aliases also work:

```
elecap.exe -w=1280 -h=720 -u="https://vdo.ninja/?view=CAM_02&solo&room=ROOM_NAME&forceviewerlandscape" -t="VDO Guest 02"
```

Keep the complete VDO.Ninja URL inside quotation marks. Otherwise, Windows can treat each `&` as a command separator.

For a repeatable multi-window setup, use a batch file and pause briefly between launches:

```batch
start elecap.exe -w=1280 -h=720 -u="https://vdo.ninja/?view=CAM_01&solo&room=ROOM_NAME&forceviewerlandscape" -t="VDO Guest 01"
timeout /T 1 /NOBREAK
start elecap.exe -w=1280 -h=720 -u="https://vdo.ninja/?view=CAM_02&solo&room=ROOM_NAME&forceviewerlandscape" -t="VDO Guest 02"
timeout /T 1 /NOBREAK
start elecap.exe -w=1280 -h=720 -u="https://vdo.ninja/?view=CAM_03&solo&room=ROOM_NAME&forceviewerlandscape" -t="VDO Guest 03"
timeout /T 1 /NOBREAK
start elecap.exe -w=1280 -h=720 -u="https://vdo.ninja/?view=CAM_04&solo&room=ROOM_NAME&forceviewerlandscape" -t="VDO Guest 04"
```

Use `elecap.exe --help` to check the options supported by the installed Electron Capture version. See the [Electron Capture command-line reference](https://electroncapture.app/command-line.html) for the full list.

### Match each Electron Capture window in OBS

For every guest:

1. Add one **Window Capture** source in OBS.
2. Name the OBS source clearly, such as `Guest 01 - Electron`.
3. Select the Electron Capture window titled `VDO Guest 01`.
4. Choose the strictest title-matching option offered by the installed OBS version.
5. Avoid a fallback that can select any window from the same `elecap.exe` process.
6. Confirm the mapping before creating clones or adding the source to other scenes.

Do not rename an Electron Capture window while the production is live. A title change can break the OBS match.

### Reuse sources safely across OBS scenes

If the same guest appears in several OBS scenes, reuse one tested base source:

* Use **Add Existing** when adding an OBS source to another scene, or use a clone/reference tool that points to the same tested base capture.
* Do not open another Electron Capture window or browser page for every OBS scene.
* Confirm the base source's guest ID, window title, and audio before making clones.
* If every clone suddenly shows the wrong guest, fix the base Window Capture mapping first.

A clone can simplify OBS scene management. It cannot reduce phone load if several separate VDO.Ninja View pages are still requesting the same phone stream.

### Alternative capture methods

| Capture method                                           | Advantage                                                                 | Important caution                                                |
| -------------------------------------------------------- | ------------------------------------------------------------------------- | ---------------------------------------------------------------- |
| One VDO.Ninja Scene in OBS                               | Fewest production inputs; simple mixed layout                             | Does not provide one independent source per guest                |
| One OBS Browser Source per guest                         | Fixed URL; no external window-title matching                              | Reuse existing sources across scenes to avoid duplicate viewers  |
| Electron Capture plus OBS Window Capture                 | Recent Chromium, flexible window and audio routing, survives OBS restarts | Requires unique titles and careful OBS window matching           |
| [Ninja OBS Plugin](/steves-helper-apps/ninja-obs-plugin) | Purpose-built OBS integration without a normal Browser Source             | Install and rehearse the plugin before replacing a working setup |

Changing capture methods may solve an OBS or Electron Capture problem. It will not fix a phone that has stopped publishing to every viewer.

## Prevent echo and duplicated audio

`&broadcast` blocks other guests' video, but it does not block their audio. This is intentional so a panel can continue speaking naturally.

The simplest audio setup is:

* Every speaker wears headphones.
* VDO.Ninja carries the live conversation audio.
* OBS Virtual Camera returns video only.
* Only one OBS or Electron Capture path supplies each guest's audio to the production mix.

OBS Virtual Camera does not carry the OBS audio mix. If guests must hear music, clips, or other Program sound, use a virtual audio device and build a controlled return. Do not send the complete OBS mix, including guest microphones, back to those same guests. They will hear delayed copies of themselves.

Check these common duplicate paths:

* The same guest audio is active in the director room and in an isolated capture.
* A Browser Source and an Electron Capture window both receive the same guest.
* A cloned source and its base source are both active in the same OBS mix.
* A shared webpage and VDO.Ninja both play the Program audio.
* OBS monitoring sends the production mix back into the same virtual audio device used as its input.

Make a private recording and listen to every audio channel before the event.

## Diagnose rotation, source switching, and disconnection separately

These symptoms can occur together, but they do not always have the same cause.

| Observation                                                                                   | Most useful next check                                                                                       |
| --------------------------------------------------------------------------------------------- | ------------------------------------------------------------------------------------------------------------ |
| The correct guest remains visible in the VDO.Ninja director room, but OBS shows another guest | Check Electron Capture titles and OBS Window Capture matching                                                |
| Electron Capture shows the correct guest, but OBS shows another window                        | Fix the OBS source mapping; do not change phone settings                                                     |
| The guest disappears from Electron Capture, OBS, and the director room                        | Check the phone, iOS version, heat, network, permissions, and WebRTC connection                              |
| Video rotates but audio and the connection remain stable                                      | Test `&forceviewerlandscape` on the receiving View link                                                      |
| Rotation, low frame rate, audio stutter, and disconnection happen after the phone becomes hot | Reduce incoming video, capture resolution, frame rate, and unnecessary viewers                               |
| Audio stops after a call or notification on iOS                                               | See [iOS audio stops during phone calls](/common-errors-and-known-issues/ios-audio-stops-during-phone-calls) |
| The director computer becomes overloaded only as more guests receive the Program return       | Add Meshcast to the director return and retest                                                               |
| OBS CPU remains high after adding Meshcast                                                    | Meshcast does not remove the need to decode and render each isolated guest input                             |

### Isolation test

Change one item at a time:

1. Test two guests with no Source Clone or duplicated OBS scenes.
2. Add `&broadcast` to the guest links and confirm each phone displays only the director return.
3. Add the third and fourth guests one at a time.
4. Watch phone temperature, VDO.Ninja connection state, OBS CPU/GPU use, and production upload/download bandwidth.
5. If a source changes identity, compare the VDO.Ninja director view, Electron Capture window, and OBS source at the same moment.
6. If the director return causes production overload, add `&meshcast` only to the director link and repeat the test.
7. Add Source Clone or the remaining OBS scenes only after every base input remains stable.

If a video tile is present, `Ctrl + left-click` it on Windows or `Command + click` it on macOS to open connection statistics. Record packet loss, available bitrate, candidate type, and connection state near the failure.

## Rehearsal checklist

* [ ] Every guest has a unique Push ID.
* [ ] Every production View link requests the matching Stream ID.
* [ ] Every Electron Capture window has a unique title.
* [ ] Every OBS Window Capture uses strict title matching.
* [ ] Existing sources or tested clones are reused across scenes.
* [ ] No unnecessary browser, director, Scene, or Electron Capture page requests a duplicate feed.
* [ ] Each phone receives the intended return mode.
* [ ] The OBS return does not capture itself.
* [ ] Every speaker uses headphones.
* [ ] Each guest microphone enters OBS through one audio path only.
* [ ] No guest hears a delayed copy of their own voice.
* [ ] The complete guest count has been tested for at least 20 to 30 minutes.
* [ ] Phone temperature, production CPU/GPU load, and network headroom remain acceptable.
* [ ] Meshcast has been rehearsed if it will be used during the event.

## Information to collect when a problem remains

Remove passwords and private tokens before sharing logs or links.

Collect:

* The exact guest, director, and View link options
* Phone or tablet model
* iOS or Android version
* Browser or native-app version
* Electron Capture version
* OBS version and capture method
* The number of active guests and duplicate viewers
* Whether Wi-Fi or cellular data was used
* Whether the guest remained visible in the director room after OBS lost it
* The approximate failure time and time zone
* A short recording showing the phone, Electron Capture, and OBS when possible
* Connection statistics immediately before or after the failure

## Related guides

* [Large production rooms with isolated guest feeds](/guides/large-production-rooms-with-isolated-guest-feeds)
* [Send an OBS return feed to guests](/guides/send-an-obs-return-feed-to-guests)
* [Electron Capture](/steves-helper-apps/electron-capture)
* [Overheating](/common-errors-and-known-issues/overheating)
* [iOS-specific guidance](/platform-specific-issues/ios)
* [Guest appears but no video or audio connects](/common-errors-and-known-issues/appearing-then-disappearing-guest)
* [`&broadcast`](/advanced-settings/video-parameters/broadcast)
* [`&meshcast`](/advanced-settings/meshcast-parameters/and-meshcast)
* [`&forceviewerlandscape`](/advanced-settings/mixer-scene-parameters/and-forceviewerlandscape)

## Search words

Multiple phone guests, iPhone overheating, iPhone video rotates, upside-down video, guest disconnects, Electron Capture title, Electron Capture switches windows, wrong guest in OBS, OBS Window Capture matching, Source Clone, Program return, broadcast mode, Meshcast, isolated guest feeds, audio feedback.


# 24/7 unattended operation

Keep links alive across ISP resets and unattended hours

Combine retry and timed reloads to recover from daily disconnects.

* Auto‑retry: Add `&retry` to re‑establish lost peer connections; tune with `&retrytimeout=5000` (ms).
* Timed reload: Use `&autoreload=3600` (seconds) for periodic reloads, or `&autoreload24=04:00` for a daily reload.
* Session end: Pair `&autoend` with `&endpage=https://...` to wrap up and redirect.
* Mobile tips: Prevent sleep and background audio pausing; see `guides/keep-mic-active-in-background-on-android-browser.md`.

Example

* Viewer: `...?view=ID&retry&retrytimeout=5000&autoreload24=04:05`
* Source: `...?push=ID&retry&autoreload=14400`

Related

* `advanced-settings/settings-parameters/and-retry.md`
* `advanced-settings/settings-parameters/and-autoreload.md`
* `advanced-settings/settings-parameters/and-autoreload24.md`
* `advanced-settings/settings-parameters/and-autoend.md`
* `advanced-settings/settings-parameters/and-endpage.md`


# Basic hotkeys

Some keyboard hotkeys

<table><thead><tr><th width="211">Hotkeys</th><th>Description</th></tr></thead><tbody><tr><td><code>CTRL + M</code></td><td>Mute your mic (audio output)</td></tr><tr><td><code>CTRL + B</code></td><td>Mute your video output</td></tr><tr><td><code>SHIFT + ALT + C</code></td><td>Toggle the control bar that's normally at the bottom of the screen</td></tr><tr><td><code>CTRL + ALT + F</code></td><td>Open the file-sharing window</td></tr><tr><td><code>CTRL + ALT + C</code></td><td>Cycle the camera to the next camera available</td></tr><tr><td><code>CTRL + ALT + S</code></td><td>Open the screen-sharing window</td></tr><tr><td><code>CTRL + ALT + D</code></td><td>Enable Draw-on-Screen</td></tr><tr><td><code>CTRL + ALT + P</code></td><td>Will toggle the picture in picture</td></tr><tr><td><code>ALT + A</code></td><td>Will toggle the speaker-output audio mute on/off (only usable when the browser tab is in focus)</td></tr></tbody></table>

{% hint style="info" %}
On MacOS use `CMD` instead of `CTRL`
{% endhint %}

When using the above keyboard short-cuts, the tab/window must be actively in focus.

When using the [Electron Capture App](/steves-helper-apps/electron-capture) in elevated privilege mode, the keyboard shortcuts are global.

<figure><img src="/files/2J0n3vGCyttVgyXwy9gj" alt=""><figcaption></figcaption></figure>

## Related

{% content-ref url="/pages/cuvr8p2uFhQ65Q4FydI3" %}
[\&disablehotkeys](/advanced-settings/settings-parameters/and-disablehotkeys)
{% endcontent-ref %}


# MIDI, API and WebHID support

Use MIDI, WebHID, and API controls with VDO.Ninja for hotkeys, automation, and remote control workflows.

## MIDI hotkeys

There are numerous more hotkeys that can be used via MIDI; these are global hotkeys, used even if the window is not visible, but they require some additional setup. You can remotely control via MIDI also, using the [`&midiout`](/advanced-settings/api-and-midi-parameters/midiout) and [`&midiin`](/advanced-settings/api-and-midi-parameters/midiin) routing functionality.

MIDI hotkeys are compatible with an Elgato Streamdeck by means of a free Streamdeck MIDI plugin.

{% content-ref url="/pages/-MZHbGHBodwMtcW0BQS0" %}
[\&midi](/advanced-settings/api-and-midi-parameters/midi)
{% endcontent-ref %}

## Bitfocus Companion

There is also Bitfocus Companion control compatibility, available here: <https://github.com/bitfocus/companion-module-vdo-ninja>

## HTTP / Websocket API

The Bitfocus Companion plugin makes use of a HTTP and Websocket API, that allows for lots of remote control functionality.

There is a website that demos some of the commands available here: <https://companion.vdo.ninja/> Details on the API itself is here: <https://github.com/steveseguin/Companion-Ninja>

You can use this to create your own hotkeys for pretty any device, application, or website.

{% content-ref url="/pages/-Mj8bfVV-0wZjmDO9Y11" %}
[\&api](/advanced-settings/api-and-midi-parameters/api)
{% endcontent-ref %}

## IFRAME API

The HTTP and websocket make use of a server to route API calls. If you'd like to create your own API server or don't need remote hotkey support, you can used the provide IFRAME API and send commands instead to VDO.Ninja via an IFRAME wrapper.

The IFRAME API is the most powerful option, but it requires some basic coding on your own part to have it provide hotkey functionality for your specific requirement.

{% content-ref url="/pages/-MeCYQQrGj2NP9ZGgJdR" %}
[How to embed VDO.Ninja into a site with iFrames](/guides/iframe-api-documentation)
{% endcontent-ref %}

Below is an example of how to remotely control OBS anywhere online using the VDO.Ninja IFrame API; the code is just an example of how to use the IFrame API with OBS in this case, and it not intended to be used in production as is. The core concept lets you relay data messages from one website page to another, peer to peer, with just a few lines of code!

{% embed url="<https://github.com/steveseguin/sample-p2p-tunnel>" %}

## WebHID

There is also WebHID support, but it's not fully implemented at this time. User requests are welcomed though and there's a demo here: <https://vdo.ninja/webhid>\
It should be improved upon in the future, assuming the feature does not get depreciated by the browser first.

## Feature requests and feedback

It's easy enough to add new hotkeys or features; please make a request as needed. The hotkey and API commands are organically development, based on user needs and feedback. Most simple requests can be accommodated within minutes.


# PTZ remote control

How to enable and control PTZ remotely (director, viewer, API, and remote mirror/rotate)

## Overview

VDO.Ninja can remotely control pan, tilt, zoom, and focus on supported cameras. The sender must opt in with `&ptz`, and the camera/browser must actually expose PTZ or focus controls. Directors can control PTZ from the built-in video settings menu, while viewers can opt in using `&remote`.

Remote output transforms (mirror/rotate) are also available via `&remote` authorization, including from the dedicated `ptz.html` page and API commands.

To confirm device support, use `https://vdo.ninja/supports` with the target camera selected.

## Quick Start (Push + View)

Sender (push link): `https://vdo.ninja/?push=STREAMID&ptz&remote`

Viewer (view link): `https://vdo.ninja/?view=STREAMID&remote`

If you want a shared passcode, add the same value on both sides: `&remote=somepasscode`

## Director Control (Rooms)

Director link: `https://vdo.ninja/?director=ptztestroom`

Guest link: `https://vdo.ninja/?room=ptztestroom&ptz`

Directors (and co-directors) can adjust PTZ from the per-guest video settings menu. Viewers do not need `&remote` for this.

## Viewer Mouse Controls (with `&remote`)

When `&remote` is enabled on both sides, viewers can use the mouse wheel over the video:

* Wheel: zoom in or out
* Shift + wheel: pan left or right
* Ctrl (or Command) + wheel: focus in or out
* Ctrl (or Command) + Shift + wheel: tilt up or down
* Hold Alt for smaller step sizes

Pan/tilt only work if the camera exposes those controls and the sender has `&ptz`.

## Right-click Menu (with `&remote`)

Right-clicking a remote video (with `&remote` enabled) exposes the remote context menu (hangup/reload). PTZ is still controlled by the mouse/keyboard shortcuts above or the sliders below; the right-click menu does not currently surface PTZ controls.

## PTZ Example App

Use the example controller: `https://vdo.ninja/examples/ptz?view=STREAMID&remote`

Make sure the sender uses: `https://vdo.ninja/?push=STREAMID&ptz&remote`

Chrome requires the sender page to remain visible on screen for PTZ controls to work. If the sender tab/window is hidden, the browser blocks PTZ changes.

## Dedicated PTZ Control Surface

You can also use the dedicated PTZ control page: `https://vdo.ninja/ptz.html`

Typical use:

* Controller: `https://vdo.ninja/ptz.html?view=STREAMID&remote`
* Sender: `https://vdo.ninja/?push=STREAMID&ptz&remote`

Use matching `&remote=PASSCODE` values on both sides if you want passcode-gated control.

Additional remote transform controls in `ptz.html`:

* `Mirror Remote` button (toggle remote mirror state)
* `Rotate Remote +90` button
* `Reset Remote Rotation` button
* Hotkeys: `Ctrl/Cmd+M` (mirror), `Ctrl/Cmd+R` (rotate +90), `Ctrl/Cmd+Shift+R` (reset rotation)

### `ptz.html` URL Parameters

The dedicated PTZ page supports additional setup/tuning query parameters:

* `?view=STREAMID` or `?url=FULL_VIEW_URL`: target the stream/viewer source
* `?remote` or `?remote=PASSCODE`: enable/pass through remote authorization
* `?target=STREAMID_OR_SLOT`: explicit API target override
* `?mode=raw`: disable the light embed preset defaults
* `?stage=1`: start in stage mode
* `?previewpad=0|1`: disable/enable drag and wheel preview pad
* `?paninvert=1` (alias `?invertpan=1`): invert pan direction
* `?mirrorpreview=1`: mirror the preview pane by default
* `?rotatepreview=90|-90|180`: set preview rotation
* `?overlayautohide=0|1`: disable/enable control overlay auto-hide
* `?overlayopacity=0.3..0.95`: set stage overlay opacity
* `?overlaytransparent=0|1`: force solid/transparent stage controls
* `?noaudio`: mute viewer audio when using light preset mode
* `?nopreview`: include `&nopreview` in generated sender template links

Example:

`https://vdo.ninja/ptz.html?view=STREAMID&remote=PASSCODE&stage=1&previewpad=1&paninvert=1&overlayopacity=0.75`

## On-screen PTZ Sliders

Add `&ptzslider` to a director or view link to show PTZ sliders (zoom/pan/tilt) directly on the video element. `&zoomslider` shows a zoom-only slider.

Example: `https://vdo.ninja/?view=STREAMID&remote&ptzslider`

## Automation with `&api`

For scripted control or Stream Deck integrations, add `&api=YOURKEY` to the controlling page and use the HTTP/WSS API or IFRAME API commands (`zoom`, `pan`, `tilt`, `focus`).

For director-side targeted control, the legacy `targetGuest` action also supports:

* `ptzZoom`
* `ptzPan`
* `ptzTilt`
* `ptzFocus`
* `ptzAutofocus`
* `remoteMirror` (aliases: `mirror`, `mirrorGuest`)
* `remoteRotate` (aliases: `rotate`, `rotateGuest`)

Example:

```javascript
iframe.contentWindow.postMessage({
    function: "targetGuest",
    target: "1", // slot or stream ID
    action: "remoteRotate",
    value: true // true=+90 step, false=reset, number=explicit rotation
}, "*");
```

References:

* [IFRAME API for Directors](/guides/iframe-api-documentation/iframe-api-for-directors)
* [HTTP/WSS API reference](/advanced-settings/api-and-midi-parameters/api/api-reference)

## Troubleshooting

* If you see `the page is not visible` or `couldn't save defaults`, the sender tab is hidden. Keep the sender visible or in a small always-on-top window.
* If controls do nothing, verify `&ptz` is on the sender link and `&remote` (with matching passcode) is on the viewer link.
* If only zoom or focus work, the camera may not support pan/tilt.


# Ninja Backer tipping

Accept tips with NinjaBacker.com inside VDO.Ninja

## Overview

NinjaBacker.com is integrated into VDO.Ninja so performers can receive tips directly from viewers and room guests during streams.

It works with:

* Private P2P streams using a built-in tip button and modal
* Larger streams to YouTube/Twitch using the QR code overlay in OBS or scene/view links

Each performer also gets a standalone donation page, for example: `https://ninjabacker.com/steveseguin`

## What viewers see

* "Send a Tip" button on the video (when `&showtips` is used)
* Tip modal with preset amounts and custom amount entry
* In-stream tip banner and chat notification when a tip lands
* Optional QR overlay for OBS/scene/view links

## How to use

### Performers

1. Register at `https://ninjabacker.com/register`
2. Create a username and connect your Stripe account
3. Copy your Tip ID from the dashboard
4. Add `&tip=YOUR_TIP_ID` to your push link

Example (alpha): `https://vdo.ninja/alpha/?push=mystream&tip=YOUR_TIP_ID`

### Viewers

Viewers must opt in with `&showtips` to see the tip UI: `https://vdo.ninja/alpha/?view=mystream&showtips`

## URL parameters

| Parameter               | Side   | Description                                      |
| ----------------------- | ------ | ------------------------------------------------ |
| `&tip=ID`               | Sender | Enable tipping with your Tip ID or overlay token |
| `&tipsid=ID`            | Sender | Same as `&tip` (recommended for overlay token)   |
| `&showtips`             | Viewer | Show tip UI (two-way opt-in)                     |
| `&supporttips`          | Viewer | Alias for `&showtips`                            |
| `&notipqr`              | Viewer | Hide the QR code overlay                         |
| `&tipqrsize=200`        | Viewer | QR size in pixels (default 150, min 100)         |
| `&tipamounts=1,5,10,25` | Viewer | Custom preset amounts                            |
| `&tipcurrency=USD`      | Viewer | Currency for the tip modal                       |

{% hint style="info" %}
Use `&tip` or `&tipsid` for tipping. The `&tips` parameter is a guest help-screen and is not the tipping feature.
{% endhint %}

## Account setup and testing

* Tip page: `https://ninjabacker.com/<username>`
* Dashboard: `https://ninjabacker.com` (sign in)
* Test tips: use "Send Test Tip" in the dashboard to trigger a fake tip notification without a real payment

## Profile avatars

Your tip page avatar uses Gravatar based on your Stripe email. Set one up at `https://gravatar.com` if you want a profile image.

## Developer features

Full developer docs are available at: `https://ninjabacker.com/developers`

This includes webhook details, live tip notification pages, OBS overlay pages, and other integrations.

## Alpha notes

* Tipping is currently on `https://vdo.ninja/alpha` for testing
* Minimum tip amount is $1 (will likely increase after alpha)
* Commission is 0% (Stripe fees only)
* Commission may change in the future as NinjaBacker is a separate service
* Questions or feedback: reach out on Discord


# Hardware-accelerated video encoding

Typically only supported with H264 video and often hit and miss

Hardware-accelerated video encoding is a tricky topic; it can sometimes work, but when it does, it doesn't always work as hoped.

It generally only works with H264 video, but it may work with other codecs in rare cases.

On a Windows PC, a Chromium-based browser offers your best chance of it working. Every month it seems the support for hardware encoding improves, which is great. The viewer just needs to request H264 video from your computer for it to have a chance of working. [`&codec=h264`](/advanced-settings/video-parameters/codec)

If it works, in the video stats window (`CTRL + Click`), you'll see the video codec type to be listed as External Encoder, if the hardware acceleration is working. CPU load may not decrease always, and there isn't an easy way to tell which encoder is being used, but if it says the codec is `h264`, then it's likely still using just software.<br>

![Sample of the H264 Hardware Encoder working with VDO.Ninja](/files/-Mb4ZoeXQ1Sa6t4cAe4e)

Despite software using a lot of CPU, it offers better compatibility, fewer glitches, and technically can still handle dozens of video streams at a time if your CPU is fast enough. Hardware however can be finicky, where glitching is common and a hardware encoder typically can only support three video encoding sessions at a time.

What's really strange about hardware encoding on a PC is that it may actually use MORE CPU than the software-based openH264 alternative. If your goal is to save CPU power, a hardware encoder may just introduce more problems and offer no benefit at all; at least if encoding with a PC.

You can specify whether to use software or hardware H264 by changing the H264 profile ID; this can be specified, for example, using `&h264profile=42e01f`. `42e01f` should trigger the OpenH264 software encoder, if available.

AMD systems, and some Intel systems, the default H264 hardware encoder will limit bitrates. Using VP8 or a software-based H264 encoder could allow for higher bitrates. The software VP8 encoder does seem to use more CPU than the H264 encoders, but it often is more stable, especially for screen shares.

On a MacOS system, Chrome may drop frame rates suddenly when using the H264 encoder.

On older versions of iOS, the H264 encoders can sometimes only support 720p30, while the VP8 software encoder on iOS can support 1080p. This recently changed with the iOS \~15, so newer iPhones can now support 1080p30 with H264. Your iPhone may still get very hot, so I am unsure if its actually hardware-accelerated; newer iPhones will do better than older.\
\
In the past, iOS devices were limited by how many videos could be encoded using H264, often just three total, so keep that in mind. This might have changed with newer iPhones however; untested.

### Android

Many Android phones may not support H264 encoding in Chrome; this seems to vary based on the browser version, device chipset, and other factors. Trying to force H264 with such incompatible devices might result in no video, as the browser isn't always smart enough to know it isn't working. Chrome on Android doesn't seem to have a software-based H264 encoder.\
\
One user has reported that while using Chrome, Brave, and Firefox with their Samsung S23+ has poor performance with video encoding, likely due to using software encoding, Microsoft's Edge browser on Android did make use of the hardware encoding. Performance in this case was near comparable to an iPhone 14 Pro's encoding performance. Users with other devices that also use a Snapdragon GPU may wish to try MS Edge if having lackluster video encoding performance.

With non-Snapdragon GPUs, such as found in entry-level and some mid-range smartphones, the hardware H264 encoder may not be available regardless of browser used. Using software-based encoders may trigger overheating or CPU throttling, especially at higher resolutions, so if you are unable to trigger hardware-encoding on a slower Android device, you may need to be content with lower resolutions and bitrates.

On the Google Pixel the H264/VP8 encoder will glitch like crazy when used in Portrait mode, however it's glitch free when using the VP9 codec via software encoding.

### NVIDIA

If a director, choosing to publish video to your group with H264 might reduce some CPU load, but if using an NVIDIA graphics card, you may end up forfeiting your ability to use NVENC encoding for RTMP or MKV file recording, since NVIDIA only offers typically three encoders. You can unlock this limit, but the benefits of using NVENC with VDO.Ninja often provides no benefits it seems over a software H264 option.

If using a CDN-service like meshcast.io, where a server redistributes the video to a large audience, H264 is highly compatible with most viewers, but this is only true for the OpenH264 profile ID `42e01f` of H264. Hardware-encoded version of H264 may not be compatible with all browsers, such as with Safari viewers, so its not advised.

OperaGX tends to have issues with H264 encoding.

On the bright side, H264 is supported well on macOS, and it seems to use less CPU to decode than VP8. H264 on OBS 27.1 and older (for PC) offers lower packet-loss-induced "rainbow puke" than the VP8 codec, but this isn't a factor anymore with OBS 27.2 and newer. On PC, VP8 and H264 seem to use about the same CPU to decode in OBS. I'd advise you to do your own testing though.

### Minimum resolutions

For many devices that are offering hardware accelerated encoding, a minimum or specific resolution is needed, else the device may switch back to software based encoding.

Sometimes this minimum resolution is 640x360, but other times it might be 1920x1080.

### Embedded and Linux hardware-encoding support

If you're comfortable with Linux, basic publishing into VDO.Ninja is available using GStreamer and Python. The project is located here: <https://github.com/steveseguin/raspberry_ninja/>

Hardware encoding with multiple viewer per encoded stream is supported with this option, although features are limited. It is not for the faint of heart; generally this approach is still reserved for hobbyists, enthusiasts, and developers. A Raspberry Pi can publish 1080p30 to VDO.Ninja, and supports HDMI connected cameras; at least when using this project's code.

Code and quick start deployment images are available for the Raspberry Pi and NVIDIA Jetson embedded development boards, along with hardware-encoding support for those platforms.

Other Linux systems are support with the provided code, but it is up to you to ensure the hardware driver and configuration is setup correctly in those cases.

The project will hopefully keep expanding, to include more devices and operating systems.

### H265 / HEVC / AV1

While AV1 hardware encoders are not common at the moment, they should be supported as they are adopted by browsers and hardware manufactures. `&codec=av1`\
\
H265/HEVC however isn't commonly supported by browsers, although Thorium / Safari browsers may support it, it's not an officially supported option. You can give it a try however by using `&codec=h265`.\
\
Update, as of December *2024*: If running Chrome on PC, you try enabling H265 support by using the following command line to start your Chrome instance:\
\
`chrome.exe --enable-features=PlatformHEVCEncoderSupport,WebRtcAllowH265Receive,WebRtcAllowH265Send --force-fieldtrials=WebRTC-Video-H26xPacketBuffer/Enabled`

You can see if your Chrome browser has H265 support enabled by going to <https://vdo.ninja/whip> and checking out the drop-down list of available codecs.

### OBS WHIP and WHEP

With OBS v30 supporting WHIP output, it's now possible to stream video directly from OBS to VDO.Ninja via WebRTC with hardware accelerated encoding.

There are limitations with OBS's WHIP implementation in version 30 however, which may get addressed in the future, but without a server supporting OBS's WHIP output currently, this option is primarily limited for single point to point video distribution on controlled networks.

You can however use OBS's WHIP output with an SFU server however, such as Cloudflare's WHIP/WHEP server, and VDO.Ninja can ingest the WHEP output from that. This setup would work a bit like how Meshcast works with VDO.Ninja currently, except with the source being specified as WHEP-based, rather than from Meshcast.


# Audio Filters & Bitrate

A guide on how to use Audio Filters & Bitrate in VDO.Ninja

## Filter Options

There are several Audio Filters in VDO.Ninja. Some of them are turned on by default, some are not. To activate these Audio Filters you have to add them to the source side.\
So for example:\
<https://vdo.ninja/?push> (for a basic push link)\
<https://vdo.ninja/?room=SOMEROOMNAME> (for a guest in a room)

<table><thead><tr><th width="158.25465046709974">Name</th><th width="223.45075172713555">Parameter</th><th width="150">By default</th><th>Change the default setting</th></tr></thead><tbody><tr><td>Outbound Audio Bitrate</td><td><a href="/pages/-MZXXYjBSAzmoXMv-_EG"><code>&#x26;oab</code></a></td><td>32-kbps</td><td><code>&#x26;oab=XX</code> (0-510 kbps)</td></tr><tr><td>Pro Audio</td><td><a href="/pages/tGoy09fN91prKCjzOlc7"><code>&#x26;proaudio</code></a></td><td>off</td><td><code>&#x26;proaudio</code></td></tr><tr><td>Master Gain</td><td><a href="/pages/-MZX_hGiS2nP__Nh4GSD"><code>&#x26;audiogain</code></a></td><td>100%</td><td><code>&#x26;audiogain=XX</code> (0-200 %)</td></tr><tr><td>Auto Gain Control</td><td><a href="/pages/-MZXNCFzsF9HHQHFmJWg"><code>&#x26;autogain</code></a></td><td>on</td><td><code>&#x26;autogain=0</code></td></tr><tr><td>Echo Cancellation</td><td><a href="/pages/-MZXM6dWB7twWeP1l2Va"><code>&#x26;echocancellation</code></a></td><td>on</td><td><code>&#x26;echocancellation=0</code></td></tr><tr><td>Noise Suppression</td><td><a href="/pages/-MZXOdpBtFnhgcwPvIQW"><code>&#x26;denoise</code></a></td><td>on</td><td><code>&#x26;denoise=0</code></td></tr><tr><td>Noise Gating</td><td><a href="/pages/-Mj8Z0VEEeXvU7RMwuTI"><code>&#x26;noisegate</code></a></td><td>off</td><td><code>&#x26;noisegate</code></td></tr><tr><td>Compressor</td><td><a href="/pages/-MZXO1l5Ll3LH7QrB7Wt"><code>&#x26;compressor</code></a></td><td>off</td><td><code>&#x26;compressor</code></td></tr><tr><td>Limiter</td><td><a href="/pages/-MZXaTPaG10EIY_k9mzP"><code>&#x26;limiter</code></a></td><td>off</td><td><code>&#x26;limiter</code></td></tr><tr><td>Equalizer</td><td><a href="/pages/-MZXav55USiVSxvhlJSI"><code>&#x26;equalizer</code></a></td><td>off</td><td><code>&#x26;equalizer</code></td></tr><tr><td>Lowcut</td><td><a href="/pages/-MZXbDK4trmFBqmom7qJ"><code>&#x26;lowcut</code></a></td><td>off</td><td><code>&#x26;lowcut=XX</code> (in hz)</td></tr><tr><td>Microphone Delay</td><td><a href="/pages/-MZXWFls_qH9Vo3GWBqf"><code>&#x26;micdelay</code></a></td><td>0-ms</td><td><code>&#x26;micdelay=XX</code> (in ms)</td></tr></tbody></table>

{% hint style="info" %}

* Adding [`&proaudio`](/advanced-settings/audio-parameters/and-proaudio) to a source link disables [Auto Gain](/advanced-settings/audio-parameters/autogain), [Echo Cancellation](/advanced-settings/audio-parameters/aec) and [Noise Suppression](/advanced-settings/audio-parameters/and-denoise), sets the audio to stereo and the possible outbound audio bitrate to 256-kbps
* the [`&proaudio`](/advanced-settings/audio-parameters/and-proaudio) parameter is the same as the [`&stereo`](/advanced-settings/audio-parameters/stereo) parameter
  {% endhint %}

Default settings of VDO.Ninja:\
![](/files/RxhrIr6DK7cl3TfAirXm)

There is a very useful google sheet with a matrix for the [`&proaudio`](/advanced-settings/audio-parameters/and-proaudio) ([`&stereo`](/advanced-settings/audio-parameters/stereo)) parameter:

{% embed url="<https://docs.google.com/spreadsheets/d/1onfIh1hNR1Gh_mthkhmezzWNUMYKMGKPrwx7T428_hc/edit#gid=0>" %}
<https://docs.google.com/spreadsheets/d/1onfIh1hNR1Gh_mthkhmezzWNUMYKMGKPrwx7T428_hc/edit#gid=0>
{% endembed %}

## Audio Bitrate

Options to control the audio bitrate:

1. Add `&proaudio` to the source AND view link to get 256-kbps (echo cancellation, noise suppression and auto gain are then DISABLED)
2. Add `&proaudio` to the view link to get 256-kbps (echo cancellation, noise suppression and auto gain are still ENABLED)
3. Add [`&oab=100`](/advanced-settings/audio-parameters/and-outboundaudiobitrate) to the source link to get 100-kbps
4. Add [`&audiobitrate=200`](/advanced-settings/audio-parameters/audiobitrate) to the view link to get 200-kbps

{% hint style="info" %}

* `&proaudio` overrides the bitrate of `&oab` if set on the source AND view link or only on the view link -> you get 256-kbps.
* `&audiobitrate` overrides `&proaudio` and `&oab`
  {% endhint %}

This also works for [`&room`](/advanced-settings/setup-parameters/room) on the source side and [`&scene`](/advanced-settings/mixer-scene-parameters/scene) on the view side if you are in a room.

Some examples:

1\)\
<https://vdo.ninja/?push=SOMESTREAMID>\
<https://vdo.ninja/?view=SOMESTREAMID&proaudio>\
-> 256-kbps

2\)\
<https://vdo.ninja/?push=SOMESTREAMID&oab=100>\
<https://vdo.ninja/?view=SOMESTREAMID&audiobitrate=200>\
-> 200-kbps

3\)\
<https://vdo.ninja/?push=SOMESTREAMID&proaudio>\
<https://vdo.ninja/?view=SOMESTREAMID>\
-> 32-kbps

4\)\
<https://vdo.ninja/?push=SOMESTREAMID&proaudio>\
<https://vdo.ninja/?view=SOMESTREAMID&audiobitrate=96>\
-> 96-kbps

{% hint style="info" %}
To see the audio bitrate\
`Right-Click -> Show Stats` or\
`Control (Command) + Left-Click`\
on a video source
{% endhint %}


# Audio-Reactive Avatars

How to make avatar images pulse or react to audio when the camera is disabled

This guide explains how to make your avatar image pulse or change based on audio levels when the camera is disabled in VDO.Ninja.

## Quick Solution

Use **`&meterstyle=5`** combined with **`&bgimage`** on your **viewer/OBS browser source URL**:

```
https://vdo.ninja/?view=STREAMID&meterstyle=5&bgimage=./media/avatar1.png
```

This makes the background image pulse larger when the guest speaks.

## How It Works

When using `&meterstyle=5`, the system automatically animates your avatar based on audio levels:

| Audio Level    | Effect                  |
| -------------- | ----------------------- |
| Silent         | Image at base size      |
| Talking        | Image grows larger      |
| Loud/Screaming | Image grows even larger |

The transitions use smooth CSS animations (0.5 second ease) creating a nice pulsing effect.

## Where to Add the Parameters

{% hint style="info" %}
Add these parameters to the **VIEWER side** (the OBS browser source / where you're watching the feed).
{% endhint %}

The guest pushing audio doesn't need any special parameters — they just need to have their camera off and be pushing audio.

### Example URLs

**OBS Browser Source (viewing a specific stream):**

```
https://vdo.ninja/?view=guestStreamID&meterstyle=5&bgimage=https://example.com/myavatar.png
```

**Viewing from a room:**

```
https://vdo.ninja/?view=guestStreamID&room=myroom&meterstyle=5&bgimage=./media/avatar1.png
```

## Multiple Avatar States

For even more control, use different images for different audio levels with `&bgimage2` and `&bgimage3`:

```
https://vdo.ninja/?view=STREAMID&bgimage=./media/avatar1.png&bgimage2=./media/avatar2.png&bgimage3=./media/avatar3.png
```

| Parameter   | When Shown                  |
| ----------- | --------------------------- |
| `&bgimage`  | Silent (not speaking)       |
| `&bgimage2` | Talking (moderate audio)    |
| `&bgimage3` | Loud/Screaming (high audio) |

{% hint style="success" %}
When you use `&bgimage2` or `&bgimage3`, the system automatically enables the switching behavior — no need to add `&meterstyle` separately.
{% endhint %}

VDO.Ninja includes sample avatar images in the `/media/` folder (`avatar1.png`, `avatar2.png`, `avatar3.png`) that you can use for testing.

## Meterstyle Reference

| Value | Description                                           |
| ----- | ----------------------------------------------------- |
| `1`   | Vertical VU-style bar meter (director default)        |
| `2`   | Green border around video when talking                |
| `3`   | Small green dot in top-right corner (guest default)   |
| `4`   | No visible meter, sets `data-loudness` for custom CSS |
| `5`   | **Background image pulses/grows when speaking**       |

## Common Issues

### Why other combinations don't work

* **`&style=2`** shows an animated audio waveform, not image pulsing
* **`&style=3`** enables audio meters, but you need `&meterstyle=5` specifically for image pulsing
* **`&meterstyle=1,2,3`** show bars, borders, or dots — not image pulsing

### URL Encoding

If your image URL contains special characters, you may need to URL-encode it.

**Original URL:**

```
https://example.com/my avatar.png
```

**Encoded URL:**

```
https%3A%2F%2Fexample.com%2Fmy%20avatar.png
```

You can encode URLs at: <https://www.urlencoder.org/>

## Related Parameters

{% content-ref url="/pages/-MZN\_8Vi5yo7zBDLWI-U" %}
[\&meterstyle](/advanced-settings/design-parameters/meterstyle)
{% endcontent-ref %}

{% content-ref url="/pages/UmehaIO8eQ4CpOdydDO6" %}
[\&bgimage](/advanced-settings/design-parameters/and-bgimage)
{% endcontent-ref %}

{% content-ref url="/pages/-MZX7oiFsDcg\_A1Z-R2M" %}
[\&style](/advanced-settings/design-parameters/style)
{% endcontent-ref %}

## Summary

1. Add `&meterstyle=5&bgimage=YOUR_IMAGE_URL` to your **OBS browser source / viewer URL**
2. The guest only needs to push audio (camera can be off)
3. For multiple avatar states, use `&bgimage`, `&bgimage2`, and `&bgimage3` together


# Live audio translation

Set up two-way, speech-to-speech translation in a VDO.Ninja room with one account holder and simple reusable links for everyone else.

VDO.Ninja can translate live speech into another spoken language. One person supplies the translation account and API key. Everyone else joins with a normal VDO.Ninja link and can choose the language they want to hear.

This is an early alpha feature. It currently uses OpenAI's `gpt-realtime-translate` service, although the VDO.Ninja translation layer is designed so another provider can be added later.

Last reviewed: July 14, 2026.

{% hint style="warning" %}
Tell everyone in the call before enabling translation. Audio selected for translation is sent to OpenAI by the account holder's browser. Review OpenAI's privacy, retention, and billing terms before using it with private, medical, legal, financial, or confidential conversations.
{% endhint %}

## What this version does

The simplest way to think about it is that the person with the OpenAI account becomes the translation hub:

1. Each participant tells the account holder which language they want to hear.
2. The account holder's outgoing voice is translated for those participants.
3. Each participant's incoming voice is translated for the account holder.
4. Participants with the same requested language share one translated version of the account holder's voice.

It is two-way between the account holder and each participant. It does not yet translate one guest directly for another guest. In a group room, guests still receive the other guests' normal VDO.Ninja audio.

If two people select the same language, their audio is left alone. OpenAI automatically detects the language being spoken for the translation sessions that are needed.

## What you need

The account holder needs:

* A normal VDO.Ninja room, director, guest, or push link.
* An [OpenAI API account](https://platform.openai.com/) with billing enabled and access to `gpt-realtime-translate`. A ChatGPT subscription by itself is not the same as API billing.
* An OpenAI API key from the [API keys page](https://platform.openai.com/api-keys).
* A current browser with WebRTC and Web Audio support. Chrome or Edge is the safest starting point for this alpha.

Other participants do not need an OpenAI account, API key, extension, application, virtual audio cable, or translation worker.

## Set it up

### 1. Open the setup page

Go to [vdo.ninja/translate.html](https://vdo.ninja/translate.html).

If you are already using the account-holder link, open **Settings**, choose **User**, and click **Configure** beside the translation language. The setup page will remember the VDO.Ninja link you came from without placing that link in a server request. Participants only see the language and Stop controls; they are not asked to configure an account.

### 2. Enter the account details

Choose **OpenAI**, paste the API key, and select the language the account holder wants to hear.

Leave **Remember this key in this browser** checked on a private computer. Turn it off on a shared computer; the key will then last only for the current browser tab session.

Choose how the original voice should sound:

* **Replace with translation** plays only the translated voice.
* **Keep quietly underneath** plays the original voice quietly beneath the translation.
* **Play both** plays the original and translated voices together.

Click **Save settings**.

<figure><img src="/files/Fd65q8uHR9bBmJiuIBmv" alt="VDO.Ninja live translation setup showing the OpenAI provider, masked API key, remember-key option, preferred language, original-audio mode, save button, and forget-key button"><figcaption><p>The key field is masked. The generated links never contain the key.</p></figcaption></figure>

### 3. Make the account-holder link

Paste the account holder's normal VDO.Ninja link into **Normal account-holder link**. This can be a director link, a reusable room link, or another link that person normally uses.

Copy the generated **Translation-enabled account-holder link**, or click **Save and open**.

The generated link adds translation settings but not the API key. The key stays in that browser.

### 4. Make the participant link

Choose the participant's starting language, then paste the normal guest or participant invite into **Normal participant link**. Leave it on **Auto** when you want each participant's browser or operating-system language to be used.

Copy the generated **Translation-ready participant link** and send it to the participants. It contains a preferred-language setting but no API key and no OpenAI account information.

The same reusable participant link can be sent again later.

### 5. Join and test

Open the account-holder link in the browser where the API key was saved. Ask the participant to open their participant link.

Use headphones for the first test. Have each person say a short sentence, then pause. Translation is streamed while they speak, but it is not instantaneous.

For a real event, test names, numbers, dates, technical terms, accents, overlapping speech, and every language pair you plan to use.

## Choosing a language inside VDO.Ninja

The default is **Auto**, which uses the browser or operating system language. A participant can change it without visiting the setup page:

1. Open **Settings**.
2. Choose **User**.
3. Change **Preferred spoken language**.

<figure><img src="/files/0AbA6UfbHMSHdWJUQnYq" alt="VDO.Ninja User settings showing the preferred spoken language selector, Configure button, Stop button, and current language status"><figcaption><p>The small User setting is the only in-room translation interface.</p></figcaption></figure>

The supported output choices in this alpha are English, Spanish, Portuguese, French, Japanese, Russian, Chinese, German, Korean, Hindi, Indonesian, Vietnamese, and Italian.

## URL options

Everything needed during a call can be configured by URL. The setup page is only a link generator.

| Option                  | Purpose                                           | Example                       |
| ----------------------- | ------------------------------------------------- | ----------------------------- |
| `&translate=1`          | Makes this browser the translation account holder | `&translate=1`                |
| `&translatelang=`       | Language this person wants to hear                | `&translatelang=es`           |
| `&translationprovider=` | Translation provider                              | `&translationprovider=openai` |
| `&translateaudio=`      | Original-audio mode: `replace`, `duck`, or `mix`  | `&translateaudio=duck`        |

Account-holder example:

`https://vdo.ninja/?director=ROOMNAME&translate=1&translatelang=en&translationprovider=openai&translateaudio=replace`

Participant example:

`https://vdo.ninja/?room=ROOMNAME&translatelang=es`

Do not add an API key to a URL. VDO.Ninja does not support an API-key URL option.

## Privacy and API-key security

Normal VDO.Ninja media continues to use VDO.Ninja's usual media paths. The account holder's browser creates additional direct WebRTC connections to OpenAI for only the audio tracks that need translation.

For incoming participant speech, the participant first sends audio to the account holder through VDO.Ninja. The account holder's browser then sends a copy of that audio to OpenAI. This is why participant notice and consent matter.

The API key:

* Is entered only in the account holder's browser.
* Is sent directly to OpenAI to create short-lived translation credentials.
* Is not sent to VDO.Ninja's server or to other room participants.
* Is not placed in generated links.
* Is stored in browser local storage when **Remember** is checked, or tab session storage when it is not.

{% hint style="danger" %}
OpenAI's production guidance recommends creating short-lived browser credentials on a trusted server instead of keeping a standard API key in browser storage. This alpha deliberately offers direct bring-your-own-key mode so VDO.Ninja remains serverless and easy to try. Use a dedicated API project/key, set sensible spending limits, do not use an administrator key, and click **Forget API key** when using a computer you do not control.
{% endhint %}

## Cost and session count

OpenAI charges the account that owns the key. Check the current [model and pricing information](https://developers.openai.com/api/docs/models/gpt-realtime-translate) before a long event.

VDO.Ninja avoids translating the same account-holder stream repeatedly when several participants request the same language. It reuses one output translation per requested language.

Incoming participant tracks stay separate. If five participants need translation into the account holder's language, that can require five incoming translation sessions. More participants and more distinct languages therefore cost more.

## Audio controls and recording

Translated audio stays inside the existing VDO.Ninja media elements and audio path:

* Per-participant volume and speaker mute continue to apply.
* Muting the account holder's microphone also mutes the translated outgoing tracks.
* Active-speaker and Web Audio processing continue to use the selected playback audio.
* A local recording of a remote participant records the audio currently being played for that participant. Wait for translation to become active before starting the recording if the recording should contain translated audio.
* VDO.Ninja delays a translation track swap until an already-running local recording stops. It also refuses a language change while a remote local recording is active, preventing the browser's `MediaRecorder` from being broken by a track-set change.

## Latency and lip sync

Speech translation necessarily arrives after the original speaker starts talking. In **Replace** mode, the translated voice can therefore trail the video. **Duck** and **Mix** modes can sound like an echo because the original voice arrives first.

This alpha does not automatically delay video to match translated audio. Automatic audio/video synchronization may be explored later, but it would add latency and needs real-world testing before becoming a default.

## Stopping or recovering

Click **Stop** in **Settings** → **User** to close translation sessions and restore original audio. **Configure** reopens the setup page. **Forget API key** removes the saved key from the browser.

If OpenAI ends or loses a live session, VDO.Ninja temporarily restores original audio and tries to reconnect the affected translation. A failed API key, unavailable model, exhausted account, or unsupported language cannot be repaired automatically; correct the account or language setting and reload the link.

## Troubleshooting

### It says an API key is needed

The account-holder link was opened in a browser that does not have the key. Open **Configure**, enter the key, save it, and reopen the account-holder link.

### The guest hears the original voice

Check that:

* The account holder used the link containing `&translate=1`.
* The participant used a link containing `&translatelang=`.
* The two people did not select the same language.
* The API account has billing and access to `gpt-realtime-translate`.

### Guests cannot understand one another

That is a current design limit. This first version translates between the account holder and each participant, not every guest-to-guest path in a mesh room.

### The translated voice is behind the video

Some delay is expected. Try short phrases and avoid people talking over one another. There is not yet automatic video delay for lip synchronization.

## Technical reference

OpenAI describes the model, WebRTC browser flow, one-session-per-output-language pattern, and separate-track approach for conversational calls in its [Realtime translation guide](https://developers.openai.com/api/docs/guides/realtime-translation).


# Options to record streams

Compare VDO.Ninja recording options for local, remote, segmented, and backup capture workflows.

There are several ways to record, with more ways coming. I'll list some of the ways here, although they may not be exactly what you had in mind. Regardless of which method you prefer, having a backup recording going is always advisable.

### Local / Remote Recording in VDO.Ninja

The VDO.Ninja room director has the option to record streams locally and remotely.

You can also add \&record to guest invite URL to introduce a recording button, for that publisher to start/stop their own local recording. Local recordings of this type are often of high quality.

You can also right-click and record any video within VDO.Ninja.

Depending on the type of video, and whether its local or remote, recording the video with this method may use up extra resources from the publisher's computer, including CPU and bandwidth.

Another issue is the format saved is WebM, which sometimes will need post-processing to make it compatible with many popular video editors. If the browser crashes, that also may cause the video recording to become lost, so it might not be the most reliable option.

That said, this is an easy option and available for free within VDO.Ninja.

Given the small chance the browser will fail with recording, you can use features like `&splitrecording` to automatically segment the video as its being recorded, saving perhaps 5-minute portions of the video at a time. You will need to concatenate the video chunks together however afterwards, but helps reduce the likelihood of the entire recording being lost due to a system crash.

### Using OBS to record; or multiple OBS

You can open multiple OBS Studios. Each OBS can record a full-window video if needed. This is useful if doing an interview with someone, and you intend to post process edit it.

OBS has advanced hardware accelerated encoding options, and so this is good option if wanting to have a few high-resolution recordings taking place, as you can offload the encoding to the GPU if available.

If adding `&channel=8` to your view/scene link in OBS, and enabling 7.1-channel audio in OBS, you can have a specific guest be recorded to a specific audio channel in your OBS recording. This is a bit finicky, given how 7.1-channel audio is hard to downmix into a proper stereo output, but for recording a podcast it might be a great option still to help in post-production ease. As of VDO.Ninja v26, the director has options to control these channels dynamically, under a guest's scene-settings menu.

<figure><img src="/files/P8Dkyvoh02ohZ3Hf9mae" alt=""><figcaption><p>Multiple channels available for recording; one per guest, for example.</p></figcaption></figure>

### OBS Source Record plugin

For OBS, there is a source-record plugin that allows you to record each Guest in OBS as its own dedicated video source. By pulling in a single high quality ISO (solo) feed per guest into OBS, and mixing videos using OBS, you can get high quality footage for post-production efforts. <https://obsproject.com/forum/resources/source-record.1285/>

This is nice because you can have one OBS Studio open, and that's it. The downside is, you won't be able to use the VDO.Ninja auto-mixer if using solo-links instead.

### Electron Capture et al

[Electron Capture](/steves-helper-apps/electron-capture) (<https://github.com/steveseguin/electroncapture>) or [Vingester.app](https://vingester.app/) are similar concepts to source-recording, but instead you can capture in an application that isn't OBS. From there you window capture or NDI capture those streams locally into OBS, or/and other applications at the same time. These options do add complexity, but I sometimes will use these approaches, especially if I want to interact with the stream or pin it on top of other apps.

If interested in Vingester, as it has NDI output options, consider downloading it from here:\
<https://github.com/steveseguin/vingester> , as the official repo for it is no longer maintained, and has an audio bug in it. Vingester does use quite a bit of CPU.

### Chunked mode

If using the [`&chunked`](/advanced-settings/settings-parameters/and-chunked) mode of [VDO.Ninja](https://vdo.ninja/), a video stream is encoded once, and that encoded stream can be sent to viewers and saved to disk without re-encoding the recording. This is experimental and can still be high CPU when publishing high-quality video, but it can avoid the extra CPU cost and quality loss of recording a second encoded copy.

Chunked mode also lets you split the workflow: use a buffered chunked view for recording, while using a separate normal WebRTC view with `&nochunked` for lower-latency monitoring or conversation.

There is no server-side support for chunked mode at the moment, but I will continue to improve it and work on it as requests come in.

### Recording via WHIP/WHEP service

You can use a WHIP/WHEP services to relay video via a server. In this case, the server itself can make a copy of the stream; the same stream everyone else in the room will see. There's also [SVC scalability support](/advanced-settings/whip-parameters/and-svc), so if your server supports that, you can push high-bitrates. (<https://vdo.ninja/alpha/whip> for some common tooling)

You could in theory record to Twitch or paid WebRTC service via their WHIP ingest, but if you deploy your own SFU server, such as MediaMTX, you can configure it to record via WHIP as well. There's even a dedicated option for configuring MediaMTX with VDO.NInja: `&mediamtx` (v26 of VDO.Ninja)

### Recording to Google Drive / Dropbox

Cloud Sync can upload local recording chunks to Google Drive or Dropbox as part of studio workflows.

Current flow is centered around the **Cloud Sync** card:

* **Google Drive:** link with built-in OAuth
* **Dropbox:** link with OAuth, with optional manual token fallback (`&dropbox=...`)

This gives you local recordings plus cloud redundancy.

See setup details here:

{% content-ref url="/pages/xjGZnRlk5Ix4koT3BxCf" %}
[Cloud Sync (Google Drive + Dropbox)](/guides/cloud-sync-google-drive-and-dropbox)
{% endcontent-ref %}

### Headless recording

This is a bit like having a headless version of OBS in the cloud, where it's configured to take a [VDO.Ninja](https://vdo.ninja/) browser link and publish it using FFmpeg to RTMP. Works with DigitalOcean or even an Orange pi.

<https://github.com/steveseguin/browser-to-rtmp-docker>

You can very easily configure the FFmpeg script to save to MP4/MKV format though, so if you were wanting to record the guest in the cloud, this is an option. It still will put a load on the guest, as they are encoding a high quality stream that won't be used live really, but if you want to do isolated guest recordings, and don't have the local CPU for it, this might help.

### [Raspberry.Ninja](#raspberry.ninja)

[Raspberry.Ninja](https://raspberry.ninja/) is my project for Linux systems (and Windows WSL also), which lets you both publish and record Raspberry Ninja streams, without a browser at all.

While it's mainly used for publishing video to [VDO.Ninja](https://vdo.ninja/) using the hardware encoder in small embedded computers, like the Raspberry Pi, it can also record video streams to disk, as perfect copies. No transcoding is done.

If you are enterprising, you can have [Raspberry.Ninja](https://raspberry.ninja/) record the incoming guest streams to disk without transcoding, and then transcode them, before window-sharing them or publishing them to NDI. NDI output support is available with Raspberry.Ninja, however it does require transcoding currently.

### Recording an entire window/scene to disk as a mixed output

If you want to record more than a single guest, but rather an entire scene, using URL parameters you can achieve this. We are essentially doing a screen share of the output window, and recording that.\
\
**Record entire scene to disk:** <https://vdo.ninja/?scene=0&layout&remote&clean&chroma=000&ssar=landscape&nosettings&prefercurrenttab&selfbrowsersurface=include&displaysurface=browser&np&nopush&publish&record&screenshareaspectratio=1.7777777777777777&locked=1.7777777777777777&room=ROOMNAME>\
**Publish entire scene to a WHIP endpoint:**\
<https://vdo.ninja/?scene=0&layout&remote&clean&chroma=000&ssar=landscape&nosettings&prefercurrenttab&selfbrowsersurface=include&displaysurface=browser&np&nopush&publish&whippush&screenshareaspectratio=1.7777777777777777&locked=1.7777777777777777&room=surprisethinP>

<figure><img src="/files/878wpRYpdnf8yD6yHRg7" alt=""><figcaption></figcaption></figure>

### Contact me for more discussion / updates

If you want to follow up with me on some of these options, please contact me on Discord at [https://discord.vdo.ninja](https://discord.vdo.ninja/).

As well, things change quickly with VDO.Ninja; this post may already be out of date by the time you read it. Feel free to ask for updates.


# Recording video with consistent results

A plain-language guide to getting steadier VDO.Ninja recordings by choosing the right network, buffer, and recording method.

This guide is for people who are using VDO.Ninja to record interviews, podcasts, remote guests, or live productions.

The goal is simple: fewer frozen moments, fewer audio jumps, and fewer surprises after the recording is finished.

The most important thing to know is this:

> A recording is only as reliable as the path used to make it.

If you record a guest after their video has already crossed a weak Wi-Fi connection, the recording may include the same freezes and jumps you saw live. If the guest records themselves locally, before the Internet gets involved, that backup can be much cleaner.

For important recordings, do not depend on only one copy. Use a live recording and at least one backup.

## A simple approach

For many serious productions, a practical approach to test is:

1. Record the live show in OBS or your production software.
2. Add a little buffer to the OBS VDO.Ninja source.
3. Have each guest make a local browser recording as a safety copy.
4. If possible, also use Google Drive cloud backup for guest recordings.
5. Test the full setup before the real session.

This gives you a live recording that is ready right away, plus cleaner guest backups if the live connection has a bad moment.

## Think in three parts

Consistent recordings usually come down to three things:

* **Network:** how steady the connection is.
* **Buffer:** how much time VDO.Ninja is allowed to smooth out bumps.
* **Recording method:** where the recording is made.

You do not need to become a network engineer. You just need to choose the right balance for the job.

## Part 1: Network

Wi-Fi is convenient, but it is also one of the most common causes of short freezes, audio skips, and sudden video quality drops.

If a guest can use an Ethernet cable, ask them to use it. This is often the single biggest improvement.

If they must use Wi-Fi:

* Ask them to sit close to the router.
* Avoid being on the far side of the house.
* Avoid busy public Wi-Fi.
* Avoid VPNs during the recording, unless they are required.
* Ask them to close cloud backup apps, game launchers, and large downloads.
* Keep the laptop plugged into power.
* Use Chrome or Edge for the most predictable browser recording support.

Firewalls can also matter. VDO.Ninja normally tries to make a direct peer-to-peer connection. Direct connections are usually best for quality and delay. Some office, school, hotel, or corporate networks block this and force the call through a relay server instead. A relay can save the connection, but it may add delay and reduce quality.

If one guest is always unstable, test them from a different network before blaming the camera or VDO.Ninja settings.

Related network and troubleshooting guides:

{% content-ref url="/pages/-MZfwIo7kzNiTYxjSnOH" %}
[Packet Loss](/common-errors-and-known-issues/packet-loss)
{% endcontent-ref %}

{% content-ref url="/pages/-MZfwb0hty6K41wp75Ru" %}
[Video freezes mid-stream](/common-errors-and-known-issues/video-freezes-mid-stream)
{% endcontent-ref %}

{% content-ref url="/pages/wnl1TKtgUKfAfXtb5N5g" %}
[Relay candidate being selected](/common-errors-and-known-issues/relay-candidate-being-selected)
{% endcontent-ref %}

{% content-ref url="/pages/cH6gwVwalkEzDqr2wtpg" %}
[Enterprise firewall checklist](/common-errors-and-known-issues/enterprise-firewall-checklist)
{% endcontent-ref %}

{% content-ref url="/pages/ydII9ENScx0tPeqQkILx" %}
[Handling Guest Disconnects and Connection Recovery](/guides/handling-guest-disconnects-and-connection-recovery)
{% endcontent-ref %}

{% content-ref url="/pages/GxC8AA4ibwUx9YPKfcKh" %}
[Guest Audio Recovery and Mesh Debug](/guides/mesh-network-debug)
{% endcontent-ref %}

## Part 2: Buffer

A buffer is a small waiting area for video and audio.

Without much buffer, video arrives quickly, but small network bumps are easier to see. With more buffer, VDO.Ninja has more time to smooth over those bumps, but the video is delayed a little more.

For live conversation, you usually want less buffer.

For recording into OBS, a small delay is often worth it if it makes the recording steadier.

### Regular buffer for OBS sources

If you are pulling a VDO.Ninja view link into OBS and seeing little freezes or sync jumps, try adding this to the OBS/view link:

```
&buffer=200
```

If that is not enough, try:

```
&buffer=500
```

This does not fix a terrible connection, but it can help with normal Wi-Fi jitter.

Use this on the viewing or OBS side, not necessarily on the guest invite link.

Example OBS/view link:

```
https://vdo.ninja/?view=GUESTID&room=ROOMNAME&scale=100&buffer=500
```

Related setting:

{% content-ref url="/pages/-MZdtO5YNVAt2R8vG5Us" %}
[\&buffer](/advanced-settings/video-parameters/buffer)
{% endcontent-ref %}

### Chunked mode as a heavier buffer option

Chunked mode is a different way of sending video. It is designed to favor steadier quality over the lowest possible delay.

It can be useful when:

* You are recording into OBS.
* A delay of about 1 to 3 seconds is acceptable.
* The guest is on Chrome or Edge.
* You care more about avoiding visible damage than having instant video.

It is not the best choice when guests need a perfectly natural, low-delay conversation path.

A basic chunked guest link might include:

```
&chunked=2500&chunkprofile=balanced
```

Then the OBS/view side can choose how much buffer to allow:

```
&chunkbuffer=1000
```

This means the OBS side is giving the video about one second of room to smooth out trouble.

For a rougher Wi-Fi connection, you can allow more:

```
&chunkbuffer=1500&chunkbufferfloor=1000&chunkbufferceil=3000&chunkjitterslack=500&chunkadapt=hybrid
```

The tradeoff is delay. More buffer can mean a steadier recording, but the video will arrive later.

Related setting:

{% content-ref url="/pages/RuI5uNIo2aV3KSIBc2p1" %}
[\&chunked](/advanced-settings/settings-parameters/and-chunked)
{% endcontent-ref %}

{% content-ref url="<https://github.com/steveseguin/vdo.ninja/blob/gitbook/advanced-settings/newly-added-parameters/and-chunkedbuffer.md>" %}
<https://github.com/steveseguin/vdo.ninja/blob/gitbook/advanced-settings/newly-added-parameters/and-chunkedbuffer.md>
{% endcontent-ref %}

{% content-ref url="/pages/eqd66SGb0Enj0YDLwElo" %}
[\&nochunked](/advanced-settings/settings-parameters/and-nochunked)
{% endcontent-ref %}

## Part 3: Recording method

There are several ways to record with VDO.Ninja. They are not all equal.

For a broader overview of recording choices and file formats, see:

{% content-ref url="/pages/Rx73wZVNHnSDztNK81t6" %}
[Options to record streams](/guides/options-to-record-streams)
{% endcontent-ref %}

{% content-ref url="/pages/PBM3jOzrsNJj56GC4BGN" %}
[Recording Format Options and Settings](/guides/recording-format-options-and-settings)
{% endcontent-ref %}

### OBS recording

This is the normal live-production method.

You bring each guest into OBS, switch the show live, and record the final result. This is great when you want a finished show right away.

The downside is that OBS records what it receives. If the guest's Wi-Fi has a bad moment, OBS may record that bad moment too.

Use OBS recording as your main live record, but keep a backup.

### Other publishing paths to test

If a normal browser publisher is not steady enough, there are other ways to get video into VDO.Ninja or into your production.

These options are not required for most people, but they can be useful for more demanding recording work:

* **OBS WHIP output:** OBS can publish using WHIP into VDO.Ninja or another WHIP-compatible service. This can be a good test when you want OBS to handle capture and encoding instead of a browser tab.
* **Game Capture:** a standalone Windows app for publishing game, window, or screen-style captures into VDO.Ninja. It can be useful when a browser's capture path is too dynamic for the job. <https://github.com/steveseguin/Game-capture>
* **Ninja OBS Plugin:** an OBS plugin for VDO.Ninja publishing and receiving workflows, without needing to manage everything through separate browser tabs. <https://steveseguin.github.io/ninja-obs-plugin/>
* **Meshcast:** a server-based companion service for VDO.Ninja. It can help when pure peer-to-peer publishing is not the right fit, or when you want RTMP, SRT, WHIP, or VDO.Ninja/WebRTC options in the same workflow. <https://app.meshcast.io>

These can be more predictable in some setups because the capture and encoding path is less like a changing browser call and more like a steady video feed. Test them before using them for a real recording.

Related tools:

{% content-ref url="/pages/zDeNQcpkXYzMdqF73cIT" %}
[WHIP and WHEP tooling](/steves-helper-apps/whip-and-whep-tooling)
{% endcontent-ref %}

{% content-ref url="/pages/4KXO0HJu6H9eu9TNvORZ" %}
[Using Game Capture and Spout2 with VDO.Ninja](/guides/using-game-capture-with-vdo.ninja)
{% endcontent-ref %}

{% content-ref url="/pages/ExFHGtOlWS5dDgehTPDH" %}
[Using the Ninja OBS Plugin with VDO.Ninja](/guides/using-ninja-obs-plugin-with-vdo.ninja)
{% endcontent-ref %}

{% content-ref url="/pages/P3fAMnNEuhYah2TMzGFV" %}
[Game Capture](/steves-helper-apps/game-capture)
{% endcontent-ref %}

{% content-ref url="/pages/e0SCjrrP2Poszx3rkY7P" %}
[Ninja OBS Plugin](/steves-helper-apps/ninja-obs-plugin)
{% endcontent-ref %}

{% content-ref url="/pages/9kYE934JxRrPbrHCbd5b" %}
[Meshcast.io](/steves-helper-apps/meshcast.io)
{% endcontent-ref %}

### Guest local recording

This is often the best safety copy.

The guest's own browser records their camera and microphone before the video travels over the Internet. If the guest's Wi-Fi drops for a second, their local recording may still be clean.

Add this to the guest invite link to give them a recording button:

```
&record=6000
```

To start recording automatically:

```
&autorecordlocal=6000
```

For longer sessions, split the recording into smaller pieces:

```
&autorecordlocal=6000&splitrecording=5
```

Splitting into 5-minute sections can reduce the chance of losing an entire recording if the browser crashes.

Important notes:

* Guest local recording uses more CPU and disk space on the guest's computer.
* It should be tested before an important session.
* The guest should not close the tab until the recording is saved.
* Chrome or Edge usually gives the most predictable browser recording support.
* Mobile browsers and Safari can be less predictable for serious recording work.

Related settings:

{% content-ref url="/pages/-MZXYl\_nYDzfbdqy-AuC" %}
[\&record](/advanced-settings/recording-parameters/and-record)
{% endcontent-ref %}

{% content-ref url="/pages/R5VmO5XZFPMNQuBLmfuy" %}
[\&autorecordlocal](/advanced-settings/recording-parameters/and-autorecordlocal)
{% endcontent-ref %}

### Google Drive backup

Google Drive backup is useful when you want guest recordings to upload to the host's Google Drive.

This can be helpful because the guest can record locally and send the file to the producer without a manual file transfer later.

Keep in mind:

* The guest may need to approve the recording prompt.
* The guest needs enough upload speed.
* Uploading while recording can add load to the guest's connection.
* It is still wise to keep another backup.

Related guide:

{% content-ref url="/pages/xjGZnRlk5Ix4koT3BxCf" %}
[Cloud Sync (Google Drive + Dropbox)](/guides/cloud-sync-google-drive-and-dropbox)
{% endcontent-ref %}

### Dropbox and local disk recording

Dropbox and local disk recording can be useful in studio workflows, especially for saving or uploading the host-side recording.

These are good extra safety layers, but they should not be the only backup if you need clean guest ISO recordings. If the host records a remote guest after the guest's video has crossed the Internet, the host may still capture network glitches.

### Director-side remote recording

The director can record remote videos, but this records what the director receives.

If the connection has a freeze, that freeze may be in the recording.

This is convenient, but for the cleanest backup, guest-side local recording is usually better.

## Example setups to test

### Simple interview

Use this when you want a steady live recording and a basic backup.

Guest link:

```
https://vdo.ninja/?room=ROOMNAME&push=GUESTID&ovb=2200&maxfps=30&contenthint=detail&record=6000&splitrecording=5
```

OBS/view link:

```
https://vdo.ninja/?view=GUESTID&room=ROOMNAME&scale=100&buffer=500
```

### Podcast with cleaner guest backups

Use this when the final show is recorded live, but you also want cleaner guest files for emergency fixes.

* Record the program in OBS.
* Ask every guest to use Ethernet if possible.
* Use `&buffer=500` on OBS/view links.
* Add `&autorecordlocal=6000&splitrecording=5` to guest links.
* Link Google Drive in the studio if you want guest backups uploaded.

Guest link:

```
https://vdo.ninja/?room=ROOMNAME&push=GUESTID&ovb=2200&maxfps=30&contenthint=detail&autorecordlocal=6000&splitrecording=5
```

OBS/view link:

```
https://vdo.ninja/?view=GUESTID&room=ROOMNAME&scale=100&buffer=500
```

### Higher-stability OBS capture with chunked mode

Use this only after testing. It adds delay, but may give a steadier OBS feed.

Guest link:

```
https://vdo.ninja/?room=ROOMNAME&push=GUESTID&maxfps=30&contenthint=detail&chunked=2500&chunkprofile=balanced&autorecordlocal=6000&splitrecording=5
```

OBS/view link:

```
https://vdo.ninja/?view=GUESTID&room=ROOMNAME&scale=100&chunkbuffer=1000
```

For worse Wi-Fi, test:

```
&chunkbuffer=1500&chunkbufferfloor=1000&chunkbufferceil=3000&chunkjitterslack=500&chunkadapt=hybrid
```

Do not use this for the first time during a paid session.

You can also use chunked mode for the recording path while keeping a smaller, lower-latency WebRTC path for monitoring or conversation. A viewer can opt out of chunked playback with:

```
&nochunked
```

For example, the OBS recording source might use chunked mode and a larger buffer, while a separate confidence-monitor or guest-view link uses normal WebRTC with less delay. Chunked recordings can also be saved directly to disk without re-encoding the encoded video, which can reduce extra CPU work and avoid another generation of quality loss.

## A plain-English checklist before recording

Before the real session:

* Ask guests to use Ethernet if possible.
* Ask guests to restart their browser before joining.
* Ask guests to close downloads, cloud backup apps, and other video apps.
* Check that the camera and microphone are correct.
* Do a short test recording.
* Make sure the guest knows not to close the tab until the recording is saved or uploaded.
* Start the OBS recording.
* Confirm the backup recording is also running.

During the session:

* Do not change too many settings live.
* If one guest is unstable, lower their bitrate or frame rate.
* If OBS is seeing small jumps, add more buffer.
* If the whole connection is bad, stop and fix the network if the recording matters.

After the session:

* Wait for local recordings to save.
* Wait for cloud uploads to finish.
* Check that the files open before telling guests they can leave.

## Bitrate and frame rate tips

Higher numbers are not always better.

If the guest's connection is weak, asking for more quality can make the recording worse, not better.

VDO.Ninja may use a higher camera frame rate by default, often around 60 fps if the camera and browser allow it. If you want to cap the frame rate to reduce load, 30 fps is usually a safer first test, because some cameras do not support every frame rate cleanly.

```
&ovb=2200&maxfps=30
```

For unstable Wi-Fi, lower the bitrate first:

```
&ovb=1800&maxfps=30
```

It may look less sharp, but it can be steadier. You can also leave the frame rate alone if the camera is already stable.

For strong wired connections, you can test higher values, but always test before the real recording.

Related guide:

{% content-ref url="/pages/wJQGxl0KrTeLughBKsSK" %}
[Video bitrate for push/view links](/guides/video-bitrate-for-push-view-links)
{% endcontent-ref %}

## The safest mindset

VDO.Ninja can do a lot, but browsers, Wi-Fi, and laptops are still real-world things.

For casual recordings, one recording may be enough.

For paid work, important interviews, or anything that cannot be repeated, use layers:

* OBS program recording.
* Guest local recording.
* Google Drive or other cloud backup.
* A short test before the session.
* Ethernet whenever possible.

The goal is not to make failures impossible. The goal is to make sure one bad Wi-Fi moment does not ruin the whole production.


# Cloud Sync (Google Drive + Dropbox)

Configure Cloud Sync uploads for recordings using Google Drive and Dropbox

VDO.Ninja can upload recording chunks to cloud storage as part of podcast/studio workflows. This is useful for redundancy and remote collaboration.

## Google Drive

Google Drive uses an in-app OAuth flow.

1. Open the podcast studio and find the **Cloud Sync** card.
2. Click **Link Google Drive**.
3. Complete the Google popup authorization (`drive.file` scope).
4. Confirm the status switches to **Linked**.

Optional folder targeting:

`&gdrivefolder=YourFolderName`

## Dropbox

Dropbox also supports OAuth linking in the Cloud Sync card.

1. Click **Link Dropbox**.
2. Complete the Dropbox popup authorization.
3. Confirm the status switches to linked/success.

The OAuth flow can store refresh-capable credentials locally so uploads can resume in future sessions.

## Manual Dropbox token fallback

If popup auth is blocked in a kiosk or constrained environment, you can still provide a token manually:

* Paste a token into the Dropbox field in Cloud Sync, or
* Use `&dropbox=YOUR_ACCESS_TOKEN`

Manual tokens can expire quickly, so OAuth is recommended for normal use.

## Related

{% content-ref url="/pages/GD22VCZck4ANSE56DLVO" %}
[\&gdrive](/advanced-settings/settings-parameters/and-gdrive)
{% endcontent-ref %}

{% content-ref url="/pages/TLXOv1LCYpqZKN5OUxtP" %}
[\&dropbox](/advanced-settings/settings-parameters/and-dropbox)
{% endcontent-ref %}

{% content-ref url="/pages/Rx73wZVNHnSDztNK81t6" %}
[Options to record streams](/guides/options-to-record-streams)
{% endcontent-ref %}


# Recording Format Options and Settings

A detailed guide to VDO.Ninja's recording URL parameters, codec choices, container formats, browser compatibility, and tips for getting the best results across desktop and mobile.

VDO.Ninja can record streams directly in the browser using the MediaRecorder API. This guide covers the recording-related URL parameters, codec and container format options, and the important differences between browsers and platforms.

***

## How Recording Works in VDO.Ninja

There are several ways to start a recording:

* **Right-click any video** and choose "Record to disk"
* **Use the Director control room** buttons (Record Local, Record Remote, Google Drive)
* **Add `&record` to a guest URL** to give them a dedicated record button
* **Use `&autorecord`** variants to start recording automatically on page load

When you start a recording (via right-click or director UI), a dialog appears with these options:

* **Use PCM audio format** — checkbox to record uncompressed audio
* **Audio-only recording** — checkbox to skip video
* **Bitrate slider** — adjustable from 50 to 10,000 kbps

> **Important:** There is no codec or container format selector in the recording dialog. The video codec must be set via URL parameter *before* joining. The container format (WebM vs MP4) is chosen automatically based on your browser.

***

## URL Parameter Reference

| Parameter                                                                           | Purpose                                                        | Default                        |
| ----------------------------------------------------------------------------------- | -------------------------------------------------------------- | ------------------------------ |
| [`&record`](/advanced-settings/recording-parameters/and-record)                     | Enable recording / set bitrate                                 | 6000 kbps                      |
| [`&autorecord`](/advanced-settings/recording-parameters/and-autorecord)             | Auto-record local + remote on load                             | —                              |
| [`&autorecordlocal`](/advanced-settings/recording-parameters/and-autorecordlocal)   | Auto-record local video only                                   | —                              |
| [`&autorecordremote`](/advanced-settings/recording-parameters/and-autorecordremote) | Auto-record remote video(s) only                               | —                              |
| [`&recordcodec`](/advanced-settings/recording-parameters/and-recordcodec) (`&rc`)   | Choose video codec                                             | VP8 (Chromium), H.264 (Safari) |
| [`&pcm`](/advanced-settings/recording-parameters/and-pcm)                           | Record uncompressed PCM audio                                  | off (uses Opus)                |
| `&splitrecording`                                                                   | Split recording into segments                                  | 5 min                          |
| [`&recordmotion`](/advanced-settings/recording-parameters/and-recordmotion)         | Snapshot on motion detection                                   | sensitivity 15                 |
| `&recordwindow` (`&rw`)                                                             | Record entire browser tab/scene                                | 6000 kbps                      |
| [`&chunked`](/advanced-settings/settings-parameters/and-chunked)                    | Chunked/WebCodecs publishing and direct-to-disk recording path | 2500 kbps                      |
| `&recordfolder`                                                                     | Google Drive folder name for uploads                           | —                              |
| `&studioiso`                                                                        | Enable/disable podcast studio isolated recording               | on                             |
| `&framegrab`                                                                        | Frame capture source URL                                       | —                              |

***

## `&record` — The Core Parameter

Add `&record` to a guest/sender link to give them a record button, or use it with a value to set the recording bitrate.

| Value                          | Behaviour                                                            |
| ------------------------------ | -------------------------------------------------------------------- |
| *(no value)*                   | Video + audio at 6000 kbps                                           |
| Positive integer (e.g. `6000`) | Video + audio at that kbps                                           |
| `0`                            | Audio-only, 32-bit PCM lossless                                      |
| Negative integer (e.g. `-120`) | Audio-only, Opus at that kbps                                        |
| `false` or `off`               | Disable recording entirely (hides buttons, blocks remote triggering) |

When recording is started from the right-click menu or from the director panel without `&record` in the URL, the default bitrate is **6000 kbps**.

The Director can also start and stop recordings remotely for all guests via the director control room, using the "Record Local", "Record Remote", and batch "start all / stop all" buttons.

***

## Auto-Record Variants

These work exactly like `&record` but start recording automatically when the page loads — no user interaction required.

* **`&autorecord`** — records both local and all remote streams
* **`&autorecordlocal`** — records only your own local stream
* **`&autorecordremote`** — records only incoming remote streams

All accept the same bitrate values as `&record`.

***

## Choosing the Video Codec (`&recordcodec`)

Use `&recordcodec` (alias `&rc`) **in the URL** to choose which video codec the recording uses. This is the only way to select the codec — it cannot be changed from the recording dialog mid-session.

**Example:** `https://vdo.ninja/?push=abc123&record=6000&recordcodec=h264`

| Codec  | Notes                                                                                                   |
| ------ | ------------------------------------------------------------------------------------------------------- |
| `vp8`  | Most compatible. Default fallback on Chromium browsers. Recommended for Android devices.                |
| `vp9`  | Better compression than VP8. Good for high-resolution recordings.                                       |
| `h264` | Hardware-friendly. Default on Safari. May not work well when recording remote iOS streams on Chromium.  |
| `av1`  | Best compression. Limited browser and hardware support — requires AV1 hardware encoder on most devices. |

### Checking codec support and choosing wisely

A useful workflow is to use <https://vdo.ninja/codecs> to check which recording codecs and formats your browser supports, then set `&recordcodec` accordingly. For H.265/HEVC specifically, you can check support at <https://vdo.ninja/h265>.

If a guest's browser does not support the requested codec, VDO.Ninja falls back automatically to the browser's default (VP8 on Chromium, H.264 on Safari) — the recording will still work, just with a different codec than requested.

### How VDO.Ninja selects the codec internally

1. If `&recordcodec` is set, it checks if the browser supports that codec via `MediaRecorder.isTypeSupported()`
2. If supported, it uses it
3. If not supported, it falls back to the browser's default (VP8 on Chromium, H.264 on Safari)
4. On iOS/Safari, if the selected WebM mimeType is not supported at all, it falls back to `video/mp4` and saves as `.mp4`

> If you are getting recording errors, try `&recordcodec=vp8` — it is the most widely supported codec and avoids incompatible hardware encoder issues.

***

## Container Formats and Browser Differences

**You do not choose the container format** — VDO.Ninja selects it automatically based on what the browser supports. Different browsers and platforms produce different output files.

### Chromium Browsers (Chrome, Edge, Brave — Desktop and Android)

* **Container:** WebM (`.webm`)
* **Default video codec:** VP8
* **Default audio codec:** Opus
* **Also supports:** VP9, H.264, AV1 (hardware dependent)
* Chrome 114+ also has experimental MP4 container support, but VDO.Ninja uses WebM by default

### Firefox (Desktop and Android)

* **Container:** WebM (`.webm`)
* **Default video codec:** VP8
* **Default audio codec:** Opus
* **Also supports:** VP9

### Safari — Desktop macOS

**Safari before 18.4 (before 2025):**

* **Container:** MP4 (`.mp4`) — no WebM support at all
* **Video codec:** H.264 only
* **Audio codec:** AAC only
* Known bug: older Safari could report the mimeType as `video/webm` but actually output MP4/H.264 data

**Safari 18.4+ (2025 onwards):**

* **Container:** MP4 or WebM
* **Video codecs:** H.264, HEVC, VP8, VP9, AV1 (hardware dependent)
* **Audio codecs:** AAC, Opus, ALAC (lossless), PCM (lossless)

### iOS Safari (iPhone / iPad)

**iOS before 18.4:**

* **Container:** MP4 (`.mp4`) only
* **Video codec:** H.264 only
* **Audio codec:** AAC only
* WebM recording was completely unavailable

**iOS 18.4+:**

* Same expanded support as desktop Safari 18.4+ (WebM, VP8/VP9, Opus now available)

### Android Chrome

* Same as desktop Chrome — WebM container, VP8 default
* Hardware encoding availability varies by device chipset
* VP8 is recommended (`&recordcodec=vp8`) for older or lower-end Android devices

### Summary Table

| Platform / Browser              | Container             | Default Video   | Default Audio |
| ------------------------------- | --------------------- | --------------- | ------------- |
| Chrome / Edge / Brave (desktop) | WebM                  | VP8             | Opus          |
| Chrome (Android)                | WebM                  | VP8             | Opus          |
| Firefox (desktop / Android)     | WebM                  | VP8             | Opus          |
| Safari < 18.4 (macOS)           | **MP4**               | **H.264**       | **AAC**       |
| Safari 18.4+ (macOS)            | MP4 (default) or WebM | H.264 (default) | AAC (default) |
| iOS Safari < 18.4               | **MP4**               | **H.264**       | **AAC**       |
| iOS Safari 18.4+                | MP4 (default) or WebM | H.264 (default) | AAC (default) |

> You can check which codecs your specific browser supports at <https://vdo.ninja/codecs>

### What this means in practice

If you have a room with guests on different browsers, **your recordings may be in different formats**: a Chrome guest will produce `.webm` files while a Safari guest will produce `.mp4` files. This is normal and expected. The files can be converted afterward if needed.

***

## Audio Options

### Default Audio Bitrate Scaling

VDO.Ninja automatically adjusts audio bitrate based on video bitrate:

| Recording Bitrate | Audio Bitrate             |
| ----------------- | ------------------------- |
| Below 1000 kbps   | 100 kbps                  |
| 1000–5999 kbps    | 130 kbps                  |
| 6000–19999 kbps   | 256 kbps                  |
| 20000+ kbps       | Included in total bitrate |

### `&pcm` — Lossless Audio Recording

Adding `&pcm` to the URL records audio as uncompressed PCM instead of Opus. This is ideal for podcasting or music production where audio quality is critical.

You can also check the "Use PCM audio format" checkbox in the recording dialog when it appears.

* Works with any video codec (e.g. `video/webm;codecs=vp8,pcm`)
* Audio-only PCM is also supported (`audio/webm;codecs=pcm`)
* Convert PCM WebM files to standard WAV using the [vdo.ninja/convert](https://vdo.ninja/convert) tool

***

## Splitting Recordings (`&splitrecording`)

Automatically splits recordings into time-based segments to protect against data loss if the browser crashes.

| Value               | Behaviour                                                           |
| ------------------- | ------------------------------------------------------------------- |
| *(no value)*        | 5-minute segments (Safari/iOS), 10-minute segments (other browsers) |
| Integer (e.g. `10`) | Segments of that many minutes (minimum 1)                           |

Files are saved with numbered suffixes (e.g. `recording.webm`, `recording.webm_1`, `recording.webm_2`).

**To reassemble segments:**

```bash
# Windows
copy /b recording.webm + recording.webm_1 + recording.webm_2 output.webm

# FFmpeg
ffmpeg -i "concat:recording.webm|recording.webm_1|recording.webm_2" -c copy output.webm
```

On mobile or laptop, VDO.Ninja will also auto-save the current segment at 2% battery.

> **Note:** If `&splitrecording` is used without a value, the split interval is 5 minutes. If `&splitrecording` is not used, Safari recording flows may still auto-enable split recording to reduce memory issues: 5-minute segments on iOS/iPad and 10-minute segments on desktop Safari.

***

## Scene/Window Recording (`&recordwindow`)

`&recordwindow` (alias `&rw`) captures the entire browser tab as a screen share and records it as a mixed output. Default bitrate is 6000 kbps. Useful for recording a composed scene with multiple guests.

***

## Chunked Mode (`&chunked`)

An alternative publishing and recording approach that can write encoded video directly without re-encoding during recording. This can reduce extra recording CPU compared with recording a second encoded copy, but chunked publishing itself is still experimental and should be tested first.

| Sub-parameter   | Purpose                                               |
| --------------- | ----------------------------------------------------- |
| `&chunkprofile` | Device preset: `mobile`, `balanced`, `desktop`        |
| `&chunkbuffer`  | Playout buffer in ms                                  |
| `&chunkadapt`   | Adaptation strategy: `bitrate`, `framerate`, `hybrid` |
| `&chunkfec`     | Forward error correction parity rate                  |

**Limitations:** primarily Chromium browsers, explicit buffering/delay, and no Meshcast-style server redistribution for the chunked path.

See the full [`&chunked` documentation](/advanced-settings/settings-parameters/and-chunked) for details.

***

## Motion-Triggered Recording (`&recordmotion`)

Saves a PNG snapshot to disk whenever motion is detected in a video. Useful as a basic security camera.

* Value sets sensitivity threshold (default 15)
* Maximum 1 snapshot per second
* Best in Chrome/Chromium — not recommended inside OBS

***

## Podcast Studio Multitrack Recording

The VDO.Ninja Podcast Studio (`/podcast/`) has its own advanced recording system separate from the standard `&record` approach:

* **Multitrack recording** — records each participant as a separate audio track (48 kHz)
* **WAV encoder** — produces lossless WAV files per track, ideal for post-production
* **IndexedDB crash recovery** — recording chunks are persisted to IndexedDB every 30 seconds, so recordings can be recovered if the browser crashes
* **Cloud upload** — integrates with Google Drive and Dropbox for automatic upload during recording
* **`&studioiso`** — controls whether isolated disk recording is enabled (on by default)

This is a distinct recording pipeline from the standard `&record` system — it is designed specifically for podcast workflows where you need separate, high-quality audio tracks per guest.

***

## Screen Recorder App

VDO.Ninja includes a dedicated screen recorder at `/screenrecorder/` with its own recording options:

* **Capture modes:** Screen, window, or browser tab capture
* **Webcam overlay** with customizable position and size
* **Audio sources:** Microphone, system audio, or both
* **Audio processing:** Voice isolation, auto gain, noise suppression, echo cancellation, bass boost
* **Output resolution:** 720p, 1080p, 1440p, 4K
* **Aspect ratios:** 16:9, 9:16, 1:1
* **Quality presets:**
  * Smaller File (0.78x bitrate)
  * Balanced (1x)
  * High Detail (1.45x)
  * Archive/Master (2x)
* **Codec selection:** VP8, VP9, H.264, with WebM or MP4 container
* **Auto-silence skip** — automatically skips silent sections
* **Live transcription** — with downloadable `.txt` transcript
* **IndexedDB crash recovery**

The screen recorder has its own codec selector UI, unlike the main VDO.Ninja recording which requires URL parameters.

***

## Native iOS/Android App Recording

The VDO.Ninja native apps (Raspberry.Ninja-based) support recording while publishing, but with no configurable recording options — it is simply **on or off** while streaming. There are no codec, bitrate, or format choices in the native app recording. This is a separate implementation from the browser-based recording system.

***

## Frame/Snapshot Capture

VDO.Ninja can save individual video frames as images:

* **Right-click menu** — save a single frame from any video
* **`&framegrab`** — set a source URL for frame capture mode
* **`&framegrabaudio`** — include audio with frame grab
* **`&recordmotion`** — automatic PNG snapshots on motion detection (see above)

These are not full recordings, but can be useful for thumbnails, security snapshots, or quick captures.

***

## Google Drive / Cloud Recording

The Director control room has a dedicated "Google Drive" button per guest that lets directors have remote guests upload their recordings to Google Drive automatically. This records a local copy to disk while simultaneously streaming it to the cloud.

* **`&recordfolder=NAME`** — customize the Google Drive folder name for uploads
* Uploads use resumable chunked transfer (4 MB chunks)
* Batch recording supported — the director can start Google Drive recording for all guests at once

### Dropbox Integration

Dropbox upload is also available, using OAuth2 authentication. The director can enable Dropbox upload per guest during recording. Like Google Drive, it streams the recording to the cloud while also saving a local copy.

***

## Converting Recordings

Recordings saved as WebM may need conversion for use in some video editors (e.g. Premiere Pro, DaVinci Resolve).

### WebM to MP4 — often no video transcoding needed

When the recording uses H.264 video (`&recordcodec=h264`), converting between WebM and MP4 containers can be done **without transcoding the video** — it is just a container remux, which is nearly instant. However, if the audio is Opus (the default on Chromium), the audio will need to be transcoded to a format the MP4 container supports (e.g. AAC), since MP4 does not natively support Opus audio.

If the recording uses VP8 or VP9 video, the video itself will need to be transcoded to H.264 for MP4 compatibility.

### Conversion tools

* [**vdo.ninja/convert**](https://vdo.ninja/convert) — browser-based FFmpeg tool for small files (up to \~2 GB). Supports WebM to MP4 and WebM-PCM to WAV.
* **Desktop FFmpeg** — for larger files:

```bash
# H.264 WebM to MP4 — remux video, transcode Opus audio to AAC
ffmpeg -i recording.webm -c:v copy -c:a aac output.mp4

# VP8/VP9 WebM to MP4 — full transcode needed
ffmpeg -i recording.webm -c:v libx264 -c:a aac output.mp4

# PCM WebM to WAV — no transcoding
ffmpeg -i recording.webm -c:a copy output.wav
```

***

## Tips and Recommendations

* **To change the recording codec**, add `&recordcodec=vp8` (or `h264`, `vp9`, `av1`) to the URL before joining. There is no way to change it from the recording dialog.
* **For podcasts/interviews**, use `&pcm` for lossless audio and a high video bitrate (e.g. `&record=6000`).
* **For safety**, add `&splitrecording` to protect against browser crashes.
* **For direct-to-disk recording without another video encode**, consider `&chunked` mode (Chromium-focused, experimental).
* **Mixed browser rooms** will produce mixed formats — Chrome guests will save WebM files, Safari guests will save MP4. This is normal.
* **Safari < 18.4** only supports MP4/H.264/AAC. If your guests are on older Safari or iOS, the recording format cannot be changed.
* **Check your codecs** at <https://vdo.ninja/codecs> to see what your browser supports.

***

## Related Documentation

* [Recording Parameters Reference](/advanced-settings/recording-parameters)
* [Options to Record Streams](/guides/options-to-record-streams) — overview of all recording methods (OBS, headless, Raspberry.Ninja, etc.)
* [`&chunked` mode](/advanced-settings/settings-parameters/and-chunked)


# External guides and how-tos

Curated external VDO.Ninja community guides covering show formats, audio workflows, screen sharing, and video quality.

## Community show format guides and examples

* [D\&D / TTRPG session for recording or streaming](https://docs.google.com/document/d/11YMfVsOw5VNaAexDHwBl-lyEyJcePDC39yC3ZLHF_pA/view) - by CharisSophia
* [OBS and VDO.Ninja DJ Setup Guide - Community Written Guide](https://app.box.com/s/0wzs9cxcvi4jo114wfrsmwfrpfyhjcbi)

## Screen sharing

* [How to share Desktop Audio on macOS, such as when screen sharing](https://kast.zendesk.com/hc/en-us/articles/360031463111-How-to-stream-computer-audio-on-a-Mac)

## Audio

* [Pro Audio Matrix for \&proaudio or \&stereo](https://docs.google.com/spreadsheets/d/1onfIh1hNR1Gh_mthkhmezzWNUMYKMGKPrwx7T428_hc/edit#gid=0)
* [Steve's personal top 3 mic recommendations for podcasting](https://docs.google.com/document/d/e/2PACX-1vSNcKW88bFYg2kNl-3ufrvidhp9z139jH7nR7FC9rsaBRwCStvTJtE9rMa8RrzgTBw8WkAqbaN7o4fb/pub)

## Video

* [How to add custom backgrounds and live video effects](https://snapcamera.snapchat.com/)
* [How to improve your video quality with some better lighting tricks](https://docs.google.com/document/d/e/2PACX-1vTs0So9I7Gx33IKLgxBlMPBTpvhc5JzLi3iFLxSeHEcGRJeSePkzyrStojFN3lEmlVmuPY9MID5DFbJ/pub)
* [How to see your camera's max resolution limit, and if it supports manual focus/zoom](https://vdo.ninja/supports)
* [How to send output of your webcam only and not the entire output from OBS into VDO.Ninja](https://github.com/exeldro/obs-virtual-cam-filter)
* [How to apply a green screen to VDO.Ninja streams](https://medium.com/@lordfloofen/free-virtual-green-screen-4c27d04fc731)
* [Info on using "chrome.exe --autoplay-policy=no-user-gesture-required" to force Auto-play in Chrome](https://developers.google.com/web/updates/2017/09/autoplay-policy-changes)

## Self hosted

* [How to deploy your own TURN (relay) server](https://github.com/steveseguin/vdo.ninja/blob/master/turnserver.md)
* [Alternative domain names and other connection methods](https://github.com/steveseguin/vdo.ninja/blob/master/install.md)
* [Consider the IFRAME API as an alternative to self-hosting VDO.Ninja](https://docs.vdo.ninja/guides/iframe-api-documentation)

## Network

* [How to test your Internet connection quality with a video-echo test](https://vdo.ninja/speedtest)
* [How to host your own RTSP server for VDO.Ninja by using OBS with the OBS-RTSP-Server plugin](https://obsproject.com/forum/resources/obs-rtspserver.1037/)
* [How to improve streaming performance and reliability with a Speedify](https://support.speedify.com/article/725-how-to-improve-streaming-via-obs-with-speedify)
* [LAN vs WAN - VDO.Ninja traffic diagram ](https://drive.google.com/file/d/1oI7NYIlf_RurYoM0TEgJtzBJRV_wohuh/view)- by saimiri 31

## YouTube Videos

* [Jon Myer VDO.Ninja Playlist](https://www.youtube.com/playlist?list=PL8VJWj2-XLFpFu3G35Hdm1nKZ2xn9_0_8)
* [Nilson1489 (German Tutorial) Basics](https://youtu.be/KX_pYQoYWgA)
* [Nilson1489 (German Tutorial) Rooms](https://youtu.be/6nDOAW_lzUs)
* [Record multiple sources in OBS Studio](https://youtu.be/OEHgNa49f6c)
* [Control OBS using SocialStream using Touch Portal](https://youtu.be/UNAgm8HmiMk)
* [Control VDO.Ninja with Bitfocus Companion](https://youtu.be/O08mAYkXdOE)
* [Control VDO.Ninja via Touch Portal](https://youtu.be/B_0WBkHmjqI)

## Other

* [How to stream to a Raspberry Pi and use as a remote monitor](https://awesomeopensource.com/project/futurice/chilipie-kiosk)
* [How to obfuscate (hide) the URL parameters for guest links](http://invite.cam/)
* [How to do VDO.Ninja to NDI output](https://docs.google.com/document/d/e/2PACX-1vR9p03eK7dXMo0izaXwh4YGkBHtLgXmzOpSYMQlB-VT2s2FjlxY_vpUzCkRZqXdqhnQLQPSoH6NZlG2/pub)
* [How to view Twitch chat while using VDO.Ninja on mobile devices](https://vdo.ninja/twitch)
* [3rd-party written How-To Guide for VDO.Ninja](https://photography.tutsplus.com/articles/how-to-easily-add-a-remote-source-to-streaming-video-with-obs-and-obsninja--cms-35885)
* [A tool to create editable URL invite links](https://short.io/)


# How to lock the resolution

If you don't want the resolution to vary

The browser doesn't allow much control over the resolution, which is unfortunate. The published resolution will often change based on network conditions or CPU performance, but also if the bitrate for a video stream is too low.

There are still some options though:

* Ensure you and your viewers have rock solid Internet. Packet loss can cause the resolution to drop, so make sure to avoid packet loss.
* Increase the target bitrate by using [`&videobitrate=20000`](/advanced-settings/video-bitrate-parameters/bitrate) on the viewer side. If in a group room, consider using [`&meshcast`](/advanced-settings/meshcast-parameters/and-meshcast) or increasing the total room bitrate. This is particularly true at higher resolutions with lots of motion.
* Add [`&scale=100`](/advanced-settings/video-parameters/scale) to the view links. This will disable any optimization VDO.Ninja applies to limit resolution based on window playback size. You can also try [`&scale=50`](/advanced-settings/video-parameters/scale) to lower the resolution, helping to keep the resolution stable at a lower resolution.
* Adding [`&contenthint=detail`](/advanced-settings/video-parameters/and-contenthint) to the guest's link is me telling the browser to "lock the resolution to something high", but it may still ignore it. This will tell the browser to lower frame rates instead of resolution, but in some cases the resolution may still drop.
* Using [`&chunked`](/advanced-settings/settings-parameters/and-chunked) on the guest invite links sends video over the data-channels instead, which is something that allows VDO.Ninja to lock the resolution / frame rate with, but this can be very troublesome to use and may increase latency a lot.\
  This is also experimental and can be buggy, so please report bugs and issues and over time it may be something I can more often recommend.
* In some cases, you can have guests publish video via OBS's WHIP output into VDO.Ninja. This lacks a lot of functionality and remote control, but it should lock the resolution and frame rate. Missed frames and latency may be issues though.
* You can also publish video via [Raspberry.Ninja](https://github.com/steveseguin/vdo.ninja/blob/gitbook/steves-helper-apps/raspberry.ninja), where I can control resolution also. Just like with OBS's WHIP output, frame loss may be an issue.
* You can record solo links in OBS Studio or with [Vingester.app](/steves-helper-apps/community-contributed-tools), which will record the inbound videos at a fixed resolution, despite the source having varying frame rates and resolutions. If recording at a high bitrate and with a touch of sharpness added, you can achieve great results.


# How to use VDO.Ninja as a webcam for Google Hangouts, Zoom, and more

Step-by-step guide to use VDO.Ninja with OBS Virtual Camera for Zoom, Google Meet, Teams, and similar video apps.

In this walkthrough we demonstrate how to use VDO.Ninja and OBS Virtual Camera to bring remote cameras, smartphones, and other media sources into Zoom, Google Meet, Teams, and similar video apps as a virtual webcam.

We also cover audio in this guide, although you can skip the audio-related portions if not needed for your application.

{% hint style="info" %}
Some third-party applications support Browser Sources as an input, negating the need for a virtual camera, as VDO.Ninja can be used directly in such scenarios.
{% endhint %}

\
**Requirements for this guide**

* OBS Studio V26 or newer
* Virtual Audio Cable Software
  * For Windows, use VB-CABLE Virtual Audio
    * This is recommended software as it enables proper audio support
    * The software is Donationware
    * <https://www.vb-audio.com/Cable/>\\
  * For macOS, you have a few choices:
    * [macOS audio capture options](/platform-specific-issues/macos#capturing-audio)

**Basic Workflow Diagram**

Please find below a diagram explaining the basic premise of what we are intending to do in this guide. We will go through it all, one step at a time.

![](/files/I7mNfucniWapMgrPasSr)

### **Step 0. - Installing dependencies**

This guide assumes you have OBS installed, along with the other required software, though we shall briefly cover these initial installation steps now.

We also will assume you are using Windows. You will need to adapt accordingly for macOS, which likely is going to be more complicated.

On the computer that will be using Zoom, Google Meet, Teams, or a similar app, please do the following:

1. Install OBS Studio <https://github.com/obsproject/obs-studio/releases/>
2. Install the VB-Cable Virtual Audio device.\
   <https://www.vb-audio.com/Cable/>

### **Step 1.**

Generate a VDO.Ninja invite. You will get an Invite link and a Browser Source link.

The <mark style="color:red;">Guest Invite Link</mark> is what you send to a person who you wish to join your live stream in OBS. We will also be calling this a PUSH link, as it contains \&push in the URL.

The <mark style="color:green;">OBS Browser Source link</mark> is what we will be putting into OBS to capture our guest's video stream with. We will also be calling this a VIEW link, as it contains \&view in the URL.

<figure><img src="/files/sL2Mm3yrXCRYCbUHl5WW" alt=""><figcaption></figcaption></figure>

![A QR-code is provided to make connecting your phone as a camera source easy](/files/kRhlG7lDND0yYIEz1YjW)

### Step 2.

For ease of setup, the "Generate Invite Link" button found at [VDO.Ninja](https://vdo.ninja) can provide you with both a <mark style="color:red;">PUSH (</mark><mark style="color:red;">**Guest Invite**</mark><mark style="color:red;">) link</mark> and a <mark style="color:green;">VIEW (</mark><mark style="color:green;">**OBS Source**</mark><mark style="color:green;">) link</mark>.

We will want to send the PUSH link to our guest, or if using a mobile phone, use the QR code to open the link. We can select our camera, microphone, and then click START.

![](/files/FLQykn6z09R7kRoXNAvj)

### Step 3.

Once we have our PUSH link set up to stream our camera, we can move on to pulling that video stream into OBS using the VIEW link.

To set up OBS Studio, create a Scene and then add a Browser Source in OBS Studio. Give it a name and we will fill out the details in the next step.

![We want to load our VIEW link in OBS as a Browser source](https://lh3.googleusercontent.com/piBkBuRIVMOmOQ35CisMz-cq0WUxdqKMxQhptnKFwUGAUT75eDZkoRXE52f1KFOpBFQ5l6XkjzFQZXTzwGXJ152n0bDa7iVnDd_B8EIewpjiEEEsxJnADnaToOi391fPZQ9SUNxSaCLsvaA1DA)

### Step 4.

In the properties for the Browser Source, we need to fill out a few fields and then hit OK.

* The URL we add to OBS needs to be set to the VIEW address we created earlier.\
  Just as an example: `https://vdo.ninja/?view=q3QCScW`\
  You will of course need to use your own link, with its own unique view ID, which was given to you at the end of Step 1. The view ID should exactly match the push ID, including case.
* Width can be set to 1280.
* Height can be set to 720.
* "<mark style="color:green;">**Control audio via OBS**</mark>" should be checked. This is quite important, else the audio will not work correctly or you will get a terrible echo or feedback.

![When you hit OK, you should see your remote camera source appear in OBS](/files/YPMgh3Y31QUzz0wulU1m)

{% hint style="info" %}
*SECRET TIP*: Some links in VDO.Ninja can be dragged and dropped directly into OBS from the Chrome browser, avoiding the tedious parts of Step 2 and Step 3. You will still need to select "Control audio via OBS" if you want audio to function correctly.
{% endhint %}

### Step 5.

The video should appear and auto-play. There should be no audio feedback if you selected the Control audio via OBS option.

Now we just need to stretch the video to fill the full scene. It should snap into place when full.

<figure><img src="https://lh6.googleusercontent.com/e5RL8KoBiICqkUWzhawTwXfZrnaiG_NYbmOyIyjRD24Z07ePD2zv-iLB3t_8xb6HMv5FVh99W7WhREFyEQavUPzsZ0Ybrf6iIzs5Vkj59tSYrsRawf0EW1_kexAk0B3zoKzBUoc-auK6TIvfmw" alt=""><figcaption></figcaption></figure>

### Step 6.

Start the OBS Virtual Camera, located under the Start Recording button.

<div align="left"><figure><img src="https://lh3.googleusercontent.com/zOShyv0F0uvhQ3PlI7mjCe8C6vZsGRUpq2mhFEuZzl8wGUvFkz1od6wYtSHsoPR8aXlG-oRHI9MTlFiOoouvJUtl0Bs96SrOwnug9MpuyYUE9sYJTAsJPAByYwG4we-cMenOQ79DBf_PO233sg" alt=""><figcaption></figcaption></figure></div>

### Step 7. (optional)

We will now configure OBS to output audio from the Browser Source to the Virtual Audio Cable. In the OBS settings, under Advanced, we select the Monitoring Device to be our Virtual Audio device (CABLE Input).

We also want to disable Windows audio ducking.

![](https://lh6.googleusercontent.com/JVL8m6M4M3r3VUBKbas9-7plk2hiozPz9q4ZkooARU639q2j9JHZjzqJrFv8V9znfe9uybgDJCdcdJ1hN-N0HzDTZxS2bQH3K2hpIqq5DmmFRDpdW180ILVL2C11OFzbQX11xRWEH-U150YPuQ)

### Step 8. (optional)

In our last configuration step, we want to go into the Advanced Audio Properties in OBS. When there, we want to set the audio sources we want to output so their Audio Monitoring setting is set to Monitor and Output.

If you intend to feed audio from OBS back into a VDO.Ninja group call, you can use this step to also mix-minus the audio by selecting just the audio sources you want the remote guests to hear, excluding their own audio to prevent echo.

<div align="left"><figure><img src="https://lh5.googleusercontent.com/qQGwkh0oeKLgaBcz24L79Zv7UiDZ2igWYYEkkVgiQZXjQ_Q95qBuFMl5-e2XMc-uZLzvQECYpBGNXS_n3_qlyS9IDHBCV3aCDkllplh519Q4pI4rs738Vcgryc4t2axygQYGzqO-BAEeFcCdWg" alt=""><figcaption></figcaption></figure></div>

<figure><img src="https://lh3.googleusercontent.com/Y0KGvcDsbj-X4KP0S8HQNGo3IbPvRSr7XYlqK4Yoj916XFLZXWeAcYNKJUFQzA2APuSaWfiBPhyjzjcXX1JnLr2LIR3CztDYeatNEoPtYj4minUkIXf1HhVDjYZW1jLZFmwt8146pU-gAu0yGQ" alt=""><figcaption></figcaption></figure>

### Step 9.

We're ready to go. Using this setup in VDO.Ninja, Zoom, Google Meet, or similar apps is just like selecting a second webcam and microphone.

If you are already in the call, you can switch between your webcam and the virtual camera in the application settings.

It is important to remember that you need to select the VB-Audio Virtual Cable in the call as well if you also want to share the audio from it.

If publishing to VDO.Ninja, remember that you can select multiple audio sources in VDO.Ninja by holding down CTRL (or Command) when selecting them. You could include the VB Audio Cable and your local microphone together, for example.

<div align="left"><figure><img src="https://lh6.googleusercontent.com/u8qy24hWB8gqCObTfmZXoNQJebutm08SzyjuYRaN55oaIzK3mb0igE22QZymMVqdQiZbMDHUyzk45_V0enlCzLiOnWEJCMvVEz8NfHB6eshVmB3AKBGecgJZQiBnjayAGEnx5Tr6EA5TpvNkLA" alt=""><figcaption></figcaption></figure></div>

<div align="left"><figure><img src="https://lh5.googleusercontent.com/uVrtV18j6fyGt6DS9-iKmvp5-k8ps-6hICvB1wdJEZyIoM-I6CVtRnT5VGS72Q1pTygzH7iWbBzuAXyTIC18PbkH_Hb9jf0DROj0tnrGbbVz-JE8vUcu4B5RJv6ZpgutwhvP4Be5N6b8XWnVMQ" alt=""><figcaption></figcaption></figure></div>

### All done!

And that should be it. You can switch between the webcam and the OBS live video as needed.

If you need to increase the video quality from the defaults, all of that is covered in the next section linked below:

{% content-ref url="/pages/-MZfz0Nym0yxXMKxlf2M" %}
[How to control bitrate/quality](/guides/how-do-i-control-bitrate-quality)
{% endcontent-ref %}

## Related

If your physical webcam is also needed directly in OBS, VDO.Ninja, Chrome, or the video-call app, see [Camera already in use by OBS or VDO.Ninja](/common-errors-and-known-issues/cant-load-camera-both-in-obs-and-vdon).


# How to capture without browser sources

Capture VDO.Ninja feeds without OBS browser sources using Electron Capture, Vingester, NDI, and virtual camera workflows.

### Vingester.app

Vingester.app can let you do VDO.Ninja to NDI. It uses a browser window and can be used to export a copy of the window to FFmpeg, NDI, or make the source available for window-capture. It is a bit heavy on CPU usage, but on a dedicated computer, it works quite well for hosting a few NDI streams.

<https://github.com/steveseguin/vingester>

### Electron Capture

Electron Capture is the officially supported tool for doing window capture of VDO.Ninja. It's very light weight and has quite a few command line options to batch start several windows at a time, along with support for hotkeys and other nifty VDO.Ninja specific tasks.

<https://github.com/steveseguin/electroncapture>

If using Electron Capture on Windows, you can currently do `Win+Tab` to switch between virtual desktops --- and sometimes this lets you can put all the VDO.Ninja windows in one desktop, and have a second desktop for vMix etc. It works with some windows setups, and in others, might just show black videos when trying to capture.

### Virtual Cameras and Virtual Audio devices

While this approach will still use a browser source, you can ingest VDO.Ninja into a browser source for an app like OBS Studio, or even something paid like ManyCam, and then export the captured video stream via their Virtual Camera features into another app that supports webcam / video input devices.

Audio can be exported directly via VDO.Ninja into a virtual audio device, either their the [`&audiooutput`](/advanced-settings/setup-parameters/and-audiooutput) feature, or from even the right-click context menu, where you can specify which audio output device an audio stream should be played into it. If a virtual audio cable is selected as the output destination, you can then bring that virtual audio cable into any audio application as a raw audio stream, as if it was a microphone or line-in source.

### WHEP / WHIP

There's also WHEP/WHIP output from VDO.Ninja, which is relatively a new technology/feature, and so not quite a replacement for browser sources. That said, OBS Studio is starting to support this ingestion approach, along with GStreamer, many WebRTC CDN servers and services, and perhaps over the coming years something like vMix will adopt this new technology as well. Please provide feedback and requests if using WHIP/WHEP, so i can continue to improve it.

<https://vdo.ninja/whip>

### Raspberry.Ninja

There's also Raspberry.Ninja (<https://github.com/steveseguin/raspberry_ninja>), which supports saving raw VDO.Ninja media streams to disk. While there is a bug that's blocking things from working soothingly, can technically use it to pull raw video sources from VDO.Ninja and push to not just disk, but even NDI, system sockets/pipes, RTSP servers, and much more.

While Raspberry.Ninja need more time to cook when it comes to video ingestion, it is more capable than using WHEP/WHIP alone, and supports the data-channel transport protocol, allow for dynamic settings to be applied and meta information to be transmitted, such as tally-light indicators.

### Third parties

There are some third parties that have integrated with VDO.Ninja already, which are able to pull from VDO.Ninja and make the streams available as RTSP sources or such, but I do not have access to their code sources and so cannot promote their paid services here, but you can perhaps search around to find them online.


# How to control bitrate/quality

Control VDO.Ninja bitrate and video quality using URL parameters for resolution, frame rate, and room bandwidth.

<figure><img src="/files/zsfGcLcg3HioPwBzbEae" alt="Infographic explaining how Chrome WebRTC adapts video quality by changing bitrate, resolution, and frame rate as network conditions change"><figcaption><p>WebRTC automatically ramps quality up and down. URL parameters can set targets or limits, but the browser still reacts to the live network.</p></figcaption></figure>

## Video Bitrate

The bitrate controls are accessible via a URL parameter that can be added to the VIEW link.

Something like [https://vdo.ninja/?view=yyyyy\&bitrate=10000 ](https://vdo.ninja/?view=yyyyy\&bitrate=10000)will let the viewer request set a 10-mbps bitrate; up to around 20000-kbps is reasonable, but higher is possible in situations. The value is in kilobits per second and the default bitrate is 2500-kbps.

The viewer sets the bitrate generally, although you can set maximum allowed bitrates as the publisher of a stream. See the advanced settings in the wiki for more help here; there are many options available.

When in a group room, the guests will generally get a very low-quality preview of the stream. This can be changed with the [`&totalroombitrate`](/advanced-settings/video-bitrate-parameters/and-totalscenebitrate/totalroombitrate) parameter or via the room's director settings menu. The higher the room bitrate however, the more CPU and Network load will be placed on those in the room.

When dealing with a group scene link, you can use [`&bitrate`](/advanced-settings/video-bitrate-parameters/bitrate) as normal, or `&totalbitrate`. There are many [other ways to control bitrates](#more-details), in both rooms and push links, with these being the standard options.

## Resolution

When `&quality` is omitted, VDO.Ninja selects an initial camera tier from the device type, available CPU cores, reported memory, and whether the guest is joining a room. The [`&quality`](/advanced-settings/video-parameters/and-quality) parameter overrides that choice with a non-strict resolution preset: `&quality=0` targets 1920x1080, `&quality=1` targets 1280x720, and `&quality=2` targets 640x360. The actual frame rate remains device- and browser-dependent unless a frame-rate parameter is also used.

You can manually set the video resolution via the URL, using `&width=1920&height=1080`, and this might be helpful when dealing with non-standard aspect-ratios.

{% hint style="info" %}
If using the OBS Virtual Camera as a source, be sure to activate it in OBS before trying to access it with VDO.Ninja with non-standard resolutions set.
{% endhint %}

The resolution can also be set on the viewer-side via the `&scale=100` parameter. This scales down the resolution, as a percentage, based on the original camera capture resolution.

By default, VDO.Ninja will try to optimize and scale down the incoming resolution to fit the viewer's window size, but sometimes you might want to disable this. Adding `&scale=100` to the view link can achieve that, as it forces 100% scale, or no scaling in other words.

VDO.Ninja may still scale the video down however, although only if the connection between the two peers is having network issues, if the sender's encoder is having issues, or if the set bitrate is too low to sustain the higher resolution.

## Audio

You can improve audio quality in the same way, by increasing the [`&audiobitrate`](/advanced-settings/audio-parameters/audiobitrate), but you can get better results by just disabling noise and echo cancellation instead.

[`&proaudio`](/advanced-settings/audio-parameters/stereo) is flag that presets many audio options, which can be added to both the sender's and viewer's link to enable stereo audio with no audio processing and a very high audio bitrate set. You may need to be using headphones, especially if in a group room, if using [`&proaudio`](/advanced-settings/audio-parameters/stereo) or if disabling the echo cancellation features.

## More Details

{% content-ref url="/pages/wJQGxl0KrTeLughBKsSK" %}
[Video bitrate for push/view links](/guides/video-bitrate-for-push-view-links)
{% endcontent-ref %}

{% content-ref url="/pages/cmIArVZ1ZIIeKoPAl7As" %}
[Video bitrate in rooms](/guides/video-bitrate-in-rooms)
{% endcontent-ref %}

{% content-ref url="/pages/NmRgCa47zHu4aeeDEwDJ" %}
[Audio Filters & Bitrate](/guides/audio-filters)
{% endcontent-ref %}


# The stats panel

How to open VDO.Ninja's statistics panel, what the numbers mean, and how to use them to narrow down the cause of a quality problem.

Every VDO.Ninja video has a live statistics panel behind it. It is the fastest way to answer questions that otherwise turn into guesswork: does the evidence point to the network or the encoder, is audio being sent, and is the bitrate you asked for the bitrate you are getting.

<figure><img src="/files/xK6O2OQwSPGP8pCFEHTL" alt="The Statistics panel showing the stream ID and the Stream Info section"><figcaption><p>The stats panel on the viewing side. The header stays fixed while the list below it scrolls.</p></figcaption></figure>

## Opening it

**Ctrl + click** on any video (**Cmd + click** on macOS). Ctrl + click the same video again to close it.

There are three other ways in:

* **Right-click a video** and choose *Show Stats* from the context menu.
* **Click the connection readout** in the top-right of the header on a publishing page. That opens your own outbound stats.
* **On a phone or tablet**, tap the video five times in quick succession. Each tap has to land within half a second of the last one, and the sequence resets if you pause.

<figure><img src="/files/qZL6SMzgv81r6EB1hBDq" alt="Header readout showing connection count, audio streams, video streams and upload bitrate"><figcaption><p>The header readout on a publishing page: connections, outbound audio streams, outbound video streams, and total upload bitrate. Click it to open your stats.</p></figcaption></figure>

Press **Escape** to close the panel, or use the **✕** in its top-right corner.

## There are two different panels

Which panel you get depends on which video you clicked, and they show different things. This trips people up constantly, so it is worth being explicit:

| You clicked             | You get                                                   | It tells you                                                                    |
| ----------------------- | --------------------------------------------------------- | ------------------------------------------------------------------------------- |
| A remote guest's video  | [The viewer panel](/guides/stats-menu/viewer-stats)       | What is arriving at **your** machine, and what the sender says about themselves |
| Your own camera preview | [The publisher panel](/guides/stats-menu/publisher-stats) | What **you** are sending, broken down per connected viewer                      |

A useful consequence: if a guest looks bad to you, their publisher panel and your viewer panel describe the same connection from opposite ends. Comparing the two can separate a capture or encoder constraint from a problem on that peer-to-peer path. It cannot, by itself, prove whether packet loss occurred on the sender's uplink, the receiver's downlink, or somewhere in transit.

## Panel controls

* **Copy** puts the entire panel on your clipboard as readable text. This is what you want when asking for help — see [asking an AI to read your stats](/guides/stats-menu/llm-prompt).
* The numbers refresh every 3 seconds by default.
* Refreshing pauses while you are dragging a slider or have text selected inside the panel, so you can select and copy a single value without it disappearing.

Only one panel is open at a time. Ctrl + clicking a second video replaces the panel rather than opening another one, so to compare two guests you need to capture one with **Copy** before switching to the other.

## URL parameters

| Parameter                | Effect                                                              |
| ------------------------ | ------------------------------------------------------------------- |
| `&stats`                 | Opens the stats panel automatically as soon as a connection is made |
| `&nostats` or `&stats=0` | Disables the panel entirely, and hides it from the right-click menu |
| `&statsinterval=1000`    | Refresh interval in milliseconds. The minimum is 250                |

`&nostats` is worth knowing about for kiosk-style or public-facing scenes, since the panel exposes the machine details of whoever is on the other end.

## The 60-second triage

If you only remember one thing from this guide, remember this table. Open the panel on the **receiving** side and read four numbers.

| What you see                             | What it usually means                                                                           | Where to go next                                                                                    |
| ---------------------------------------- | ----------------------------------------------------------------------------------------------- | --------------------------------------------------------------------------------------------------- |
| **Packet Loss** above \~1%               | Network congestion or a weak link somewhere on the path                                         | [Diagnosing problems](/guides/stats-menu/troubleshooting#video-is-blocky-soft-or-keeps-freezing)    |
| **Bitrate** far below what you asked for | The sender cannot push more, or is being told not to                                            | [Diagnosing problems](/guides/stats-menu/troubleshooting#the-bitrate-is-far-lower-than-i-asked-for) |
| **Candidate type** says `relay`          | Traffic is going through a TURN relay, which may add latency or encounter relay capacity limits | [Diagnosing problems](/guides/stats-menu/troubleshooting#the-connection-is-using-a-relay)           |
| **Quality limited by** says `cpu`        | The sender's machine cannot encode fast enough                                                  | [Diagnosing problems](/guides/stats-menu/troubleshooting#cpu-is-the-bottleneck-on-the-sending-side) |

These four are useful starting points. The surrounding fields provide the context needed before treating any one reading as a diagnosis.

## What "good" looks like

For a healthy 1080p30 connection between two well-connected machines:

```
Packet Loss           0 %
Round Trip Time       under 100 ms
Candidate type        stable path; direct when available
Quality limited by    none
FPS                   within 1-2 of the sender's capture rate
Jitter Buffer Delay   under ~100 ms
Bitrate               sufficient for the desired quality
```

None of these are hard thresholds. A 200 ms round trip is completely normal between continents, and 1% packet loss on a cellular uplink may be a good result. An encoder may also stay below its target on a static or low-detail scene because it does not need the extra bits. Read the fields as a relative picture, and compare against the same stream when it *was* behaving.

## Pages in this guide

* [Reading the viewer panel](/guides/stats-menu/viewer-stats) — every field on the receiving side
* [Reading the publisher panel](/guides/stats-menu/publisher-stats) — every field on the sending side
* [Diagnosing problems](/guides/stats-menu/troubleshooting) — symptom-first recipes
* [Asking an AI to read your stats](/guides/stats-menu/llm-prompt) — a copy-paste prompt that teaches an LLM what these numbers mean

## Related reading

* [How to control bitrate/quality](/guides/how-do-i-control-bitrate-quality)
* [Stable IRL streaming](/guides/irl-streaming-stability)
* [Video bitrate for push/view links](/guides/video-bitrate-for-push-view-links)
* [Handling guest disconnects and connection recovery](/guides/handling-guest-disconnects-and-connection-recovery)
* [`&showconnections`](/advanced-settings/settings-parameters/and-showconnections) — puts the viewer count on the video itself, without opening the panel
* [`&maxconnections`](/advanced-settings/settings-parameters/and-maxconnections) — caps how many viewers a source will accept


# Reading the viewer panel

Field-by-field reference for VDO.Ninja's stats panel when you are watching someone else's stream.

This is the panel you get when you Ctrl + click a **remote** video — a guest in your room, or a stream you are viewing in OBS. It describes what is arriving at your machine.

The panel opens with `StreamID:` so you always know which stream you are looking at. That matters when several guests are on screen.

## Stream info

<figure><img src="/files/xK6O2OQwSPGP8pCFEHTL" alt="Stream Info section listing capture settings, audio processing, version, and the sender&#x27;s hardware"><figcaption><p>Stream info describes the <em>sender's</em> machine and settings, not yours.</p></figcaption></figure>

Everything in this section is **self-reported by the person sending the video**. It is not measured by you. This is the single most misread part of the panel: `CPU`, `GpGPU`, `Platform (OS)` and `Power level` all belong to the guest, not to you.

| Field                                                | Meaning                                                                                                                                                                                                                                                   |
| ---------------------------------------------------- | --------------------------------------------------------------------------------------------------------------------------------------------------------------------------------------------------------------------------------------------------------- |
| `Video init width` / `height` / `frameRate`          | What the sender asked their camera for. Not necessarily what is being sent right now — compare against `Resolution` under Video track                                                                                                                     |
| `Quality (URL)`                                      | The sender's `&quality` setting                                                                                                                                                                                                                           |
| `Echo-Cancellation`, `Auto-Gain (agc)`, `De-noising` | The sender's audio processing. `default` means they did not override it and the browser decides — which is not the same as "off"                                                                                                                          |
| `Pro-Audio (Stereo-mode)`                            | Only appears if the sender used `&stereo`. Higher-fidelity audio modes usually need headphones at both ends                                                                                                                                               |
| `VDO.Ninja Version`                                  | The sender's version. Mismatched versions are worth noting when something behaves oddly                                                                                                                                                                   |
| `User agent`, `Platform (OS)`, `Browser`             | The sender's browser and OS. Click the user agent to copy it                                                                                                                                                                                              |
| `GpGPU`, `CPU`                                       | The sender's graphics adapter and core count. Limited hardware can help explain encoder trouble, but these fields do not measure current load                                                                                                             |
| `Power level`, `Plugged in`                          | The sender's reported battery state. A low battery, low-power mode, or thermal pressure may reduce performance, but the percentage alone does not prove throttling                                                                                        |
| `Quality limited by`                                 | Why the browser says the sender's encoder is limiting resolution or frame rate: `none`, `bandwidth`, `cpu`, or `other`                                                                                                                                    |
| `Total outbound p2p connections`                     | How many viewers the sender currently has, updated within a few seconds of anyone joining or leaving. The same count can be shown as a 🔗 badge on the video itself with [`&showconnections`](/advanced-settings/settings-parameters/and-showconnections) |

`Quality limited by` is one of the highest-value fields in this section. If a guest looks soft and it says `cpu`, raising the bitrate on your side is unlikely to fix it.

## Peer-to-peer connection

<figure><img src="/files/upOVJdJlg0AlrSnu6d36" alt="Peer-to-peer connection section showing round trip time, candidate types, time active and total received bitrate"><figcaption><p>The transport between you and the sender.</p></figcaption></figure>

This section describes the network path itself, measured by your machine.

| Field                     | Meaning                                           | What to look for                                                                                                                                 |
| ------------------------- | ------------------------------------------------- | ------------------------------------------------------------------------------------------------------------------------------------------------ |
| `Round Trip Time`         | Network latency there and back                    | Stable is more important than low. A number that swings around indicates a congested path                                                        |
| `Candidate type - Local`  | The candidate used at **your** end                | `host` = a local interface candidate. `srflx` = a public NAT mapping discovered through STUN. `relay` = a TURN allocation                        |
| `Candidate type - Remote` | The candidate used at **their** end               | Interpret it together with the local candidate. A selected pair containing `relay` is using TURN; `host` on both ends often indicates a LAN path |
| `Local network type`      | Your interface type where the browser exposes it  | Often `unknown`; Chrome hides this for privacy                                                                                                   |
| `Time active`             | How long this connection has been up              | Resets on reconnect. A number that keeps resetting means the connection is flapping                                                              |
| `Total received`          | Total inbound bitrate on this connection          | Includes every track plus protocol overhead, so it reads slightly higher than the per-track bitrates added together                              |
| `Requested resolution`    | The size your viewer has asked the sender to send | In **device pixels**, so on a HiDPI screen it will look larger than your window. `~` means the request was snapped to a nearby standard size     |

`Requested resolution` surprises people. VDO.Ninja asks for the resolution that matches how large the video is actually drawn on your display, multiplied by your device pixel ratio. A small video in a grid genuinely does request a small resolution — that is the bandwidth optimisation working as intended. See [`&scale`](/advanced-settings/video-parameters/scale) if you need to override it.

## Audio track and Video track

<figure><img src="/files/187oglTZOoi5ohN8mELu" alt="Audio track and Video track sections showing bitrate, jitter buffer, codec, packet loss and NACKs"><figcaption><p>One section per incoming track. If a section is missing, that track is not being received at all.</p></figcaption></figure>

Each incoming track gets its own section. **A missing section is itself a diagnosis**: if there is no *Audio track* section, no audio is arriving, and the problem is at the sender or in the negotiation — not in your speakers.

| Field                       | Applies to | Meaning                                                                                                                                                                  |
| --------------------------- | ---------- | ------------------------------------------------------------------------------------------------------------------------------------------------------------------------ |
| `Bitrate`                   | both       | Actual received bitrate for this track. A ⚠️ appears here if it drops to zero while the track still exists                                                               |
| `FPS`                       | video      | Frames per second actually being decoded                                                                                                                                 |
| `Resolution`                | video      | The size actually arriving. Compare to `Requested resolution` above and to the sender's `Video init width/height`                                                        |
| `Jitter Buffer Delay`       | both       | How much delay the receiver is adding to smooth out uneven arrival. A rising value can warn that packets are arriving unevenly, even when the current loss sample is low |
| `Audio Level`               | audio      | Current loudness, 0 to 1. If this sits at exactly 0 while bitrate is healthy, the sender is transmitting silence                                                         |
| `ClockRate`                 | audio      | Sample rate and channel count, e.g. `48000 / 2`                                                                                                                          |
| `Codec`                     | both       | The negotiated codec. `opus, /w fec` means forward error correction is active on audio                                                                                   |
| `Packet Loss`               | both       | Percentage of packets that never arrived                                                                                                                                 |
| `Keyframes requested (PLI)` | video      | How many times your end has asked for a fresh keyframe. Climbing steadily means your decoder keeps losing sync                                                           |
| `NACKs sent`                | video      | How many times your end asked for a specific lost packet to be resent                                                                                                    |
| `Type`                      | both       | Which kind of track this is                                                                                                                                              |

### How these interact

Packet loss, NACKs and PLIs often interact:

1. A missing or late packet can cause your end to send a **NACK** asking for it again.
2. If the decoder cannot continue from the frames it has, it can request a fresh **keyframe (PLI)**.
3. A keyframe is usually larger than a delta frame, so it can briefly increase bandwidth.

A burst of loss can therefore produce NACKs followed by a PLI and the familiar "freeze, then snap back into focus" artefact. A PLI is not proof of packet loss, though: startup, decoder resets, layer changes and renegotiation can also request a keyframe. Look for sustained counter growth alongside the visible symptom.

## Extra rows you may see

These only appear in specific configurations:

| Field                                                                         | When                                                                                                                                                                                                                                                                                                                                                        |
| ----------------------------------------------------------------------------- | ----------------------------------------------------------------------------------------------------------------------------------------------------------------------------------------------------------------------------------------------------------------------------------------------------------------------------------------------------------- |
| `Added Buffer Delay`, `Total Playout Delay`                                   | You are using [`&buffer`](/advanced-settings/video-parameters/buffer) or [`&bufferaudio`](https://github.com/steveseguin/vdo.ninja/tree/gitbook/advanced-settings/audio-parameters/and-bufferaudio.md). `Total Playout Delay` is network latency plus jitter buffer plus any buffer you added — but it does not include Bluetooth, monitor or capture delay |
| `Video Buffer: Target / Current`, `Audio Buffer`, `Video Repairs: FEC / NACK` | The stream is in chunked mode. `(rebuffering)` in red means playback has stalled while it refills                                                                                                                                                                                                                                                           |
| `Candidate type` showing `💸 relay server`                                    | A TURN relay is carrying the traffic. See [relay connections](/guides/stats-menu/troubleshooting#the-connection-is-using-a-relay)                                                                                                                                                                                                                           |
| `⚠️ You're blocking` / `⚠️ They're blocking`                                  | A browser or system setting is preventing a direct peer-to-peer connection at that end                                                                                                                                                                                                                                                                      |
| A map with coordinates                                                        | The sender is sharing location data                                                                                                                                                                                                                                                                                                                         |

## Next

* [Reading the publisher panel](/guides/stats-menu/publisher-stats) — the other end of the same connection
* [Diagnosing problems](/guides/stats-menu/troubleshooting) — what to actually do about these numbers


# Reading the publisher panel

Field-by-field reference for VDO.Ninja's stats panel when you are the one sending video, including the per-viewer breakdown.

This is the panel you get when you Ctrl + click **your own camera preview**, or click the connection readout in the page header. It describes what you are sending.

The key structural difference from the viewer panel: the publisher panel repeats a **whole block per connected viewer**. In ordinary peer-to-peer use, each viewer has a separate connection and can be limited differently.

## The top block

<figure><img src="/files/azTypzprZLw8jeR0fSOj" alt="Publisher stats panel showing stream ID, mic level, connection counts, capture settings and the first viewer heading"><figcaption><p>Session-wide information, then the first viewer's block.</p></figcaption></figure>

| Field                  | Meaning                                                                                                                                                                |
| ---------------------- | ---------------------------------------------------------------------------------------------------------------------------------------------------------------------- |
| `StreamID`             | Your own stream ID. Screen shares append `:s`                                                                                                                          |
| `Mic level (sent)`     | The audio level actually reaching the encoder, 0 to 1. **If this stays at 0 while you speak, your viewers receive silence**, regardless of what your local meter shows |
| `Inbound connections`  | How many streams you are receiving                                                                                                                                     |
| `Outbound connections` | How many viewers are pulling from you                                                                                                                                  |
| `Capture settings`     | What your camera is actually producing, e.g. `1280x720 @ 30fps`. Compare this to the `Resolution` in each viewer block                                                 |

`Mic level (sent)` is measured after VDO.Ninja's audio pipeline, so it catches the whole class of problems where the meter in the UI looks fine but nothing is being transmitted — wrong device selected, a virtual cable with no input, or a gate closing.

**Send Keyframe to Viewers** forces a fresh keyframe to everyone. Useful when a viewer or OBS is showing a corrupted or frozen frame but the connection is otherwise healthy.

## One block per viewer

Each connected viewer gets a heading — their `&label` if they set one, otherwise a short identifier — followed by their machine details and then the stats for *your connection to them specifically*.

<figure><img src="/files/LZRpyovVMt72TuAdVXWF" alt="Per-viewer connection stats including bitrates, quality limitation, resolution and the bitrate slider"><figcaption><p>The per-viewer block, ending with the bitrate slider and the start of the next viewer's block.</p></figcaption></figure>

### Remote Peer Info

The viewer's self-reported details: `CPU`, `GpGPU`, `Platform (OS)`, `User agent`, `VDO.Ninja Version`, and their `Label` highlighted in pink. These are useful context when a problem may be specific to one viewer, but they do not measure the viewer's current CPU or GPU load.

### Your connection to that viewer

| Field                                                       | Meaning                                                                    | What to look for                                                                                                                                                                   |
| ----------------------------------------------------------- | -------------------------------------------------------------------------- | ---------------------------------------------------------------------------------------------------------------------------------------------------------------------------------- |
| `Video bitrate`                                             | What you are sending them for video                                        | Compare to your intended target                                                                                                                                                    |
| `Audio bitrate`                                             | What you are sending them for audio                                        | A ⚠️ appears at 0. If it remains there while you speak, no audio data is reaching that viewer                                                                                      |
| `Total sending bitrate`                                     | Everything on this connection including overhead and retransmissions       | Should be a little above video + audio                                                                                                                                             |
| `Available outgoing bitrate`                                | The congestion controller's estimate of what this path can currently carry | If this stays close to the actual bitrate while `Quality limited by` says `bandwidth`, the path is probably congestion-limited. It is an estimate, not a measured physical ceiling |
| `Quality limited by`                                        | Why the browser is limiting resolution or frame rate                       | `none`, `bandwidth`, `cpu`, or `other`                                                                                                                                             |
| `Resolution`                                                | What you are actually encoding for this viewer, with fps                   | Often lower than your capture settings — that is `Scale factor` at work                                                                                                            |
| `Scale factor`                                              | How much the frame is being downscaled for this viewer                     | `100%` means full size                                                                                                                                                             |
| `Average round trip time`                                   | Latency to that viewer                                                     |                                                                                                                                                                                    |
| `NACKs per second`                                          | How often that viewer is asking you to resend lost packets                 | Sustained non-zero means loss on the path to them                                                                                                                                  |
| `Retransmitted`                                             | Bandwidth being spent resending lost packets                               | Large values mean you are paying twice for the same data                                                                                                                           |
| `Keyframes encoded`                                         | Total keyframes produced                                                   |                                                                                                                                                                                    |
| `Keyframe requests (PLI)`                                   | How many times that viewer asked for a fresh keyframe                      | Climbing means they keep losing sync                                                                                                                                               |
| `Candidate type - Local` / `Remote`                         | How this connection was established                                        | `relay` on either side means TURN is carrying it                                                                                                                                   |
| `Audio codec`, `Video codec`, `Audio clock rate / channels` | What was negotiated                                                        |                                                                                                                                                                                    |

Because each viewer has their own block, you can compare paths. If one viewer shows `bandwidth` and heavy NACKs while three others are clean, the problem is specific to that viewer's end-to-end path; it does not prove which segment of that path is responsible.

If every viewer shows `bandwidth` at once, a shared sender-side constraint such as the publisher's uplink becomes more likely.

### Controls in each block

* **Trigger an ICE restart** renegotiates the network path for that one viewer. Worth trying when a connection has degraded but not dropped — for example after a network change.
* **Disconnect this viewer** appears only when you are running with access approval — [`&prompt`](/advanced-settings/settings-parameters/and-prompt), `&validate` or `&approve`.
* **Adjust video bitrate** is a live slider for that viewer's target bitrate. It appears by default outside group rooms; `&slider` or `&showslider` also exposes it in rooms. Dragging it applies on release.

You may also see `max bandwidth target`, `init bitrate target` and `current bitrate target` when those have been set by URL parameters. Clicking `init bitrate target` prompts you for a new value.

## Reliability counters

<figure><img src="/files/GuCqgJVTtP2TA5BXb5cK" alt="Reliability counters section listing internal recovery counters, most reading zero"><figcaption><p>Internal recovery counters, at the bottom of the panel.</p></figcaption></figure>

The last section is internal telemetry about VDO.Ninja's own connection-recovery machinery. In normal operation almost all of it reads `0`, and you can ignore it.

It becomes useful in two situations: when you are chasing an intermittent fault, and when someone helping you asks for it.

| Counter                              | Meaning if it is climbing                                                                 |
| ------------------------------------ | ----------------------------------------------------------------------------------------- |
| `Peer recovery attempts`             | Connections are being rebuilt repeatedly — the session is unstable                        |
| `Media stall restarts`               | Media stopped flowing and had to be kicked back into life                                 |
| `Relay escalations`                  | Direct connections failed and traffic was pushed onto TURN                                |
| `Connecting watchdog fired`          | Connections are timing out during setup                                                   |
| `Ice candidate errors`               | Some candidates failed to gather. A non-zero count here is common and harmless on its own |
| `Audio repair attempts` / `failures` | The audio track needed intervention to keep running                                       |

A handful of `Ice candidate error 701` entries is normal and does not indicate a problem. Sustained growth in `Peer recovery attempts` or `Media stall restarts` during a session does.

## Next

* [Reading the viewer panel](/guides/stats-menu/viewer-stats) — the other end of the same connection
* [Diagnosing problems](/guides/stats-menu/troubleshooting) — symptom-first recipes


# Diagnosing problems with the stats panel

Symptom-first recipes for using VDO.Ninja's stats panel to find the real cause of quality, audio, and connection problems.

Each section below starts from something you can actually observe, tells you which numbers to read, and says what to change. Open the panel on **both** ends where you can — most wrong diagnoses come from looking at only one side.

## Video is blocky, soft, or keeps freezing

**Read, on the receiving side:** `Packet Loss`, `NACKs sent`, `Keyframes requested (PLI)`, `Jitter Buffer Delay`.

| Reading                                           | Diagnosis                                                                                                 | Action                                                                                             |
| ------------------------------------------------- | --------------------------------------------------------------------------------------------------------- | -------------------------------------------------------------------------------------------------- |
| Current loss sample 0%, PLI climbing              | The decoder keeps requesting refreshes. Earlier loss bursts, decoder resets or layer changes are possible | Have the sender press **Send Keyframe to Viewers** once, then watch whether PLI continues climbing |
| Loss under 1%, occasional NACKs                   | Retransmission is probably recovering isolated missing or reordered packets                               | Monitor it; investigate if the counters keep climbing alongside visible freezes                    |
| Loss 1–5%, PLIs climbing                          | The path is degraded and retransmission may not be keeping up                                             | Lower the bitrate, add `&buffer=500`, or reduce resolution or frame rate                           |
| Loss above 5%                                     | The path is dropping a substantial part of the stream                                                     | Drop to a much lower profile — see [stable IRL streaming](/guides/irl-streaming-stability)         |
| Current loss sample 0% but jitter buffer climbing | Packets are arriving unevenly even though this sample shows little or no loss                             | Check for an overloaded or wireless network; try a wired connection or add buffer                  |

The counter-intuitive one: **raising the bitrate when you have packet loss makes it worse.** More data on a path that is already dropping packets means more retransmissions, more keyframes, and more loss. If loss is high, go down, not up.

## The bitrate is far lower than I asked for

**Read, on the sending side:** `Available outgoing bitrate`, `Quality limited by`, `Scale factor`.

The order to check:

1. **`Quality limited by` says `bandwidth`** — compare `Video bitrate` to `Available outgoing bitrate`. If they remain close, the congestion controller currently believes that path is at its safe limit. A higher target is unlikely to help.
2. **`Quality limited by` says `cpu`** — see [CPU is the bottleneck on the sending side](#cpu-is-the-bottleneck-on-the-sending-side) below.
3. **`Quality limited by` says `none` but the bitrate is still low** — the browser is not currently limiting resolution or frame rate. Check your `&videobitrate` / `&maxvideobitrate` settings, the room's bitrate rules, and whether a static or low-detail scene simply needs fewer bits.
4. **`Scale factor` is below 100%** — the frame is being downscaled. In VDO.Ninja this is usually deliberate: the viewer requested a smaller size because the video is drawn small on their screen.

Then check the receiving side: if the viewer's `Requested resolution` is small, the sender is being asked for a small stream and is doing exactly what it was told. That is the bandwidth optimisation working, not a fault. Use `&scale` on the view link if you need to force it larger.

See [how to control bitrate/quality](/guides/how-do-i-control-bitrate-quality) for the parameters themselves.

## Nobody can hear me, or a guest has no audio

This is where the panel saves the most time, because it splits one vague symptom into four distinct causes.

**On the sending side**, read `Mic level (sent)` and `Audio bitrate`:

| Reading                                                      | Cause                                                                                                               |
| ------------------------------------------------------------ | ------------------------------------------------------------------------------------------------------------------- |
| `Mic level (sent)` stays at 0 while speaking                 | The microphone pipeline is producing silence. Check the selected device, OS mute, gate, and any virtual cable input |
| `Mic level (sent)` is healthy, `Audio bitrate` stays at 0 ⚠️ | Audio is being captured but no audio data is reaching that viewer                                                   |
| Both healthy                                                 | You are sending audio correctly. The problem is on the receiving end                                                |
| No `Audio bitrate` row at all for a viewer                   | No audio track was negotiated with them — check whether that viewer used `&noaudio`                                 |

<figure><img src="/files/bdjpdpYAMQ2Iru0usswD" alt="Publisher panel showing Audio bitrate flagged with a warning triangle at 0 kbps"><figcaption><p>A ⚠️ next to a bitrate means the track exists but nothing is moving through it. Hover it for the explanation.</p></figcaption></figure>

**On the receiving side**, look for the *Audio track* section:

* **No Audio track section at all** — nothing is arriving. Go back to the sender.
* **Section present, `Bitrate` healthy, `Audio Level` at 0** — the sender is transmitting silence.
* **Section present, `Audio Level` moving** — audio is arriving fine and the problem is local: output device, browser volume, or the stream being muted in your scene.

## The connection is using a relay

**Read:** `Candidate type - Local` and `Candidate type - Remote`, on either side.

`relay` (shown as `💸 relay server`) means the selected path is being carried through a TURN server. It can add latency, consume relay capacity and incur hosting cost. A relay is not automatically faulty, and it does not imply a particular fixed bitrate ceiling.

If you also see `⚠️ You're blocking` or `⚠️ They're blocking`, a browser or system setting at that end is actively preventing direct connections — often a VPN, a privacy extension, or a corporate network policy.

What to try, in order:

1. Disable VPNs and WebRTC-blocking browser extensions at both ends.
2. Get at least one end off a restrictive network (mobile hotspot is a quick test).
3. If relay is unavoidable and the stats show congestion, try a lower bitrate target; relays are shared infrastructure and can have capacity or policy limits.

`host` means a host/interface candidate and `srflx` means a public NAT mapping discovered through STUN. A host-host pair often indicates a LAN path, while a pair using `srflx` can connect directly across the internet without TURN.

## CPU is the bottleneck on the sending side

**Read:** `Quality limited by` = `cpu`, plus `CPU`, `GpGPU` and `Power level` in the sender's info.

The encoder cannot keep up. Raising the bitrate will not help. In rough order of effectiveness:

1. Lower the frame rate and/or resolution. Frame rate is often the first trade-off for motion-heavy video; resolution may matter more when fine detail is unnecessary.
2. Switch codec. H.264 usually has hardware encoding available where VP8/VP9 do not. See [hardware-accelerated video encoding](/guides/hardware-accelerated-video-encoding).
3. Reduce the number of viewers pulling directly from that sender. Every viewer is a separate encode.
4. Close other applications, and check `Power level` — battery-saving or thermal modes may reduce performance.

For phone guests, also check `Plugged in`. A hot phone or one in low-power mode may throttle, but the battery percentage alone does not establish that it has.

## The connection keeps dropping and re-establishing

**Read:** `Time active` on the receiving side, and the `Reliability counters` on the sending side.

`Time active` resetting to zero repeatedly is the clearest signal that the connection is flapping rather than merely degraded. On the sending side, watch whether `Peer recovery attempts` and `Media stall restarts` climb during the session.

If they do, the network path is unstable rather than merely slow. `&autorecover` and a lower, more conservative bitrate profile will do more than any quality setting. See [handling guest disconnects](/guides/handling-guest-disconnects-and-connection-recovery).

## Video is fine but badly out of sync with audio

**Read:** `Jitter Buffer Delay` on both tracks, and `Total Playout Delay` if you are using `&buffer`.

Audio and video have independent jitter buffers, and a large gap between the two is the usual cause of drift. [`&buffer`](/advanced-settings/video-parameters/buffer) on the viewer sets a target playout delay for both tracks, which trades a little latency for sync. If audio specifically needs a different target, [`&bufferaudio`](https://github.com/steveseguin/vdo.ninja/tree/gitbook/advanced-settings/audio-parameters/and-bufferaudio.md) overrides it for the audio track alone.

Note that `Total Playout Delay` does **not** include Bluetooth headphone latency, monitor delay, or capture-card delay. If the numbers look right and it still sounds wrong, suspect the hardware after the browser.

## What to do when none of this helps

Use the **Copy** button and share the output. Capture both panels if you can: comparing sender and receiver often narrows the problem, even when it cannot identify the exact network segment at fault.

* [Asking an AI to read your stats](/guides/stats-menu/llm-prompt) — a prompt that gives an LLM the context to interpret the dump
* The [VDO.Ninja Discord](https://discord.vdo.ninja) — include both stats dumps and your full URLs, with any sensitive parts redacted


# Asking an AI to read your stats

A copy-paste prompt that teaches Claude, ChatGPT or any other LLM what VDO.Ninja's stats fields mean, so it can troubleshoot your stream properly.

Pasting a raw stats dump into an LLM usually produces confident nonsense. The field names look like generic WebRTC statistics but several of them are VDO.Ninja-specific, and a few mean close to the opposite of what a model will assume — most importantly, that raising the bitrate is the wrong response to packet loss.

The prompt below supplies that missing context. Paste it, then paste your stats underneath.

## Before you paste: redact these

The **Copy** button captures the panel exactly as shown, which can include:

* **IP addresses** — `Local relay IP` and `Remote relay IP` appear when the connection is going through a TURN relay.
* **Machine fingerprints** — user agent, GPU model, CPU core count, for both you and the person at the other end.
* **Guest labels** — real names, if that is what you use for `&label`.
* **Your stream IDs** — anyone with a stream ID can attempt to view or push to it, unless you are using a password.

Replace anything sensitive with `REDACTED` before sharing. The diagnosis does not depend on any of it.

## The prompt

```
You are helping me troubleshoot a live video stream sent with VDO.Ninja, a
peer-to-peer WebRTC streaming tool. I am going to paste the contents of its
statistics panel. Read it using the following context.

WHICH PANEL IS THIS
There are two panels and they mean different things:
- A VIEWER panel starts with "StreamID:" followed by a "Stream info" section.
  It describes what is ARRIVING at the person who captured it. Critically, the
  "Stream info" section is self-reported by the REMOTE SENDER: the CPU, GPU,
  OS, browser and battery listed there belong to the sender, not the person
  who captured the dump.
- A PUBLISHER panel lists "Outbound connections" and then repeats a block per
  connected viewer, each headed "Viewer: <name>". It describes what is BEING
  SENT. Each viewer block is a separate encode with its own limits.
If both panels are pasted, they are the two ends of the same connection and
should be cross-referenced rather than analysed separately.

FIELD MEANINGS
- Packet Loss: the panel's current loss sample. Under 1% is often fine, but a
  low current sample does not rule out an earlier burst.
- NACKs sent / NACKs per second: requests to resend a lost packet. Some is
  normal; sustained growth usually means missing or reordered packets.
- Keyframes requested (PLI): the receiver asked for a full refresh because
  its decoder needed one. Loss can cause this, but startup, decoder resets,
  layer changes and renegotiation can as well. Correlate sustained growth with
  NACKs, loss and visible freezes rather than treating PLI as proof of loss.
- Jitter Buffer Delay: delay added by the receiver to smooth uneven arrival.
  A rising value means arrival is becoming less even; a zero current loss
  sample does not prove that no earlier packets were lost.
- Round Trip Time: network latency. Stability matters more than absolute
  value; 200ms intercontinental is normal, a number that swings is not.
- Candidate type (Local and Remote): "host" = a host/interface candidate,
  "srflx" = a public NAT mapping discovered through STUN, and "relay" = a TURN
  allocation. Interpret the selected pair together. A pair containing relay
  uses TURN; host on both ends often indicates a LAN path.
- Available outgoing bitrate: what the congestion controller believes the
  selected path can currently carry. It is an estimate, not proof of the
  physical upload ceiling.
- Quality limited by: why the encoder is holding back. Values: none,
  bandwidth, cpu, other. "none" means the browser is not currently limiting
  resolution or frame rate; it does not promise that bitrate will hit a target.
- Scale factor / Requested resolution: VDO.Ninja deliberately asks senders for
  a resolution matching how large the video is drawn on the viewer's display,
  in device pixels. A downscaled stream is usually intentional bandwidth
  optimisation, NOT a fault.
- Mic level (sent): audio level reaching the encoder, 0 to 1. If it stays at
  zero while the sender speaks, the microphone pipeline is producing silence.
- Audio Level: received audio loudness, 0 to 1.
- Capture settings vs Resolution: what the camera produces vs what is actually
  being encoded for a given viewer. They differ when scaling is applied.
- Video init width/height/frameRate: what the SENDER asked their camera for,
  not what is currently being sent.
- A missing "Audio track" or "Video track" section means that track is not
  being received at all. Absence is a finding, not missing data.
- A "⚠️" next to a bitrate means the track exists but nothing is flowing.
- Reliability counters: internal recovery telemetry. Almost all zero is
  normal. A few "Ice candidate error 701" entries are harmless. Sustained
  growth in "Peer recovery attempts" or "Media stall restarts" indicates an
  unstable connection rather than a merely slow one.

INTERPRETATION RULES
1. Raising the bitrate is the WRONG response to packet loss. More data on a
   lossy path causes more retransmission and more loss. Recommend lowering
   bitrate, resolution or framerate instead.
2. When "Quality limited by" is cpu, raising bitrate will not help. Reducing
   frame rate and/or resolution reduces encoder work. Switching to H.264 often
   enables hardware encoding.
3. When "Quality limited by" is bandwidth AND video bitrate is close to
   available outgoing bitrate, the path is probably congestion-limited and a
   higher target is unlikely to help.
4. If several viewers show problems but one does not, the problem is on the
   affected viewers' end-to-end paths rather than a universal sender limit.
   If all viewers show the same limit simultaneously, investigate shared
   sender-side constraints first. Neither pattern proves the exact segment.
5. Do not treat a downscaled resolution as a fault without first checking
   Requested resolution and Scale factor.
6. Distinguish "degraded" from "flapping": Time active resetting repeatedly,
   or climbing Peer recovery attempts, means the connection is dropping and
   rebuilding, which needs a different fix from mere congestion.
7. Battery and thermal state matter for phone senders. Check Power level and
   Plugged in before recommending settings changes.

WHAT I WANT BACK
1. One sentence: what is actually wrong.
2. Which end the problem is on (sender, receiver, or the network between).
3. The specific numbers in the dump that support that conclusion.
4. Concrete next steps, most likely to help first. Use VDO.Ninja URL
   parameters where relevant.
5. Anything you would need to see to be more certain, including whether you
   need the other end's stats panel.

If the data does not support a confident conclusion, say so and tell me what
to capture next. Do not invent values that are not in the dump.

Here are my stats:

[PASTE YOUR STATS HERE]
```

## Add your context

The prompt works better if you also tell it what you are actually doing. Add a couple of lines before your stats:

```
Setup: publishing from a phone on 5G, viewed in OBS on a wired desktop.
Symptom: video freezes for about a second every 30 seconds, audio is fine.
My push link: https://vdo.ninja/?push=XXXX&quality=1&codec=h264
My view link: https://vdo.ninja/?view=XXXX&buffer=500
```

Setup, symptom and both URLs answer most of the follow-up questions an LLM would otherwise have to ask.

## Short version

If you just want a quick read and do not need the full glossary:

```
This is a stats dump from VDO.Ninja, a peer-to-peer WebRTC streaming tool.
Notes: the "Stream info" section describes the remote sender's machine, not
mine. "Quality limited by" says why the encoder is holding back. Raising
bitrate is the wrong response to packet loss. Downscaled resolution is usually
intentional bandwidth optimisation, not a fault.
Tell me what is wrong, which end it is on, and what to change.

[PASTE YOUR STATS HERE]
```

## Capturing both ends

Most of the harder cases are only decidable by comparing sender and receiver, so capture both where you can:

1. On the sending machine, Ctrl + click your own camera preview, press **Copy**.
2. On the receiving machine, Ctrl + click the incoming video, press **Copy**.
3. Label them clearly — `--- PUBLISHER ---` and `--- VIEWER ---` — before pasting.

Both ends let an LLM cross-check what was sent against what arrived and distinguish many sender, receiver and path problems. They still cannot prove whether loss occurred on the sender's access link, the receiver's access link, or an intermediate network without additional measurements.

## Next

* [Diagnosing problems](/guides/stats-menu/troubleshooting) — the same reasoning, done by hand
* [Reading the viewer panel](/guides/stats-menu/viewer-stats) and [the publisher panel](/guides/stats-menu/publisher-stats) — full field references


# Green rooms and guest waiting options

Room-based green-room workflows, app.invite.cam lobbies, and supporting guest waiting controls.

A green room is a place for guests to wait before they enter the live room.

That matters because a guest usually needs to feel they are in the right place. If they only see a blocked join, a browser error, or a confusing blank page, they may refresh, leave, or message the host at the worst time.

For VDO.Ninja, the main room-based green-room workflow is a transfer room. For a larger hosted lobby, `app.invite.cam` can sit in front of VDO.Ninja. Other controls, such as `&requireapproval`, `&hold`, and `&roomcap`, can stop interruptions, but they are not the same as having a lobby or separate waiting room.

`&scene` is not a green room. Scenes control what appears in OBS or a scene view. They do not stop a guest from entering the room.

## The main options

| Need                                                                            | Main option                                                                      | What the guest experiences                                             |
| ------------------------------------------------------------------------------- | -------------------------------------------------------------------------------- | ---------------------------------------------------------------------- |
| A real VDO.Ninja lobby room before the live room                                | [Transfer rooms](/guides/transfer-rooms)                                         | Guest joins a lobby room, then the director moves them to another room |
| A larger lobby with waiting lists, signed-in ownership, and grant/revoke access | [app.invite.cam](/steves-helper-apps/app-invite-cam)                             | Guest waits in an invite/lobby flow before being sent to VDO.Ninja     |
| A VDO.Ninja queue workflow without a separate room                              | [`&queue`](/advanced-settings/guest-queuing-parameters/queue) and queue variants | Guest waits until the director activates them                          |
| A simple join approval gate                                                     | [`&requireapproval`](/advanced-settings/director-parameters/and-requireapproval) | Guest is pending until approved, but this is not a room                |

## Option 1: VDO.Ninja transfer rooms

Transfer rooms are the current VDO.Ninja way to make a room-based green room.

The simple idea:

1. Guests join a lobby room.
2. The live show or interview happens in another room.
3. The director checks the lobby.
4. The director transfers the guest into the live room when ready.

Example guest link:

```
https://vdo.ninja/?room=LobbyRoom
```

Example lobby director link:

```
https://vdo.ninja/?director=LobbyRoom&rooms=LiveRoom
```

Example live-room director link:

```
https://vdo.ninja/?director=LiveRoom
```

The `&rooms=LiveRoom` part adds a quick transfer destination to the lobby director page. The director can pick `LiveRoom`, then transfer the waiting guest there.

### Why this feels like a green room

The guest is in a real room first. They are not simply blocked from joining. The host can keep the live room separate from the waiting area, so the next guest does not walk into the current conversation.

This also gives the host a clear mental model:

* `LobbyRoom` is where guests arrive.
* `LiveRoom` is where the active conversation happens.
* Transfer is the moment the guest moves from waiting to live.

### Transfer-room details that matter

Only the main director can transfer guests. Room director ownership is first come, first served, so keep the director tab open for any room you need to control.

When a guest is transferred, the destination room's director becomes the owner of that guest.

Transferred guests do not see the destination room name during a normal transfer. That keeps private rooms private.

If a transferred guest refreshes or disconnects, they return to the original landing room. This is intentional privacy behavior. If the guest must stay in the destination room after refresh, the director can use **Change URL** instead of normal transfer, but then the guest can see the new room and password.

Transfers require matching passwords for both rooms.

If the destination room has `&requireapproval`, the transferred guest waits for approval in that destination room. If the destination room has `&roomcap` and is full, the transfer is rejected.

## Option 2: app.invite.cam

[app.invite.cam](https://app.invite.cam) is a lobby and invite workflow that can sit in front of VDO.Ninja.

The simple idea:

1. The host signs in.
2. The host shares an `app.invite.cam` room or lobby link.
3. Guests wait in that lobby flow.
4. The host grants or revokes access.
5. Approved guests are sent to the intended VDO.Ninja room or invite flow.

This is not just a VDO.Ninja URL parameter. It is a separate lobby layer before the final VDO.Ninja room.

`app.invite.cam` is built for cases like:

* public lobby links
* larger events
* many people requesting access
* signed-in room ownership
* owner-managed waiting lists
* helper or access-management workflows
* keeping the public invite separate from the final VDO.Ninja room link

This can be easier for guests to understand because they are in a visible lobby flow rather than staring at a plain approval gate.

Do not confuse `app.invite.cam` with plain [invite.cam](/steves-helper-apps/invite-link-generators). Plain `invite.cam` is for hiding, encoding, shortening, or managing links. `app.invite.cam` is the larger lobby and access flow.

## Supporting transfer-room controls

These are still part of the room-based workflow, but they are helpers rather than the green room by themselves.

### `&rooms`

[`&rooms`](/advanced-settings/director-parameters/rooms) adds preset transfer destinations to the director control bar.

```
https://vdo.ninja/?director=LobbyRoom&rooms=LiveRoom,GuestRoom,BackupRoom
```

Pressing a room name arms the transfer buttons beneath the guests, so the director can move people faster.

`&rooms` only adds shortcuts. The destination room's own rules still apply.

### `&queuetransfer`

[`&queuetransfer`](/advanced-settings/guest-queuing-parameters/and-queuetransfer), also called `&qt`, changes what happens after transfer.

Guest link:

```
https://vdo.ninja/?room=LobbyRoom&queuetransfer
```

With this on the guest link, a transferred guest lands in the destination room's queue flow instead of going live immediately. The destination director can activate them when ready.

This is useful when one person manages the public lobby, but another director controls the final room.

### `&broadcasttransfer`

[`&broadcasttransfer`](/advanced-settings/director-parameters/and-broadcasttransfer), also called `&bct`, changes the default transfer behavior so transferred guests enter in broadcast mode.

This mostly matters when using `&rooms`, because `&rooms` acts more like a quick-transfer button and does not show the full transfer menu each time.

## Queue and hold options

These can be useful, but they are queue or activation workflows. They are not the same as a separate waiting room unless they are combined with a room-transfer setup.

### `&queue` on both director and guest links

[`&queue`](/advanced-settings/guest-queuing-parameters/queue) on both sides creates a screening-room style workflow.

Director link:

```
https://vdo.ninja/?director=LobbyRoom&queue
```

Guest link:

```
https://vdo.ninja/?room=LobbyRoom&queue
```

Guests wait in a queue. The director pulls them in as needed and can transfer them to another room.

### `&queue` only on the guest link

Guest link:

```
https://vdo.ninja/?room=RoomName&queue
```

The guest is held until the director presses **Activate Guest**. This is a simple activation flow, not a separate room.

### `&hold`, `&holdwithvideo`, and `&screen`

These are guest invite modes:

| Option                                                                                  | Also called | What happens                                                     |
| --------------------------------------------------------------------------------------- | ----------- | ---------------------------------------------------------------- |
| [`&hold`](/advanced-settings/guest-queuing-parameters/and-hold-alpha)                   | `&queue3`   | Guest sees a waiting message until activated                     |
| [`&holdwithvideo`](/advanced-settings/guest-queuing-parameters/and-holdwithvideo-alpha) | `&queue4`   | Guest sees a waiting message while the director can preview them |
| [`&screen`](/advanced-settings/guest-queuing-parameters/and-screen-alpha)               | `&queue2`   | Guest can see and hear the director before activation            |

For these modes, transferring the guest to another room also counts as activation.

These can help stop the next guest from interrupting the current room, but they are not a room-based green room by themselves.

## Approval and access controls

These are useful controls for stopping unwanted joins or managing room access. They are lower-level access tools, not green rooms.

### `&requireapproval` and `&approvepopup`

[`&requireapproval`](/advanced-settings/director-parameters/and-requireapproval) makes the active director approve or deny room joins.

Director link:

```
https://vdo.ninja/?director=RoomName&requireapproval&approvepopup
```

Guest link:

```
https://vdo.ninja/?room=RoomName
```

`&approvepopup` shows a popup for pending joins. It does not enable sounds or system notifications. Add `&beep` or `&notify` only when those alerts are wanted.

This can stop someone from entering too early, but it is still an approval gate. It is not a separate room where guests wait.

### `&roomcap`

[`&roomcap=NUMBER`](/advanced-settings/director-parameters/and-roomcap) limits how many guests can be admitted to a claimed room.

```
https://vdo.ninja/?director=RoomName&roomcap=1
```

This can prevent extra people from joining a room that is already full. It does not provide a guest lobby.

### `&roomkey`

[`&roomkey=KEY`](/advanced-settings/director-parameters/and-roomkey) lets selected guests bypass approval or a custom room cap.

Treat a room key like a password.

### Passwords and signed-in access

[`&password`](/advanced-settings/setup-parameters/and-password) can protect a room or source link.

[`&auth`](/guides/sso-and-signed-in-access), [`&requireauth`](/guides/sso-and-signed-in-access), SSO, or another identity gateway can check who someone is before they reach the VDO.Ninja room flow.

These are access layers. They can sit before or around a green-room workflow, but they do not replace the room/lobby experience.

## Related

{% content-ref url="/pages/-M\_GN9YKWH8VJmAwHOek" %}
[How to transfer guests to other rooms](/guides/transfer-rooms)
{% endcontent-ref %}

{% content-ref url="/pages/pPNWQyU9PybI3WEBdwyr" %}
[app.invite.cam](/steves-helper-apps/app-invite-cam)
{% endcontent-ref %}

{% content-ref url="/pages/-MZIPPqrpNwMWJWYr4vY" %}
[\&rooms](/advanced-settings/director-parameters/rooms)
{% endcontent-ref %}

{% content-ref url="/pages/z42vIBJSKxSIRVsEnRjE" %}
[\&queuetransfer](/advanced-settings/guest-queuing-parameters/and-queuetransfer)
{% endcontent-ref %}

{% content-ref url="/pages/-MZX-3ygkLfjNFzYFAbU" %}
[\&queue](/advanced-settings/guest-queuing-parameters/queue)
{% endcontent-ref %}

{% content-ref url="/pages/ZfR6xaezGnQ9TFCbRDxz" %}
[How to selectively allow access](/guides/how-to-selectively-allow-access)
{% endcontent-ref %}


# How to selectively allow access

Choose between room caps, approval prompts, queue mode, transfer rooms, SSO, app.invite.cam, passwords, and source connection limits.

VDO.Ninja has several access-control tools. They are not interchangeable, so start by choosing the layer you want to control:

| Goal                                                      | Best option                                                                                                                                                                                                                                                                                              | Where it applies                          |
| --------------------------------------------------------- | -------------------------------------------------------------------------------------------------------------------------------------------------------------------------------------------------------------------------------------------------------------------------------------------------------- | ----------------------------------------- |
| Limit how many people can be admitted to a room           | [`&roomcap`](/advanced-settings/director-parameters/and-roomcap)                                                                                                                                                                                                                                         | Claimed director rooms                    |
| Make the director approve or deny room joins              | [`&requireapproval`](/advanced-settings/director-parameters/and-requireapproval)                                                                                                                                                                                                                         | Claimed director rooms                    |
| Show a modal popup for each pending room join             | [`&approvepopup`](/advanced-settings/director-parameters/and-approvepopup)                                                                                                                                                                                                                               | Director UI, used with `&requireapproval` |
| Let trusted users bypass approval or a lower room cap     | [`&roomkey`](/advanced-settings/director-parameters/and-roomkey)                                                                                                                                                                                                                                         | Director and selected guest links         |
| Ask a publisher before a viewer can see a single source   | [`&prompt`](/advanced-settings/settings-parameters/and-prompt)                                                                                                                                                                                                                                           | Push/source links                         |
| Hold guests until the director activates them             | [`&queue`](/advanced-settings/guest-queuing-parameters/queue), [`&screen`](/advanced-settings/guest-queuing-parameters/and-screen-alpha), [`&hold`](/advanced-settings/guest-queuing-parameters/and-hold-alpha), [`&holdwithvideo`](/advanced-settings/guest-queuing-parameters/and-holdwithvideo-alpha) | Guest invite workflow                     |
| Move approved guests from a lobby to a private room       | [Transfer rooms](/guides/transfer-rooms), [`&rooms`](/advanced-settings/director-parameters/rooms), [`&queuetransfer`](/advanced-settings/guest-queuing-parameters/and-queuetransfer)                                                                                                                    | Director workflow                         |
| Check identity before users reach the VDO.Ninja room flow | [SSO and signed-in access](/guides/sso-and-signed-in-access)                                                                                                                                                                                                                                             | External/auth gateway path                |
| Run a larger lobby with owner-controlled access           | [app.invite.cam](/steves-helper-apps/app-invite-cam)                                                                                                                                                                                                                                                     | Lobby/invite app                          |
| Limit connections to a single source                      | [`&maxconnections`](/advanced-settings/settings-parameters/and-maxconnections)                                                                                                                                                                                                                           | Push/source links                         |

## Limit room size

Use [`&roomcap`](/advanced-settings/director-parameters/and-roomcap) on the director link:

```
https://vdo.ninja/?director=MyRoom&roomcap=10
```

On the official `vdo.ninja` service, the default cap is `80` and the hard maximum is `80`. A lower cap can be set per claimed room. Higher values are clamped.

Room caps are handshake-server admission controls attached to the live director claim. If the director is not present, that director's live cap is not present either.

## Approve guests before they enter

Use [`&requireapproval`](/advanced-settings/director-parameters/and-requireapproval) on the director link:

```
https://vdo.ninja/?director=MyRoom&requireapproval
```

Guests attempting to join are put into a pending state until the director approves or denies them.

To also show a modal confirmation popup to the director, add [`&approvepopup`](/advanced-settings/director-parameters/and-approvepopup):

```
https://vdo.ninja/?director=MyRoom&requireapproval&approvepopup
```

The guest invite can stay normal:

```
https://vdo.ninja/?room=MyRoom
```

`&approvepopup` does not enable audio alerts or system notifications. Add [`&notify`](/advanced-settings/settings-parameters/and-notify) or `&beep` for sound.

## Allow trusted bypasses

Use [`&roomkey`](/advanced-settings/director-parameters/and-roomkey) when selected guests should bypass approval or a custom room cap:

```
https://vdo.ninja/?director=MyRoom&requireapproval&roomcap=10&roomkey=TRUSTEDKEY
```

Trusted guest:

```
https://vdo.ninja/?room=MyRoom&roomkey=TRUSTEDKEY
```

The room key cannot bypass the server hard cap. Treat it like a password and rotate it if it leaks.

## Confirm viewers for a single source

[`&prompt`](/advanced-settings/settings-parameters/and-prompt), also available as `&approve` or `&validate`, is sender-side confirmation. It asks the publisher before sending audio/video to a newly connected viewer:

```
https://vdo.ninja/?push=Camera1&prompt
```

Use this for one-source push/view workflows. It is not a room admission system, and it does not stop a denied viewer from trying again.

## Queue, hold, and screening workflows

Use [`&queue`](/advanced-settings/guest-queuing-parameters/queue) and the queue variants when you want a room workflow where guests wait until the director activates them.

Common modes:

* `&queue` on both director and guest links creates a screening-room workflow.
* `&queue` only on the guest invite creates a simple "Activate Guest" workflow.
* [`&screen`](/advanced-settings/guest-queuing-parameters/and-screen-alpha) / `&queue2` lets the guest see and hear the director before activation.
* [`&hold`](/advanced-settings/guest-queuing-parameters/and-hold-alpha) / `&queue3` keeps the guest on a waiting message until activation.
* [`&holdwithvideo`](/advanced-settings/guest-queuing-parameters/and-holdwithvideo-alpha) / `&queue4` lets the director preview the guest while the guest waits.

Queue mode is a guest workflow. `&requireapproval` and `&roomcap` are handshake-server room admission controls. They can be combined, but they solve different problems.

## Transfer rooms

Use [transfer rooms](/guides/transfer-rooms) when you want a public lobby room and one or more private destination rooms.

A common setup:

1. Guests join a public lobby room.
2. The director screens them there.
3. The director transfers approved guests into a private room.

Use [`&rooms`](/advanced-settings/director-parameters/rooms) to add preset transfer buttons to the director UI. Use [`&queuetransfer`](/advanced-settings/guest-queuing-parameters/and-queuetransfer) / `&qt` when transferred guests should remain queued in the destination room.

If the destination room has `&requireapproval`, transferred guests enter that destination room pending approval. If the destination room has `&roomcap` and is full, the transfer is rejected.

## SSO and larger lobbies

[SSO and signed-in access](/guides/sso-and-signed-in-access) is its own access path. Use it when identity needs to be checked before a person reaches the VDO.Ninja room flow.

[app.invite.cam](/steves-helper-apps/app-invite-cam) is a larger lobby/invite path with authenticated room ownership, waiting lists, and owner-controlled grant/revoke access.

Do not treat SSO or app.invite.cam as the same thing as `&requireapproval`, `&roomcap`, `&approvepopup`, or `&prompt`. They sit in front of or alongside the VDO.Ninja room workflow.

## Other access tools

[`&password`](/advanced-settings/setup-parameters/and-password) can protect a room or source link. Change the password when rotating between groups.

[`&maxconnections`](/advanced-settings/settings-parameters/and-maxconnections) limits the total push/view peer connections for a source. It can be useful for one-source workflows, but it is not a room-cap replacement.

Cloudflare Zero Trust or another identity gateway can protect a self-hosted VDO.Ninja deployment before users reach the VDO.Ninja page.

## Related

{% content-ref url="/pages/CdV7XfS7kF1iejAVFibl" %}
[\&requireapproval](/advanced-settings/director-parameters/and-requireapproval)
{% endcontent-ref %}

{% content-ref url="/pages/FcWXWvhwDS2DwO5K6O3q" %}
[\&roomcap](/advanced-settings/director-parameters/and-roomcap)
{% endcontent-ref %}

{% content-ref url="/pages/Ooi4zYfZocafbY1ydL3R" %}
[\&roomkey](/advanced-settings/director-parameters/and-roomkey)
{% endcontent-ref %}

{% content-ref url="/pages/0pvG7wPli92vGYlyP3hH" %}
[\&approvepopup](/advanced-settings/director-parameters/and-approvepopup)
{% endcontent-ref %}

{% content-ref url="/pages/qv4dEscZAckfaCZMsW5i" %}
[\&prompt](/advanced-settings/settings-parameters/and-prompt)
{% endcontent-ref %}

{% content-ref url="/pages/-MZX-3ygkLfjNFzYFAbU" %}
[\&queue](/advanced-settings/guest-queuing-parameters/queue)
{% endcontent-ref %}


# SSO and signed-in access

Use SSO or a signed-in access layer before sending users to VDO.Ninja.

SSO is its own access path. It is separate from VDO.Ninja's room-cap, approval, queue, and source-prompt parameters.

Use SSO when you need identity checked before a person reaches the VDO.Ninja room flow. In that setup, the SSO or invite system handles sign-in, allowlists, identity policy, and access decisions. Approved users are then sent to the intended VDO.Ninja link.

In VDO.Ninja URLs, the common signed-in flags are:

| Parameter         | Meaning                                                                                                                   |
| ----------------- | ------------------------------------------------------------------------------------------------------------------------- |
| `&auth`           | Turns on the signed-in access layer for the room flow                                                                     |
| `&requireauth`    | Requires sign-in before the user can join the protected room flow                                                         |
| `&authtoken`      | Temporary redirect token from the SSO service; normally saved then removed from the visible URL                           |
| `&universaltoken` | Viewer/scene/solo access token generated for browser-source style links, so OBS does not need to complete a human sign-in |

## When to use it

SSO is the better fit when you need:

* sign-in before users reach the room
* allowlists based on accounts, email domains, groups, or other identity rules
* an access layer that is separate from VDO.Ninja room state
* a lobby or event flow where people request access before receiving the real invite

## What it is not

SSO is not the same as:

* [`&requireapproval`](/advanced-settings/director-parameters/and-requireapproval), which is VDO.Ninja room admission approval
* [`&roomcap`](/advanced-settings/director-parameters/and-roomcap), which caps admitted guests in a claimed VDO.Ninja room
* [`&approvepopup`](/advanced-settings/director-parameters/and-approvepopup), which shows the director a modal approval prompt
* [`&prompt`](/advanced-settings/settings-parameters/and-prompt), which asks a publisher before sending media to a viewer
* [`&queue`](/advanced-settings/guest-queuing-parameters/queue), which controls guest activation after a guest reaches the room workflow

Those options can still be useful after SSO sends someone to a VDO.Ninja link, but they are different layers.

## Common patterns

One common pattern is:

1. User opens an event or invite page.
2. SSO or the invite system checks identity.
3. Approved users receive or are redirected to the VDO.Ninja room link.
4. VDO.Ninja room controls, such as `&requireapproval` or `&queue`, optionally handle final production workflow.

Another pattern is a self-hosted VDO.Ninja deployment behind an identity gateway, such as Cloudflare Zero Trust. In that case, users sign in before the VDO.Ninja page is served.

## Browser source links

OBS and other browser sources usually cannot complete a normal sign-in flow comfortably. For authenticated rooms, the director can generate scene, view, or solo links that include a `&universaltoken`. That token lets the browser source view the intended room/stream without showing the sign-in UI inside OBS.

This signed-in access layer is about identity and permission. For a browser source to keep following the same guest after refreshes, you still need a stable stream strategy, such as [`&push`](/advanced-settings/setup-parameters/push), [`&permaid`](/advanced-settings/setup-parameters/and-permaid), scenes, or slots. See [Permanent links, reusable invites, and stream IDs](/guides/how-to-get-permanent-links).

## Larger lobby option

For larger lobbies, use [app.invite.cam](/steves-helper-apps/app-invite-cam). It is designed around authenticated room ownership, waiting lists, and owner-controlled grant/revoke access.

## Related

{% content-ref url="/pages/ZfR6xaezGnQ9TFCbRDxz" %}
[How to selectively allow access](/guides/how-to-selectively-allow-access)
{% endcontent-ref %}

{% content-ref url="/pages/pPNWQyU9PybI3WEBdwyr" %}
[app.invite.cam](/steves-helper-apps/app-invite-cam)
{% endcontent-ref %}

{% content-ref url="/pages/-MZfzezMF7\_FyjAq8Dze" %}
[How to get permanent links](/guides/how-to-get-permanent-links)
{% endcontent-ref %}


# Stream Scheduling and Promotion

Best Practices for Stream Scheduling and Promotion

Consistent scheduling and effective promotion are crucial for growing your audience and maintaining a successful streaming channel. This guide will cover key strategies to optimize your stream schedule and promote your content effectively.

### Stream Scheduling

#### 1. Consistency is Key

* Set a regular schedule and stick to it
* Stream at the same times each week to build viewer habits

#### 2. Find Your Optimal Time Slot

* Use your platform's analytics to identify when your audience is most active
* Consider your target audience's time zone and typical schedule

#### 3. Balance Frequency and Quality

* Stream often enough to maintain audience engagement
* Don't overcommit – prioritize quality over quantity

#### 4. Plan for Variety

* Mix up your content to keep things interesting
* Consider themed days (e.g., "Multiplayer Mondays", "Tutorial Tuesdays")

#### 5. Account for Special Events

* Plan around major events in your niche (e.g., game releases, tournaments)
* Occasionally schedule special, longer streams for big occasions

### Stream Promotion

#### 1. Leverage Social Media

* Maintain active profiles on relevant platforms (Twitter, Instagram, TikTok)
* Post regular updates, teasers, and highlights
* Use appropriate hashtags to increase visibility

#### 2. Optimize Your Stream Titles and Descriptions

* Use clear, catchy titles that describe your content
* Include relevant keywords in your descriptions for discoverability

#### 3. Create a Content Calendar

* Plan your streams and promotional content in advance
* Ensure a consistent flow of content across all platforms

#### 4. Collaborate with Other Streamers

* Participate in raids and host other channels
* Organize collaborative streams to cross-pollinate audiences

#### 5. Engage with Your Community

* Respond to comments and messages promptly
* Create a Discord server for your community

#### 6. Use Email Marketing

* Build an email list for your most dedicated fans
* Send regular newsletters with stream schedules and updates

#### 7. Create Highlight Reels and Clips

* Share your best moments on platforms like YouTube and TikTok
* Use these to attract new viewers to your live streams

### Platform-Specific Strategies

#### Twitch

* Use the Schedule feature to display upcoming streams
* Leverage Channel Points for viewer engagement
* Participate in Twitch Teams relevant to your content

#### YouTube

* Create and update playlists for your streams
* Use Community posts to engage with your audience between streams
* Optimize your video titles and thumbnails for search

#### Facebook Gaming

* Use the Streamer Dashboard to schedule upcoming streams
* Engage with viewers in Facebook Groups related to your content
* Utilize Facebook Events to promote big streaming events

### Advanced Promotion Techniques

#### 1. Create a Website or Blog

* Centralize your content and streaming information
* Improve your SEO for better discoverability

#### 2. Develop a Brand

* Create consistent visuals across all platforms
* Develop a unique streaming persona or style

#### 3. Offer Exclusive Content

* Provide Subscriber-only streams or content
* Create Patreon tiers with special perks

#### 4. Attend Gaming Events and Conventions

* Network with other content creators and industry professionals
* Promote your channel in person to potential new viewers

#### 5. Run Contests and Giveaways

* Encourage viewers to share your content for entries
* Ensure you comply with platform rules and local laws

### Measuring and Improving

#### 1. Track Your Metrics

* Monitor viewer counts, engagement rates, and follower growth
* Use this data to refine your scheduling and promotion strategies

#### 2. Seek Feedback

* Regularly ask your community for input on your schedule and content
* Conduct polls to gauge interest in potential new stream ideas

#### 3. Stay Adaptable

* Be willing to adjust your schedule based on performance and feedback
* Keep an eye on platform changes and new features to leverage

### Conclusion

Effective scheduling and promotion are ongoing processes that require consistent effort and adaptation. By maintaining a regular schedule, actively promoting your streams, and continuously engaging with your community, you can build a strong, loyal audience for your streaming channel. Remember to stay authentic and true to your content – your genuine passion will be your best promotional tool.


# How to send the audio/video output of one OBS to another OBS using VDO.Ninja

Send low-latency audio and video from one OBS setup to another remote OBS instance using VDO.Ninja links.

In this walk-through we demonstrate how to use VDO.Ninja to stream a low-latency video/audio stream from one OBS Studio to another remote OBS Studio.

{% embed url="<https://youtu.be/Ze1q6Qof2r0>" %}

#### Requirements

* OBS Studio
  * For some Linux or older systems, you may need a virtual camera plugin as well
* A virtual audio cable
  * For Windows, use VB-CABLE Virtual Audio
    * This is recommended software as it enables proper audio support
    * The software is Donationware
    * <https://www.vb-audio.com/Cable/>
  * For macOS, you have a few choices:
    * [macOS audio capture options](/platform-specific-issues/macos#capturing-audio)
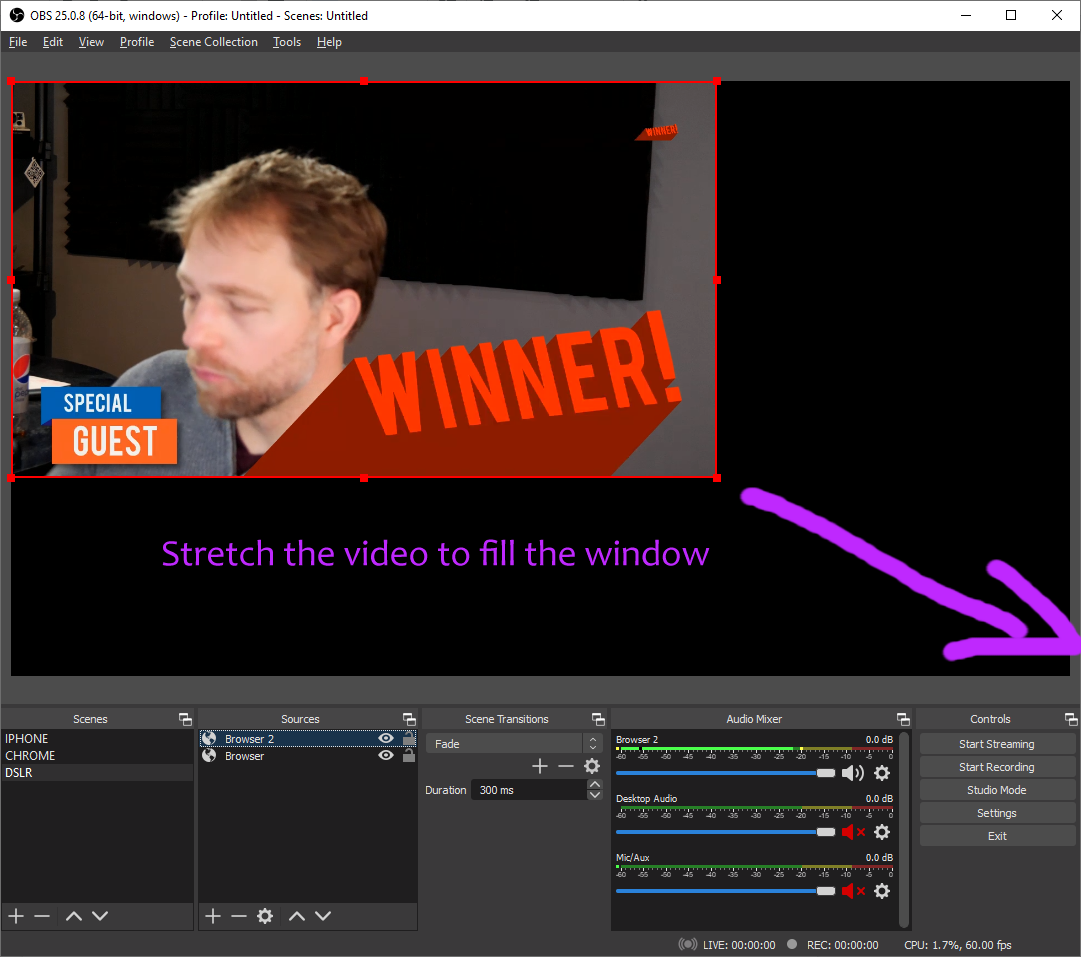
#### Basic Workflow Diagram

Please find below a diagram explaining the basic premise of what we are intending to do in this guide. We will go through it all, one step at a time.

![](https://lh3.googleusercontent.com/hqQhbNUaiXIdsR3-jKUVySOwgG7ds07QPKZJVbhapaTNyvoWp1EHXA-pPJqlO15TKGaoZdNA1UATly8Ed2-5bu4zXm5mf4rnj_q3rMbOpWTrh1Y1mx9I3b_ryVAI9pd_0uU6Hs41Q5mbkDY)

#### Step 0.

This guide assumes you have OBS installed, along with the other required software, though we shall briefly cover these initial installation steps now.

1. Install OBS Studio (or StreamLabs, etc)\
   <https://github.com/obsproject/obs-studio/releases/>
2. Install the VB-Cable Virtual Audio device.\
   <https://vb-audio.com/Cable/>

If you are on Mac, you can consider Loopback as a premium alternative option, if having problems.

#### Step 1

We now need to create a virtual webcam so we can connect OBS to VDO.Ninja. If we followed the initial software setup of Step 0 correctly, this should be all smooth sailing.

Just press START VIRTUAL CAM in OBS v26 or newer.

#### Step 2

We will now configure OBS to output audio from the Browser Source to the Virtual Audio Cable. In the OBS settings, under Advanced, we select the Monitoring Device to be our Virtual Audio device. (CABLE Input).

We also want to disable Windows audio ducking.

![](https://lh6.googleusercontent.com/O0bHw4kwdhys0MLhsQIsLQx-_GUvd-xpFD7gILaMBSVwKlgmXMG2y_yhQdMfF-jgugFmbgco7XM_uFhQMY9oBOqDIz6VNhxXXgQhBh3Qhj6qPugObOW3O5KmAdCNG5Bg682NBfSEW-HKGKU)

#### Step 3

In our last configuration step, we want to go into the Advanced Audio Properties in OBS. When there, we want to set up the Audio Monitoring setting to have any audio we want pushed to the Virtual Audio Cable to be set to MONITOR AND OUTPUT.

![](https://lh6.googleusercontent.com/rlcZugNaCwarzH2x08EATZJ17q4_LwozJv2ulOyigTmONkyCqaxBTLKlfbvy1BBVKEUD3BUnADQWOrLbYYYCjmu0q854BeFaccKWow1533U0mr0mDnMAq3NbnPrvYsx8YDx8XFCbGpERGxE)

#### Step 4

We’re ready to now create our VDO.Ninja stream.

There are many ways to do this, but the EASIEST way is to go to VDO.Ninja, click Add your Camera to OBS, and select from the options OBS Virtualcam. This option will set you up with the default settings, such as with audio echo-cancellation on, although you can use URL parameters when visiting VDO.Ninja to customize the settings more.

{% hint style="info" %}
A popular advanced URL option at this point might be with the stereo flag, so visit <https://vdo.ninja/?stereo> instead of just <https://vdo.ninja>. You can also set your own custom stream ID values, so <https://vdo.ninja/?push=myCustomStreamId123>, and then give your remote OBS user the link <https://vdo.ninja/?view=myCustomStreamId123>![](https://lh3.googleusercontent.com/NuZ8o9ot8Uqcm2SsCSP-X11N4aPkcHYaV0enXMsDdgYdfddXsKbt320HHWM-eK-WjDzxxeXEMx75idJnJKmpxIxnC9DcMeyZ2sy35i6gka2lSGn_mdsURHGmK3jMNSK_I3b9C_1Ck5IEZrU)
{% endhint %}

#### Step 5

You can select the Virtual Audio Cable from the audio choices, or instead, you can select your local microphone or multiple audio input sources.

VDO.Ninja will auto-mix if more than one option is selected. Hold `CTRL` (or `command`) to select more than one option.

![](https://lh4.googleusercontent.com/IK0U5Drf61V28WYGWLPrxN2gjRan-tX_NNHdZV3xcKSoFwzuzPZl1nNuTlPyWxcrh0kM7rDJAO4WPGG6HUbhO8Fhh3zwdP5JRKLlJCXZmN5bn-flY175uD4IOCx3Q4RnhcyLoRmrdGuP5Dc)

#### Step 6

Press the green button when ready.

You’ll see a preview of your video stream and a link. This link is what we want to send to our remote OBS studio as an input source.

We can modify this link if we wish to have higher bitrates, for example, <https://vdo.ninja/?view=streamID&videobitrate=20000> to set a target video bitrate of 20-mbps.

![](https://lh5.googleusercontent.com/y4-K-FYPET5a-TEswgl_FE-2IU5oSIMXH9o2lyjydhNZAqdIvussPvXS19BUmW2lte8fxDfw8dMyt5JT9H8TslLhNJfO5KTJB4xmsHbwSU7Ofq5xP2NU7fuxlPsZkgT82P6T1JxV5MzXdrM)

#### Step 7

We send this VDO.Ninja view URL to our remote OBS Studio computer and now we use it to ingest the feed into the OBS there.

To do this, we create a scene and then a Browser Source in OBS. Give it a name and we will fill out the details in the next step.

![](https://lh3.googleusercontent.com/-FvXnmuJ3YnuARZCWSh7HvXCjypC3_aUrynSj_7_w7s4aeC_67qGK5GfResjT91ol1D3wftGZrMwjtF1jVEtruVs0JA1GwUMGzip44NC2CuiE3G3T7a_M_udNYt4yJnfOk42JiRwzTj34c8)\\

#### Step 8

In the properties for the Browser Source, we need to fill out a few fields and then hit OK.

* The URL needs to be set to the address we created earlier, i.e.: <https://vdo.ninja/?view=q3QCScW>
* Width needs to match the input video resolution, so likely 1280
* The height also needs to match, so likely 720
* ***Control audio via OBS*** should be checked, for audio capture to function

![](https://lh6.googleusercontent.com/72c_PKWSl2peJ3L8cGnBqZcl9YAv9xvFfgzp3PXjsSpRPq0k1Ahbka3XKO27LK3DMglV0WP8APNYPdjCumRTUiJw_V19CvWFcIKRH-Hi218IwWLGsssFSxHmRiOXBfTU44HSHf2P1hyKe3s)

SECRET TIP: Some links on VDO.Ninja can be dragged and dropped directly into OBS, avoiding the tedious parts of this step.

#### Step 9

Once you hit OK, the video should appear and auto-play within seconds. There should be no audio feedback if you selected the Control audio via OBS option.

Now we just need to stretch the video to fill the full scene. It should snap into place when full.

![](https://lh5.googleusercontent.com/a1jBOf6j_2py-tFMieJ2LoXTBv8_ECEq-KgCQHGslz6sG5BwnN5eVcjwXgaoNmCygnyL-rzt0QPcNvQcyf-Wk4wJ2VHnICKHR_fwiayS5iCrVrN0yT_HsLm6Bkc7wvv8fRBZF7mw62eosyM)

All done! And that should be it! Problems?

You can also ask for help on [Discord](https://discord.vdo.ninja/); usually help can be provided within minutes, if not usually within half a day.

### WHIP Output

Newer versions of OBS may also support WHIP output, which VDO.Ninja also supports. While the Virtual Camera might be the better option for many, details on [WHIP are here](/advanced-settings/whip-parameters/and-whip).


# Host a guest panel on a Mac with OBS and Meshcast

Build a guest panel on a Mac with VDO.Ninja and OBS, return the finished program to guests, and stream through Meshcast or another RTMP destination.

This guide is for a host who wants to bring remote guests into OBS, arrange them into a panel, let them see the finished program, and stream the show to one or more platforms.

{% hint style="success" %}
**The simple version:** VDO.Ninja brings in the guests. OBS builds the show. Meshcast or your usual streaming service sends the finished show to the audience.
{% endhint %}

```mermaid
flowchart LR
    G[Remote guests] -->|camera and microphone| V[VDO.Ninja room]
    V -->|clean Scene output| O[OBS]
    O -->|RTMP or WHIP| M[Meshcast]
    M --> D[Streaming destinations]
    O -. OBS Virtual Camera .-> R[Program return for guests]
```

{% hint style="warning" %}
Keep the OBS Program return out of the VDO.Ninja Scene captured by OBS. Otherwise, the program captures itself and creates an endless hall-of-mirrors effect.
{% endhint %}

## Before you start

You need:

* A Mac running current OBS Studio. For the most compatible Virtual Camera on Mac, use **OBS 30 or newer on macOS 13 or newer**.
* A [VDO.Ninja room](/getting-started/rooms) for the guests.
* A Meshcast account if you want RTMP ingest or multi-destination restreaming.
* Headphones for every person who will speak.
* At least one private or unlisted destination for the rehearsal.

### Choose sensible Mac settings

| Mac                                      | Recommended starting point                          |
| ---------------------------------------- | --------------------------------------------------- |
| Apple silicon (M1, M2, M3, M4, or newer) | Apple VT H.264 hardware encoder, 1080p30 or 720p30  |
| Intel Mac                                | x264 at 720p30, 2,500–3,500 Kbps, preset `veryfast` |

If an Intel Mac reports encoding lag, try `superfast` or `ultrafast`. These presets use less CPU but reduce picture quality at the same bitrate. RTMP is usually the simplest workflow on an Intel Mac, but it does not turn x264 into hardware encoding.

For WHIP, OBS may switch the **audio** encoder from AAC to FFmpeg Opus. That message does not necessarily mean the H.264 video encoder changed. See [OBS WHIP output settings](/guides/obs-whip-output-settings) and [hardware-accelerated video encoding](/guides/hardware-accelerated-video-encoding).

## 1. Create the room and guest links

Open VDO.Ninja, choose **Create a Room**, and open the Director's Room. Send each guest a separate invite link and ask them to wear headphones.

Give regular guests stable seats by adding a unique preferred slot to each invite:

```
Guest 1: https://vdo.ninja/?room=YOUR_ROOM&slot=1
Guest 2: https://vdo.ninja/?room=YOUR_ROOM&slot=2
Guest 3: https://vdo.ninja/?room=YOUR_ROOM&slot=3
```

Add `&slotmode` to the director link, or keep **Assign a slot to new guests automatically** enabled in the Mixer. Do not give two guests the same slot link. A preferred slot cannot be occupied by two people at once.

Read more about [`&slot`](/advanced-settings/settings-parameters/and-slot) and the [VDO.Ninja Mixer](/steves-helper-apps/mixer-app).

## 2. Build the panel layout

Open the Mixer from the director room and create the layout you want. Use the numbered slots as permanent seats for recurring guests.

For a mix of landscape cameras and vertical phone video:

* Make the portrait slot taller or slightly wider.
* Use **Cover** when filling the frame matters more than showing every edge.
* Use the per-slot crop controls to remove empty space.
* Test with a real phone before the show.

{% hint style="info" %}
The automatic group layout is convenient, but a custom Mixer layout gives you predictable sizing for portrait guests.
{% endhint %}

## 3. Add the clean Scene output to OBS

In the Mixer, copy the clean **Scene/output link intended for OBS**. Do not copy the Mixer control-page URL.

In OBS:

1. Add a **Browser Source**.
2. Paste the clean Scene/output link.
3. Match its width and height to the OBS canvas, normally 1920 × 1080 or 1280 × 720.
4. Enable **Control audio via OBS** if that option is shown.
5. Confirm the source moves an OBS audio meter, then make and listen to a short recording.

One mixed Scene source is simpler than loading every guest separately. Avoid loading the same guest in multiple browser sources because every duplicate creates another connection.

See [How to get permanent links](/guides/how-to-get-permanent-links) for reusable Scene URLs.

## 4. Return the finished program to guests

In OBS Virtual Camera settings, choose **Program**, then start **OBS Virtual Camera**.

<figure><img src="/files/x0NXnk7I5dEvYEiIcuY9" alt="OBS Virtual Camera configuration showing a selectable output"><figcaption><p>OBS Virtual Camera can return Program, Preview, a scene, or a source.</p></figcaption></figure>

Use the director as a performer and select **OBS Virtual Camera** as the director camera. Keep that return publisher **Unset** in the Mixer so it is not included in the Scene captured by OBS.

Add `&broadcast` to each **guest invite**, not to the director or Scene link:

```
https://vdo.ninja/?room=YOUR_ROOM&slot=1&broadcast
```

Guests still publish their camera and microphone to the director, but receive the director's Program video instead of every guest video.

<figure><img src="/files/BqHsyvc2CVOzHG1bW6KD" alt="VDO.Ninja room option for guests to see only the director video"><figcaption><p>Broadcast mode returns the director's video while guest conversation audio can remain active.</p></figcaption></figure>

OBS Virtual Camera carries video, not the OBS audio mix. The safest starting setup is:

* VDO.Ninja handles conversation audio.
* OBS Virtual Camera returns Program video only.
* Every speaker wears headphones.

If guests must hear clips or music from OBS, create a separate media-only return bus using a virtual audio device. Exclude **all host and guest microphones** from that return. Never send the full Program audio mix back into the room.

For more routing options, see [Send an OBS return feed to guests](/guides/send-an-obs-return-feed-to-guests) and [`&broadcast`](/advanced-settings/video-parameters/broadcast).

## 5. Send OBS to Meshcast

For the least-fussy Mac workflow, start with RTMP.

1. In the Meshcast dashboard, copy the complete RTMP URL. It resembles `rtmp://host:1935/live/pk_example`.
2. In OBS, open **Settings → Stream** and choose **Custom**.
3. Put the URL only through `/live` in **Server**, such as `rtmp://host:1935/live`.
4. Put the private `pk_...` Publishing Key in **Stream Key**.
5. Use H.264 video, AAC audio, CBR rate control, and a two-second keyframe interval.
6. Start streaming.

{% hint style="danger" %}
Never share a private `pk_...` Publishing Key. Public watch links use the public `st_...` Stream ID instead.
{% endhint %}

To send the show to several platforms, configure the destinations in Meshcast **before** starting OBS. For Restream.io or another provider, choose a custom destination and enter the RTMP or RTMPS URL and key supplied by that provider. Destination availability depends on the Meshcast account tier.

You can also keep your existing streaming provider as the OBS destination. VDO.Ninja and the OBS guest-panel workflow do not require Meshcast.

## Rehearsal checklist

* [ ] Every speaker is wearing headphones.
* [ ] Each guest enters the expected slot.
* [ ] Portrait guests are large enough and not awkwardly cropped.
* [ ] Guests can see the OBS Program return.
* [ ] The Program return is not visible as a tile in the OBS Scene.
* [ ] Nobody hears a delayed copy of their own voice.
* [ ] **View → Stats** in OBS shows no encoding lag or dropped network frames.
* [ ] A private destination receives both picture and sound.

## Quick fixes

| Problem                                      | Fix                                                                                                                                |
| -------------------------------------------- | ---------------------------------------------------------------------------------------------------------------------------------- |
| The picture repeats inside itself            | Remove the Program-return publisher from the VDO.Ninja Scene captured by OBS.                                                      |
| A guest enters the wrong frame               | Give every seat a unique `&slot=N` invite and make sure the requested slot is free.                                                |
| A phone guest looks tiny                     | Use a custom Mixer layout with a taller portrait slot and adjust Cover or crop.                                                    |
| A guest hears an echo                        | Use headphones and do not return the full OBS audio mix to the room.                                                               |
| The Mac gets hot or OBS reports encoding lag | Close unused browser sources, use 720p30, lower bitrate, and use Apple VT H.264 on Apple silicon or a faster x264 preset on Intel. |
| OBS rejects the Meshcast WHIP URL            | Confirm OBS **Service** is WHIP, not Custom RTMP, and use the private Publishing Key as the Bearer Token.                          |


# Multi-operator Twitch production with VDO.Ninja and OBS

Build a shared Twitch production where three to five operators contribute POV and camera feeds, join without scene edits, and hand the broadcast between operators.

This workflow is for a shared Twitch channel where:

* any authorized member can start the show;
* three to five members can add their POV and camera without the current operator rebuilding OBS;
* another member can take over when the current operator leaves; and
* Discord carries the conversation audio.

VDO.Ninja and Twitch have different jobs in this design. VDO.Ninja transports each participant's contribution. One OBS instance composites those feeds and sends the single program to Twitch.

```
Player POVs and cameras -> VDO.Ninja -> current program OBS -> Twitch
Discord voice ------------------------> current program OBS -> Twitch
```

A handoff therefore needs either a coordinated stop/start between two OBS computers or an encoder that stays connected to Twitch while control changes hands. VDO.Ninja alone does not elect the Twitch operator or keep the Twitch ingest session alive.

## Quick recommendation

| Priority                                                     | Recommended design                                                                                             |
| ------------------------------------------------------------ | -------------------------------------------------------------------------------------------------------------- |
| Start with equipment everyone already owns                   | Install the same OBS scene collection on every operator's computer and use a short, coordinated Twitch handoff |
| Lowest load on the gaming computers and the cleanest handoff | Run one always-on production OBS on a spare computer and let members control it remotely                       |
| Highest uptime and automatic failover                        | Put a redundant encoder or private relay behind the production and add an authenticated active-operator lease  |

For a three-to-five-person Windows gaming group, a practical starting point is **Game Capture for each gameplay feed, a VDO.Ninja browser link for each camera, and OBS Browser Sources for the final mix**. Give every feed a permanent ID and pre-build every source once.

## Choose the contribution tool

| Tool                                                                            | Best use here                                              | Advantages                                                                                                 | Important limitation                                                                                                          |
| ------------------------------------------------------------------------------- | ---------------------------------------------------------- | ---------------------------------------------------------------------------------------------------------- | ----------------------------------------------------------------------------------------------------------------------------- |
| VDO.Ninja in a browser                                                          | Webcams, phone cameras, and occasional screen sharing      | No install, cross-platform, reusable links                                                                 | Browser screen sharing requires a window/screen choice and may be less consistent for games                                   |
| [Game Capture](/guides/using-game-capture-with-vdo.ninja)                       | Windows game/window video and its audio                    | Native, low-memory capture with hardware encoding and window-specific audio                                | Windows only; send the webcam separately or composite it elsewhere                                                            |
| [Ninja OBS Plugin](/guides/using-ninja-obs-plugin-with-vdo.ninja) as a receiver | Managing VDO.Ninja sources inside OBS                      | Can auto-create/update inbound room sources; its browser-backed receiver follows normal VDO.Ninja behavior | The native VP9/H.264/Opus receiver remains experimental                                                                       |
| Ninja OBS Plugin as a publisher                                                 | A contributor-only OBS or a separate contribution computer | Publishes the OBS output directly to VDO.Ninja                                                             | It uses OBS's active streaming output slot, so this plugin path alone cannot publish to VDO.Ninja and Twitch at the same time |
| OBS Browser Sources                                                             | Receiving the final VDO.Ninja feeds                        | Established, portable OBS workflow                                                                         | Each live feed still needs decoding and compositing                                                                           |

The Ninja OBS Plugin is useful, but it is not automatically the lightest answer for this design. Its publishing mode conflicts with using the same normal OBS output for Twitch. Game Capture is generally the better gameplay contributor on Windows, while a Browser Source or the plugin's browser-backed receiver is a sensible production input.

## Solution 1: give every operator the same OBS production

This is the simplest decentralized setup. It does not require an always-on server, but Twitch handoffs can include a short slate, cut, or stream restart.

### 1. Give each operator separate Twitch access

Do not share the channel owner's password or primary stream key.

In the channel's Twitch Creator Dashboard, open **Settings -> Stream -> Permissions -> People who can stream to your channel** and authorize each operator by email. Twitch gives each person a separate guest stream key. Removing an authorized streamer invalidates that person's key without rotating everyone else's key.

Each person configures their own key in a local OBS profile. Share the scene collection, but configure the streaming profile separately because [OBS profiles store stream and output settings](https://obsproject.com/kb/profiles), while [scene collections store scenes and sources](https://obsproject.com/kb/scene-collections).

See Twitch's [Stream Key FAQ](https://help.twitch.tv/s/article/twitch-stream-key-faq?language=en_US) for the current authorized-streamer workflow.

Enable [Twitch Disconnect Protection](https://help.twitch.tv/s/article/Disconnect-Protection?language=en_US) and rehearse with it. It can display a temporary slate for up to 90 seconds during a supported encoder disconnect, but it is not a source switcher and should not be assumed to make a handoff seamless.

### 2. Assign permanent VDO.Ninja identities

Choose a private room name, a strong room password, and two unique IDs per person:

| Member | Gameplay ID  | Camera ID   |
| ------ | ------------ | ----------- |
| Alice  | `alice-game` | `alice-cam` |
| Bob    | `bob-game`   | `bob-cam`   |
| Carol  | `carol-game` | `carol-cam` |

Use names that are unique to the production rather than these public examples. Do not open the same publishing ID on two devices at once.

An example camera shortcut is:

```
https://vdo.ninja/?room=TEAMROOM&push=alice-cam&webcam&audiodevice=0&autostart&view#p=ROOMPASSWORD
```

This disables the camera link's microphone because voice is coming from Discord, starts the camera path with fewer prompts, and prevents the contributor page from receiving every other room feed. The browser must still receive camera permission.

For browser-based gameplay or desktop capture, a reusable link can look like:

```
https://vdo.ninja/?room=TEAMROOM&push=alice-game&screenshare&autostart&view#p=ROOMPASSWORD
```

The browser will still require the user to choose the screen or window for security. On Windows, Game Capture avoids that browser workflow: save `TEAMROOM`, `alice-game`, and the password in the app, select the game/window, and select only that window's audio. Do not capture the complete desktop mix if it includes Discord.

Keeping the password after `#` prevents it from being sent in normal web requests and server logs. Treat every saved link as private anyway.

### 3. Build the OBS scene once

There are two useful layout models.

#### Fastest automatic layout

Add one OBS Browser Source containing a VDO.Ninja auto-scene:

```
https://vdo.ninja/?room=TEAMROOM&scene=0&slots=10&maxslots=10#p=ROOMPASSWORD
```

`scene=0` automatically adds live room feeds, so the operator does not need to touch OBS when someone joins. Set the slot count to the maximum number of simultaneous gameplay and camera feeds. This is quick, but game and camera feeds become separate tiles and the layout is intentionally generic.

#### Fixed branded layout

For a consistent gameplay-plus-camera composition, pre-add a Browser Source for every expected feed and position it in advance:

```
https://vdo.ninja/?room=TEAMROOM&view=alice-game&solo#p=ROOMPASSWORD
https://vdo.ninja/?room=TEAMROOM&view=alice-cam&solo&noaudio#p=ROOMPASSWORD
```

Repeat this for all members. An offline source waits in its assigned position; when that permanent publishing ID comes online, it appears without operator action.

For each Browser Source:

* enable **Control audio via OBS** for gameplay sources;
* keep camera sources silent;
* leave **Refresh browser when scene becomes active** disabled;
* leave **Shutdown source when not visible** disabled when immediate reconnection matters; and
* avoid loading the same VDO.Ninja feed through both a Browser Source and the plugin.

Export this scene collection and import it on each operator's OBS. Local capture device names can differ, so each operator should test their copy once. A personalized version can use direct local game/camera sources for that operator and VDO.Ninja sources for everyone else; this saves a local encode/decode round trip but requires one variant per operator.

The collection contains the private VDO.Ninja room links, so distribute it only to trusted operators and change the room credentials when access should be revoked.

#### One combined feed per member

If each person's camera must always be overlaid on their gameplay, build a dedicated **Contribution** scene in that person's OBS and publish it as one VDO.Ninja feed. In OBS Virtual Camera settings, select **Scene** and choose **Contribution** rather than **Program**. The [OBS Virtual Camera](https://obsproject.com/kb/virtual-camera-guide) can output that fixed scene while Program shows the multi-person Twitch production, avoiding a recursive picture.

Select OBS Virtual Camera in a VDO.Ninja browser publisher. Route game audio through a virtual audio device if the combined feed needs it; Virtual Camera itself carries video only. This reduces the production OBS from as many as ten live decodes to five, but it adds a browser encode and audio routing on each gaming computer. Unlike the Ninja OBS Plugin's publishing path, Virtual Camera does not consume OBS's Twitch streaming-output slot.

### 4. Route Discord and game audio only once

Audio duplication is the most common failure in this setup.

* Everyone should use headphones.
* Camera publishing links should have no microphone audio.
* Game Capture should send the game/window audio, not the full desktop mix containing Discord.
* The active OBS captures Discord application audio once.
* The active operator also adds their own microphone to OBS, because their microphone is not normally present in Discord's local output capture.
* For the active operator's own game, use either the local game source or its VDO.Ninja return, never both.
* Leave OBS monitoring off unless a deliberate mix-minus has been tested.

Record a short local sample with all members talking and playing. Confirm that every voice and game is present once, with no delayed duplicate.

### 5. Use a break-before-make handoff

Use a private Discord text channel as the on-air lock. Exactly one person may own it.

1. The incoming operator opens OBS, loads the shared program scene, and confirms video and meters.
2. The incoming operator writes `READY` in the control channel.
3. The outgoing operator stops only the Twitch output and writes `OFF AIR`. Their Game Capture and camera contribution can remain live.
4. The incoming operator starts their Twitch output with their own guest stream key.
5. Confirm the channel is live from Twitch's dashboard or a separate device.
6. The old operator closes the full program receiver unless they are remaining as the immediate standby.

Do not deliberately overlap two Twitch outputs. The stop/start order is easy to rehearse and avoids treating Twitch as a mixer. Expect a short interruption; Disconnect Protection may cover a brief encoder loss with its slate, but test the exact handoff before relying on it.

If the current operator disappears unexpectedly, another authorized member can start their OBS output. Depending on timing and Twitch state, viewers may see the disconnect slate or a stream restart.

## Solution 2: keep one production OBS online

An always-on production computer is the best match for both low player impact and clean operator takeover.

```
Players -> VDO.Ninja -> dedicated OBS -> Twitch
                              ^
                    authorized remote control
```

The production OBS can run on a spare desktop at a member's home or on suitable hosted hardware. It owns the Twitch connection, common overlays, browser sources, and Discord/program audio routing. Members take control of that OBS rather than replacing the Twitch encoder.

Join the production computer to the Discord call with its microphone disabled, then capture that Discord output in OBS. Because every participant is remote from this computer, their voices arrive in one mix; do not also enable microphone audio on their VDO.Ninja camera feeds.

Benefits:

* joining feeds still appear automatically;
* a member leaving does not disconnect Twitch;
* handoff means changing control, not changing encoder;
* gaming computers only publish their own feeds; and
* the Twitch key exists on one production machine.

OBS includes obs-websocket in OBS 28 and newer. Keep authentication enabled, use a strong unique password, and reach it through a private VPN or equivalent trusted network. Do not expose the obs-websocket port directly to the public Internet. Remote desktop is another option, although it should also be protected with strong authentication and restricted network access.

The production computer should use wired networking, a hardware H.264 encoder, and enough GPU decode/composition capacity for all live feeds. A UPS and automatic OBS launch are worthwhile if the machine is expected to be available without an operator on site.

This design still has one production-computer and one-site failure domain. Add a standby if that matters.

## Solution 3: active/standby production or a private relay

For higher uptime, keep two matching production encoders or place a switching relay in front of Twitch.

### Active/standby OBS

The primary OBS sends to Twitch. The standby keeps the same scene ready and may receive confidence feeds, but it does not transmit until the primary fails. A health check or operator initiates the takeover.

This is simpler than a full relay, but Twitch still sees an encoder reconnection. Keep the standby's full VDO.Ninja receive path closed until needed, or accept that every extra live receiver adds upload/network work for contributors.

### Stable relay output

A relay design keeps one outbound session connected to Twitch and switches between private contribution inputs:

```
Operator A program --\
Operator B program ----> authenticated switch/relay -> one Twitch output
Fallback slate -------/
```

The control layer should provide one active lease, a visible owner, a manual **Take over** action, a heartbeat, and a fallback slate. It must reject simultaneous ownership rather than guessing which operator wins.

This can make failover nearly invisible to Twitch, but it adds server administration, monitoring, bandwidth, latency, and possibly another encode generation. Standardize resolution, frame rate, keyframe interval, and audio layout across every input before attempting automatic switching.

VDO.Ninja can continue carrying the individual player feeds in this design; the relay only stabilizes the final program output.

## A small helper app can reduce the remaining clicks

A purpose-built VDO.Ninja example app could later add:

* a roster showing which POV and camera feeds are healthy;
* a clearly visible current Twitch operator;
* an expiring on-air lease with **Ready**, **Release**, and **Take over** actions;
* a handoff countdown and acknowledgement; and
* optional control of the local or dedicated OBS through authenticated obs-websocket.

Such an app should never store or transmit Twitch stream keys. It can coordinate operators and OBS, but only an always-on encoder or relay can preserve the same Twitch output session through a workstation handoff.

## Performance guidelines

Start conservatively and increase quality after a full-group test:

* use 720p30 or 720p60 for gameplay contributions before attempting 1080p60 from every player;
* use 360p30 or 720p30 for small webcam overlays;
* use a phone for the webcam when practical so the gaming computer only encodes the gameplay contribution;
* use a [hardware encoder in OBS](https://obsproject.com/kb/hardware-encoding) to reduce CPU load;
* cap the game's frame rate so OBS retains GPU headroom;
* keep contributor pages in publish-only mode with the empty `&view` parameter;
* let only the active program OBS, and briefly a standby during handoff, receive every feed;
* prefer wired Ethernet for the current operator or dedicated production machine; and
* watch OBS **Stats** for rendering lag, encoding lag, and network-dropped frames separately.

VDO.Ninja is peer-to-peer by default. Each additional active production receiver increases contributor upload demand even when a sender can reuse its encode. A single dedicated production receiver is therefore usually lighter than keeping five complete OBS program views open.

## Rehearsal checklist

Before the first public show:

* join every permanent game and camera ID in a different order;
* confirm late arrivals appear without changes in the active OBS;
* confirm Discord voices and game audio are present exactly once;
* leave and rejoin one contributor;
* perform a planned operator handoff;
* unplug or close the current operator unexpectedly and test recovery;
* verify that two operators cannot accidentally believe they are on air;
* check Twitch's dashboard and the public player after each transition; and
* save a local OBS recording of the test for audio and frame-drop review.

The replicated-OBS design is a good starting point. If the handoff interruption or gaming-PC load becomes unacceptable, move the same VDO.Ninja sources and scene collection to an always-on production computer; the contribution links do not need to change.

## Related guides

* [Using Game Capture and Spout2 with VDO.Ninja](/guides/using-game-capture-with-vdo.ninja)
* [Using the Ninja OBS Plugin with VDO.Ninja](/guides/using-ninja-obs-plugin-with-vdo.ninja)
* [How to send the output of one OBS to another](/guides/how-to-send-the-audio-video-output-of-one-obs-to-another-obs-using-vdo.ninja)
* [Permanent VDO.Ninja links and stream IDs](/guides/how-to-get-permanent-links)
* [System requirements for streaming](/guides/system-requirements-for-streaming)
* [Enabling WebRTC sources in OBS](/guides/enabling-webrtc-sources-in-obs)


# Low-latency game streaming for esports commentary

Send live gameplay to remote commentators and production with direct, low-latency VDO.Ninja feeds using browser sharing, Versus.cam, Game Capture, OBS, WHIP, or the Ninja OBS Plugin.

VDO.Ninja can send gameplay directly to a remote commentator and a production computer with much less delay than a public Twitch or YouTube player. The commentator watches the direct VDO.Ninja feed, while OBS combines the game and commentary for the audience.

{% hint style="info" %}
No Internet video path has literally zero latency. Capture, encoding, network transit, decoding, and the display each add some delay. The practical goal is a direct interactive feed: do not ask the commentator to monitor the delayed public broadcast.
{% endhint %}

<figure><img src="/files/5V9nqErE3Fw1rHmOAVAk" alt="Esports signal flow with gameplay sent through VDO.Ninja directly to a commentator and production OBS, followed by a separate delayed public broadcast path"><figcaption><p>The commentator follows the direct feed. Only the audience watches the public platform output.</p></figcaption></figure>

## The basic signal flow

There are three separate jobs:

1. A game computer, observer computer, or console capture computer publishes the gameplay and game audio.
2. The commentator watches that direct feed in VDO.Ninja and publishes their microphone back as a separate source.
3. The production computer receives the game and commentator sources in OBS, builds the show, and streams the finished program to the public platform.

Keeping the game and commentator microphone as separate sources gives the OBS operator independent level, mute, recording, and sync control.

## A simple room setup

This browser-only workflow is enough for one gameplay feed and one or more commentators:

1. On [VDO.Ninja](https://vdo.ninja/), create a private room and open its Director Control Center.
2. Send the room's guest invite to the game sender. They select **Share your Screen**, choose the game window or display, and enable shared audio when the browser offers it.
3. Send a guest invite to the commentator. They select their microphone and use headphones, then watch the gameplay inside the room.
4. In the director room, add the gameplay screen share and commentator to a scene, or copy their individual solo links.
5. Add the scene or solo links to OBS as Browser Sources. Enable **Control audio via OBS** for sources whose audio OBS must mix.

Chrome or another Chromium-based desktop browser exposes the broadest screen-share and system-audio choices. Browser security requires the game sender to confirm what is shared; a prepared link cannot silently capture a screen.

## The Versus.cam setup

[Versus.cam](https://versus.cam/) is a VDO.Ninja interface focused on esports contribution. It creates Chrome screen-share invites with gameplay-oriented settings and gives the operator a simple dashboard with a View Link for each incoming stream.

1. Enter a private room name and password at [Versus.cam](https://versus.cam/).
2. Select **Copy Invite Link** and send it to each game sender.
3. Each sender opens the link in Chrome or Edge, selects the game window or display, and shares its audio.
4. Copy each stream's **View Link** into OBS and give the required direct View Link to the commentator.
5. Carry the commentator microphone and private producer talkback in a normal VDO.Ninja room or [Comms](https://comms.cam/).

Versus.cam contribution links are designed for one-way game ingest; they do not turn the game senders into an open conference. This keeps the game workflow simple, while the commentary/intercom path remains separate.

## Choose a publishing method

Each row below is a complete way to get a game source into VDO.Ninja. They are options, not steps that must be combined.

| Publishing method                                                   | What the sender does                                                                                          | Game audio                                                                             | Main constraints                                                                                              |
| ------------------------------------------------------------------- | ------------------------------------------------------------------------------------------------------------- | -------------------------------------------------------------------------------------- | ------------------------------------------------------------------------------------------------------------- |
| Normal browser screen share                                         | Opens a VDO.Ninja invite and shares a game window, browser tab, or display                                    | Uses the browser's available tab/system-audio option                                   | No install; capture and audio choices vary by browser, operating system, and game                             |
| [Versus.cam](https://versus.cam/)                                   | Opens an esports-oriented invite and shares through Chrome/Chromium                                           | Uses the browser's screen-share audio                                                  | Adds an operator dashboard and preconfigured game-stream links; commentary/talkback stays separate            |
| [Game Capture](https://vdo.ninja/gamecapture)                       | Selects a Windows game, app window, camera, or Spout2 source and goes live                                    | Can capture the selected window's audio without a virtual cable                        | Windows only; download from the [latest release](https://github.com/steveseguin/game-capture/releases/latest) |
| OBS Virtual Camera                                                  | Captures the game or capture card in OBS, starts Virtual Camera, then selects it in a VDO.Ninja publisher     | Virtual Camera is video-only; route audio with an OBS monitor and virtual audio device | Uses OBS plus a browser, but does not consume OBS's normal streaming-output slot                              |
| OBS WHIP output                                                     | Captures and mixes in OBS, then publishes to VDO.Ninja from OBS's WHIP service                                | Carries the OBS program audio                                                          | Uses OBS's streaming output; network/NAT and multi-viewer behavior require testing                            |
| [Ninja OBS Plugin](https://steveseguin.github.io/ninja-obs-plugin/) | Publishes an OBS output through the VDO.Ninja service, or receives a VDO.Ninja source in OBS                  | Carries the OBS mix when publishing                                                    | Install the release matching the installed OBS version; publishing uses OBS's active streaming-output slot    |
| HDMI capture card                                                   | Connects a console or observer output to a computer, then selects the card in VDO.Ninja, Game Capture, or OBS | Depends on the card and selected publishing path                                       | Use the card's passthrough for local play rather than playing from a delayed capture preview                  |

<figure><img src="/files/drrj240XU4A3XhbgPTwn" alt="Six game publishing paths including browser screen share, Versus.cam, Game Capture, OBS Virtual Camera, OBS WHIP, and the Ninja OBS Plugin converging on VDO.Ninja and feeding a commentator and production OBS"><figcaption><p>Choose one publishing path for each game source. The resulting VDO.Ninja feed can serve both commentary and production.</p></figcaption></figure>

### Normal Chrome screen share

This path needs no software beyond the browser. Sharing **Entire Screen** can produce a steadier high frame rate on some systems, while sharing a window exposes less of the desktop. Test the exact game: anti-cheat systems, exclusive fullscreen modes, GPU selection, and browser capture behavior can cause a black frame or a lower frame rate.

If the game audio checkbox is unavailable, use [application-audio routing](/guides/audio), Game Capture, or an OBS-based path. The [1080p screen-share guide](/guides/how-to-screen-share-in-1080p) covers high-frame-rate links and quality controls.

### Game Capture on Windows

[Game Capture](/guides/using-game-capture-with-vdo.ninja) is a native Windows publisher. A player can select the game or app window, its audio, a hardware encoder, and VDO.Ninja stream/room details without running OBS. It also supports cameras and Spout2 sources.

The app can reuse one HD encode for multiple viewers, but direct VDO.Ninja viewers still create separate network paths. A commentator plus a production receiver therefore requires more sender upload than one receiver alone.

### OBS Virtual Camera

This path works when OBS must crop a game, combine a capture card and graphics, or build a dedicated contribution scene. Start OBS Virtual Camera, select it as the VDO.Ninja camera, and select a virtual audio device as the microphone if the OBS mix must travel with it.

Virtual Camera carries video only. Keep the detailed [OBS-to-VDO.Ninja Virtual Camera guide](/guides/publish-from-obs-into-vdo.ninja) open while setting up audio, and prevent the contribution scene from capturing its own VDO.Ninja return.

### OBS WHIP

OBS can publish its encoded video and program audio directly to VDO.Ninja:

1. In OBS, open **Settings -> Stream** and select **WHIP**.
2. Set the server to `https://whip.vdo.ninja`.
3. Use a private, unique stream token as the Stream Key.
4. Open `https://vdo.ninja/?whip=YOUR_STREAM_TOKEN` on the receiving side.
5. Start streaming in OBS.

WHIP removes the browser publisher and Virtual Camera from this path. It uses OBS's normal streaming output, so a computer that must also stream the finished show needs a deliberately tested second-output arrangement or a separate contribution OBS. See [From OBS to VDO.Ninja using WHIP](/guides/from-obs-to-vdo.ninja-using-whip) and [OBS WHIP output settings](/guides/obs-whip-output-settings) for the current compatibility and network caveats.

### Ninja OBS Plugin

The [Ninja OBS Plugin](/guides/using-ninja-obs-plugin-with-vdo.ninja) adds a VDO.Ninja streaming service and VDO.Ninja sources directly to OBS. It can publish an OBS composition with VDO.Ninja room/stream semantics, and it can receive feeds without manually managing a separate browser window.

This is distinct from WHIP. The plugin speaks the VDO.Ninja workflow directly, including room and multi-viewer behavior. Its publishing mode uses the active OBS stream-output slot; its native receive mode is still marked experimental, while its browser-backed receiver follows the normal VDO.Ninja viewing path.

## Reusable standalone links

For a small setup that does not need a room, make one private game stream ID and one private commentator stream ID. Replace every example value before use.

Game sender using browser screen share:

```
https://vdo.ninja/?push=GAME01&screenshare&quality=0&screensharestereo#p=STRONGPASSWORD
```

Direct game monitor for the commentator and the production Browser Source:

```
https://vdo.ninja/?view=GAME01&videobitrate=10000&scale=100#p=STRONGPASSWORD
```

Commentator microphone publisher:

```
https://vdo.ninja/?push=CASTER01&miconly#p=STRONGPASSWORD
```

Commentator audio input for OBS:

```
https://vdo.ninja/?view=CASTER01&solo#p=STRONGPASSWORD
```

Use unique, hard-to-guess IDs and a strong password. Do not run two simultaneous publishers with the same Push ID. If the producer must speak privately to the commentator, use a room or [Comms](/steves-helper-apps/comms) rather than adding producer talkback to the public program mix.

## Prevent echo and doubled audio

Audio routing is usually the part that needs the most rehearsal:

* The game source should carry game audio, not Discord, Comms, or the commentator's returned voice.
* The commentator should wear headphones and publish their microphone once.
* OBS should capture each game and voice source once. Mute duplicate room, desktop, or public-player audio.
* Private producer talkback should stay out of the show mix unless it is intentionally placed on air.
* The commentator should mute the Twitch/YouTube player or avoid opening it on the commentary computer.

If the game sender and commentator must talk to each other, a normal VDO.Ninja room provides the simplest two-way path. For a larger crew with private channels, use [Comms](/steves-helper-apps/comms).

## Keep delay low without destroying quality

* Use the direct VDO.Ninja view for commentary; a public platform player is normally many seconds later.
* Use wired Ethernet where practical and leave upload headroom above the configured video bitrate.
* Give the game and capture/encoder enough GPU headroom; limiting the game's frame rate can help an overloaded system.
* Do not add `&buffer` to a commentator's view unless smoother playback is more important than added delay.
* Normal WebRTC mode is the low-delay starting point. Buffered or chunked modes intentionally trade more delay for resilience.
* A direct publisher sends media separately to each active viewer. Count the commentator, production OBS, confidence monitors, and backups when checking upload capacity.
* For detailed 1080p60 gameplay, plan around the [12-20 Mbps upload range described in the screen-share guide](/guides/how-to-screen-share-in-1080p#bandwidth-requirements), then verify the real route with [VDO.Ninja's speed test](https://vdo.ninja/speedtest). This is a test target, not a guarantee.

The commentator's viewing bitrate and the production bitrate do not need to match. Production may request the full-quality feed while the commentator uses a lighter direct monitor if their connection is weaker.

## Show-day checklist

1. Test the exact game and capture mode; menus or test videos do not expose every fullscreen or anti-cheat issue.
2. Confirm the game sender sees the correct source and that game audio reaches OBS.
3. Confirm the commentator watches only the direct VDO.Ninja feed and hears no delayed duplicate.
4. Confirm the commentator microphone reaches OBS as a separate source.
5. Record a local OBS sample and check sync, frame rate, clarity, and audio levels.
6. Disconnect and reconnect each sender once; permanent Push/View IDs should recover into the same OBS inputs.
7. Test with every planned viewer open at the same time so publisher upload fan-out is realistic.
8. Keep a second capture option ready, such as browser screen share, Game Capture, or OBS, if the primary method cannot capture that game.

## Related guides

* [How to screen share in 1080p](/guides/how-to-screen-share-in-1080p)
* [Using Game Capture and Spout2 with VDO.Ninja](/guides/using-game-capture-with-vdo.ninja)
* [Using the Ninja OBS Plugin with VDO.Ninja](/guides/using-ninja-obs-plugin-with-vdo.ninja)
* [Publish from OBS into VDO.Ninja](/guides/publish-from-obs-into-vdo.ninja)
* [From OBS to VDO.Ninja using WHIP](/guides/from-obs-to-vdo.ninja-using-whip)
* [PlayStation or Xbox to VDO.Ninja](/guides/playstation-or-xbox-to-vdo.ninja)
* [How to capture application audio](/guides/audio)
* [Send an OBS return feed to guests](/guides/send-an-obs-return-feed-to-guests)


# Stream Apple Vision Pro POV and an iPhone camera to TikTok with OBS

Build a vertical TikTok LIVE scene in OBS with an Apple Vision Pro point-of-view feed, a separate iPhone front camera, optional private chat monitoring, and a custom overlay.

This workflow combines two independent live pictures into one portrait program:

* The view mirrored from an Apple Vision Pro.
* A separate iPhone front camera.
* Optional TikTok chat monitored privately through Social Stream Ninja.
* A custom background or transparent overlay.
* OBS Studio as the compositor and TikTok publisher.

VDO.Ninja transports live feeds into OBS. OBS positions, crops, mixes, records, and encodes them. TikTok receives only the finished OBS program.

<figure><img src="/files/4MdnSXLYfLF9SDdBei2T" alt="Conceptual studio setup with a person wearing a mixed-reality headset, an iPhone front camera, and a laptop composing two video feeds into a portrait scene"><figcaption><p>Conceptual hardware layout. The generated interface shown on the laptop is illustrative, not an exact OBS screenshot.</p></figcaption></figure>

{% hint style="info" %}
This guide uses OBS to publish directly when TikTok has provided the account with a stream server URL and stream key. TikTok controls LIVE access, and its requirements vary by account and region. If the account only has TikTok LIVE Studio access, the capture and layout principles still apply, but the final publishing handoff is different.
{% endhint %}

## How the pieces fit together

<figure><img src="/files/cK04qzLCLTQKTsMiejko" alt="Routing diagram showing Apple Vision Pro POV and an iPhone camera entering OBS through supported capture paths, OBS building a portrait program, and the finished program going to TikTok"><figcaption><p>Choose one Vision Pro route. The iPhone face camera remains a separate source. Social Stream Ninja can return chat privately without placing it in the public program.</p></figcaption></figure>

## What is confirmed, and what still needs a device test

The foundations of this workflow are documented by the platform owners:

* Apple supports mirroring the Vision Pro view to an iPhone, iPad, supported Mac, Apple TV 4K, or AirPlay-compatible television. Apple states that Video Mirroring can share the view at up to 1080p. [Apple Vision Pro mirroring instructions](https://support.apple.com/en-us/119944)
* The VDO.Ninja App Store listing includes Apple Vision compatibility and documents camera or ReplayKit-based screen publishing into a VDO.Ninja view link. [VDO.Ninja on the App Store](https://apps.apple.com/us/app/vdo-ninja/id1607609685)
* OBS Browser Source is available on Windows, macOS, and Linux and accepts a URL plus a defined viewport size and frame rate. [OBS Browser Source documentation](https://obsproject.com/kb/browser-source)
* TikTok LIVE Studio supports portrait scenes, multiple sources, preview, audio mixing, and performance monitoring. [TikTok LIVE Studio basics](https://www.tiktok.com/live/studio/help/article/Get-started-with-your-first-LIVE/Learn-the-basics-of-LIVE?lang=en)

The following still needs testing on the exact devices and OS versions used for the production:

* Direct ReplayKit screen publishing from the VDO.Ninja app running on Vision Pro. The App Store entry establishes install compatibility only; it does not establish reliable screen publishing on every visionOS release.
* Any third-party Windows AirPlay receiver. Windows is not included in Apple's official Vision Pro mirroring destination list.
* System audio from the mirrored or screen-shared content. Confirm it with the OBS audio meters and a recording; do not assume every app exposes its audio.
* End-to-end latency and thermal stability for the intended stream duration.

## What you need

* Apple Vision Pro.
* An iPhone for the separate front-camera shot.
* The [VDO.Ninja native mobile app](/steves-helper-apps/native-mobile-app) on each Apple device that will publish through VDO.Ninja.
* OBS Studio on a Mac, Windows PC, or Linux computer.
* A reliable local network. Ethernet from the production computer to the router is useful when available.
* TikTok LIVE access. Direct OBS publishing also requires a stream server URL and stream key supplied by TikTok.
* A portrait scene design, ideally exported at `1080x1920`.
* Headphones if any source audio will be monitored in the room.

{% hint style="warning" %}
Do not plan on one iPhone providing two independent VDO.Ninja streams at once. The documented native-app modes select a camera or the screen. The optional front-and-rear camera mix is one composited camera stream; it is not a separate Vision Pro screen feed plus face camera.
{% endhint %}

## Step 1: Choose the Vision Pro route

Only one of the following routes is needed.

### Route A: Publish the Vision Pro screen directly through VDO.Ninja

This route has the fewest hops when it works on the target Vision Pro and visionOS version.

1. Install the VDO.Ninja app on Vision Pro.
2. Choose **SCREEN**.
3. Set a stable, private Stream ID such as `VISIONPOV7F3K`. Stream IDs are case-sensitive; use only letters and numbers for the most predictable result.
4. Tap **Connect**.
5. Start the VDO.Ninja broadcast service when the system screen-broadcast picker appears.
6. Open the matching view link on the OBS computer and verify motion, orientation, and audio before continuing.

Example viewer link:

```
https://vdo.ninja/?view=VISIONPOV7F3K&cleanoutput&noaudio&videobitrate=6000
```

Replace every example Stream ID in this guide with a unique value of your own.

[`&cleanoutput`](/advanced-settings/design-parameters/cleanoutput) hides production UI. [`&noaudio`](/advanced-settings/audio-parameters/noaudio) makes this a video-only source when another microphone will be the audio master. [`&videobitrate=6000`](/advanced-settings/video-bitrate-parameters/bitrate) is a starting request from the viewer, not a guaranteed rate; lower it if the network or computer cannot sustain it.

{% hint style="warning" %}
Treat this route as conditional until it passes a full-length test on the exact Vision Pro. If screen publishing is unavailable, unstable, or does not show the intended wearer view, use Route B or C.
{% endhint %}

### Route B: Mirror Vision Pro directly to a Mac

This uses Apple's documented AirPlay path and does not require VDO.Ninja for the Vision Pro picture.

1. Connect the Vision Pro and Mac to the same network and enable Wi-Fi and Bluetooth.
2. On the Mac, open **System Settings** -> **General** -> **AirDrop & Handoff**, then enable **AirPlay Receiver**.
3. On Vision Pro, open Control Center, choose **Mirror My View**, and select the Mac.
4. In OBS, add **macOS Screen Capture** and select the display, window, or application area showing the mirrored view.
5. Crop away any receiver controls or unused borders.

Apple documents mirroring at up to 1080p. Protected movies, television programs, and similar protected video may appear black in the mirror. [Apple Vision Pro mirroring limitations](https://support.apple.com/en-us/119944)

### Route C: Use an Apple device as a bridge to a Windows computer (conditional)

Apple's supported destination list does not include Windows. A practical bridge is therefore:

```
Vision Pro -> AirPlay to iPhone or iPad -> VDO.Ninja Screen -> OBS on Windows
```

1. On the bridge iPhone or iPad, configure the VDO.Ninja app's **SCREEN** mode and Stream ID.
2. Start the VDO.Ninja ReplayKit broadcast service.
3. Return to the Apple Vision Pro app, enable **AirPlay Receiver**, and leave that app in the foreground.
4. From Vision Pro, choose **Mirror My View** and select the bridge device.
5. Add the bridge device's VDO.Ninja view link to OBS as described below.

Test this exact chain before relying on it. ReplayKit controls which video and audio samples an iOS app receives. In the European Union, Apple says the Apple Vision Pro app must be open and in the foreground for the iPhone or iPad to appear as a mirroring destination in Vision Pro Control Center. If the bridge is the only iPhone available, use a different device or webcam for the face camera.

A third-party Windows AirPlay receiver is another possibility, but it is not an Apple-supported path. Validate its latency, picture quality, audio behavior, licensing, and stability before a live production.

## Step 2: Publish the iPhone front camera

1. Mount the iPhone securely. Use landscape orientation if the design uses a wide face-camera window.
2. Open the VDO.Ninja native app and choose **FRONT CAMERA**.
3. Set a different stable Stream ID, such as `PHONECAM8R2M`.
4. Select the microphone only if this phone will be the program's audio master.
5. Tap **Connect** and grant camera and microphone permissions when requested.
6. Keep the phone powered and run a thermal test for at least as long as the planned LIVE.

Example viewer link when the phone supplies program audio:

```
https://vdo.ninja/?view=PHONECAM8R2M&cleanoutput&videobitrate=4000
```

If a USB microphone or another OBS source supplies program audio, add `&noaudio`:

```
https://vdo.ninja/?view=PHONECAM8R2M&cleanoutput&noaudio&videobitrate=4000
```

Use private, difficult-to-guess Stream IDs and a matching password when appropriate. See [stream IDs](/getting-started/stream-ids) and [permanent links](/guides/how-to-get-permanent-links) for the security and reuse details.

## Step 3: Add the VDO.Ninja feeds to OBS

For each VDO.Ninja feed:

1. In OBS, select **Sources** -> **+** -> **Browser Source**.
2. Give the source a clear name, such as `iPhone Face Camera` or `Vision Pro POV`.
3. Paste the matching VDO.Ninja viewer link.
4. For a landscape source, start with a Browser Source viewport of `1280x720` and 30 fps. For a portrait phone source, use `720x1280`.
5. Leave **Shutdown source when not visible** disabled so hiding the source does not intentionally tear down its page.
6. Leave **Refresh browser when scene becomes active** disabled unless automatic reloads are specifically wanted.
7. Enable **Control audio via OBS** only for a Browser Source whose audio OBS should mix.

OBS renders a Browser Source at the width, height, and frame rate set in its properties. Those values are separate from the source's final size on the portrait canvas. [OBS Browser Source properties](https://obsproject.com/kb/browser-source)

{% hint style="info" %}
If a VDO.Ninja link works in Chrome but not in OBS, use the [Enabling WebRTC Sources in OBS](/guides/enabling-webrtc-sources-in-obs) troubleshooting guide.
{% endhint %}

## Step 4: Build the portrait OBS scene

Open **Settings** -> **Video** and use:

| Setting                    | Normal starting point | Lower-load starting point |
| -------------------------- | --------------------- | ------------------------- |
| Base (Canvas) Resolution   | `1080x1920`           | `1080x1920`               |
| Output (Scaled) Resolution | `1080x1920`           | `720x1280`                |
| Common FPS Value           | `30`                  | `30`                      |

The Base Canvas is the workspace in which the sources are positioned. The Output Resolution is the encoded stream size. OBS documents these as separate controls and notes that 60 fps requires substantially more resources than 30 fps. [OBS Studio video settings](https://obsproject.com/kb/obs-studio-overview#video)

### Use the correct source order

OBS draws sources from the bottom of the Sources list upward. A source higher in the list covers sources below it. [OBS Sources Guide](https://obsproject.com/kb/sources-guide)

For artwork with transparent video openings, use this order from top to bottom:

1. Labels or intentional public chat graphics.
2. Transparent overlay PNG.
3. iPhone face camera.
4. Vision Pro POV.
5. Background image or color.

For a flattened background with opaque black rectangles, use this order instead:

1. Labels.
2. iPhone face camera.
3. Vision Pro POV.
4. Flattened artwork or background.

A `.png` filename does not guarantee transparency. Transparent openings should show a checkerboard in an image editor. If the openings are solid black, the image must sit below the videos or be re-exported with an alpha channel.

### Crop; do not stretch

Scale each video proportionally until it fills its intended window, then crop the excess:

* Windows and Linux: hold `Alt` while dragging a source edge.
* macOS: hold `Option` while dragging a source edge.
* For precise values, right-click the source and open **Transform** -> **Edit Transform**.

Stretching a landscape feed into a non-matching frame distorts faces and the Vision Pro view. OBS recommends scaling and cropping rather than stretching. [OBS aspect-ratio and cropping guide](https://obsproject.com/kb/aspect-ratio-guide)

Designing both video openings at `16:9` avoids unnecessary cropping. If the artwork uses a wider or taller opening, decide in advance which part of the source may be lost.

## Step 5: Choose one program-audio master

The simplest reliable setup has one voice source:

* The iPhone microphone, or
* A microphone connected directly to the OBS computer.

Add `&noaudio` to every VDO.Ninja view link that should be video-only. This prevents duplicated room sound and simplifies troubleshooting. If the Vision Pro content also needs audio, enable it deliberately as a separate OBS mixer source and verify the result with headphones.

Use **Control audio via OBS** when individual Browser Source volume, filters, or routing are needed. OBS added this control so Browser Source audio can appear independently in its mixer. [OBS Browser Source audio control](https://obsproject.com/blog/progress-report-september-2019#browser-source-audio-can-now-go-through-obs)

Before going live, record at least five minutes locally and listen to the file. Check for:

* A single clean voice rather than two delayed copies.
* Hiss, clipping, or automatic gain pumping.
* Vision Pro content audio, if required.
* Lip sync during a hand clap or spoken count.

If noise appears only after opening TikTok on a capture iPhone, keep TikTok off that phone. Let OBS on the computer publish to TikTok and use the mobile app only for its assigned capture or monitoring role.

## Step 6: Optionally monitor TikTok chat privately

Social Stream Ninja can collect TikTok LIVE chat on the production computer and send it to the VDO.Ninja mobile app without placing it in the public OBS scene.

1. Install the current Social Stream Ninja browser extension or standalone app from the [official Social Stream Ninja repository](https://github.com/steveseguin/social_stream).
2. Open the TikTok LIVE page while signed in and keep its chat open. The extension version currently requires the TikTok chat to remain open and visible.
3. Enable chat streaming in Social Stream Ninja and note its Session ID.
4. In the VDO.Ninja mobile app, enable **Social Stream**, enter the same Session ID, and select the desired WebRTC or server connection mode.
5. Disable chat text-to-speech unless it is intentionally part of the audio design.

TikTok chat is a currently supported Social Stream Ninja source, and the current VDO.Ninja iOS app includes Social Stream Ninja integration. [Social Stream Ninja supported sources](https://github.com/steveseguin/social_stream#supported-sites)

Do not add a Social Stream featured or dock URL to the OBS scene unless viewers are meant to see chat publicly.

## Step 7: Send the OBS program to TikTok

If TikTok supplied a stream server URL and stream key:

1. Open **OBS Settings** -> **Stream**.
2. Select **Custom** as the service.
3. Enter the server URL supplied by TikTok.
4. Enter the stream key supplied by TikTok.
5. Keep the stream key secret. Do not include it in screenshots, scene collections, or support messages.
6. Use TikTok's current LIVE Center recommendations for bitrate, encoder, and keyframe interval rather than copying an old preset from another guide.
7. Start with a private or limited test if the account provides one, or record locally while previewing every source before the public LIVE.

OBS supports custom streaming servers and a separate stream-key field. [OBS Stream settings](https://obsproject.com/kb/obs-studio-overview#stream)

TikTok LIVE access requirements vary by region and can change without notice. [TikTok LIVE Studio access information](https://www.tiktok.com/live/studio/help/article/Before-you-go-LIVE/Apply-for-LIVE-access?lang=en)

## Performance and latency tuning

Every extra capture or transport hop can add delay. Compare the available Vision Pro routes rather than assuming the most complicated route is best.

For an older laptop or a system showing lag:

1. Use `720x1280` output at 30 fps.
2. Keep VDO.Ninja Browser Sources at `1280x720` rather than unnecessarily decoding 4K video.
3. Lower `&videobitrate` in steps, such as from `6000` to `4000` or `2500`.
4. Select a hardware encoder in OBS when the computer offers a supported one.
5. Remove unnecessary browser sources, animated overlays, filters, and duplicate previews.
6. Open **View** -> **Stats** and watch rendering lag, encoding lag, and network dropped frames during a recording or test stream.
7. Keep the production computer cool and connected to power.

OBS confirms that scene compositing requires GPU resources and recommends lowering output resolution or frame rate and simplifying scenes when encoding cannot keep up. [OBS encoding performance troubleshooting](https://obsproject.com/kb/encoding-performance-troubleshooting)

## Common problems

| Symptom                                              | Likely cause                                                                     | Fix                                                                                               |
| ---------------------------------------------------- | -------------------------------------------------------------------------------- | ------------------------------------------------------------------------------------------------- |
| Portrait artwork appears tiny with large black areas | OBS still has a landscape Base Canvas                                            | Change Base Canvas to `1080x1920`, then realign the sources.                                      |
| Video disappears behind the design                   | The artwork is opaque or the source order is wrong                               | Put flattened artwork below video, or export transparent cutouts and put the overlay above video. |
| Faces or POV look unnaturally wide or tall           | The source was stretched                                                         | Restore its aspect ratio, scale it to fill, and crop the excess.                                  |
| Only the Vision Pro feed or face camera is available | One iPhone is being asked to bridge the mirror and act as the independent camera | Publish directly from Vision Pro, AirPlay to a Mac, or add a second camera/bridge device.         |
| Mirrored protected video is black                    | Apple blocks protected video from Vision Pro mirroring                           | Use content that permits mirroring; this is not an OBS or VDO.Ninja defect.                       |
| Feed is smooth in one browser but delayed in OBS     | Browser Source settings, computer load, or a different network route             | Match the Browser Source viewport to the source, reduce load, and compare OBS statistics.         |
| Voice has echo or hiss                               | More than one audio path is active                                               | Keep one audio master, add `&noaudio` to video-only links, and test a local recording.            |
| TikTok chat stops updating                           | The source chat was closed, hidden, or the Session IDs differ                    | Keep TikTok chat visible when using the extension and confirm both Session IDs match.             |

## Pre-LIVE checklist

* Both VDO.Ninja links reconnect after a deliberate refresh.
* The OBS Base Canvas is portrait and the output has no unintended side bars.
* Video is cropped without stretching.
* Exactly one intended voice path reaches the OBS program mix.
* A local test recording has been watched and heard from beginning to end.
* The Vision Pro route remains stable for the intended session length.
* OBS statistics do not accumulate rendering, encoding, or network frame loss.
* The iPhone and Vision Pro are powered, cool, and on the intended network.
* Notifications and private information are hidden from the mirrored Vision Pro view.
* The TikTok stream key is not visible anywhere in the scene or screenshots.

## Related guides

* [VDO.Ninja native mobile app guide](/steves-helper-apps/native-mobile-app)
* [How to screen share your iPhone or iPad](/guides/screen-share-your-iphone-ipad)
* [Video bitrate for push/view links](/guides/video-bitrate-for-push-view-links)
* [How to control bitrate and quality](/guides/how-do-i-control-bitrate-quality)
* [Enabling WebRTC Sources in OBS](/guides/enabling-webrtc-sources-in-obs)
* [Social Stream Ninja](/steves-helper-apps/social-stream-ninja)


# Active speaker layouts in OBS

How to build OBS layouts with fixed guest boxes and a larger active speaker or screen-share window using VDO.Ninja.

This guide covers a common production layout: several guests shown as smaller boxes, with one larger video area for the current speaker, featured guest, or screen share.

There are a few ways to do this. The best option depends on whether you want VDO.Ninja to manage the layout, or whether you want to build the layout manually in OBS.

## Option 1: Let VDO.Ninja manage the main layout

Use a VDO.Ninja scene link as the main Browser Source in OBS:

```
https://vdo.ninja/?room=ROOMNAME&scene=0
```

Replace `ROOMNAME` with your room name.

If your audio is coming from somewhere else, such as an online radio player, you can disable incoming VDO.Ninja audio on that source:

```
https://vdo.ninja/?room=ROOMNAME&scene=0&noaudio
```

In the director room, use the Featured / Highlight control to choose which guest is emphasized in the scene output. Any guest video can be featured. Holding `CTRL` while clicking the feature option can apply a partial featured layout, around 80%, rather than fully replacing the view.

This is usually the simplest method if you want one OBS Browser Source for the composed VDO.Ninja layout.

## Option 2: Use solo links for fixed guest boxes

If you want three fixed guest boxes on the side of your OBS canvas, add each guest as a separate OBS Browser Source using their solo link:

```
https://vdo.ninja/?view=GUESTID&room=ROOMNAME&solo
```

If you do not want audio from these sources:

```
https://vdo.ninja/?view=GUESTID&room=ROOMNAME&solo&noaudio
```

Replace `GUESTID` with the guest's stream ID.

This gives OBS full control over position, crop, scaling, filters, and scene switching. The tradeoff is that switching the large active speaker view becomes something you manage in OBS with scenes, source visibility, hotkeys, or duplicated/cropped sources.

## Option 3: Use VDO.Ninja for the main window and OBS for the side boxes

A hybrid setup often works well:

* Main large Browser Source: a VDO.Ninja scene link, such as `&scene=0`, controlled by the director's Featured / Highlight button.
* Side guest boxes: individual `&solo` links, positioned manually in OBS.

Example main source:

```
https://vdo.ninja/?room=ROOMNAME&scene=0&noaudio
```

Example side source:

```
https://vdo.ninja/?view=GUESTID&room=ROOMNAME&solo&noaudio
```

This keeps the main speaker switching inside VDO.Ninja, while letting OBS handle the permanent guest boxes.

## Screen-share layouts

When someone screen shares, VDO.Ninja can automatically make the screen share large and place the guest videos beside it.

By default, the screen share is large and the guests are placed on the right. To put the guests on the left instead, add `&alignright` or `&rightalign` to the scene or view URL:

```
https://vdo.ninja/?room=ROOMNAME&scene=0&alignright
```

or:

```
https://vdo.ninja/?room=ROOMNAME&scene=0&rightalign
```

This option is for the screen-share auto-layout. It does not move arbitrary Featured / Highlight videos.

If you do not want screen shares to become larger than other videos, use `&smallshare`.

## Option 4: Use the Mixer App

The Mixer App provides a more visual layout control surface:

```
https://vdo.ninja/mixer.html
```

This can be useful if you want to arrange guests and scenes from a dedicated mixer interface rather than building everything directly in OBS.

## Which method should I use?

| Goal                                     | Suggested method                                                    |
| ---------------------------------------- | ------------------------------------------------------------------- |
| Fixed guest boxes on the side            | Use separate `&solo` links in OBS                                   |
| One large active speaker window          | Use a VDO.Ninja `&scene` link and the Featured / Highlight controls |
| Guests on the left during screen sharing | Add `&alignright` or `&rightalign` to the scene/view link           |
| Maximum layout control                   | Build custom OBS scenes with individual Browser Sources             |
| Visual VDO.Ninja layout control          | Use `https://vdo.ninja/mixer.html`                                  |

If none of these approaches matches your production workflow, feel free to share the exact layout and switching behavior you want. Suggestions are welcome, and better layout options can be considered.


# Active speaker, Highlight, and talking indicators

Use active-speaker switching, Highlight, fixed solo sources, and talking indicators for live VDO.Ninja productions.

This guide explains the common ways to feature the current speaker, manually highlight a guest, keep other guests visible in OBS, and show a green talking indicator around people who are speaking.

## Quick choice

| Goal                                                                      | Best option                                                                       |
| ------------------------------------------------------------------------- | --------------------------------------------------------------------------------- |
| Automatically show only the current speaker                               | Use `&activespeaker=1` or `&activespeaker=3` on a scene/view link                 |
| Automatically show all current speakers                                   | Use `&activespeaker=2` or `&activespeaker=4`                                      |
| Automatically make the current speaker larger while others remain visible | Use `&activehighlight=2` or `&activespeakerfeatured`                              |
| Manually feature one guest from the director room                         | Use the director Highlight / Featured control                                     |
| Build a fully custom OBS layout with fixed guest boxes                    | Use a large `&activespeaker` browser source plus separate `&solo` sources in OBS  |
| Add a green border or dot when guests talk                                | Use `&meterstyle=2`, `&meterstyle=3`, or `&meterstyle=4` with CSS                 |
| Feature social chat messages                                              | Use Social Stream Ninja; this is separate from VDO.Ninja guest video highlighting |

## Automatic active speaker

Add `&activespeaker`, `&speakerview`, or `&sas` to a viewer, room, or scene link.

```
https://vdo.ninja/?room=ROOMNAME&scene=0&activespeaker=3&cleanoutput
```

Modes:

| Mode               | Behavior                                                       |
| ------------------ | -------------------------------------------------------------- |
| `&activespeaker=1` | Shows one speaker at a time, including audio-only sources      |
| `&activespeaker=2` | Shows everyone currently talking, including audio-only sources |
| `&activespeaker=3` | Shows one speaker at a time, but only video sources            |
| `&activespeaker=4` | Shows everyone currently talking, but only video sources       |

Use `3` or `4` for most OBS scene layouts, since audio-only guests will not replace the video layout.

You can slow down one-speaker switching with `&activespeakerdelay`, `&speakerviewdelay`, or `&sasdelay`. This applies to modes `1` and `3`.

```
https://vdo.ninja/?room=ROOMNAME&scene=0&activespeaker=3&activespeakerdelay=1200
```

The delay is in milliseconds. This helps prevent rapid switching when people briefly interrupt or laugh.

{% content-ref url="/pages/-MZHeaXqdR9WQuzFCjZc" %}
[\&activespeaker](/advanced-settings/mixer-scene-parameters/activespeaker)
{% endcontent-ref %}

{% content-ref url="/pages/C3wiMCwjXsgCwbWDJQUr" %}
[\&activespeakerdelay](/advanced-settings/mixer-scene-parameters/and-activespeakerdelay)
{% endcontent-ref %}

## Automatic active speaker Highlight

Use `&activehighlight=2` when you want VDO.Ninja to keep everyone in the scene, but automatically make the current speaker larger using the secondary Highlight / Featured layout.

```
https://vdo.ninja/?room=ROOMNAME&scene=0&activehighlight=2&cleanoutput
```

`&activespeakerfeatured` is an alias for the same mode.

```
https://vdo.ninja/?room=ROOMNAME&scene=0&activespeakerfeatured&cleanoutput
```

Options:

| Mode                     | Behavior                                                                                                             |
| ------------------------ | -------------------------------------------------------------------------------------------------------------------- |
| `&activehighlight=2`     | Uses the secondary Highlight / Featured mode, so the active speaker becomes larger while other guests remain visible |
| `&activespeakerfeatured` | Alias for `&activehighlight=2`                                                                                       |
| `&activehighlight=1`     | Uses normal Highlight, which is closer to a full speaker focus mode                                                  |

By itself, `&activehighlight=2` does not enable `&activespeaker`, so it does not hide non-speaking guests. If you combine it with `&activespeaker`, the normal active-speaker hide/show behavior still applies.

You can also add `&activespeakerdelay` if speaker changes are happening too quickly.

This link still needs to receive and process guest audio, so do not add `&noaudio` or `&noap` to the same scene/view link. By default, it follows video-capable speakers, similar to `&activespeaker=3`, so audio-only sources do not take over the Featured layout.

{% content-ref url="/pages/WoXGdP5Hq3dYg1JQ9oR0" %}
[\&activehighlight](/advanced-settings/mixer-scene-parameters/activehighlight)
{% endcontent-ref %}

## Large speaker plus smaller guests in OBS

If you need exact positioning, crops, borders, or per-guest filters in OBS, use a hybrid OBS layout:

1. Add one large OBS Browser Source for the automatic speaker view.
2. Add each guest as a separate smaller OBS Browser Source using their solo link.
3. Add `&noaudio` to the smaller solo sources so audio is not duplicated.

Large automatic speaker source:

```
https://vdo.ninja/?room=ROOMNAME&scene=0&activespeaker=3&cleanoutput
```

Fixed side guest source:

```
https://vdo.ninja/?view=GUESTID&room=ROOMNAME&solo&cleanoutput&noaudio
```

Replace `GUESTID` with the guest's stream ID. Permanent guest IDs make this easier to maintain between shows.

Do not add `&noaudio` to the active-speaker source, since the automatic switching needs incoming audio levels. If the active-speaker source should not be heard in your final mix, mute that OBS source or route audio elsewhere in OBS instead.

<figure><img src="/files/p9IDj23qx7mom5r141YL" alt="Mocked OBS layout with a large active speaker and smaller fixed guest boxes"><figcaption><p>Mocked example: a large active-speaker source with fixed solo sources in OBS.</p></figcaption></figure>

{% content-ref url="/pages/C3Rjc1ablPEGKifNC2Y1" %}
[Active speaker layouts in OBS](/guides/active-speaker-layouts-in-obs)
{% endcontent-ref %}

{% content-ref url="/pages/0B2hIACeLpYnQexPND6Z" %}
[\&solo](/advanced-settings/mixer-scene-parameters/and-solo)
{% endcontent-ref %}

## Manual Highlight / Featured guest

From the director room, use the Highlight / Featured control on a guest to make that guest the featured video in scene outputs and connected room views that follow Highlight.

This is useful when the producer knows who should be on screen, such as a host, presenter, guest answer, or screen reader.

Tips:

* Use a normal scene link for the OBS program source:

```
https://vdo.ninja/?room=ROOMNAME&scene=0&cleanoutput
```

* Click Highlight / Featured in the director control room to feature a guest.
* Hold `Ctrl` on Windows/Linux or `Cmd` on macOS while using Highlight for the partial featured mode in supported layouts, where the guest becomes larger instead of fully replacing the layout.
* Add `&ignorehighlight` to a viewer or scene link if that link should not follow director Highlight changes.

## Mute follows Highlight

If you want the highlighted guest to be the only unmuted guest, add `&highlightmute` to the director link.

```
https://vdo.ninja/?director=ROOMNAME&highlightmute
```

Aliases:

* `&hmute`
* `&mutefollowhighlight`
* `&mfh`

This is intended for producer-controlled panels where the highlighted person should be the only active on-air microphone. Manual mute changes are still possible, but the rule applies again the next time Highlight changes.

{% content-ref url="/pages/XdHazgMGdrbggiYIJscB" %}
[\&highlightmute](/advanced-settings/director-parameters/and-highlightmute)
{% endcontent-ref %}

## Green border or talking dot

Use `&meterstyle` when you want visible feedback that someone is talking.

```
https://vdo.ninja/?room=ROOMNAME&scene=0&meterstyle=2&cleanoutput
```

Common modes:

| Mode            | Behavior                                                                               |
| --------------- | -------------------------------------------------------------------------------------- |
| `&meterstyle=1` | Shows a VU-style meter                                                                 |
| `&meterstyle=2` | Shows a green border around a talking guest                                            |
| `&meterstyle=3` | Shows a small green dot when a guest is talking                                        |
| `&meterstyle=4` | Hides the built-in meter and adds `data-loudness` / `data-speaking` attributes for CSS |
| `&meterstyle=5` | Pulses an audio-only avatar/background image while speaking                            |

<figure><img src="/files/O7lCamh7mjROzjU7Bn4e" alt="Mocked talking indicators with a green border, dot, and audio meter"><figcaption><p>Mocked example: a green talking border, dot, and meter-style loudness feedback.</p></figcaption></figure>

For custom CSS, `data-speaking` is usually easier than raw `data-loudness`.

```css
video[data-speaking="2"] {
	outline: 6px solid #00ff66;
	outline-offset: -6px;
}

video[data-speaking="1"] {
	outline: 3px solid #99ffbb;
	outline-offset: -3px;
}
```

`data-speaking="0"` means quiet, `1` means low-level speaking, and `2` means loud speaking.

{% content-ref url="/pages/-MZN\_8Vi5yo7zBDLWI-U" %}
[\&meterstyle](/advanced-settings/design-parameters/meterstyle)
{% endcontent-ref %}

## API-driven switching

For most active-speaker Featured layouts, use `&activehighlight=2`. Use the API/loudness path only when you need custom rules, custom layout objects, or external production controls.

Available building blocks:

* `getLoudness` or `&pushloudness` can report guest loudness to a parent page.
* The `layout` API can apply a custom layout object or switch predefined layouts.
* The `soloVideo` / `highlight` API command can toggle Highlight for a guest.

This is flexible, but it is more work than the built-in `&activehighlight=2` mode. It usually requires a parent page, Stream Deck / Companion workflow, or custom script to decide who is loudest and then update the layout.

{% content-ref url="/pages/ffAYMCMlMio4qiqqdJhS" %}
[IFRAME API Basics](/guides/iframe-api-documentation/iframe-api-basics)
{% endcontent-ref %}

{% content-ref url="/pages/PXjivO1rOxoewycX9ieZ" %}
[\&layouts](/advanced-settings/director-parameters/and-layouts)
{% endcontent-ref %}

## Featured chat messages are separate

Featured social chat messages are handled by Social Stream Ninja, not by `&activespeaker` or the director Highlight video controls.

Use Social Stream Ninja when you want to select YouTube, Twitch, or other social chat messages and show them as an OBS overlay.

{% content-ref url="/pages/2pGU9TxBaXEy72kvDG33" %}
[Social Stream Ninja](/steves-helper-apps/social-stream-ninja)
{% endcontent-ref %}

## Common issues

If active speaker never switches:

* Make sure the scene/view link is receiving audio.
* Do not add `&noap`; audio processing is needed for loudness-based features.
* Try `&meterstyle=2` first to confirm VDO.Ninja can detect who is talking.
* Use `&activespeaker=3` if audio-only sources are unexpectedly taking over the scene.

If the layout is switching too quickly:

* Add `&activespeakerdelay=1000` to `&activespeakerdelay=2000`.
* Use manual Highlight when the producer needs deterministic control.

If you need the exact "current speaker large, everyone else still visible, all inside one VDO.Ninja scene link" behavior:

* Use `&activehighlight=2` or `&activespeakerfeatured`.
* Use the OBS hybrid method only when you need custom per-source positioning or filters.


# How to mirror a video while Full-Screen - For iPads and Teleprompters

Mirror VDO.Ninja video in fullscreen for teleprompters and iPads using browser fullscreen and effects parameters.

To get a video to mirror while full-screened, you have a few options.

One is to just full screen the browser itself; F11 on most desktops. The video itself may not be fullscreen, but the browser will be and should be pretty close to perfect. Adding [`&hideheader`](/advanced-settings/design-parameters/and-hideheader) can hide any menu bars, if there are any.

Another option that is undergoing experimental testing as of Sept 23rd 2020 is to use the [`&effects`](/advanced-settings/video-parameters/effects) option, with `&effects=2` applying a mirrored effect to the video before publishing the video.

**Push Link**\
<https://vdo.ninja/?push=SOMESTREAMID&effects=2>

**View Link**\
<https://vdo.ninja/?view=SOMESTREAMID>

So by adding `&effects=2`, the video will be mirrored in a way that can be full screened. There are some limitations with this approach still, but I'm curious to get your feedback.


# How to capture an application's audio

How to capture application audio for VDO.Ninja on Windows and macOS using VB-CABLE, Loopback, virtual audio devices, and OBS-based alternatives.

This page contains the standard guide for capturing application-specific audio into VDO.Ninja, especially on Windows where app-specific audio routing is common. If you need to send game audio, music app audio, browser audio, or another desktop app into VDO.Ninja, this is the main guide. Less complex methods are being developed, with some current [alternative options listed here](#other-options).

<figure><img src="/files/aFio916wMvlQvmn6Fg0G" alt="Diagram showing app audio routed into a virtual audio cable input, VDO.Ninja selecting the cable output as its microphone, and headphones kept separate to avoid feedback"><figcaption><p>A virtual audio cable should feed VDO.Ninja like a microphone input. Keep headphones and program audio out of that same cable unless you intentionally want to send them.</p></figcaption></figure>

#### Guide: Routing a Windows application's audio to [VDO.Ninja](https://vdo.ninja/)

(For macOS users, you can use [Loopback](https://rogueamoeba.com/loopback/) instead, or check out this list of free options: <https://docs.vdo.ninja/platform-specific-issues/macos#capturing-audio>)

* 1\) Install the VB-Cable Virtual Audio device. ([Voicemeeter](https://vb-audio.com/Voicemeeter/) can be used instead)\
  <https://www.vb-audio.com/Cable/>

![](https://lh5.googleusercontent.com/BJg9POjpwA3Psi0qX_Ruew9VU8uZkR0wdbIcTL1GLmyfXEwa5lx71k7QdYLj51h_MRw_WnkoKoPcd-vVuD5of98OXkmHQRexbEwZnre2hbWQtdCvEi41ne2Om5ghHy1NuVIb-Ou1)

Tip: If you want to configure the VB Audio driver with custom settings, the recommended sample rate is 48000-hz, as that is the sample used by VDO.Ninja.

* 2\) Load up Windows Mixer by typing in Mixer to the Windows search bar:

![](https://lh5.googleusercontent.com/1TcP9r7sYHpQKoFu72F_RUm7_wCYArK3LSTDar5phOvKqiMIjUbPsyKc29EEYDW0--LTXjhBdnbjjvobfAfDIe9yF1_302ormfnAFDZM10wzqRjmcFe0YRzNiTUrusA5whvMBvLo)

* 3\) For the application you want, select the Output dropdown and select CABLE Input.

![](https://lh4.googleusercontent.com/8v-kZNpbgx_AFbccMaznCzsiB0hJUgFjmtgzp-TR-QY6YEvUP67mo969OgeR6Ae9cgKZ_Z_sC8RE7Ws9DVs32fK1ql7vQLTdsGYx1CvhSREHLRUHE-tf8grWIaH4FkMCNUPhufK3)

* 4\) We can now head over to <https://vdo.ninja>, but we will want to add the advanced URL parameter [`&proaudio`](/advanced-settings/audio-parameters/and-proaudio) to the web URL, which disables echo cancellation and other digital effects. It will make the audio sound better and echo cancellation is likely not needed if capturing from a game or application window.\
  \
  For example, [`https://vdo.ninja/?push=myStreamID&proaudio`](https://vdo.ninja/?push=myStreamID\&proaudio)\
  \
  You can also add this to the view link, which increases the audio quality even more. For example, [`https://vdo.ninja/?view=myStreamID&proaudio`](https://vdo.ninja/?view=myStreamID\&proaudio)\\
* 5\) In VDO.Ninja, select the Cable Output device.\
  \
  Tip: If you hold down `CTRL` (`Command`) while selecting inputs, you can select more than one at a time.\
  ![](https://lh3.googleusercontent.com/VzGq5kxxnObkfu-jLhc1HRzXdlbscE68QDVbOHPTHYa0cDLOF5DHQF3UrqoT_tk9GrJrBBWKmQh2buUzh8UCERiususMiH7IrI7RiAKWHNuqC33j78Sv6DJVUcvwH9HPVvAqw20N)\\
* 6\) A simple way to hear the audio as an output is to just unmute the video. Right-click and show the controls, if not visible, then unmute.\
  ![](https://lh3.googleusercontent.com/Eu257zu9VlV2ueK_IGMoQlDARqpkGxoqB8PVl_aSobcsqk-hndfVgzLB0o3z_F52O1CrBQuM_CeslpIrYZBXRg9raG8WCLGi4wzfBOF6phsXRtyeTx9zlY3ABc0tYD8TcMvEYLXJ)![](https://lh4.googleusercontent.com/p_6XTkNhfGQWi0quBnvEe5Bbsy06nT9jkCFi_aHTCQbOi8HydOI5XQHtoxp4v0r8WhAHQ_2c5LWYWnWx9SVtrWTNyyKrDlXElq991W8AyfeATdSZKx1BfzVE1sJ5sU0KXzy3yPlF)
* 7\) Alternatively, you can also use the Sound properties for the VB cable to "listen to this device" in Windows, so you can hear the audio even if not in VDO.Ninja. This method might have lower latency than the method in step 6.\
  \
  ![](https://lh3.googleusercontent.com/AQwJuAdfBEGqhrSOyjqYmZyoNf8HrfrRRtNK3w2HhFMWiP87NZeoFQ6rh2pznr-InI8gg1OyI3CnPnyWUbtV1tnlTfXMswIchomWpbfwyJtlkFFOt-BnS5nO8ObxwBocmU8NuqlJ)

## Other options

#### Using OBS to capture audio

While this option still requires a virtual audio cable, as seen above, you can use OBS to capture the application's audio and output the audio from OBS to the virtual cable via the Monitor output in OBS.

<figure><img src="/files/hFTodHO2nkY9jvunlSah" alt=""><figcaption><p>Another way of selecting application audio for the Virtual Audio Cable</p></figcaption></figure>

***

#### Capturing application and system audio on Linux

If you're on **Linux**, Chrome and Chromium browsers may not yet support full system or application audio capture when screen sharing.\
\
To route and capture app-specific or system-wide audio, you can use **PipeWire** or tools built on top of it like [**Sonusmix**](https://codeberg.org/sonusmix/sonusmix).

**Option 1: Using PipeWire (manual)**

1. Ensure your system uses **PipeWire** (most modern distros do).
2. Use `pavucontrol` or `helvum` to route application audio to a **virtual sink**.
3. In your app (for example VDO.Ninja, OBS, or your browser), select that virtual sink as your **input/microphone**.
4. For window capture, use the built-in **screen/window picker** in Chromium or your compositor (for example GNOME or KDE).

**Option 2: Using Sonusmix (easy UI)**

1. Download the **Sonusmix AppImage** from Codeberg.
2. Launch it to create or manage **virtual devices** and route audio between apps visually.
3. Select the routed virtual output in your streaming or capture app (OBS, VDO.Ninja, and so on).

> With Sonusmix or PipeWire routing, you can isolate a single game, window, or app's audio, which is ideal for high-quality, low-latency sharing.

***

#### Publishing directly from OBS to VDO.Ninja

An alternative to using a virtual audio cable is to use OBS to capture the audio, and then publish the audio to VDO.Ninja directly using the WHIP-publishing mode.

[WHIP](/advanced-settings/whip-parameters/and-whip) is an experimental feature currently in OBS and may require a special version of OBS at the moment to access, but it might be included in OBS by default with the release of OBS v30 or v31.

Check out a demo YouTube video of how to accomplish this:\
[Publishing from OBS directly to VDO.Ninja](https://www.youtube.com/watch?v=ynSOE2d4Z9Y)\
\
More details will be provided as the feature develops.

{% embed url="<https://www.youtube.com/watch?v=ynSOE2d4Z9Y>" %}
Using WHIP to publish to VDO.Ninja directly from OBS
{% endembed %}


# Phone call-ins with VDO.Ninja and virtual audio cables

Route a live phone caller and a VDO.Ninja guest into each other using virtual audio cables, Voicemeeter, OBS monitoring, or a hardware mixer.

VDO.Ninja does not currently expose a polished native phone call-in feature for public use. There is experimental SIP/PSTN call-in work in the project, but it is not really exposed as a normal feature and should be treated as unsupported. A native version would likely need a bring-your-own SIP or telephone provider setup, since phone networks and SIP/PSTN gateways have ongoing per-minute and number-rental costs.

For now, the reliable way to run a call-in show is to create two separate **mix-minus** audio feeds with a hardware mixer, Voicemeeter, OBS audio monitoring, or virtual audio cables.

<figure><img src="/files/KBC37S5E0HBJfXf48h2e" alt="Phone call-in workflow using virtual audio cables and mix-minus routing"><figcaption><p>Two return mixes are needed: one for the VDO.Ninja guest and one for the phone caller.</p></figcaption></figure>

## The goal

You usually have three live talkers:

* Host or producer
* Remote VDO.Ninja guest
* Phone caller

Each side needs to hear the other sides, but not a delayed copy of themselves.

| Destination            | Should hear                           | Must not hear                 |
| ---------------------- | ------------------------------------- | ----------------------------- |
| VDO.Ninja guest        | Host + phone caller                   | VDO.Ninja guest               |
| Phone caller           | Host + VDO.Ninja guest                | Phone caller                  |
| Livestream / recording | Host + VDO.Ninja guest + phone caller | Usually no exclusions         |
| Host headphones        | Whatever the host needs to monitor    | Avoid delayed self-monitoring |

This is the same idea used in broadcast intercom and podcast systems. The "minus" part means the return feed excludes the person receiving it.

## What you need

At minimum:

* A way to receive the phone call, such as a phone connected to a mixer, a browser-based phone service, a SIP softphone, or a USB phone interface.
* A way to receive the VDO.Ninja guest audio on the host PC.
* A mixer that can create at least two different output buses.

Common options:

* **Voicemeeter Banana/Potato**: good for Windows software routing.
* **Rodecaster Duo/Pro or similar hardware mixer**: good if it supports custom USB routing and mix-minus.
* **OBS Studio plus monitoring/plugin routing**: useful if OBS is already your production hub, but stock OBS monitoring is usually only one monitor device, so two independent return mixes may need an audio monitoring plugin or an external software mixer.
* **VB-CABLE / Virtual Audio Cable / Loopback / BlackHole**: virtual patch cables between apps.

## The simple routing model

Create three source channels in your mixer:

1. **Host mic**
2. **VDO guest audio**
3. **Phone caller audio**

Then create three output mixes:

1. **Guest return mix**: Host mic + phone caller. Send this into VDO.Ninja as the host microphone.
2. **Caller return mix**: Host mic + VDO guest. Send this to the phone app, SIP softphone, phone USB return, or hardware phone channel.
3. **Program/stream mix**: Host mic + VDO guest + phone caller. Send this to OBS, MELD, YouTube, or your recorder.

The most common failure is accidentally using the program mix as a return feed. That sends people a delayed copy of themselves and creates echo.

## Voicemeeter example

This is a generic Windows example. The exact device names may differ.

1. Install Voicemeeter Banana or Potato and at least one virtual audio cable.
2. Put your **host microphone** on a Voicemeeter hardware input.
3. Route your **VDO.Ninja guest audio** into Voicemeeter. For example, use a VDO.Ninja view link in Chrome or Electron Capture and set its audio output to a virtual cable, then select that cable output as an input in Voicemeeter.
4. Route your **phone caller audio** into Voicemeeter. This might be a Rodecaster USB channel, a phone app, a SIP softphone output, or another virtual cable.
5. Create a **Guest return** bus containing host mic + phone caller, but not VDO guest. Select this bus or its virtual output as the microphone/input in the VDO.Ninja host/director page.
6. Create a **Caller return** bus containing host mic + VDO guest, but not phone caller. Select this bus or its virtual output as the microphone/input in the phone/SIP app, or send it to the phone interface.
7. Create a **Program** bus with all three sources and send that to OBS, MELD, or the livestream.

If the host is publishing a pre-mixed cable into VDO.Ninja, consider using [`&proaudio`](/advanced-settings/audio-parameters/and-proaudio) on the host's VDO.Ninja link. This disables browser audio processing that can damage music or mixed program audio. Only do this when you have proper mix-minus routing or headphones, since browser echo cancellation will not be there to save a bad loop.

## Rodecaster or hardware mixer example

For a Rodecaster Duo/Pro style setup:

1. Connect the host PC over USB.
2. Connect the phone over USB, Bluetooth, TRRS, or the phone input supported by the mixer.
3. Bring the VDO.Ninja guest audio from the PC into a separate mixer channel. This can be the browser source audio, a Chrome/Electron Capture output, or an OBS monitor output.
4. In the mixer's routing matrix, make the **phone send** contain host mic + VDO guest, excluding the phone caller.
5. Make the **VDO.Ninja send** contain host mic + phone caller, excluding the VDO guest.
6. Make the **stream send** contain all sources.

The important part is not the brand of mixer. The important part is that the phone return and the VDO.Ninja return are different mixes.

## OBS notes

OBS can be part of this workflow, but it is easy to hit a routing limit:

* OBS Browser Source can receive the VDO.Ninja guest for the stream.
* OBS Advanced Audio Properties can monitor audio to an output device.
* OBS's built-in monitor output is typically one shared monitor device.

If you need to send one mix to the phone caller and another mix to the VDO.Ninja guest, OBS alone may not be enough. Use Voicemeeter, a hardware mixer, or a per-source audio monitoring plugin so each destination can get its own return mix.

## Useful VDO.Ninja options

* [`&audiooutput`](/advanced-settings/setup-parameters/and-audiooutput) or `&od=` can route VDO.Ninja playback to a named output device in compatible browsers.
* [`&proaudio`](/advanced-settings/audio-parameters/and-proaudio) improves quality when sending a clean pre-mixed audio feed.
* [`&aec=0`](/advanced-settings/audio-parameters/aec), [`&denoise=0`](/advanced-settings/audio-parameters/and-denoise), and [`&autogain=0`](/advanced-settings/audio-parameters/autogain) can be useful when the audio is already handled by a mixer, but avoid disabling echo cancellation if anyone is monitoring on speakers.
* [`&miconly`](/advanced-settings/setup-parameters/miconly) can be useful for an audio-only host or utility connection.

Example host-side VDO.Ninja URL when publishing the guest return mix:

```
https://vdo.ninja/?room=YourRoomName&label=Host&proaudio
```

In that example, the selected microphone in VDO.Ninja should be the **Guest return mix** device, not the raw host microphone.

## Experimental SIP call-in panel

There is also an experimental browser-side SIP panel available with:

```
https://vdo.ninja/?room=YourRoomName&callin=sip
```

This is not a public polished phone bridge yet. It expects a bring-your-own SIP/PBX account that supports SIP over secure WebSockets (`wss://`) and WebRTC-compatible media. For example, an Asterisk/FreePBX setup would need WebRTC/PJSIP configured, a trusted TLS certificate, and a WSS endpoint reachable by the browser.

The panel can register for incoming calls or place an outbound SIP call. The same mix-minus rule still applies internally: VDO.Ninja sends the caller a return mix of the host plus VDO.Ninja guests, while adding the caller audio to the VDO.Ninja outbound mix. SIP passwords are entered manually in the panel; do not put SIP passwords in shared invite links.

Useful experimental parameters:

| Parameter                               | Purpose                                                         |
| --------------------------------------- | --------------------------------------------------------------- |
| `&callin=sip`                           | Shows the advanced SIP call-in panel.                           |
| `&sipwss=wss://pbx.example.com:8089/ws` | Pre-fills the SIP WebSocket server.                             |
| `&sipuri=sip:1001@example.com`          | Pre-fills the SIP address/extension.                            |
| `&sipuser=1001`                         | Pre-fills the auth username if different from the SIP URI user. |
| `&siptarget=sip:1002@example.com`       | Pre-fills the outbound dial target.                             |
| `&sipauto=1`                            | Starts the SIP registration automatically when the page loads.  |
| `&sipautoanswer=1`                      | Answers incoming SIP calls automatically.                       |

Twilio, SignalWire, Telnyx, and similar providers can be supported with provider-specific token, SIP-over-WSS, or backend handling. A free hosted default is difficult because phone numbers and PSTN minutes have ongoing costs and abuse risk. For the experimental provider-backed path, see [Phone call-in provider options](/guides/phone-call-in-provider-options), [SignalWire SIP call-in setup](/guides/signalwire-sip-call-in-setup), and [Twilio phone call-in setup](/guides/twilio-phone-call-in-setup).

## Testing checklist

Before going live, test with all three parties connected.

1. Host speaks: VDO guest and phone caller both hear the host.
2. VDO guest speaks: host and phone caller hear the guest, but the VDO guest does not hear a delayed copy of themselves.
3. Phone caller speaks: host and VDO guest hear the caller, but the phone caller does not hear a delayed copy of themselves.
4. The stream/recording hears all three voices.
5. Muting any single source only removes that source from the expected mixes.

## Troubleshooting

| Symptom                                                  | Likely cause                                                                                                                     |
| -------------------------------------------------------- | -------------------------------------------------------------------------------------------------------------------------------- |
| Guest hears the caller, but caller cannot hear the guest | The caller return mix is missing the VDO guest audio.                                                                            |
| Caller hears the guest, but guest cannot hear the caller | The VDO.Ninja host mic/input is missing the phone caller audio.                                                                  |
| Everyone hears an echo                                   | A return mix includes the person receiving it, or a speaker is being picked up by a mic.                                         |
| Audio is distorted or crackling                          | Virtual cable buffer size or sample rate mismatch. Use 48 kHz where possible and increase buffer size if needed.                 |
| Audio works in OBS but not in VDO.Ninja                  | The wrong side of the virtual cable was selected. On Windows, apps usually play to "CABLE Input" and record from "CABLE Output". |

Once the two return mixes are correct, the setup should behave like a normal call-in show: the VDO.Ninja guest and phone caller can talk to each other, while the host keeps control of the program mix.


# Phone call-in provider options

Compare practical BYO phone call-in options for VDO.Ninja, including SignalWire, Twilio, Telnyx, and DIY PBX/SIP trunk setups.

Phone call-ins require a bridge between the public phone network and the browser. VDO.Ninja can handle the WebRTC side, but a phone provider still needs to supply the phone number, PSTN minutes, SIP trunk, or programmable voice API.

The current recommended direction is bring-your-own provider. A free shared VDO.Ninja dial-in number may be tested later, but it is not the default recommendation yet because phone numbers and PSTN minutes create ongoing cost and abuse risk.

Last reviewed: July 12, 2026.

{% hint style="warning" %}
The call-in feature is experimental. Phone callers are currently mixed into the director/host audio. They do not yet appear as normal VDO.Ninja guest tiles with scene membership, per-guest volume, or the full director control set.
{% endhint %}

## Quick recommendation

| Option              | Current fit                      | Best for                                                             | VDO.Ninja path                        |
| ------------------- | -------------------------------- | -------------------------------------------------------------------- | ------------------------------------- |
| SignalWire          | Best direct BYO candidate today  | Users who want a cheap provider that supports browser SIP-over-WSS   | `&callin=signalwire` or `&callin=sip` |
| Twilio              | Best tested hosted/PIN flow      | Users who have a compatible backend/Worker for token minting         | `&callin=twilio`                      |
| Telnyx              | Good next adapter candidate      | Users who want low-cost WebRTC/PSTN once a Telnyx adapter exists     | Not fully wired yet                   |
| DIY PBX + SIP trunk | Cheapest/flexible, hardest setup | Users with FreePBX, Asterisk, VoIP.ms, IPComms, or another SIP trunk | `&callin=sip`                         |

For a live production today, the non-native fallback is still the most reliable: use a phone app, softphone, hardware mixer, Voicemeeter, OBS monitoring, or virtual audio cables to create two mix-minus feeds. See [Phone call-ins with VDO.Ninja and virtual audio cables](/guides/phone-call-ins-with-vdo-ninja-and-virtual-audio-cables).

## Current VDO.Ninja panel

The experimental call-in panel appears when the director URL includes `&callin=sip`, `&callin=signalwire`, or `&callin=twilio`.

<figure><img src="/files/Eva8Hib6F2FDI2Ok4mkC" alt="VDO.Ninja phone call-in panel in SignalWire mode with SIP WebSocket URL, SIP URI, auth username, password, dial target, and connect controls"><figcaption><p>SignalWire/SIP mode registers the browser as a SIP endpoint over secure WebSockets.</p></figcaption></figure>

<figure><img src="/files/Cq3qiiC3ccqkfEM1LvGj" alt="VDO.Ninja phone call-in panel in Twilio mode with Worker URL, access key, outbound test number, and start controls"><figcaption><p>Twilio mode requires a compatible backend that mints browser tokens and handles Twilio webhooks.</p></figcaption></figure>

The screenshots above are intentionally using placeholder values. Do not put SIP passwords, Twilio API secrets, or provider account tokens in shared VDO.Ninja URLs.

The bell button controls a browser-local incoming ringtone. Choose the classic ring, bell, chime, a custom uploaded audio file, or silent mode. The ringtone is not sent into the room or returned to the caller.

The upload button opens `fileuploads.vdo.ninja`. Uploaded audio is stored as a public media file by that service; only its HTTPS URL and your ringtone preference are saved in the current browser. Use a short file that you are comfortable hosting there.

## Option 1: SignalWire SIP-over-WSS

SignalWire is the best fit for the current browser-side SIP implementation because it supports SIP over secure WebSockets, which is what browser SIP libraries such as JsSIP need.

High-level flow:

1. Create a SignalWire account and Space.
2. Buy or port a phone number.
3. Create a SIP endpoint/credential.
4. Route the phone number to that SIP endpoint.
5. Open VDO.Ninja with `&callin=signalwire`.
6. Enter the SignalWire SIP WebSocket URL, SIP URI, username, and SIP password in the call-in panel.

The SIP password is entered in the browser panel. It should be a scoped SIP endpoint credential, not a master account API token.

See [SignalWire SIP call-in setup](/guides/signalwire-sip-call-in-setup).

## Option 2: Twilio Voice

Twilio is the most tested native call-in path in VDO.Ninja alpha, but it is not a pure browser-only setup.

Twilio's browser Voice SDK uses short-lived Access Tokens. Those tokens are created on a server, not in a public web page. In VDO.Ninja's experimental Twilio path, a compatible backend such as a private Cloudflare Worker mints the browser token, creates a PIN, and answers Twilio's voice webhook.

This gives the easiest operator flow:

1. Director opens VDO.Ninja with `&callin=twilio`.
2. The panel asks the backend for a phone number and PIN.
3. Caller dials the number and enters the PIN.
4. The call is bridged to the browser.

Tradeoff: Twilio is mature, but usually costs more than lower-level SIP providers. Do not put Twilio Account SIDs, Auth Tokens, or API Key Secrets in VDO.Ninja URLs or browser-side JavaScript.

See [Twilio phone call-in setup](/guides/twilio-phone-call-in-setup).

## Option 3: Telnyx

Telnyx is a good candidate for a future low-cost adapter. Telnyx has a WebRTC JS SDK and supports browser softphone use cases, but VDO.Ninja does not currently have a complete Telnyx-specific call-in adapter wired into the panel.

Practical status:

* Telnyx can be attractive on price.
* Telnyx's browser flow uses its WebRTC SDK with credential connections and generated login tokens/JWTs, so it is not the same as the current generic SIP-over-WSS form.
* A proper VDO.Ninja integration likely needs a Telnyx-specific WebRTC SDK/JWT flow or a provider-specific backend.
* Until that adapter exists, Telnyx should be treated as a future native option or used behind a DIY PBX/SIP bridge.

## Option 4: DIY PBX plus a cheap SIP trunk

This is the most flexible route if you already know telephony:

1. Buy or reuse a DID from VoIP.ms, IPComms, Telnyx SIP trunking, or another trunk provider.
2. Route the DID to Asterisk, FreePBX, FreeSWITCH, or another PBX/SBC.
3. Configure a browser/WebRTC SIP extension with TLS, SIP over WSS, and compatible media settings.
4. Open VDO.Ninja with `&callin=sip`.
5. Enter the PBX WebSocket URL, SIP URI, auth username, and extension password.

This is where VoIP.ms currently fits best. VoIP.ms is inexpensive and useful as a SIP trunk/DID provider, but the browser still needs a WebRTC/SIP-over-WSS endpoint. In practice, that usually means putting FreePBX, Asterisk, FreeSWITCH, or another PBX/SBC between VoIP.ms and VDO.Ninja.

The PBX extension must be configured for WebRTC media, not only SIP over WSS. It needs DTLS-SRTP, ICE, AVPF, RTCP mux, and a DTLS fingerprint in its SDP offer. A normal extension may register and work in MicroSIP but fail when answered in Chrome or Edge with `488 Not Acceptable Here` because browsers will not accept plain RTP audio.

Also note that trusting a PBX's HTTPS/WSS certificate fixes the signaling connection only. DTLS-SRTP and its fingerprint are a separate requirement for the call audio.

## Why a backend is needed

A normal browser page should not contain phone-provider account secrets. Providers such as Twilio, SignalWire, and Telnyx use API keys or account tokens to buy numbers, mint browser tokens, and validate webhooks. Those account-level secrets need to live on a backend service, such as a Cloudflare Worker, or remain in the provider/PBX dashboard.

For hosted/PIN systems, the backend typically does four jobs:

1. Mint a short-lived browser calling token.
2. Create a temporary PIN that maps a phone caller to one VDO.Ninja director page.
3. Answer the provider's webhook when a phone call arrives.
4. Route the call to the registered browser client after the caller enters the PIN.

The audio itself should flow between the browser and the provider. The backend should not normally proxy live audio.

SIP-over-WSS is different: the browser logs in as a SIP endpoint directly. In that model, use a scoped SIP extension password. Do not use a master provider API key as the SIP password.

## Audio flow

Regardless of provider, the same mix-minus rule applies:

| Destination             | Should hear                | Should not hear       |
| ----------------------- | -------------------------- | --------------------- |
| Phone caller            | Host plus VDO.Ninja guests | Phone caller          |
| VDO.Ninja guests        | Host plus phone caller     | Themselves delayed    |
| Livestream or recording | Host, guests, and caller   | Usually no exclusions |

The experimental VDO.Ninja call-in paths attempt to create that return mix in the browser. If you are routing calls outside the browser, use the virtual-audio-cable guide instead.

## Credential handling

Use the least powerful credential that can work:

| Credential type                        | Store in browser?                                | Notes                                                  |
| -------------------------------------- | ------------------------------------------------ | ------------------------------------------------------ |
| SIP extension username/password        | Acceptable for testing if scoped to one endpoint | Enter manually; do not put it in a shared URL.         |
| Twilio API Key Secret or Auth Token    | No                                               | Backend only. Used to mint short-lived browser tokens. |
| SignalWire or Telnyx project API token | No                                               | Backend or provider dashboard only.                    |
| Temporary browser token/JWT            | Yes                                              | Short-lived and provider-scoped.                       |

The current SIP panel can optionally remember a SIP profile in the local browser. Saving the SIP password is opt-in and should only be used on a trusted production machine. Browser local storage is convenience storage, not protection against XSS, browser profile compromise, or a shared computer.

Do not put provider account secrets or SIP passwords in shared VDO.Ninja URLs.

## Free shared VDO.Ninja number

A single free VDO.Ninja-hosted number may be reasonable as a trust-based beta later, but it should start with strict guardrails:

* Short PIN expiry.
* One active caller per room/session.
* Maximum call duration.
* Global concurrency cap.
* Monthly/manual spend cap.
* Failed PIN throttling.
* No outbound PSTN calls.

The inbound-only design avoids outbound toll fraud, but it does not avoid inbound cost abuse. If usage grows beyond a small monthly budget, account linking or access gating would be needed.

## Current experimental parameters

| Parameter                                             | Purpose                                                                              |
| ----------------------------------------------------- | ------------------------------------------------------------------------------------ |
| `&callin=sip`                                         | Show the SIP/PBX panel.                                                              |
| `&callin=signalwire`                                  | Show the same SIP-over-WSS panel with SignalWire-specific copy.                      |
| `&callin=twilio`                                      | Show the Twilio call-in adapter when available.                                      |
| `&callinapi=https://example.com`                      | Point the Twilio adapter at a compatible backend.                                    |
| `&callinoutput=DeviceName` or `&sipoutput=DeviceName` | Route the local call monitor to a named output device when supported by the browser. |
| `&sipwss=wss://pbx.example.com:8089/ws`               | Pre-fill the SIP WebSocket endpoint.                                                 |
| `&sipuri=sip:1001@example.com`                        | Pre-fill the SIP URI.                                                                |
| `&sipuser=1001`                                       | Pre-fill the SIP auth username.                                                      |
| `&siptarget=sip:1002@example.com`                     | Pre-fill the outbound SIP dial target.                                               |
| `&sipauto=1`                                          | Register the SIP endpoint automatically when the page loads.                         |
| `&sipautoanswer=1`                                    | Automatically answer incoming SIP calls after registration.                          |

Do not put provider account secrets or SIP passwords in shared URLs.

## Provider links and price checks

Prices change. Check each provider's current pricing before buying numbers or leaving a DID active.

* [SignalWire voice pricing](https://signalwire.com/pricing/voice)
* [SignalWire SIP-over-WebSockets overview](https://signalwire.com/blogs/product/webrtc-using-sip-over-websockets)
* [Twilio Voice pricing](https://www.twilio.com/en-us/voice/pricing/us)
* [Twilio Access Tokens](https://www.twilio.com/docs/iam/access-tokens)
* [Telnyx WebRTC browser guide](https://developers.telnyx.com/docs/voice/webrtc/make-a-call-to-a-web-browser)
* [Telnyx Elastic SIP pricing](https://telnyx.com/pricing/elastic-sip)
* [VoIP.ms pricing](https://voip.ms/pricing)

## Related guides

* [Phone call-ins with VDO.Ninja and virtual audio cables](/guides/phone-call-ins-with-vdo-ninja-and-virtual-audio-cables)
* [SignalWire SIP call-in setup](/guides/signalwire-sip-call-in-setup)
* [Twilio phone call-in setup](/guides/twilio-phone-call-in-setup)


# SignalWire SIP call-in setup

Set up SignalWire SIP-over-WSS for the experimental VDO.Ninja phone call-in panel.

SignalWire is currently the most direct bring-your-own provider option for VDO.Ninja's browser-side SIP call-in panel. It supports SIP over secure WebSockets, which lets the browser register as a SIP endpoint without running your own PBX.

Last reviewed: July 12, 2026.

{% hint style="warning" %}
This is experimental. Phone callers are mixed into the director/host audio and do not yet appear as normal guest tiles with full scene controls.
{% endhint %}

## What this creates

The call path is:

1. A phone caller dials your SignalWire number.
2. SignalWire routes the call to a SIP endpoint in your SignalWire Space.
3. The VDO.Ninja director page registers to that SIP endpoint over `wss://`.
4. VDO.Ninja answers the call in the browser.
5. VDO.Ninja mixes the caller into the room and sends a mix-minus return feed back to the caller.

<figure><img src="/files/Eva8Hib6F2FDI2Ok4mkC" alt="VDO.Ninja SignalWire SIP call-in panel with example WSS URL, SIP URI, auth username, blank password, dial target, and connect controls"><figcaption><p>The SignalWire mode is the generic SIP-over-WSS panel with SignalWire-specific defaults and wording.</p></figcaption></figure>

## Cost notes

Check SignalWire's current pricing before buying numbers. At the time this guide was written, SignalWire's public voice pricing listed local numbers at a low monthly cost and usage priced per minute for PSTN, SIP, and WebRTC legs. Prices and country availability can change.

Useful references:

* [SignalWire voice pricing](https://signalwire.com/pricing/voice)
* [SignalWire SIP-over-WebSockets overview](https://signalwire.com/blogs/product/webrtc-using-sip-over-websockets)
* [SignalWire SIP trunking guide](https://signalwire.com/docs/platform/voice/sip/trunking)

## 1. Create a SignalWire Space

Create or open a SignalWire account, then create a Space. Your Space has a SIP domain similar to:

```
your-space.sip.signalwire.com
```

The exact Space name and SIP domain are shown in the SignalWire dashboard.

This direct setup does not require FreePBX. SignalWire supplies the phone number, routing, and browser-compatible SIP endpoint. A PBX is optional if you want local extensions, queues, voicemail, or different billing/routing control.

## 2. Create a SIP endpoint

In the SignalWire dashboard, create a SIP credential or SIP endpoint for VDO.Ninja.

Use a dedicated credential for this purpose:

| Field      | Example                         |
| ---------- | ------------------------------- |
| Username   | `vdo-callin`                    |
| Password   | Use a strong generated password |
| Caller ID  | Your show name or phone number  |
| Encryption | Required, if offered            |

Do not use your SignalWire project API token as the SIP password. The browser only needs the scoped SIP endpoint credential.

**Using FreePBX:** If VDO.Ninja connects to FreePBX instead of directly to SignalWire, use a dedicated WebRTC-enabled PJSIP extension. An ordinary SIP extension can work in MicroSIP while still failing in Chrome or Edge.

## 3. Buy or route a phone number

Buy a voice-capable number in SignalWire, or use an existing number that can route into SignalWire.

Route inbound calls from that number to the SIP endpoint you created. The exact dashboard wording can change, but the goal is:

```
Inbound phone number -> SIP endpoint vdo-callin@your-space.sip.signalwire.com
```

If you are using a SignalWire XML/SWML/Call Flow style route, the route should dial the SIP endpoint. For example, a compatibility XML style route would be conceptually:

```xml
<Response>
  <Dial>
    <Sip>sip:vdo-callin@your-space.sip.signalwire.com</Sip>
  </Dial>
</Response>
```

Use the current SignalWire dashboard/docs for the exact routing UI.

### Optional path through FreePBX

The alternate route is:

```
SignalWire number -> FreePBX SIP trunk -> WebRTC PJSIP extension -> VDO.Ninja
```

The VDO.Ninja extension must offer browser-compatible secure media. In FreePBX, enable the equivalent of:

* Media Encryption: **DTLS-SRTP**
* ICE Support: **Yes**
* AVPF: **Yes**
* RTCP Mux: **Yes**
* DTLS Setup: **Act/Pass**
* DTLS Verify: **Fingerprint**

The exact labels depend on the FreePBX/Asterisk version. A successful SIP-over-WSS registration only proves that signaling works. The call can still fail at Answer if the PBX's SDP offer does not include a DTLS fingerprint for secure browser audio.

## 4. Start VDO.Ninja

Open the director page with the experimental call-in panel:

```
https://vdo.ninja/alpha/?director=YourRoomName&callin=signalwire
```

If the deployed version does not yet include the SignalWire label, use the generic SIP mode instead:

```
https://vdo.ninja/alpha/?director=YourRoomName&callin=sip
```

In the panel, enter:

| VDO.Ninja field   | SignalWire value                                |
| ----------------- | ----------------------------------------------- |
| SIP WebSocket URL | `wss://your-space.sip.signalwire.com`           |
| SIP URI           | `sip:vdo-callin@your-space.sip.signalwire.com`  |
| Auth username     | The SIP endpoint username, such as `vdo-callin` |
| Password          | The SIP endpoint password                       |
| Display name      | Optional label, such as `VDO.Ninja`             |

Leave **Register for incoming calls** enabled. Enable **Auto-answer incoming calls** only after testing.

Click **Connect**. The status should show that the SIP account registered.

### Field meanings

The **SIP WebSocket URL** is the secure WebSocket endpoint the browser connects to. It starts with `wss://`. It is not the same thing as the SIP address.

The **SIP URI** is the callable SIP address for the endpoint, usually formatted like `sip:username@your-space.sip.signalwire.com`.

The **Auth username** is the SIP credential username. In many setups it matches the `username` part of the SIP URI, but some providers let these differ.

The **Password** is the SIP endpoint password only. Do not enter a SignalWire project token or account-level API token here.

The **Dial target** is used only for outbound calls from the VDO.Ninja panel. For SignalWire, a normal phone number such as `+15551234567` is converted to a SIP target on the same domain.

## 5. Test before going live

1. Join the VDO.Ninja room as director/host.
2. Join as a normal guest from another browser or device.
3. Start the SignalWire call-in panel and confirm it registers.
4. Call the SignalWire number from a regular phone.
5. Answer the incoming call in the panel.
6. Confirm the VDO.Ninja guest hears the phone caller.
7. Confirm the phone caller hears the host and VDO.Ninja guest.
8. Confirm the phone caller does not hear a delayed copy of themselves.

## Useful parameters

### Incoming ringtone

Use the bell button in the call-in panel to choose the classic ring, bell, chime, a custom uploaded audio file, or silent mode. You can preview the selection and adjust its volume. These preferences stay in the current browser. The ringtone is local operator audio and is not mixed into the VDO.Ninja room or sent back to the caller. Auto-answered calls do not ring.

The upload button opens `fileuploads.vdo.ninja`. Sign in there and upload a short audio file. The file is hosted as public media; VDO.Ninja stores only the returned HTTPS URL and selection in this browser. The ringtone menu does not store the audio file itself.

When `&callinoutput=DeviceName` or `&sipoutput=DeviceName` is supported by the browser, the ringtone follows the same local output device as the caller monitor.

| Parameter                                              | Purpose                                                                                |
| ------------------------------------------------------ | -------------------------------------------------------------------------------------- |
| `&callin=signalwire`                                   | Opens the call-in panel in SignalWire/SIP mode.                                        |
| `&callin=sip`                                          | Opens the generic SIP/PBX panel.                                                       |
| `&sipwss=wss://your-space.sip.signalwire.com`          | Pre-fills the SIP WebSocket URL.                                                       |
| `&sipuri=sip:vdo-callin@your-space.sip.signalwire.com` | Pre-fills the SIP URI.                                                                 |
| `&sipuser=vdo-callin`                                  | Pre-fills the auth username.                                                           |
| `&siptarget=+15551234567`                              | Pre-fills the outbound dial target.                                                    |
| `&callinoutput=DeviceName` or `&sipoutput=DeviceName`  | Routes the local caller monitor to a named output device when the browser supports it. |
| `&sipauto=1`                                           | Connects automatically when the page loads.                                            |
| `&sipautoanswer=1`                                     | Answers incoming calls automatically.                                                  |

Do not put the SIP password in the URL.

The panel can optionally remember the SIP profile in this browser. If you enable **Remember password on this browser**, the password is saved in this browser's local storage. That is a convenience feature for a trusted production machine, not a secure vault. Do not use it on shared computers.

## Troubleshooting

| Symptom                                                               | Likely cause                                                                                                                                                                                        |
| --------------------------------------------------------------------- | --------------------------------------------------------------------------------------------------------------------------------------------------------------------------------------------------- |
| SIP registration fails                                                | Wrong WSS URL, SIP URI, username, password, or SignalWire endpoint settings.                                                                                                                        |
| Browser says the WebSocket URL is invalid                             | The URL must start with `wss://`, not `sip:`, `http:`, or `ws:`.                                                                                                                                    |
| Phone call never reaches VDO.Ninja                                    | The SignalWire number is not routed to the SIP endpoint, or the VDO.Ninja page is not registered.                                                                                                   |
| Chrome reports `ERR_CERT_AUTHORITY_INVALID` for the PBX WSS URL       | Install a trusted certificate, or visit the PBX HTTPS/WSS host and explicitly trust its local certificate before connecting. This only fixes SIP signaling, not media encryption.                   |
| VDO.Ninja rings, but Answer immediately sends the caller to voicemail | Check the JsSIP log for `488 Not Acceptable Here` and `SDP without DTLS fingerprint`. Configure the FreePBX extension for WebRTC with DTLS-SRTP, ICE, AVPF, RTCP mux, and fingerprint verification. |
| MicroSIP works but VDO.Ninja does not                                 | MicroSIP can accept conventional SIP/RTP. Chrome and Edge require a WebRTC-compatible secure-media SDP offer, so use a WebRTC PJSIP extension for VDO.Ninja.                                        |
| Caller connects but no one hears them                                 | Check browser microphone permissions, the VDO.Ninja outbound mix, and whether the caller audio track attached in the panel.                                                                         |
| Caller hears echo                                                     | The return mix includes the phone caller audio. Hang up and check the routing before going live.                                                                                                    |

When testing is done, release unused numbers or disable routing if you do not want ongoing charges.


# Twilio phone call-in setup

Set up a Twilio phone number and backend for the experimental VDO.Ninja Twilio call-in adapter.

This guide is for advanced users or operators testing the experimental Twilio call-in adapter. It assumes there is a compatible backend service, such as a Cloudflare Worker, that can mint Twilio Voice SDK tokens and answer Twilio webhooks.

Do not put Twilio account secrets in a VDO.Ninja URL, a public web page, or GitHub. Twilio Account Auth Tokens and API key secrets belong on the backend only.

Twilio is different from the generic SIP/PBX option. Twilio's browser path uses the Twilio Voice JavaScript SDK and short-lived Access Tokens generated by a backend. Twilio does not work as a simple `wss://` SIP-over-WebSockets account for the current VDO.Ninja SIP panel.

Last reviewed: July 9, 2026.

## What this creates

The call path is:

1. The VDO.Ninja director opens a URL with `&callin=twilio`.
2. The director panel asks the backend for a browser calling token and PIN.
3. Twilio registers the browser as a Voice SDK client.
4. A phone caller dials the Twilio number.
5. Twilio sends the call to the backend webhook.
6. The caller enters the PIN.
7. Twilio connects the phone call to the registered browser.
8. VDO.Ninja mixes the caller into the room and sends a return mix back to the caller.

<figure><img src="/files/Cq3qiiC3ccqkfEM1LvGj" alt="VDO.Ninja Twilio call-in panel with placeholder Worker URL, blank access key, outbound test number, and start controls"><figcaption><p>Twilio mode talks to a backend Worker. The browser never receives the Twilio API Key Secret or Auth Token.</p></figcaption></figure>

## Cost notes

Twilio charges for phone numbers and PSTN minutes. Check Twilio's current pricing before leaving a number active.

At the time this guide was tested, Twilio's account-specific pricing API reported these Canada rates for this account:

| Item                         | Example price     |
| ---------------------------- | ----------------- |
| Canadian local number rental | 1.15 USD/month    |
| Canadian local inbound voice | 0.0085 USD/minute |

Prices can change, and other countries or number types may cost more.

Useful Twilio references:

* [Available local number API](https://www.twilio.com/docs/phone-numbers/api/availablephonenumberlocal-resource)
* [Incoming phone number API](https://www.twilio.com/docs/phone-numbers/api/incomingphonenumber-resource)
* [Twilio Voice pricing](https://www.twilio.com/en-us/voice/pricing)

## 1. Create or find Twilio credentials

In the Twilio Console, collect these values:

| Value              | Where it is used                                            |
| ------------------ | ----------------------------------------------------------- |
| Account SID        | Backend token generation and Twilio REST API calls          |
| Account Auth Token | Backend webhook signature validation                        |
| API Key SID        | Backend token generation and optional Twilio REST API calls |
| API Key Secret     | Backend token generation and optional Twilio REST API calls |

The Account SID and Auth Token are shown in the Twilio Console's Account Info area. API keys are managed in the API keys section of the Console.

Save the API Key Secret when Twilio shows it. Twilio will not show it again.

## 2. Create a TwiML App

In the Twilio Console:

1. Open **Voice**.
2. Open **TwiML Apps**.
3. Create a new TwiML App.
4. Set the Voice request URL to your backend route:

```
https://YOUR-CALLIN-BACKEND.example.com/twilio/incoming2
```

5. Set the method to `POST`.
6. Save the app.

Keep the TwiML App SID. It starts with `AP`.

## 3. Buy a phone number

In the Twilio Console:

1. Open **Phone Numbers**.
2. Choose **Buy a number**.
3. Select the country.
4. Filter for **Voice** capability.
5. For a local number, optionally filter by area code or locality.
6. Buy the number.
7. Open the number's configuration page.
8. Under voice handling, choose the TwiML App created above.
9. Save the number.

For Toronto-area testing, area codes such as `647` or `437` may have better availability than `416`.

## 4. Backend configuration

A compatible backend needs the following server-side configuration:

| Setting                 | Purpose                                                   |
| ----------------------- | --------------------------------------------------------- |
| `TWILIO_ACCOUNT_SID`    | Account SID                                               |
| `TWILIO_AUTH_TOKEN`     | Webhook signature validation                              |
| `TWILIO_API_KEY_SID`    | Voice SDK token issuer                                    |
| `TWILIO_API_KEY_SECRET` | Voice SDK token signing secret                            |
| `TWILIO_APP_SID`        | TwiML App SID                                             |
| `PUBLIC_DIAL_NUMBER`    | Phone number shown to the VDO.Ninja director              |
| `TOKEN_API_KEY`         | Optional access key protecting the backend token endpoint |

The backend should validate `X-Twilio-Signature` on Twilio webhook routes. It should also keep PINs short-lived and rate-limit bad attempts.

For BYO Twilio, the safest model is still server-side token minting. A user can run their own compatible backend, or a hosted VDO.Ninja backend can accept credentials only if that flow is designed carefully. Pasting a Twilio API Key Secret into browser-side code is not recommended.

## 5. Start VDO.Ninja

Use a director link with the experimental Twilio adapter:

```
https://vdo.ninja/alpha/?director=YourRoomName&callin=twilio&callinapi=https://YOUR-CALLIN-BACKEND.example.com
```

If the backend requires a token endpoint access key, enter it in the panel. Do not place the access key in a shared guest URL.

Click **Start**. The panel should show a phone number and PIN:

```
Call +15551234567 and enter PIN 1234567.
```

Give that number and PIN to the caller.

If the backend advertises outbound dialing support, the **Outbound test number** field can place a test call. Use E.164 format, such as `+15551234567`. This should stay restricted by the backend; do not offer unrestricted outbound dialing from a public Worker.

If the backend does not advertise outbound support, the **Dial** button remains unavailable for Twilio mode. Inbound PIN calling can still work.

## REST API alternative

The same Twilio setup can be automated with the REST API. Use placeholders only; do not paste real secrets into public documentation.

Search for available Canadian local voice numbers:

```bash
curl -G "https://api.twilio.com/2010-04-01/Accounts/ACxxxxxxxxxxxxxxxxxxxxxxxxxxxxxxxx/AvailablePhoneNumbers/CA/Local.json" \
  -u "SKxxxxxxxxxxxxxxxxxxxxxxxxxxxxxxxx:API_KEY_SECRET" \
  --data-urlencode "AreaCode=647" \
  --data-urlencode "VoiceEnabled=true"
```

Update a TwiML App's voice URL:

```bash
curl -X POST "https://api.twilio.com/2010-04-01/Accounts/ACxxxxxxxxxxxxxxxxxxxxxxxxxxxxxxxx/Applications/APxxxxxxxxxxxxxxxxxxxxxxxxxxxxxxxx.json" \
  -u "SKxxxxxxxxxxxxxxxxxxxxxxxxxxxxxxxx:API_KEY_SECRET" \
  --data-urlencode "VoiceUrl=https://YOUR-CALLIN-BACKEND.example.com/twilio/incoming2" \
  --data-urlencode "VoiceMethod=POST"
```

Buy a specific number and attach it to the TwiML App:

```bash
curl -X POST "https://api.twilio.com/2010-04-01/Accounts/ACxxxxxxxxxxxxxxxxxxxxxxxxxxxxxxxx/IncomingPhoneNumbers.json" \
  -u "SKxxxxxxxxxxxxxxxxxxxxxxxxxxxxxxxx:API_KEY_SECRET" \
  --data-urlencode "PhoneNumber=+15551234567" \
  --data-urlencode "FriendlyName=VDO.Ninja call-in" \
  --data-urlencode "VoiceApplicationSid=APxxxxxxxxxxxxxxxxxxxxxxxxxxxxxxxx" \
  --data-urlencode "VoiceReceiveMode=voice"
```

## Test checklist

Before using this live:

1. Start the VDO.Ninja director page with `&callin=twilio`.
2. Confirm the panel shows a phone number and PIN.
3. Call the number from a regular phone.
4. Enter the PIN.
5. Confirm the browser rings or auto-answers.
6. Confirm the VDO.Ninja guest hears the phone caller.
7. Confirm the phone caller hears the host and VDO.Ninja guest.
8. Confirm the phone caller does not hear a delayed copy of themselves.
9. Hang up and confirm the panel cleans up the call state.

## Troubleshooting

| Symptom                                             | Likely cause                                                                                               |
| --------------------------------------------------- | ---------------------------------------------------------------------------------------------------------- |
| VDO.Ninja says the token endpoint is not configured | Backend secrets are missing or the wrong backend URL was entered.                                          |
| Twilio says the application URL failed              | The TwiML App voice URL is wrong, unreachable, or not using HTTPS.                                         |
| Calls never reach the browser                       | The number is not attached to the TwiML App, the PIN expired, or the browser token was not registered.     |
| Webhook requests fail with 403                      | The backend is rejecting Twilio signatures; check the Auth Token and public webhook URL.                   |
| Caller hears echo                                   | The return mix includes the phone caller audio. Check the VDO.Ninja call-in mix or external mixer routing. |

When testing is finished, release unused Twilio numbers so monthly rental charges stop.


# How to control VDO.Ninja with Touch Portal

Controlling VDO.Ninja with Touch Portal using API commands

## How to

1\. Create a new room as a director, with a custom API key, so that it looks like this: [`https://vdo.ninja/?api=APIKEY&director=TouchPortalExample`](https://vdo.ninja/?api=APIKEY\&director=TouchPortalExample)\
Replacing the APIKEY with a string of your choosing.

2\. Then, in Touch Portal, add a new button with the `HTTP GET` action. In the `HTTP GET` Action `GET URL` field, input your desired action. This particular GET action will send Guest 1 to Scene 1 with a push of the button:\
`https://api.vdo.ninja/APIKEY/addScene/1/1`

<div align="left"><img src="/files/Yrl8ZmPzljtemoUmqqPo" alt=""></div>

Thanks to <mark style="color:red;">djlefave</mark> on [Discord](https://discord.vdo.ninja/) for this guide.

## Switching the layout of a scene in OBS

`https://api.vdo.ninja/APIKEY/layout/[{"x":0,"y":0,"w":50,"h":100,"c":true,"slot":0},{"x":50,"y":0,"w":50,"h":100,"c":false,"slot":1}]`

![](/files/UBgPkPiKf9kRbCwX4YjJ)

You can also use Touch Portal to switch the layout of [`&scene=0`](/advanced-settings/mixer-scene-parameters/scene) without using the [Mixer App](/steves-helper-apps/mixer-app).

<https://docs.google.com/spreadsheets/d/1cHBTfni-Os3SAITsXrrNJ3qVCMVjunuW3xugvw1dykw/edit#gid=151839312>

You can download this google sheet and use it to create your own layouts.

## Examples and resources

For more API examples, check out these resources:\
<https://github.com/steveseguin/Companion-Ninja>\
<https://companion.vdo.ninja/?api=k8eYrfvJUC>

## Related

{% content-ref url="/pages/-Mj8bfVV-0wZjmDO9Y11" %}
[\&api](/advanced-settings/api-and-midi-parameters/api)
{% endcontent-ref %}


# How to publish from OBS into VDO.Ninja

Publish an OBS scene into VDO.Ninja using OBS Virtual Camera and a virtual audio cable, with notes on WHIP and server-based alternatives.

If you want to use an OBS scene, source, crop, or full program output as the camera feed in VDO.Ninja, the most reliable general workflow is:

1. Build the shot in OBS
2. Output that shot with OBS Virtual Camera
3. Route the audio you want with a virtual audio cable
4. Select those devices in a VDO.Ninja push link

This approach is useful when:

* You want a polished OBS scene to appear as a live camera in VDO.Ninja
* You want to send a composited feed into a room, guest slot, or interview
* You want to send only a cropped or branded version of a camera instead of the raw source
* You want to keep your main program output separate from your VDO.Ninja contribution

For most users, this is the best default option. It is mature, flexible, low latency, and does not depend on newer WHIP support.

## What you need

* OBS Studio v26 or newer
* OBS Virtual Camera
* A virtual audio cable
  * Windows or macOS: [VB-CABLE](https://www.vb-audio.com/Cable/)
  * macOS alternatives: see [macOS audio capture options](/platform-specific-issues/macos#capturing-audio)
* A Chromium-based browser is recommended for the VDO.Ninja sender side

## Why this method is recommended

OBS Virtual Camera lets you turn an OBS scene into a webcam device that browsers can use. That means VDO.Ninja can treat your OBS output just like a normal camera, while OBS remains the place where you do the compositing, cropping, branding, scene switching, and filtering.

Because the VDO.Ninja sender runs separately from your main OBS output pipeline, this also keeps your workflow modular. If you are already streaming, recording, or routing signals elsewhere from OBS, you do not need to rebuild those paths just to send one feed into VDO.Ninja.

## Step 1: Build the shot you want in OBS

Create the scene or source you want VDO.Ninja to use.

That can be:

* A full scene
* A single cropped camera
* A branded lower-third scene
* A split-screen layout
* A source with filters, color correction, or overlays applied

If needed, create a dedicated scene just for VDO.Ninja. This is often cleaner than reusing your full live program scene.

## Step 2: Start OBS Virtual Camera

In OBS, start the Virtual Camera.

If your OBS version allows selecting the source for Virtual Camera output, point it at the specific scene or source you built for VDO.Ninja. If not, route the desired scene through your active virtual camera output path.

Official OBS Virtual Camera guide:

* [OBS Virtual Camera Guide](https://obsproject.com/kb/virtual-camera-guide)

## Step 3: Route audio from OBS to a virtual audio cable

OBS does not include a built-in virtual microphone device, so you normally need a virtual audio cable for audio.

In OBS:

1. Open **Settings** -> **Audio** or **Advanced**
2. Set the **Monitoring Device** to your virtual audio cable input
3. Open **Advanced Audio Properties**
4. For each source you want to send to VDO.Ninja, set **Audio Monitoring** to `Monitor and Output`

This lets OBS send selected audio sources into the virtual cable, which VDO.Ninja can then use as a microphone.

{% hint style="info" %}
This is also where you create a mix-minus. If you are feeding OBS audio back into a live room or group call, only monitor the sources you want remote participants to hear. Do not send their own return audio back to them unless you intentionally want that.
{% endhint %}

For more audio routing options:

* [Audio guide](/guides/audio)

## Step 4: Open a VDO.Ninja push link

Open your VDO.Ninja push link in a browser.

Then select:

* **Camera:** `OBS Virtual Camera`
* **Microphone:** your virtual audio cable

At that point, your OBS scene is now your VDO.Ninja source.

If you want, you can also combine the OBS audio feed with a live microphone by holding `CTRL` or `CMD` while selecting audio devices in supported browsers.

## Step 5: Tune resolution and frame rate when needed

If the browser does not detect the correct frame rate or aspect ratio from OBS Virtual Camera, you can force the values with URL parameters on the push link.

Examples:

* `&framerate=60`
* `&width=1920&height=1080`
* `&width=720&height=1280`

{% hint style="info" %}
Start OBS Virtual Camera before selecting it in VDO.Ninja. If you select it first and activate it later, the browser may cache the wrong aspect ratio or frame rate.
{% endhint %}

{% hint style="info" %}
If you force `&width` and `&height`, make them match the actual OBS output resolution for that virtual camera feed. Mismatches can cause scaling or framing issues.
{% endhint %}

## Common use cases

### Send a polished scene into a VDO.Ninja room

Use a dedicated scene with your chosen camera crop, graphics, and audio mix, then select it via OBS Virtual Camera in a normal VDO.Ninja push link.

### Send only a clean camera crop

If you have a wide camera in OBS but only want one crop or composition to appear in VDO.Ninja, build that crop in OBS and expose only that shot through Virtual Camera.

### Use OBS as a browser-based contribution encoder

This is a practical way to send a prepared video feed into browser-based production systems, remote interviews, green rooms, or guest workflows without sending the raw camera directly.

## Alternatives

### Publish directly from OBS using WHIP

OBS also supports WHIP output, and VDO.Ninja supports receiving WHIP streams.

This can remove the browser from the publishing side, but it is still a more advanced path and can be less forgiving depending on OBS version, NAT behavior, encoder settings, and the network environment.

Start here if you want to test that path:

* [From OBS to VDO.Ninja using WHIP](/guides/from-obs-to-vdo.ninja-using-whip)
* [Recommended OBS WHIP settings](/guides/obs-whip-output-settings)

### Share media directly from inside OBS

If you want OBS itself to host the VDO.Ninja sender page in a dock or browser source, see:

* [How to share webcam from inside OBS](/guides/share-webcam-from-inside-obs)

### Use a server bridge such as MediaMTX

If your media is already being published to a server, or if you want VDO.Ninja viewers to consume a WHEP feed instead of a local browser camera feed, a WHIP/WHEP server such as MediaMTX can also fit into the workflow.

That path is usually better for specialized server-based routing than for the default "send an OBS scene into VDO.Ninja" use case.

## Troubleshooting

### The video looks stretched or the crop is wrong

* Start OBS Virtual Camera before opening the VDO.Ninja device picker
* Confirm the OBS output resolution matches any forced `&width` and `&height` values
* Re-select the camera in the browser after changing OBS virtual camera state

### Audio is missing

* Confirm the OBS Monitoring Device is set to the virtual audio cable
* Confirm the relevant OBS sources are set to `Monitor and Output`
* Confirm the virtual cable is selected as the microphone in VDO.Ninja

### Remote participants hear themselves

Your OBS audio mix is feeding return audio back into the room. Revisit your monitored sources and rebuild the mix-minus so only intended sources are sent to the virtual cable.

### The frame rate is lower than expected

Try forcing the sender link with `&framerate=30` or `&framerate=60`, depending on your OBS output.

## Related

To send that OBS output back to room participants, including larger-room relay options, see [Send an OBS return feed to guests](/guides/send-an-obs-return-feed-to-guests).

If the OBS scene uses a physical webcam and VDO.Ninja also needs that same camera, see [Camera already in use by OBS or VDO.Ninja](/common-errors-and-known-issues/cant-load-camera-both-in-obs-and-vdon).

## Summary

If your goal is to get an OBS-built shot into VDO.Ninja, use OBS Virtual Camera for video and a virtual audio cable for audio first. It is the most broadly compatible and production-friendly workflow.

Use WHIP when you specifically want direct OBS publishing and are prepared to tune around the additional constraints.


# Let guests see your finished OBS scene

Let VDO.Ninja guests watch the finished OBS scene without creating a hall-of-mirrors effect or an audio feedback loop.

This guide is for a director who brings guests into OBS with VDO.Ninja, builds a finished scene in OBS, and wants the guests to see that finished scene in their VDO.Ninja room.

{% hint style="success" %}
**The simple version:** Put the clean VDO.Ninja Scene link in OBS, send the OBS picture back through the director's camera, and give guests a link containing `&broadcast`.
{% endhint %}

```mermaid
flowchart LR
    G1[Guest cameras] --> R[VDO.Ninja room]
    R -->|clean Scene link| O[OBS scene]
    O -->|OBS Virtual Camera| D[Director's return video]
    D -->|direct or through Meshcast v2| G2[What guests watch]
    N[Keep the director return out of the OBS Scene] -. prevents the hall-of-mirrors effect .-> O
```

## What you need

* A VDO.Ninja room and its Director's Room
* OBS with the guest layout already added as a Browser Source
* OBS Virtual Camera
* Headphones for everyone who will speak

## 1. Use the clean Scene link in OBS

The Browser Source in OBS should use the room's clean **Scene** link, not a guest link or the Director's Room itself.

For a room named `YOUR_ROOM`, a basic Scene link is:

```
https://vdo.ninja/?scene&room=YOUR_ROOM
```

The director is normally left out of this Scene. Keep it that way. Do not add `&showdirector`, and do not manually add the director's return video to the Mixer scene being captured by OBS.

This is what prevents the OBS picture from capturing itself over and over.

## 2. Choose what the guests should see

In OBS, open the settings beside **Start Virtual Camera**. Depending on the OBS version, the Virtual Camera can show:

* The current Program output
* The Preview output
* One chosen scene
* One chosen source

A dedicated scene named something like **Guest Return** is often the easiest choice. It can contain the guest layout, graphics, timers, or instructions without showing private producer notes.

Start OBS Virtual Camera before selecting it in VDO.Ninja.

## 3. Use the director as the return video

Open the Director's Room:

```
https://vdo.ninja/?director=YOUR_ROOM
```

In the Director's Room:

1. Click the option to enable the director's microphone or video.
2. Select **OBS Virtual Camera** as the camera.
3. Select the director's normal microphone, or choose no microphone if the return should be video-only.

Give guests a room link containing `&broadcast`:

```
https://vdo.ninja/?room=YOUR_ROOM&broadcast
```

With this link, guests see the main director's video instead of receiving every guest's video. Their normal room conversation audio can remain active.

{% hint style="warning" %}
Do not send the complete OBS audio mix back to the guests. They may hear themselves with a delay. The safest starting point is to let VDO.Ninja handle the microphones and use OBS Virtual Camera for the finished picture.
{% endhint %}

## 4. Optional: send the return through Meshcast v2

For a small room, the direct setup above is usually the simplest and has the least delay. As more guests join, the director must send more copies of the return video.

Meshcast can take one return feed from the director and distribute it to the guests. To use the newer Meshcast service, add `&meshcast2` to the director link:

```
https://vdo.ninja/?director=YOUR_ROOM&meshcast2
```

The guest and OBS links stay the same:

```
Guest: https://vdo.ninja/?room=YOUR_ROOM&broadcast
OBS:   https://vdo.ninja/?scene&room=YOUR_ROOM
```

VDO.Ninja handles the connection to Meshcast automatically. The director still selects OBS Virtual Camera in VDO.Ninja, and guests still use their normal broadcast-mode invites.

{% hint style="info" %}
`&meshcast2` is a temporary name for selecting the newer Meshcast v2 service while Meshcast v1 is still available. When Meshcast v1 is retired, this distinction may be simplified or renamed.
{% endhint %}

Meshcast usually adds a little more delay, but it reduces the number of return-video copies the director must upload.

## Complete sample link sets

### Small room: direct return

```
Director: https://vdo.ninja/?director=YOUR_ROOM
Guest:    https://vdo.ninja/?room=YOUR_ROOM&broadcast
OBS:      https://vdo.ninja/?scene&room=YOUR_ROOM
```

### Larger room: return through Meshcast v2

```
Director: https://vdo.ninja/?director=YOUR_ROOM&meshcast2
Guest:    https://vdo.ninja/?room=YOUR_ROOM&broadcast
OBS:      https://vdo.ninja/?scene&room=YOUR_ROOM
```

If the room uses a password or other room options, keep those settings consistent across the director, guest, and Scene links.

## Other ways to share the return

### Use a separate return source

The main director method is easiest for guests who already use `&broadcast`. A separate return source is useful when the director wants to keep a normal camera separate from the OBS picture.

Give that source a memorable name such as `RETURN`, then point the guest links at it:

```
Return source: https://vdo.ninja/?room=YOUR_ROOM&push=RETURN&novideo&noaudio&meshcast2
Guest:         https://vdo.ninja/?room=YOUR_ROOM&broadcast=RETURN
```

The `novideo` and `noaudio` options keep this return-source tab from also showing or playing the room.

Select OBS Virtual Camera on the return-source page. Keep the `RETURN` source out of the OBS Scene to prevent the repeating-picture effect.

This method requires the special `&broadcast=RETURN` guest link. Existing guest links containing only `&broadcast` will continue looking for the main director instead.

### Bring back an existing Meshcast stream

The newer Meshcast Studio provides a **WHEP URL** under **Watch Links**. That address can be used to bring an existing Meshcast stream into VDO.Ninja without using a webpage player.

This is useful for a show that is already publishing through Meshcast, but it is a more advanced setup. For a director starting from OBS Virtual Camera, the integrated `&meshcast2` method above is simpler and works naturally with normal `&broadcast` guest links.

### Share a webpage player

The director can select **Share Website** and paste an embeddable Meshcast, YouTube, Twitch, or other player link. This can be convenient, but it places a webpage player inside the guest's room instead of using the normal VDO.Ninja media path.

```mermaid
flowchart LR
    P[Embedded webpage plays audio] --> S[Speakers]
    S --> M[Open microphone hears it]
    M --> P
    H[Headphones or a muted player] -. breaks the feedback loop .-> M
```

Audio from an embedded webpage may not be handled reliably by the room's echo cancellation. It can also duplicate the audio guests already hear through VDO.Ninja.

If using a shared webpage:

* Ask everyone to wear headphones.
* Mute the embedded player when VDO.Ninja already carries the audio.
* Avoid playing the same audio through both the webpage and VDO.Ninja.
* Test with two separate devices before going live.

Website sharing is generally safer for video-only material or for content where extra delay is acceptable.

### Share an OBS projector window

Another option is to open an OBS projector and share that window with VDO.Ninja's screen-share feature. It can work, but OBS Virtual Camera usually requires less window management and is easier to keep consistent.

## Prevent echo and feedback

The safest audio arrangement is:

* Every speaker wears headphones.
* VDO.Ninja carries the conversation microphones.
* OBS Virtual Camera returns the finished video.
* Only one path carries any music, clips, or other program sound.

If guests must hear sound from OBS, use a carefully prepared audio return that leaves out their microphones. This is often called a **mix-minus**. Make a private test recording and ask every guest to confirm that they do not hear a delayed copy of themselves.

## Quick fixes

| Problem                             | What to check                                                                                                                                                   |
| ----------------------------------- | --------------------------------------------------------------------------------------------------------------------------------------------------------------- |
| The picture repeats inside itself   | Remove the director or `RETURN` feed from the Mixer scene captured by OBS. Make sure the OBS Browser Source uses a `?scene&room=` link without `&showdirector`. |
| Guests still see individual cameras | Make sure their invite contains `&broadcast`, or `&broadcast=RETURN` when using a separate return source.                                                       |
| Guests see no OBS return            | Start OBS Virtual Camera, enable the director's video, and select OBS Virtual Camera in VDO.Ninja.                                                              |
| Guests hear themselves delayed      | Stop sending the full OBS audio mix. Use headphones and keep only one audio return path.                                                                        |
| A shared webpage causes echo        | Mute the webpage player or use headphones. Prefer the director or Meshcast v2 return method.                                                                    |
| The return has too much delay       | For a small room, remove `&meshcast2` and test the direct return.                                                                                               |

## Related guides

* [Send an OBS return feed to guests](/guides/send-an-obs-return-feed-to-guests) - detailed routing and server options
* [Publish from OBS into VDO.Ninja](/guides/publish-from-obs-into-vdo.ninja)
* [`&broadcast`](/advanced-settings/video-parameters/broadcast)
* [`&meshcast`](/advanced-settings/meshcast-parameters/and-meshcast)
* [How to capture an application's audio](/guides/audio)


---

[Next Page](/llms-full.txt/1)