> For the complete documentation index, see [llms.txt](https://docs.vdo.ninja/llms.txt). Markdown versions of documentation pages are available by appending `.md` to page URLs; this page is available as [Markdown](https://docs.vdo.ninja/guides/use-vdo.ninja-as-a-webcam-for-google-hangouts-zoom-and-more.md).
# How to use VDO.Ninja as a webcam for Google Hangouts, Zoom, and more
In this walkthrough we demonstrate how to use VDO.Ninja and OBS Virtual Camera to bring remote cameras, smartphones, and other media sources into Zoom, Google Meet, Teams, and similar video apps as a virtual webcam.
We also cover audio in this guide, although you can skip the audio-related portions if not needed for your application.
{% hint style="info" %}
Some third-party applications support Browser Sources as an input, negating the need for a virtual camera, as VDO.Ninja can be used directly in such scenarios.
{% endhint %}
\
**Requirements for this guide**
* OBS Studio V26 or newer
* Virtual Audio Cable Software
* For Windows, use VB-CABLE Virtual Audio
* This is recommended software as it enables proper audio support
* The software is Donationware
* \\
* For macOS, you have a few choices:
* [macOS audio capture options](/platform-specific-issues/macos.md#capturing-audio)
**Basic Workflow Diagram**
Please find below a diagram explaining the basic premise of what we are intending to do in this guide. We will go through it all, one step at a time.

### **Step 0. - Installing dependencies**
This guide assumes you have OBS installed, along with the other required software, though we shall briefly cover these initial installation steps now.
We also will assume you are using Windows. You will need to adapt accordingly for macOS, which likely is going to be more complicated.
On the computer that will be using Zoom, Google Meet, Teams, or a similar app, please do the following:
1. Install OBS Studio
2. Install the VB-Cable Virtual Audio device.\
### **Step 1.**
Generate a VDO.Ninja invite. You will get an Invite link and a Browser Source link.
The Guest Invite Link is what you send to a person who you wish to join your live stream in OBS. We will also be calling this a PUSH link, as it contains \&push in the URL.
The OBS Browser Source link is what we will be putting into OBS to capture our guest's video stream with. We will also be calling this a VIEW link, as it contains \&view in the URL.

### Step 2.
For ease of setup, the "Generate Invite Link" button found at [VDO.Ninja](https://vdo.ninja) can provide you with both a PUSH (**Guest Invite**) link and a VIEW (**OBS Source**) link.
We will want to send the PUSH link to our guest, or if using a mobile phone, use the QR code to open the link. We can select our camera, microphone, and then click START.

### Step 3.
Once we have our PUSH link set up to stream our camera, we can move on to pulling that video stream into OBS using the VIEW link.
To set up OBS Studio, create a Scene and then add a Browser Source in OBS Studio. Give it a name and we will fill out the details in the next step.

### Step 4.
In the properties for the Browser Source, we need to fill out a few fields and then hit OK.
* The URL we add to OBS needs to be set to the VIEW address we created earlier.\
Just as an example: `https://vdo.ninja/?view=q3QCScW`\
You will of course need to use your own link, with its own unique view ID, which was given to you at the end of Step 1. The view ID should exactly match the push ID, including case.
* Width can be set to 1280.
* Height can be set to 720.
* "**Control audio via OBS**" should be checked. This is quite important, else the audio will not work correctly or you will get a terrible echo or feedback.

{% hint style="info" %}
*SECRET TIP*: Some links in VDO.Ninja can be dragged and dropped directly into OBS from the Chrome browser, avoiding the tedious parts of Step 2 and Step 3. You will still need to select "Control audio via OBS" if you want audio to function correctly.
{% endhint %}
### Step 5.
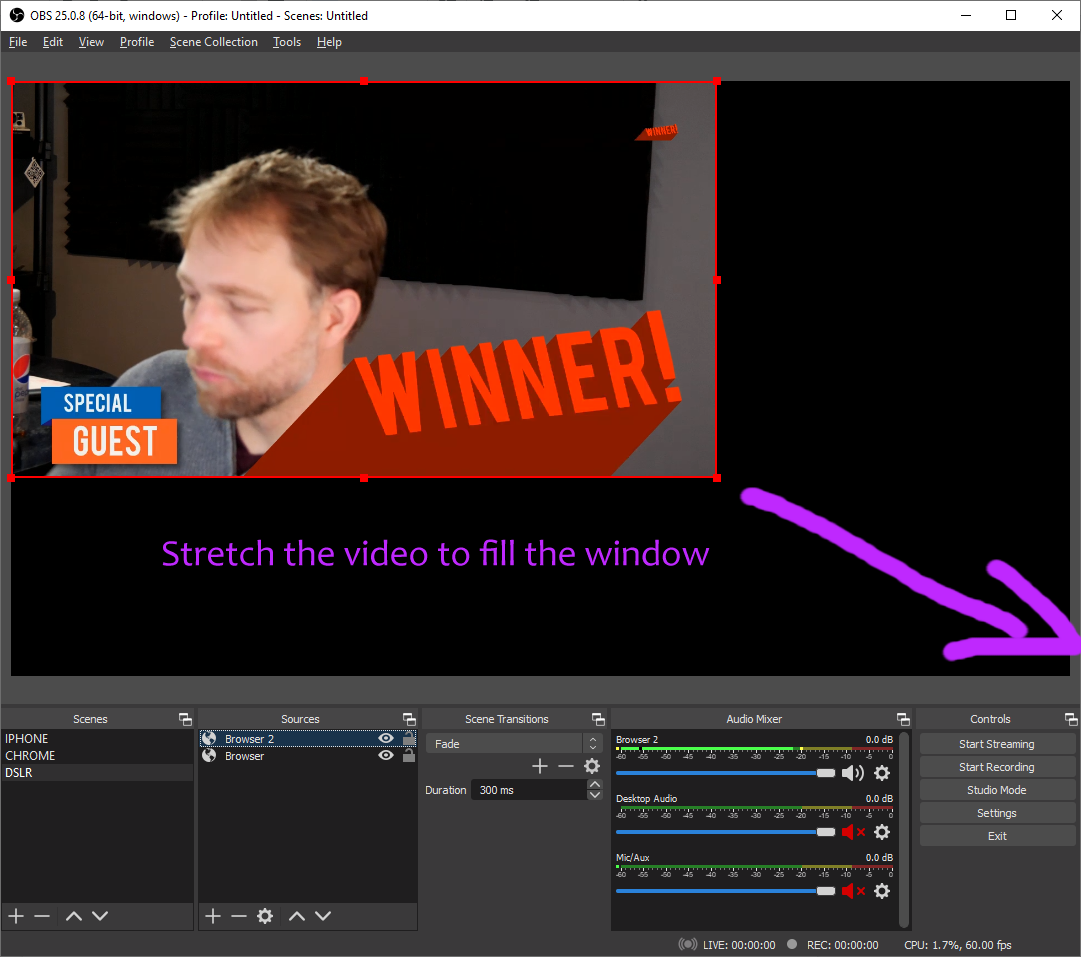
The video should appear and auto-play. There should be no audio feedback if you selected the Control audio via OBS option.
Now we just need to stretch the video to fill the full scene. It should snap into place when full.
### Step 6.
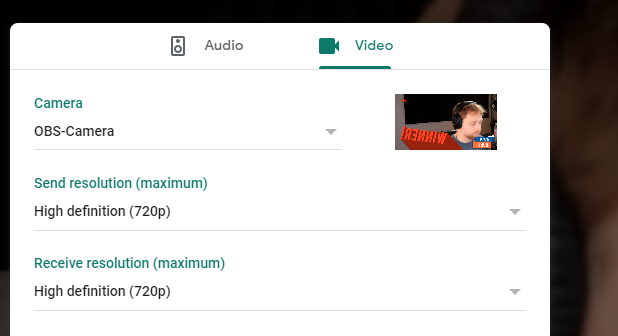
Start the OBS Virtual Camera, located under the Start Recording button.
### Step 7. (optional)
We will now configure OBS to output audio from the Browser Source to the Virtual Audio Cable. In the OBS settings, under Advanced, we select the Monitoring Device to be our Virtual Audio device (CABLE Input).
We also want to disable Windows audio ducking.

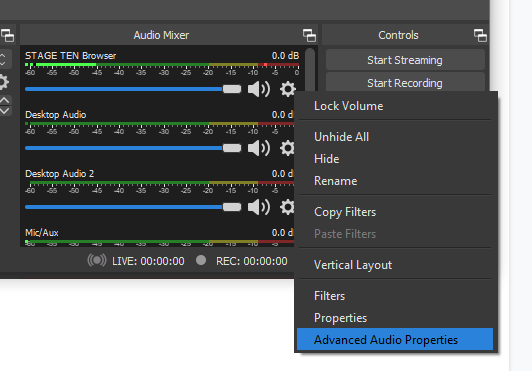
### Step 8. (optional)
In our last configuration step, we want to go into the Advanced Audio Properties in OBS. When there, we want to set the audio sources we want to output so their Audio Monitoring setting is set to Monitor and Output.
If you intend to feed audio from OBS back into a VDO.Ninja group call, you can use this step to also mix-minus the audio by selecting just the audio sources you want the remote guests to hear, excluding their own audio to prevent echo.
### Step 9.
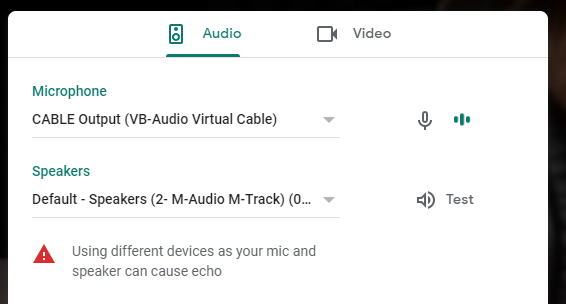
We're ready to go. Using this setup in VDO.Ninja, Zoom, Google Meet, or similar apps is just like selecting a second webcam and microphone.
If you are already in the call, you can switch between your webcam and the virtual camera in the application settings.
It is important to remember that you need to select the VB-Audio Virtual Cable in the call as well if you also want to share the audio from it.
If publishing to VDO.Ninja, remember that you can select multiple audio sources in VDO.Ninja by holding down CTRL (or Command) when selecting them. You could include the VB Audio Cable and your local microphone together, for example.
### All done!
And that should be it. You can switch between the webcam and the OBS live video as needed.
If you need to increase the video quality from the defaults, all of that is covered in the next section linked below:
{% content-ref url="/pages/-MZfz0Nym0yxXMKxlf2M" %}
[How to control bitrate/quality](/guides/how-do-i-control-bitrate-quality.md)
{% endcontent-ref %}
## Related
If your physical webcam is also needed directly in OBS, VDO.Ninja, Chrome, or the video-call app, see [Camera already in use by OBS or VDO.Ninja](/common-errors-and-known-issues/cant-load-camera-both-in-obs-and-vdon.md).
---
# Agent Instructions
This documentation is published with GitBook. GitBook is the documentation platform designed so that both humans and AI agents can read, navigate, and reason over technical content effectively. Learn more at gitbook.com.
## Querying This Documentation
If you need additional information that is not directly available in this page, you can query the documentation dynamically by asking a question.
Perform an HTTP GET request on the current page URL with the `ask` query parameter, and the optional `goal` query parameter:
```
GET https://docs.vdo.ninja/guides/use-vdo.ninja-as-a-webcam-for-google-hangouts-zoom-and-more.md?ask=&goal=
```
`ask` is the immediate question: it should be specific, self-contained, and written in natural language.
`goal` is optional and describes the broader end goal you are ultimately trying to accomplish on behalf of the user. GitBook uses it to tailor the answer towards what is most useful for that goal.
The response will contain a direct answer to the question and relevant excerpts and sources from the documentation.
Use this mechanism when the answer is not explicitly present in the current page, you need clarification or additional context, or you want to retrieve related documentation sections.